Bugku 逆向WP(1)
文章目录
- Bugku 逆向
- 入门逆向
- Easy_vb
- Easy_Re
- 游戏过关
- Timer(阿里CTF)
- 逆向入门
- love
- LoopAndLoop(阿里CTF)
- easy-100(LCTF)
Bugku 逆向
2018-11-7 19:05:10
今天开始刷题了.
入门逆向
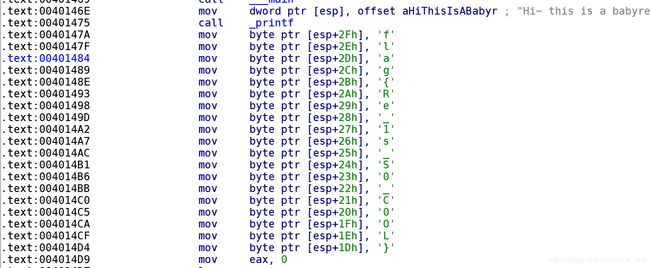
题目非常简单.用IDA直接看汇编代码,会发现printf函数后面有很多mov指令,这里就是flag.
建议不要直接F5,因为F5后看不到mov指令,找了半天.

flag{Re_1s_S0_C0OL}
Easy_vb
看题目就知道和vb有关.
MCTF{N3t_Rev_1s_E4ay}
虽然答案是这个但是平台提交的时候要把前面mctf改为flag
Easy_Re
OD打开搜索字符串.找到了flag.好水
DUTCTF{We1c0met0DUTCTF}
游戏过关
一个游戏,凭实力打出来了flag
zsctf{T9is_tOpic_1s_v5ry_int7resting_b6t_others_are_n0t}
Timer(阿里CTF)
因为是一道Android题目,所以要先反编译,试了很多工具,最后确定JEB2是最好用的.其他反编译出来源码是错误的.
- 下载运行
发现需要200000秒就会出现flag. - 反编译,定位关键点
if(MainActivity.this.beg - MainActivity.this.now <= 0) {
        this.val$tv1.setText("The flag is:");
        this.val$tv2.setText("alictf{" + MainActivity.this.stringFromJNI2(MainActivity.this.k) + "}");
        }
可以看到beg-now的值<=0就会调用stringFromJNI2显示falg.
public native String stringFromJNI2(int arg1) {
}
native表名是调用so了,我们不需要反编译so文件,只要算出k的值就可以了.
3. 计算k的值
知道计算k值得地方.
if(MainActivity.is2(MainActivity.this.beg - MainActivity.this.now)) {
        MainActivity.this.k += 100;
        }
else {
    --MainActivity.this.k;
    }
这里其实是一个循环,将beg-now的值带入is2.每秒循环一次.
4. beg和now值分析
 public MainActivity() {
        super();
        this.beg = (((int)(System.currentTimeMillis() / 1000))) + 200000;
        this.k = 0;
        this.t = 0;
    }
MainActivity.this.t = System.currentTimeMillis();
MainActivity.this.now = ((int)(MainActivity.this.t / 1000));
beg的值就是**运行时的当前时间(毫秒)/1000(秒)+200000秒.
now的值就是当前时间的秒.
所以beg-now=200000+now-beg的程序执行时间(因为小于1秒可以忽略)
5. 计算k值
is2是代码中的源码,直接计算得到k=1616384
public class timer {
    public static boolean is2(int arg4) {
        boolean v1 = true;
        if(arg4 > 3) {
            if(arg4 % 2 != 0 && arg4 % 3 != 0) {
                int v0 = 5;
                while(true) {
                    if(v0 * v0 <= arg4) {
                        if(arg4 % v0 != 0 && arg4 % (v0 + 2) != 0) {
                            v0 += 6;
                            continue;
                        }
                        return false;
                    }
                    else {
                        return v1;
                    }
                }
            }
            v1 = false;
        }
        else if(arg4 <= 1) {
            v1 = false;
        }
        return v1;
    }

    public static void main(String[] args) {
        System.out.println("hello");
        int k =0;
        int time =200000;
        while(time > 0){
            if(is2(time)){
                k += 100;
            }
            else{
                --k;
            }
            --time;
        }
        System.out.println(k);
    }

}
- 修改smali
现在我们只需要修改beg-now<=0的逻辑为!=0和k的值,然后再编译生成apk运行就可以得到flag.
    if-gtz v0, :cond_0

    .line 53
    iget-object v0, p0, Lnet/bluelotus/tomorrow/easyandroid/MainActivity$1;->val$tv1:Landroid/widget/TextView;

    const-string v1, "The flag is:"
这里gtz是大于0的意思.我们改成
if-ltz v0, :cond_0
然后修改k的值
iget v3, v3, Lnet/bluelotus/tomorrow/easyandroid/MainActivity;->k:I
在这个后面加上const v3, 1616384;这句话表示给v3赋值.
编译运行,得到flag
alictf{Y0vAr3TimerMa3te7}
提交答案时alictf改为flag
逆向入门
水题,不是exe文件,打开是image数据.
扫码得到flag
bugku{inde_9882ihsd8-0}
love
先尝试运行,输入字符串,进行比较。
reverse_3.exe
please enter the flag:sss
wrong flag!
IDA打开,找wrong flag!

str2字符串可以找到.
可以看出来对字符串进行一些列变换后,和str2进行比较.
跟进去去看sub_4110BE函数的作用

猜测可能是base64加密,写脚本尝试
import  base64
s2 ="e3nifIH9b_C@n@dH"
s1=""
for i in range(len(s2)):
    a =ord(s2[i])-i
    s1+=chr(a)
print(str(base64.b64decode(s1),'utf-8'))
得到flag
flag{i_l0ve_you}
LoopAndLoop(阿里CTF)
- 又是一道Android题目.用Android Killer反编译(因为可以编译回去,并正常运行,所以推荐此软件)
- 运行程序,如果输入正确的数字就会返回flag
- 反编译看源码
paramAnonymousView = this.val$ed.getText().toString();
try
{
    int i = Integer.parseInt(paramAnonymousView);
if (MainActivity.this.check(i, 99) == 1835996258)
{
    localTextView1.setText("The flag is:");
    localTextView2.setText("alictf{" + MainActivity.this.stringFromJNI2(i) + "}");
    return;
}
i是我们输入的值,经过check函数如果相等.就会将i传给stringFromJNI2函数处理,显示flag.chec函数是native的,所以直接看so文件.
public int check(int arg2, int arg3) {
        return this.chec(arg2, arg3);
    }
public native int chec(int arg1, int arg2) {
    }
result = _JNIEnv::CallIntMethod(Evn, obj, *(&check1_id + 2 * _99 % 3), _99 - 1);
分析后说第一个参数*2%3决定调用三个check函数中的一个,第二个参数每次减一
public int check1(int input, int s) {
        int v1 = input;
        int v0;
        for(v0 = 1; v0 < 100; ++v0) {
            v1 += v0;
        }

        return this.chec(v1, s);
    }

public int check2(int input, int s) {
        int v2;
        int v3 = 1000;
        int v1 = input;
        if(s % 2 == 0) {
            int v0;
            for(v0 = 1; v0 < v3; ++v0) {
                v1 += v0;
            }

            v2 = this.chec(v1, s);
        }
        else {
            for(v0 = 1; v0 < v3; ++v0) {
                v1 -= v0;
            }

            v2 = this.chec(v1, s);
        }

        return v2;
    }

public int check3(int input, int s) {
        int v1 = input;
        int v0;
        for(v0 = 1; v0 < 10000; ++v0) {
            v1 += v0;
        }

        return this.chec(v1, s);
    }
贴上别人的代码
a = 1835996258
i = 99
while i > 0:
    i -= 1
    if i > 0:
        now = ((i + 1) * 2) % 3 #注意一下这里是i+1,因为这里判断的是没有减一的第二个参数
        if now == 0:
            a -= 4950 #等价于for循环 从1加到99
        elif now == 1:
            if i % 2 == 0:
                a -= 499500
            else:
                a += 499500
        else:
            a -= 49995000
print(a)
236492408
alictf{Jan6N100p3r}
easy-100(LCTF)
又是一道安卓题.
- 先JEB反编译,查看MainActivity代码
protected void onCreate(Bundle arg3) {
    super.onCreate(arg3);
    this.setContentView(2130968602);
    ApplicationInfo v0 = this.getApplicationInfo();
    v0.flags &= 2;
    this.p();
    this.findViewById(2131427413).setOnClickListener(new d(this));
}
- 分析,主函数Main,先执行p函数,p函数后面会用,先不讲.创建了一个按钮监听事件在classs d中.
class d 中onclick函数,当我们点击安卓的按钮,触发函数.
public void onClick(View arg5) {
        if(MainActivity.a(this.a, MainActivity.a(this.a), this.a.findViewById(2131427414).getText().toString())) {
            View v0 = this.a.findViewById(2131427412);
            Toast.makeText(this.a.getApplicationContext(), "Congratulations!", 1).show();
            ((TextView)v0).setText(2131099682);
        }
        else {
            Toast.makeText(this.a.getApplicationContext(), "Oh no.", 1).show();
        }
    }
if判断正确就显示flag.调用了Main函数中的a函数,第一个参数是句柄,第二个参数是调用了a函数(另外一个)返回一个字符串,第三个参数是我们输入的字符串.
3. a函数分析
private String v;

static String a(MainActivity arg1) {
    return arg1.v;
}
通过调用a,返回Main中的字符串v,字符串v的初始化在p函数中进行.
4. p函数分析
 private void p() {
        try {
            InputStream v0_1 = this.getResources().getAssets().open("url.png");
            int v1 = v0_1.available();
            byte[] v2 = new byte[v1];
            v0_1.read(v2, 0, v1);
            byte[] v0_2 = new byte[16];
            System.arraycopy(v2, 144, v0_2, 0, 16);
            this.v = new String(v0_2, "utf-8");
        }
        catch(Exception v0) {
            v0.printStackTrace();
        }
    }
p函数的作用就是读取一张图片的二进制数据取出这张图片byte[144:144+16]的数据保存在v字符串中.
5. 继续分析if判断语句
上面说了if语句调用了Main的a函数(三个参数)
static boolean a(MainActivity arg1, String arg2, String arg3) {
    return arg1.a(arg2, arg3);
}

private boolean a(String arg4, String arg5) {
    return new c().a(arg4, arg5).equals(new String(new byte[]{21, -93, -68, -94, 86, 117, -19, -68, -92, 33, 50, 118, 16, 13, 1, -15, -13, 3, 4, 103, -18, 81, 30, 68, 54, -93, 44, -23, 93, 98, 5, 59}));
}
可以看出a函数(三个参数)的调用了a函数(两个参数).而a函数(两个参数)的调用c的a函数(两个参数).计算完后和后面的字节比较,如果相等就显示flag.
6. a函数(两个参数)分析
public String a(String arg5, String arg6) {
    String v0 = this.a(arg5);
    String v1 = "";
    a v2 = new a();
    v2.a(v0.getBytes());
    try {
        v0 = new String(v2.b(arg6.getBytes()), "utf-8");
    }
    catch(Exception v0_1) {
        v0_1.printStackTrace();
        v0 = v1;
    }

    return v0;
}
this.a = new SecretKeySpec(arg4, "AES");
            this.b = Cipher.getInstance("AES/ECB/PKCS5Padding");
arg5是从图片中获取的字符串,arg6是我们输入的.
后面代码主要就是AES加密.将arg5经过变换后的字符串当做密码,将输入的字符串进行AES加密后和后面给出的字符串比较,如果相等得到flag.
那我们就可以直接解密AES就可以得到flag了.
#equals比较的字节数组
byteArray =[21, -93, -68, -94, 86, 117, -19, -68, -92, 33,
            50, 118, 16, 13, 1, -15, -13, 3, 4, 103, -18,
            81, 30, 68, 54, -93, 44, -23, 93, 98, 5, 59]
#读取图片
with open('url.png','rb') as f:
    p =f.read()
str1 =p[144:144+16]


str2 =""
for i in range(0,len(str1),2):
    str2 += chr(str1[i+1])
    str2 += chr(str1[i])
print(str2)

print(p[144:144+16])
#把字节数组转换为16进制字符串
str3 =""
for i in byteArray:
    s=str(hex((i+256)%256))
    if len(s) <4:
        s = s[0:2]+'0'+s[2:]
    str3+=s[2:]
print(str3)
得到密码的16进制,然后解密AES解密得到flag
LCTF{1t’s_rea1ly_an_ea3y_ap4}


