07-1SciPy绘图工具的使用 scipy 积分求解与绘图工具matplotlib.pyplot及scipy.misc 使用、文件输入输出
scipy 积分求解与绘图工具matplotlib.pyplot及scipy.misc 使用
文章目录
- scipy 积分求解与绘图工具matplotlib.pyplot及scipy.misc 使用
- 求积分
- 绘制正弦曲线
- 文件输入输出
- SciPy 中ndimage的使用
- 可选的cmap字符串
- 滤波处理
import numpy as np
import pandas as pd
from pandas import Series,DataFrame

# scipy求解积分
from scipy.integrate import quad

# 绘图专用的工具
import matplotlib.pyplot as plt

# 表示把matplotlib生成的图像绘制到当前notebook当中
%matplotlib inline
求积分
确认不规则图形的函数曲线
f = lambda x:(1-x**2)**0.5
确认不规则图形x轴的界限(-1,1)
b = 1
a = -1
定义想x,y的函数
x = np.linspace(-1,1,100)
y = f(x)
绘制线性图
plt.plot(x,y)
plt.plot(x,-y)
调整坐标轴刻度的比例一致
plt.axis('equal')
确认结果是否正确,结果为pi,即为正确
half_area,error = quad(f,a,b)
2*half_area/1
结果为:
3.1415926535897967
绘制正弦曲线
x1 = np.linspace(0,2*np.pi,100)
y1 = np.sin(x1)
plt.plot(x1,y1)
文件输入输出
处理文本输入
import scipy.io as io
处理图片输入输出
import scipy.misc as misc
把数据存储为2进制格式的数据
io.savemat()
读取二进制的数据文件
io.loadmat()
数据写入,支持数组对象
xiaoming = np.random.randint(0,100,size=3)
index = np.array(['语文','数学','英语'])

mdic = {
    'xiaomingkey':xiaoming,
    'indexkey':index
}
# 不需要制定文件后缀,只保存为mat格式
io.savemat('xiaomingpath',mdict=mdic)
读取二进制文件
xiaoming = io.loadmat(‘xiaomingpath.mat’)
display(xiaoming['xiaomingkey'],xiaoming['indexkey'])
结果为:
array([[76, 98, 90]])
array(['语文', '数学', '英语'], dtype='
【注意】 misc所有的功能都已经被其他类库替代
图片读取:misc.imread()
图片保存:misc.imsave()
添加滤镜效果:misc.imfilter()
调整图片大小:misc.imresize()
调整图片旋转角度:misc.imrotate()
图片展示:misc.imshow()
plt.imshow(misc.imread('./123.jpg'))
使用imageio.imread替代misc.imread()
from imageio import imread
plt.imshow(imread('./123.jpg'))
meixi = plt.imread('./123.jpg')
meixi.shape
结果为:
(1086, 2010, 3)
将图片黑白化
plt.imshow(meixi.max(axis=2),cmap='gray')
将黑白图片保存
from imageio import imwrite
gray_meixi = meixi.max(axis=2)
imwrite('gray_meixi2.jpg',gray_meixi)
滤镜效果
# imfiter参数选项:'blur', 'contour', 'detail', 'edge_enhance', 'edge_enhance_more', 'emboss', 'find_edges', 'smooth', 'smooth_more', 'sharpen'
plt.imshow(misc.imfilter(meixi,'contour'))
使用0-100之间的数,设置原始图像的百分比
plt.imshow(misc.imresize(meixi,50))
使用0-1之间的小数,设置原始图像的比例
plt.imshow(misc.imresize(meixi,0.5))
分别制定(heigth,width)的尺寸来修该原始图片大小
plt.imshow(misc.imresize(meixi,(200,300)))
使用skimage处理图片的大小
from skimage.transform import resize
plt.imshow(resize(meixi,output_shape=(300,400),mode='reflect'))
使用misc.imrotate不会改变原始图片的形状
plt.imshow(misc.imrotate(meixi,90,interp='bilinear'))
使用skimage.transform.rotate处理图片
from skimage.transform import rotate
# mode 是设置空白处的填充方式 'constant', 'edge', 'symmetric', 'reflect', 'wrap'
plt.imshow(rotate(meixi,angle=90,mode='reflect'))
SciPy 中ndimage的使用
import numpy as np
import pandas as pd
from pandas import Series,DataFrame
from scipy import ndimage
# 信号处理--- 维纳滤波器
from scipy.signal import wiener
from scipy import misc

import matplotlib.pyplot as plt
%matplotlib inline
旋转图片:ndimage.rotate()
图片缩放:ndimage.zoom()
图片移动:ndimage.shift()
高斯滤波器:ndimage.gaussian_filter()
中止滤波器:ndimage.median_filter()
维纳滤波器:wiener()
可选的cmap字符串
Accent, Accent_r, Blues, Blues_r, BrBG, BrBG_r, BuGn, BuGn_r, BuPu, BuPu_r, CMRmap, CMRmap_r, Dark2, Dark2_r, GnBu, GnBu_r, Greens, Greens_r, Greys, Greys_r, OrRd, OrRd_r, Oranges, Oranges_r, PRGn, PRGn_r, Paired, Paired_r, Pastel1, Pastel1_r, Pastel2, Pastel2_r, PiYG, PiYG_r, PuBu, PuBuGn, PuBuGn_r, PuBu_r, PuOr, PuOr_r, PuRd, PuRd_r, Purples, Purples_r, RdBu, RdBu_r, RdGy, RdGy_r, RdPu, RdPu_r, RdYlBu, RdYlBu_r, RdYlGn, RdYlGn_r, Reds, Reds_r, Set1, Set1_r, Set2, Set2_r, Set3, Set3_r, Spectral, Spectral_r, Vega10, Vega10_r, Vega20, Vega20_r, Vega20b, Vega20b_r, Vega20c, Vega20c_r, Wistia, Wistia_r, YlGn, YlGnBu, YlGnBu_r, YlGn_r, YlOrBr, YlOrBr_r, YlOrRd, YlOrRd_r, afmhot, afmhot_r, autumn, autumn_r, binary, binary_r, bone, bone_r, brg, brg_r, bwr, bwr_r, cool, cool_r, coolwarm, coolwarm_r, copper, copper_r, cubehelix, cubehelix_r, flag, flag_r, gist_earth, gist_earth_r, gist_gray, gist_gray_r, gist_heat, gist_heat_r, gist_ncar, gist_ncar_r, gist_rainbow, gist_rainbow_r, gist_stern, gist_stern_r, gist_yarg, gist_yarg_r, gnuplot, gnuplot2, gnuplot2_r, gnuplot_r, gray, gray_r, hot, hot_r, hsv, hsv_r, inferno, inferno_r, jet, jet_r, magma, magma_r, nipy_spectral, nipy_spectral_r, ocean, ocean_r, pink, pink_r, plasma, plasma_r, prism, prism_r, rainbow, rainbow_r, seismic, seismic_r, spectral, spectral_r, spring, spring_r, summer, summer_r, tab10, tab10_r, tab20, tab20_r, tab20b, tab20b_r, tab20c, tab20c_r, terrain, terrain_r, viridis, viridis_r, winter, winter_r
加载一张misc提供的现有图片
cmap 制定图片的色调
0-255 黑—白 灰度值越大,越趋向于白,越小,越趋向于色调的主色
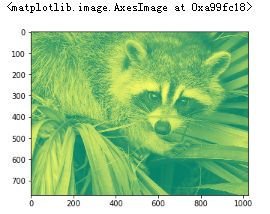
plt.imshow(misc.face(gray=True),cmap='summer')
jpg uint8 0-255;png float32 0.-1.; 255 白;0 黑
color_test = np.full(shape=(100,100,3),fill_value=255,dtype=np.uint8)
plt.imshow(color_test)
face = misc.face(gray=True)
face.shape
结果为:
(768, 1024)
plt.imshow(misc.imrotate(face,90))
ndimage的旋转会修改图片的形状,旋转产生的黑边就是填充的0值
plt.imshow(ndimage.rotate(face,60))
zoom 设置为 float 图片放大的倍数,支持0.3–1;zoom 设置为列表,图片在不同轴以不同比例拉伸、压缩
plt.imshow(ndimage.zoom(face,zoom=[2,3]))
shift 设置的是像素大小,mode 设置黑白的填充模式:‘constant’, ‘nearest’, ‘reflect’, ‘mirror’ or ‘wrap’
plt.imshow(ndimage.shift(face,shift=100,mode='nearest'),cmap='gray')
滤波处理
moon_landing = plt.imread('moonlanding.png')
plt.imshow(moon_landing,cmap='gray')
moon_landing.shape
plt.imshow(ndimage.gaussian_filter(moon_landing,sigma=1),cmap='gray')
空值、异常值的填充一般使用如下三个指标
- 平均值
- 中位数
- 众数
如果哪一种都不合适,那就drop
plt.imshow(ndimage.median_filter(moon_landing,size=9),cmap='gray')
plt.imshow(wiener(moon_landing,mysize=7),cmap='gray')


