OpenGL入门之纹理
窗口代码:
/*OpenGL之窗口初始化*/
#include
#include
#include
#include
#include
#include "Shader.h"
#define STB_IMAGE_IMPLEMENTATION
#include "stb_image.h"
void framebuffer_size_callback(GLFWwindow* windows, int width, int height);
void processInput(GLFWwindow *windows);
unsigned int shaderProgram;
std::string vertexCode;
std::string fragmentCode;
std::ifstream vShaderFile;	//文件输入流
std::ifstream fShaderFile;
int success;	//定义一个整型变量来表示是否成功编译
char infoLog[512];	//存储错误消息的容器
unsigned int VBO;	//顶点缓冲对象
unsigned int VAO;	//顶点数组对象
unsigned int EBO;
unsigned int vertexShader;	//通过ID引用
unsigned int fragmentShader;
unsigned int texture1;	//创建纹理的ID
unsigned int texture2;
int main()
{
	glfwInit();	//初始化GLFW
	glfwWindowHint(GLFW_CONTEXT_VERSION_MAJOR, 3);	//将主版本号和此版本号都设为3
	glfwWindowHint(GLFW_CONTEXT_VERSION_MINOR, 3);
	glfwWindowHint(GLFW_OPENGL_PROFILE, GLFW_OPENGL_CORE_PROFILE);	//明确告诉GLFW使用的是核心模式
	GLFWwindow* window = glfwCreateWindow(800, 600, "LearnOpenGL", NULL, NULL);		//创建窗口对象
	if (window == NULL)
	{
		std::cout << "Failed to create GLFW window" << std::endl;
		glfwTerminate();
		return -1;
	}
	glfwMakeContextCurrent(window);	//将窗口的上下文设置为当前线程的主上下文
	glfwSetFramebufferSizeCallback(window, framebuffer_size_callback);	//注册窗口的大小改变时,视口也应该被调整的函数
	if (!gladLoadGLLoader((GLADloadproc)glfwGetProcAddress))	//	调用任何OpenGL的函数之前需要初始化GLAD:给GLAD传入了用来加载系统相关的OpenGL函数指针地址的函数
	{
		std::cout << "Failed to initialize GLAD" << std::endl;
		return -1;
	}
	glViewport(0, 0, 800, 600);	//设置渲染窗口的尺寸大小,即视口,这样OpenGL才知道怎样根据窗口大小显示数据和坐标,前两个参数控制窗口左下角的位置。第三个和第四个参数控制渲染窗口的宽度和高度(像素)

	Shader ourShader("vshader.vs", "fshader.fs");

	int nrAttributes;
	glGetIntegerv(GL_MAX_VERTEX_ATTRIBS, &nrAttributes);
	std::cout << "Maximun nr of vertex attributes supported:" << nrAttributes << std:: endl;
	float vertices[] = {
		//位置           //颜色
		0.5f,0.5f,0.0f,1.0f,0.0f,0.0f,1.0f,1.0f,
		0.5f,-0.5f,0.0f,0.0f,1.0f,0.0f,1.0f,0.0f,
		-0.5f,-0.5f,0.0f,0.0f,0.0f,1.0f,0.0f,0.0f,
		-0.5f,0.5f,0.0f,1.0f,1.0f,0.0f,0.0f,1.0f
	};
	unsigned int indices[] = {//注意索引从0开始
		0,1,3,//第一个三角形
		1,2,3 //第二个三角形
	};
	glGenBuffers(1, &VBO);	//创建顶点缓冲对象
	glGenVertexArrays(1, &VAO);	//创建顶点数组对象
	glGenBuffers(1, &EBO);	//创建索引缓冲对象
	//绑定VAO
	glBindVertexArray(VAO);
	//把顶点数组复制到缓冲中供OpenGL使用
	glBindBuffer(GL_ARRAY_BUFFER, VBO);	//绑定顶点缓冲对象
	glBindBuffer(GL_ELEMENT_ARRAY_BUFFER, EBO);	//绑定索引缓冲对象
	glBufferData(GL_ARRAY_BUFFER, sizeof(vertices), vertices, GL_STATIC_DRAW);//复制顶点数组到一个顶点缓冲中,供OpenGL使用
	glBufferData(GL_ELEMENT_ARRAY_BUFFER, sizeof(indices), indices, GL_STATIC_DRAW);//复制索引数组到一个索引缓冲中,供OpenGL使用


	/*设置顶点属性指针,第一个参数指定要配置的顶点属性,第二个参数指定顶点属性的大小,第三个参数指定数据的类型,
	第四个参数定义是否希望数据被标准化,第五个参数叫做步长,最后一个参数类型是void*(为偏移量)*/
	glVertexAttribPointer(0, 3, GL_FLOAT, GL_FALSE, 8 * sizeof(float), (void*)0);
	glVertexAttribPointer(1, 3, GL_FLOAT, GL_FALSE, 8 * sizeof(float), (void *)(3*sizeof(float)));
	glVertexAttribPointer(2, 2, GL_FLOAT, GL_FALSE, 8 * sizeof(float), (void *)(6 * sizeof(float)));
	glEnableVertexAttribArray(0);	//以顶点属性位置值作为参数,启用顶点属性
	glEnableVertexAttribArray(1);
	glEnableVertexAttribArray(2);
	glBindVertexArray(0);
	glBindBuffer(GL_ARRAY_BUFFER, 0);
	/*
	/当目标是GL_ELEMENT_ARRAY_BUFFER的时候,VAO会储存glBindBuffer的函数调用。
	这也意味着它也会储存解绑调用,所以确保你没有在解绑VAO之前解绑索引数组缓冲,否则它就没有这个EBO配置
	*/
	glBindBuffer(GL_ELEMENT_ARRAY_BUFFER, 0);

	/*生成纹理的过程*/
	glGenTextures(1, &texture1);	//	函数首先需要输入生成纹理的数量,然后把它们存储在第二个参数的unsigned int数组中
	glGenTextures(1, &texture2);	//	函数首先需要输入生成纹理的数量,然后把它们存储在第二个参数的unsigned int数组中
	//加载并生成纹理
	int width1, height1, nrChannels1;
	int width2, height2, nrChannels2;
	stbi_set_flip_vertically_on_load(true);//指示stb_image.h在y轴上翻转加载纹理
	unsigned char *data1 = stbi_load("container.jpg", &width1, &height1, &nrChannels1,0);
	unsigned char *data2 = stbi_load("awesomeface.png", &width2, &height2, &nrChannels2, 0);
	if (data1)
	{
		glBindTexture(GL_TEXTURE_2D, texture1);	//像其他对象一样,需要绑定它,之后任何的纹理指令都可以配置当前绑定的纹理
		//为当前绑定的纹理对象设置环绕、过滤方式
		glTexParameteri(GL_TEXTURE_2D, GL_TEXTURE_WRAP_S, GL_REPEAT);
		glTexParameteri(GL_TEXTURE_2D, GL_TEXTURE_WRAP_T, GL_REPEAT);
		glTexParameteri(GL_TEXTURE_2D, GL_TEXTURE_MIN_FILTER, GL_LINEAR);
		glTexParameteri(GL_TEXTURE_2D, GL_TEXTURE_MAG_FILTER, GL_LINEAR);
		glTexImage2D(GL_TEXTURE_2D, 0, GL_RGB, width1, height1, 0, GL_RGB, GL_UNSIGNED_BYTE, data1);//第一个参数指定纹理目标,第二个参数为纹理指定多级渐远纹理级别,0为基本级别,第三个参数代表希望把纹理存储为何种格式,第七、八个参数定义了源图的格式和数据类型,最后一个参数是真正的图像数据
		glGenerateMipmap(GL_TEXTURE_2D);	//为当前绑定的纹理自动生成所有需要的多级渐远纹理
	}
	else
	{
		std::cout << "Failed to load texture" << std::endl;
	}
	if (data2)
	{
		glBindTexture(GL_TEXTURE_2D, texture2);	//像其他对象一样,需要绑定它,之后任何的纹理指令都可以配置当前绑定的纹理
		//为当前绑定的纹理对象设置环绕、过滤方式
		glTexParameteri(GL_TEXTURE_2D, GL_TEXTURE_WRAP_S, GL_REPEAT);
		glTexParameteri(GL_TEXTURE_2D, GL_TEXTURE_WRAP_T, GL_REPEAT);
		glTexParameteri(GL_TEXTURE_2D, GL_TEXTURE_MIN_FILTER, GL_LINEAR);
		glTexParameteri(GL_TEXTURE_2D, GL_TEXTURE_MAG_FILTER, GL_LINEAR);
		glTexImage2D(GL_TEXTURE_2D, 0, GL_RGBA, width2, height2, 0, GL_RGBA, GL_UNSIGNED_BYTE, data2);//第一个参数指定纹理目标,第二个参数为纹理指定多级渐远纹理级别,0为基本级别,第三个参数代表希望把纹理存储为何种格式,第七、八个参数定义了源图的格式和数据类型,最后一个参数是真正的图像数据
		glGenerateMipmap(GL_TEXTURE_2D);	//为当前绑定的纹理自动生成所有需要的多级渐远纹理
	}
	else
	{
		std::cout << "Failed to load texture" << std::endl;
	}
	stbi_image_free(data1);
	stbi_image_free(data2);
	ourShader.use();

	ourShader.setInt("texture1", 0);//通过使用着色器类告诉OpenGL每个着色器采样器属于哪个纹理单元
	ourShader.setInt("texture2", 1);

	//渲染循环,在主动关闭它之前不断绘制图像并能够接受用户输入
	while (!glfwWindowShouldClose(window))	//在循环的开始前检查一次GLFW是否被要求退出,是的话该函数返回true,渲染循环便结束
	{
		/*float timeValue = glfwGetTime();
		float greenValue = (sin(timeValue) / 2.0f) + 0.5f;
		int vertexColorLocation = glGetUniformLocation(shader.ID, "ourColor");*/
		processInput(window);
		glClearColor(0.2f, 0.3f, 0.3f, 1.0f);	//设置清空屏幕所用的自定义颜色,为状态设置函数
		glClear(GL_COLOR_BUFFER_BIT);	//通过调用glClear函数来清空屏幕的颜色缓冲,为状态使用函数

		//绑定纹理到相应纹理单元(此处为0和1)
		glActiveTexture(GL_TEXTURE0);
		glBindTexture(GL_TEXTURE_2D, texture1);
		glActiveTexture(GL_TEXTURE1);
		glBindTexture(GL_TEXTURE_2D, texture2);

		ourShader.use();	//当渲染一个物体时要使用着色器程序
		glBindVertexArray(VAO);			//绑定VAO
		//glUniform4f(vertexColorLocation, 0.0f, greenValue, 0.0f, 1.0f);	//设置uniform属性值
		//glPolygonMode(GL_FRONT_AND_BACK, GL_LINE);//使用线框模式绘制三角形,默认为glPolygonMode(GL_FRONT_AND_BACK, GL_FILL)

		glDrawElements(GL_TRIANGLES, 6, GL_UNSIGNED_INT,0);	//绘制想要的物体
		glfwSwapBuffers(window);	//函数会交换颜色缓冲(是一个储存着GLFW窗口每一个像素颜色的值得大缓冲)
		glfwPollEvents();	//函数检查有没有触发什么事件(比如键盘输入,鼠标移动等)、更新窗口状态
	}
	//删除所有分配的资源
	glDeleteVertexArrays(1, &VAO);
	glDeleteBuffers(1, &VBO);
	glDeleteBuffers(1, &EBO);

	glfwTerminate();	//渲染循环结束后需要正确释放/删除之前的分配的所有资源
	return 0;
}
void framebuffer_size_callback(GLFWwindow* window, int width, int height)	//视口根据窗口大小调整的函数,两个整数表示窗口的新维度
{
	glViewport(0, 0, width, height);
}
void processInput(GLFWwindow *window)	//输入的控制
{
	if (glfwGetKey(window, GLFW_KEY_ESCAPE) == GLFW_PRESS)	//	glfwGetKey函数需要一个窗口以及一个按键作为输入,函数将会返回这个按键是否正在被按下
		glfwSetWindowShouldClose(window, true);
}
顶点着色器:
#version 330 core
layout(location=0)in vec3 aPos;
layout(location=1)in vec3 aColor;
layout(location=2)in vec2 aTexCoord;
out vec3 ourColor;
out vec2 TexCoord;
void main()
{
	gl_Position=vec4(aPos.x,aPos.y,aPos.z,1.0);
	ourColor=aColor;	//将ourColor设置为从顶点数据那里得到的输入颜色
	TexCoord=aTexCoord;
}
片段着色器:
#version 330 core
out vec4 FragColor;
in vec3 ourColor;
in vec2 TexCoord;
uniform sampler2D texture1; // 纹理1
uniform sampler2D texture2; // 纹理2
void main()
{
   FragColor=mix(texture(texture1,TexCoord),texture(texture2,TexCoord),0.2);
 }
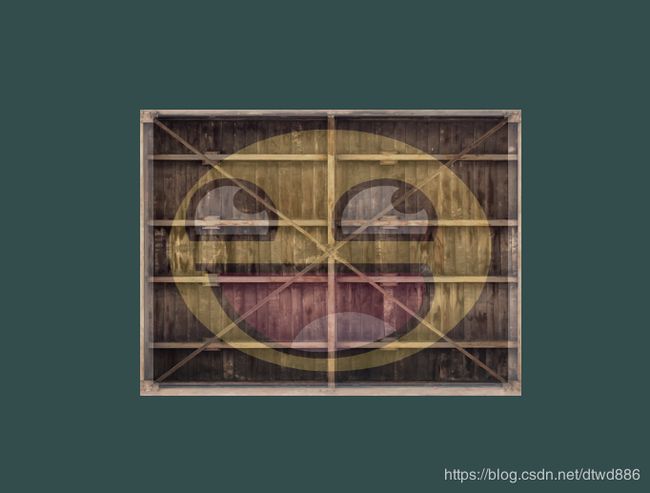
container.jpg
awesomeface.png
效果图: