你真的了解微信好友吗
![]()
今天发现了一个好玩的 python 第三方库 itchat,它的功能很强大:只要你扫一下它所生成的二维码即可模拟登陆你的微信号,然后可以实现自动回复,爬取微信列表好友信息等功能。这么强大的功能简直是相见恨晚,我忍不住激动地心情用它练了一把手。
登录微信
要使用 itchat,我们首先需要安装 itchat 包,这个很简单,直接 pip install 就行。
登录操作也很简单,直接调用 auto_login() 函数。
import itchat


itchat.auto_login()
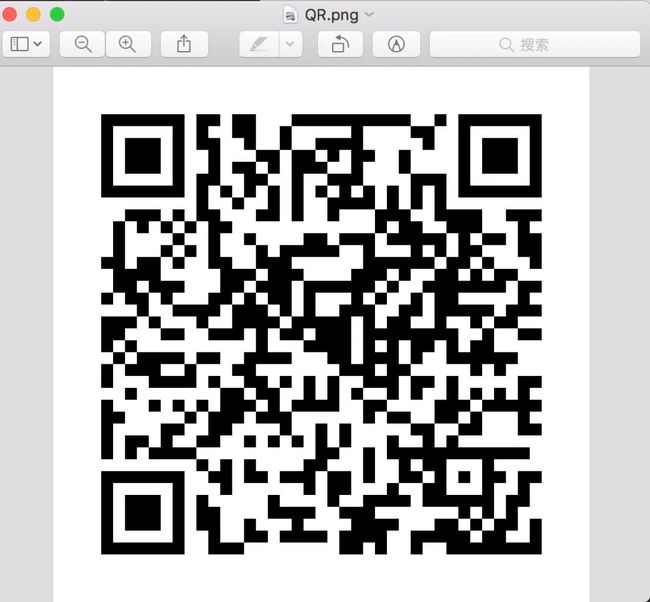
运行这行代码,你的电脑会弹出一个微信登录二维码,类似于我们网页登录微信,像下面这样:
并且我们的 Console 里面会出现下面的提示信息提示你使用微信扫一扫扫描二维码登录:
Getting uuid of QR code.
Downloading QR code.
Please scan the QR code to log in.
这里有两点需要注意:
你扫码登录时,电脑端的微信必须退出,否则登录不成功,会出现提示:
Your wechat account may be LIMITED to log in WEB wechat, error info:
1203 为了你的帐号安全,此微信号不能登录网页微信。你可以使用Windows微信或Mac微信在电脑端登录。Windows微信下载地址:https://pc.weixin.qq.com Mac微信下载地址:https://mac.weixin.qq.com 二维码有过期时间,过期之后会再次弹出一个新的二维码。我没有计算这个时间,总之出来后赶紧扫就对了。
扫码之后,会有一行提示信息,提示我们在手机端点击确认登录:
Please press confirm on your phone.
扫码登录成功后,我们会看到提示信息:
Loading the contact, this may take a little while.
TERM environment variable not set.
Login successfully as 欢乐豆
获取好友信息
登录微信之后,我们就可以获取我们通讯录的好友信息了,获取信息也很简单,一行代码搞定:
friends_info_list = itchat.get_friends(update=True)
得到的是一个好友信息列表,我们打印其中一个看看:
{'MemberList': , 'Uin': 0, 'UserName': '@b5eed3c44df3b8f1404ad0fd9efacf847b6bdf43fbc3fd12d9cbcca09361e16d', 'NickName': '李伟波', 'HeadImgUrl': '/cgi-bin/mmwebwx-bin/webwxgeticon?seq=705127145&username=@b5eed3c44df3b8f1404ad0fd9efacf847b6bdf43fbc3fd12d9cbcca09361e16d&skey=@crypt_d1e3f9d6_3e7fd5ff8ee7c0097845abce8da661e9', 'ContactFlag': 3, 'MemberCount': 0, 'RemarkName': '', 'HideInputBarFlag': 0, 'Sex': 1, 'Signature': '人生就象一场梦', 'VerifyFlag': 0, 'OwnerUin': 0, 'PYInitial': 'LWB', 'PYQuanPin': 'liweibo', 'RemarkPYInitial': '', 'RemarkPYQuanPin': '', 'StarFriend': 0, 'AppAccountFlag': 0, 'Statues': 0, 'AttrStatus': 37381, 'Province': '浙江', 'City': '温州', 'Alias': '', 'SnsFlag': 257, 'UniFriend': 0, 'DisplayName': '', 'ChatRoomId': 0, 'KeyWord': '', 'EncryChatRoomId': '', 'IsOwner': 0}
在这里我们可以获取到这个好友的很多信息,例如:昵称、性别、头像、省份、签名等等。
得到好友信息后,我想把好友的头像保存下来,说不定有我平时没注意的镁钕哦!于是我写了下面的代码:
# 保存头像
img = itchat.get_head_img(userName=friend["UserName"])
path = "./pic"
if not os.path.exists(path):
    os.makedirs(path)
try:
    file_name = path + os.sep + friend['NickName']+"("+friend['RemarkName']+").jpg"
    with open(file_name, 'wb') as f:
        f.write(img)
except Exception as e:
    print(repr(e))
我把好友的头像保存在当前目录的pic文件夹下,并且以好友的昵称和备注作为文件名。
省份分布
接下来,我想看看我的好友分布在哪些省份,于是我将好友的地区信息做了归并:
# 处理省份
if friend['Province'] in self.province_dict:
    self.province_dict[friend['Province']] = self.province_dict[friend['Province']] + 1
else:
    if friend['Province'] not in self.province_tuple:
        if '海外' in self.province_dict.keys():
            self.province_dict['海外'] = self.province_dict['海外'] + 1
        else:
            self.province_dict['海外'] = 1
    else:
        self.province_dict[friend['Province']] = 1


self.friends.append(friend)
除了中国的31个省份,其他的都归到“海外”同胞组。
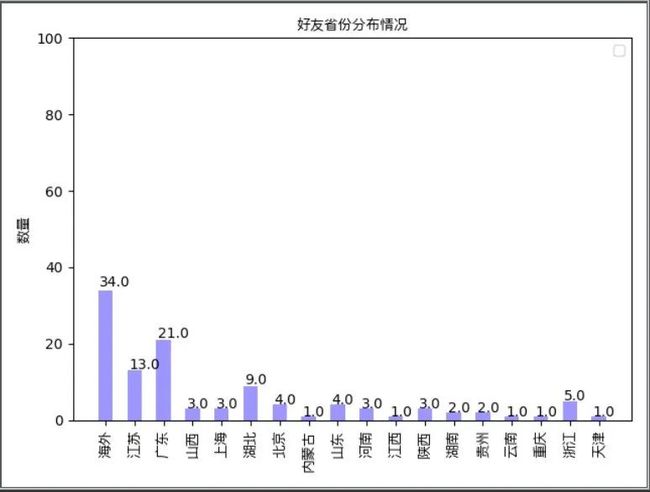
有了这个归并数据后,我想做个柱形图来直观地看结果:
# 处理中文字体
@staticmethod
def get_chinese_font():
    return FontProperties(fname='/System/Library/Fonts/PingFang.ttc')

# 为图表加上数字
@staticmethod
def auto_label(rects):
    for rect in rects:
        height = rect.get_height()
        plt.text(rect.get_x()+rect.get_width()/2.-0.2, 1.03*height, '%s' % float(height))


# 展示省份柱状图
def show(self):
    labels = self.province_dict.keys()
    means = self.province_dict.values()
    index = np.arange(len(labels)) + 1
    # 方块宽度
    width = 0.5
    # 透明度
    opacity = 0.4
    fig, ax = plt.subplots()
    rects = ax.bar(index + width, means, width, alpha=opacity, color='blue', label='省份')
    self.auto_label(rects)
    ax.set_ylabel('数量', fontproperties=self.get_chinese_font())
    ax.set_title('好友省份分布情况', fontproperties=self.get_chinese_font())
    ax.set_xticks(index + width)
    ax.set_xticklabels(labels, fontproperties=self.get_chinese_font())
    # 将x轴标签竖列
    plt.xticks(rotation=90)
    # 设置y轴数值上下限
    plt.ylim(0, 100)
    plt.tight_layout()
    ax.legend()


    fig.tight_layout()
    plt.show()
这里使用了 matplotlib 库来画图形,这里有个地方需要注意的,那就是我们的柱形图的横轴坐标是省份名称,也就是中文,在 matplotlib 里面默认中文显示是乱码,所以我们必须处理一下,也就是找到我们电脑上的字体库,选择一种字体,显示的指定。在 Mac 电脑上,字体库的路径是:/System/Library/Fonts/PingFang.ttc,而 Windows 电脑的字体库路径是:C:\Windows\Fonts。
运行之后,会自动弹出一个柱形图,像下面这样:
看起来,我的朋友都是海外人士,you kidding me?
签名词云
我突然又有个大胆的想法,我想把好友的签名搜集起来,做个词云,看看我的朋友们最喜欢说什么词语?
# 分词
@staticmethod
def split_text(text):
    all_seg = jieba.cut(text, cut_all=False)
    all_word = ' '
    for seg in all_seg:
        all_word = all_word + seg + ' '


    return all_word


# 作词云
def jieba(self, strs):
    text = self.split_text(strs)
    # 设置一个底图
    alice_mask = np.array(Image.open('./alice.png'))
    wordcloud = WordCloud(background_color='white',
                          mask=alice_mask,
                          max_words=1000,
                          # 如果不设置中文字体,可能会出现乱码
                          font_path='/System/Library/Fonts/PingFang.ttc')
    myword = wordcloud.generate(str(text))
    # 展示词云图
    plt.imshow(myword)
    plt.axis("off")
    plt.show()


    # 保存词云图
    wordcloud.to_file('./alice_word.png')


# 判断中文
@staticmethod
def judge_chinese(word):
    cout1 = 0
    for char in word:
        if ord(char) not in (97, 122) and ord(char) not in (65, 90):
            cout1 += 1
    if cout1 == len(word):
        return word


# 处理签名,并生成词云
def sign(self):
    sign = []
    for f in self.friends:
        sign.append(f['Signature'])


    strs = ''
    for word in sign[0:]:
        if self.judge_chinese(word) is not None:
            strs += word


    self.jieba(strs)
这里我分为几个步骤实现的:
将签名取出来(这里我只取了中文),然后组装成文本。
使用 jieba 这个第三方库来进行分词。
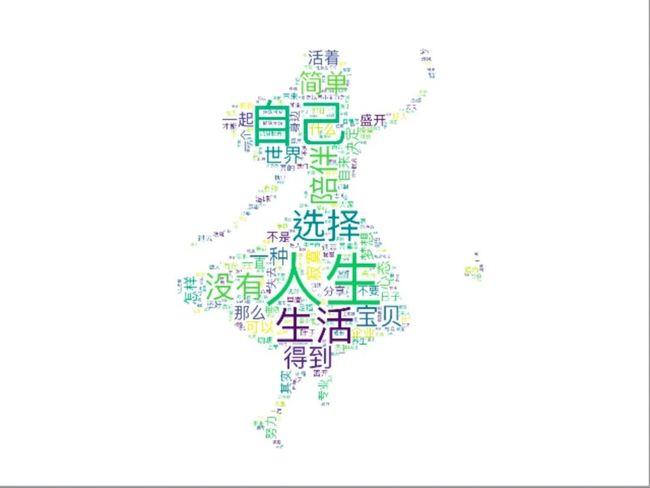
使用 jieba 来画词云图,这里我调皮了一下,我找了一张爱丽丝的图片作为底图,目的是想生成的词云图形状跟底图一样。
运行之后,会弹出我们生成的词云图,我们赶紧来看看:
看来我的好友很崇尚自我啊,对人生的思考也是极其深刻的。看来真的是近朱者赤近墨者黑啊!
总结
本文主要使用 itchat 这个第三方库进行微信登录操作,然后获取到微信的好友信息。接着我们使用这些信息做一些有意思的事情,看看好友的省份分布,将好友的签名做成词云等。
文中示例代码:https://github.com/JustDoPython/python-100-day
PS:公号内回复 :Python,即可进入Python 新手学习交流群,一起100天计划!
-END-
Python 技术
关于 Python 都在这里
![]()


