SpringBoot实战项目笔记
文章目录
- 写在开头
- 1.忘记开头的开头
- (1)Github登录之获取用户信息
- (2)测试token
- (3) 设置GithubUser实体类
- (4) 使用okhttp获取access_token
- (5) 利用封装好的accessTokenDto取到用户信息
- (4) 小结
- 2. 配置application.properties
- 3. 细说session和cookies原理和实现
- 4. 初识H2数据库
- 5. 集成MyBatis并实现插入操作
- 6. 实现持久化用户状态获取
- 7. 集成Flyway Migration
- (1) 导入插件
- (2) 创建第一个migration
- (3) 迁移数据库
- 8. 使用Bootstrap编写发布问题页面
- 9. 完成文章发布功能
- 10. 添加Lombok支持
- 11. 首页问题列表功能
- 12. 问题答疑
- 13. 自动部署
- 14. 分页
- 15. 页面拆解
- 16. 个人发布列表的实现
- 17. 拦截器
- 18. 问题详情页面
- 19. 退出登录
- 20. 隐藏域
- 21. 集成mybatis generator
- 22. 异常处理
- 23. 增加阅读数的并发问题
- 24. 实现回复
- postman软件
写在开头
这是跟着小匠老师进行论坛项目实战的学习笔记,老师的视频链接如下
【Spring Boot 实战】论坛项目【第一季】
最开始的时候没有写笔记的习惯,所以可能有极小一部分开头缺失,笔记是从申请github链接开始的
我自己写的源代码会实时更新到github,视频里应该也有老师的源码地址,下面我会附上实时更新的我的源码地址
我的源码
接下来会放一些常用的官方文档地址,方便使用
bookstrap中文网
thymeleaf
菜鸟教程:本次笔记中大部分用于查询sql语句
从一位关注我的博友那里学到了很多,决定也添个目录方便手机版阅读,以及对整个笔记的梳理,先附上这位博友关于这个项目笔记的链接,做的比我好很多,也精简很多。
基于Spring Boot的论坛项目笔记
1.忘记开头的开头
(1)Github登录之获取用户信息
GET https://github.com/login/oauth/authorize
点击后跳转到github网址,需要传入client_id以及redirect_uri,scope用来获取用户信息,state是一个随机字符串,只是为了跨站时使用,这里随机给了个1.
<a href="https://github.com/login/oauth/authorize?client_id=d5c54e7e70dc5d5646a6&redirect_uri=http://localhost:8887/callback
         &scope=user&state=1">登录a>
此时点击登录,便可以跳转到github授权页面
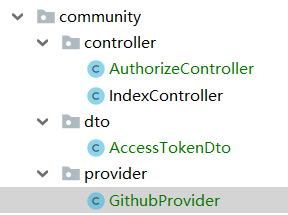
然后建立一个AuthorizeController用于接收github传回来的参数,并返回到index页面,由于后面的步骤也需要state这个参数,所以我们要把自己定义的state也拿过来
@Controller
public class AuthorizeController {
    @GetMapping("/callback")
    public String callback(@RequestParam(name = "code") String code,
                           @RequestParam(name = "state") String state){
        return "index";
    }
}
之后创建dto类(相当于实体类entity),用来封装要传递的五个参数。这里是因为要养成良好的学习习惯,超过两个参数就将他们封装起来。
这里采用okhttp的方式进行post,参考官方文档
<dependency>
    <groupId>com.squareup.okhttp3groupId>
    <artifactId>okhttpartifactId>
    <version>3.14.1version>
dependency>
这里我因为com.squareup.okhttp3没有加3,导致导入不了正确的包。
还有一种报错可能,是因为idea的bug,重启即可。
在GithubProvider中,把okhttp的POST方法写入,并修改。
@Component //把路径仅仅上传到spring的上下文
public class GithubProvider {
    public String getAccessToken(AccessTokenDto accessTokenDto){
        MediaType JSON = MediaType.get("application/json; charset=utf-8");

        OkHttpClient client = new OkHttpClient();

        RequestBody body = RequestBody.create(JSON, json);
        Request request = new Request.Builder()
                .url("https://github.com/login/oauth/access_token")
                .post(body)
                .build();
        try (Response response = client.newCall(request).execute()) {
            String string = response.body().string();
            System.out.println(string);
            return string;
        } catch (IOException e) {
            e.printStackTrace();
        }
        return null;
    }
}
中间还需要导入fastjson依赖,dto实体类内写上post需求的五个参数,并设置getter和setter方法
导入fastjson时遇到问题,我最开始导入最新版本1.2.62和1.2.61,导入的都是空的jar包,换成1.2.57后才正常导入该jar包
<dependency>
    <groupId>com.alibabagroupId>
    <artifactId>fastjsonartifactId>
    <version>1.2.57version>
dependency>
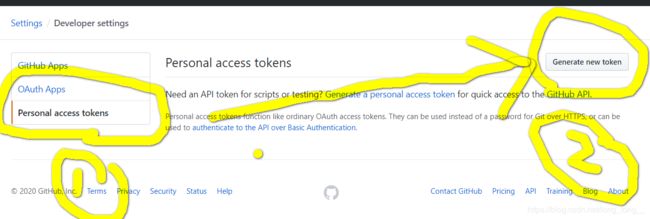
(2)测试token
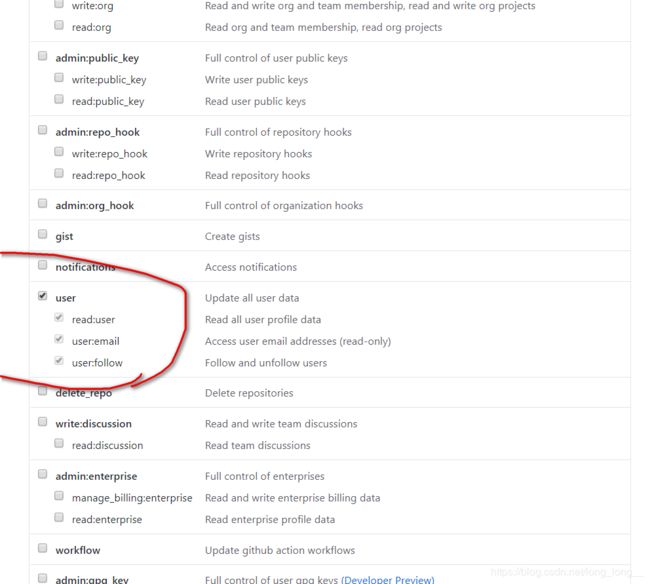
进入new token,勾上user
获取到token
获得后在网页测试,根据官方文档中
Authorization: token OAUTH-TOKEN
GET https://api.github.com/user
在网站输入https://api.github.com/user?access_token=(你获得的token),进入返回了name,bio,id等一系列信息的页面则说明获取成功
其中name为空是因为github账号name没有改过,默认为空
测完即可将token delete掉。
(3) 设置GithubUser实体类
登录验证中我们实际需要的是他的name,id和bio。
因此,我们需要创建一个dto实体类用来封装用户信息。
public class GithubUser {
    private String name;
    private Long id;
    private String bio;

    public String getName() {
        return name;
    }

    public void setName(String name) {
        this.name = name;
    }

    public Long getId() {
        return id;
    }

    public void setId(Long id) {
        this.id = id;
    }

    public String getBio() {
        return bio;
    }

    public void setBio(String bio) {
        this.bio = bio;
    }
}
(4) 使用okhttp获取access_token
这里用okhttp官方文档中getURL的方法去获取access_token
public GithubUser getUser(String accessToken){
    OkHttpClient client = new OkHttpClient();
    Request request = new Request.Builder()
            .url("https://api.github.com/user?access_token=" + accessToken)
            .build();

    try  {
        Response response = client.newCall(request).execute();
        String string = response.body().string();
        GithubUser githubUser = JSON.parseObject(string, GithubUser.class);//直接将string转换成java类项目
        return githubUser;
    } catch (IOException e) {
    }
    return null;
}
然后运行项目,登陆后出现以下错误
经排查,原因是我在controller配置时,把返回路径Redirect_uri配置错误,改为正确的本地地址http://localhost:8887/callback就收到了access_token。
(5) 利用封装好的accessTokenDto取到用户信息
利用getUser方法,将access_token传入函数,得到用户信息。
@Controller
public class AuthorizeController {
    @Autowired //把spring容器里面已经实例化好的实例加载到当前使用的上下文
    private GithubProvider githubProvider;

    @GetMapping("/callback")
    public String callback(@RequestParam(name = "code") String code,
                           @RequestParam(name = "state") String state){
        AccessTokenDto accessTokenDto = new AccessTokenDto();
        accessTokenDto.setClient_id("d5c54e7e70dc5d5646a6");
        accessTokenDto.setClient_secret("(填入你的secret)");
        accessTokenDto.setCode(code);
        accessTokenDto.setRedirect_uri("http://localhost:8887/callback");
        accessTokenDto.setState(state);
        String accessToken = githubProvider.getAccessToken(accessTokenDto);
        GithubUser user = githubProvider.getUser(accessToken);
        return "index";
    }
}
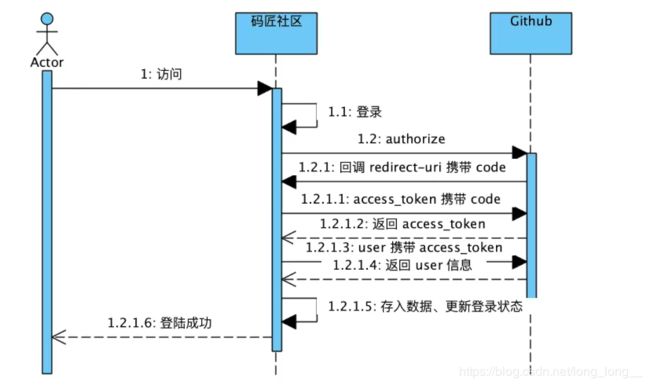
(4) 小结
此小节做的具体步骤如下图
2. 配置application.properties
为更方便地在不同地方调用这些信息,我们把它存入application.properties里
server.port=8887

github.client.id=d5c54e7e70dc5d5646a6
github.client.secret=你的secret
github.redirect.uri=http://localhost:8887/callback
@Controller
public class AuthorizeController {
    @Autowired //把spring容器里面已经实例化好的实例加载到当前使用的上下文
    private GithubProvider githubProvider;

    @Value("${github.client.id}")
    private String clientId;

    @Value("${github.client.secret}")
    private String clientSecret;

    @Value("${github.redirect.uri}")
    private String redirectUri;

    @GetMapping("/callback")
    public String callback(@RequestParam(name = "code") String code,
                           @RequestParam(name = "state") String state){
        AccessTokenDto accessTokenDto = new AccessTokenDto();
        accessTokenDto.setClient_id(clientId);
        accessTokenDto.setClient_secret(clientSecret);
        accessTokenDto.setCode(code);
        accessTokenDto.setRedirect_uri(redirectUri);
        accessTokenDto.setState(state);
        String accessToken = githubProvider.getAccessToken(accessTokenDto);
        GithubUser user = githubProvider.getUser(accessToken);
        return "index";
    }
}
3. 细说session和cookies原理和实现
session就相当于一个银行账户,你注册了,银行就会留有你的账户,所有的信息都会存到银行的数据库里
cookies就相当于一张银行卡,只有你给了银行银行卡,它才能告诉你你的信息是什么,并且操作你里面的余额。
浏览器相当于你,服务器相当于银行。
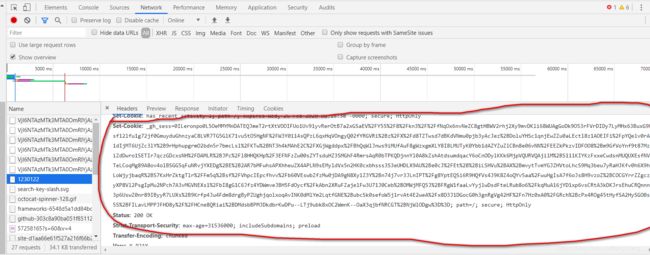
五角星,即name部分,相当于github这个银行户下的许许多多银行卡。
Expires/是cookies的过期时间,也就相当于银行卡的有效时间。
name相当于卡号,value相当于卡内的唯一标识。
network中将cookies作为key,一大串内容作为value,value内容即为application中,各部分内容信息。
所以我们配置controller,对之前获得的user对象进行逻辑判断
@Controller
public class AuthorizeController {
    @Autowired //把spring容器里面已经实例化好的实例加载到当前使用的上下文
    private GithubProvider githubProvider;

    @Value("${github.client.id}")
    private String clientId;

    @Value("${github.client.secret}")
    private String clientSecret;

    @Value("${github.redirect.uri}")
    private String redirectUri;

    @GetMapping("/callback")
    public String callback(@RequestParam(name = "code") String code,
                           @RequestParam(name = "state") String state,
                           HttpServletRequest request){
        //session是通过request得到的
        AccessTokenDto accessTokenDto = new AccessTokenDto();
        accessTokenDto.setClient_id(clientId);
        accessTokenDto.setClient_secret(clientSecret);
        accessTokenDto.setCode(code);
        accessTokenDto.setRedirect_uri(redirectUri);
        accessTokenDto.setState(state);
        String accessToken = githubProvider.getAccessToken(accessTokenDto);
        GithubUser user = githubProvider.getUser(accessToken);
        if (user != null){
            //登录成功,写cookie和session
            //这样就把user对象放进了session里面,这个时候相当于我们银行账户已经创建成功了,但我们没有给前端一个银行卡
            request.getSession().setAttribute("user", user);
            //不加前缀的话,只会把页面渲染到index,但是用户信息会出现在地址上,加上后,相当于重定向到index页面,地址也会转回index
            return "redirect:/";
        }else {
            //登录失败,重新登录
            return "redirect:/";
        }
    }
}
这个时候我们需要从index.html中拿去session,去判断有没有session
<li th:if="${session.user} == null"><a href="https://github.com/login/oauth/authorize?client_id=d5c54e7e70dc5d5646a6&redirect_uri=http://localhost:8887/callback&scope=user&state=1">登录a>li>
<li class="dropdown" th:if="${session.user} != null">
    <a href="#" class="dropdown-toggle" data-toggle="dropdown" role="button" aria-haspopup="true" aria-expanded="false" th:text="${session.user.getName()}"> <span class="caret">span>a>
    <ul class="dropdown-menu">
        <li><a href="#">消息中心a>li>
        <li><a href="#">个人资料a>li>
        <li><a href="#">退出登录a>li>
    ul>
li>
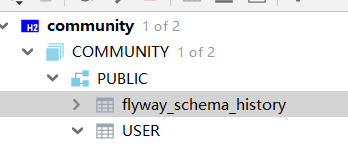
4. 初识H2数据库
<dependency>
    <groupId>com.h2databasegroupId>
    <artifactId>h2artifactId>
    <version>1.4.199version>
dependency>
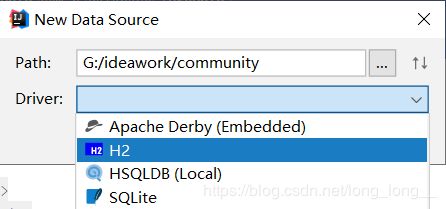
windows用这种方法创建数据库比较快捷
创建表
primary key 主键
varchar括号内跟的是最大字符长度,如果未达到则为当前字符长度
而char是无论达没达到,都是括号内的字符长度大小
gmt指格林威治标准时间。
5. 集成MyBatis并实现插入操作
Maven
<dependency>
    <groupId>org.mybatis.spring.bootgroupId>
    <artifactId>mybatis-spring-boot-starterartifactId>
    <version>2.1.1version>
dependency>
<dependency>
    <groupId>org.springframework.bootgroupId>
    <artifactId>spring-boot-starter-jdbcartifactId>
dependency>
添加数据库配置
spring.datasource.url =jdbc:h2:G:/ideawork/community
spring.datasource.username=yourname
spring.datasource.password=yourpassword
spring.datasource.driver-class-name=org.h2.Driver
设置mapper接口,并为接口设置user模型
@Mapper
public interface UserMapper {
    @Insert("insert into user (name, account_id, token, gmt_create, gmt_modified) values (#{name}, #{accountId}, #{token}, #{gmtCreate}, #{gmtModified})")
    void insert(User user);
}
public class User {
    private int id;
    private String accountId;
    private String token;
    private Long gmtCreate;
    private Long gmtModified;
    private String name;
User中设置这些变量,并设置getter和setter方法。
然后在controller中将user封装并存入数据库。
User user = new User();
user.setToken(UUID.randomUUID().toString());
user.setAccountId(String.valueOf(githubUser.getId()));
user.setGmtCreat(System.currentTimeMillis());
user.setGmtModified(user.getGmtCreate());
user.setName(githubUser.getName());
userMapper.insert(user);
首先h2数据库连接时,第一次如果没有设置用户名和密码,应该是自动设置sa和123,如果不是
可采用以上方法,设置数据库的用户名密码。
还有如果报错数据库某字段找不到的异常,切记检查各封装类的值是否和数据库属性值一致,避免出现单词拼错漏拼的尴尬状况,切记切记切记!!!
6. 实现持久化用户状态获取
我们手动地写出一组key和value,并让服务器读取成为application中的name和value
@Controller
public class AuthorizeController {
    @Autowired //把spring容器里面已经实例化好的实例加载到当前使用的上下文
    private GithubProvider githubProvider;

    @Value("${github.client.id}")
    private String clientId;

    @Value("${github.client.secret}")
    private String clientSecret;

    @Value("${github.redirect.uri}")
    private String redirectUri;

    @Autowired
    private UserMapper userMapper;

    @GetMapping("/callback")
    public String callback(@RequestParam(name = "code") String code,
                           @RequestParam(name = "state") String state,
                           HttpServletRequest request,
                            HttpServletResponse response){
        //session是通过request得到的
        AccessTokenDto accessTokenDto = new AccessTokenDto();
        accessTokenDto.setClient_id(clientId);
        accessTokenDto.setClient_secret(clientSecret);
        accessTokenDto.setCode(code);
        accessTokenDto.setRedirect_uri(redirectUri);
        accessTokenDto.setState(state);
        String accessToken = githubProvider.getAccessToken(accessTokenDto);
        GithubUser githubUser = githubProvider.getUser(accessToken);
        if (githubUser != null){
            User user = new User(); //获取用户信息
            String token = UUID.randomUUID().toString();  //想让token代替曾经的session
            user.setToken(token); //生成一个token,并将token放进user对象中,存入数据库
            user.setAccountId(String.valueOf(githubUser.getId()));
            user.setGmtCreat(System.currentTimeMillis());
            user.setGmtModified(user.getGmtCreate());
            user.setName(githubUser.getName());
            userMapper.insert(user); //存入数据库
            response.addCookie(new Cookie("token", token));
            //不加前缀的话,只会把页面渲染到index,但是用户信息会出现在地址上,加上后,相当于重定向到index页面,地址也会转回index
            return "redirect:/";
        }else {
            //登录失败,重新登录
            return "redirect:/";
        }
    }
}
此时因为删去了request,所以点击登录不会跳转出用户信息,但是application中已经得到了我们传过去的token
然后我们在indexCotroller中取到这个token用来获取session
@Controller //这个注解会让spring自动扫描这个类,并当成一个bean去管理
public class IndexController {
    @Autowired
    private UserMapper userMapper; //我们需要注入一个userMapper,因为这样才能访问User

    @GetMapping("/")
    public String hello(HttpServletRequest request){
        Cookie[] cookies = request.getCookies();//从服务器拿到我们传过去的cookies
        if (cookies != null){
            for (Cookie cookie:cookies) {
                if (cookie.getName().equals("token")){
                    String token = cookie.getValue();
                    User user = userMapper.findUserByToken(token);
                    if (user != null){
                        request.getSession().setAttribute("user", user);
                    }
                    break;
                }
            }
        }
        return "index";
    }
}
7. 集成Flyway Migration
1.(1)中实体类的bio实际上还没有用到,我们需要将它存入数据库中,则需要再进行一次表的添加操作,但是更多的属性需要添加呢?分模块合作时,每个人有不同的属性需要添加呢?手动的添加会耗费大量不必要的时间,因此我们集成Flyway Migration进行简化。
(1) 导入插件
<plugin>
    <groupId>org.flywaydbgroupId>
    <artifactId>flyway-maven-pluginartifactId>
    <version>6.2.4version>
    <configuration>
        <url>jdbc:h2:G:/ideawork/communityurl>
        <user>sauser>
        <password>123password>
    configuration>
    <dependencies>
        <dependency>
            <groupId>com.h2databasegroupId>
            <artifactId>h2artifactId>
            <version>1.4.199version>
        dependency>
    dependencies>
plugin>
(2) 创建第一个migration
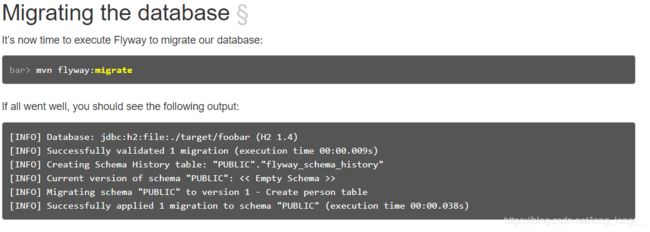
根据官方文档介绍,我们来到第二步
(3) 迁移数据库
在terminal执行mvn命令时出现,mvn非内部外部命令的报错,查了非常久的解决方法,却怎么也没有解决,最后解决后,将我的错误解决方法写在下边。
maven环境是一定要配好的,在cmd中执行mvn -v能正确输出版本号的情况下,idea的terminal却不能执行,网上说的方法是:
1.在用户变量(平时配的系统变量的上方)path中,加入idea下G:\IntelliJ IDEA 2019.1.3\plugins\maven\lib\maven3的路径(这是我的路径配置)
-
使用管理员身份启动idea
-
(以上两种方法我尝试了无数次都失败了,不过从原理上讲还是很有道理的,很多人都是这个错误,可惜我不是)我将系统变量中所有MAVEN_HOME改成了M2_HOME,重启idea就成功运行了。据说,是因为maven版本不够新,识别不了新版本maven路径,只能识别maven2的路径(但我觉得我的maven版本在写现在这个项目的时候应该还算新,具体原因可能还需要细细推敲)
在后面我大概是推出了原因,mavenhome还是需要放在javahome之后的,我因为给学弟演示配环境,重配了javahome在最末尾,可能是这个原因导致扫描不到
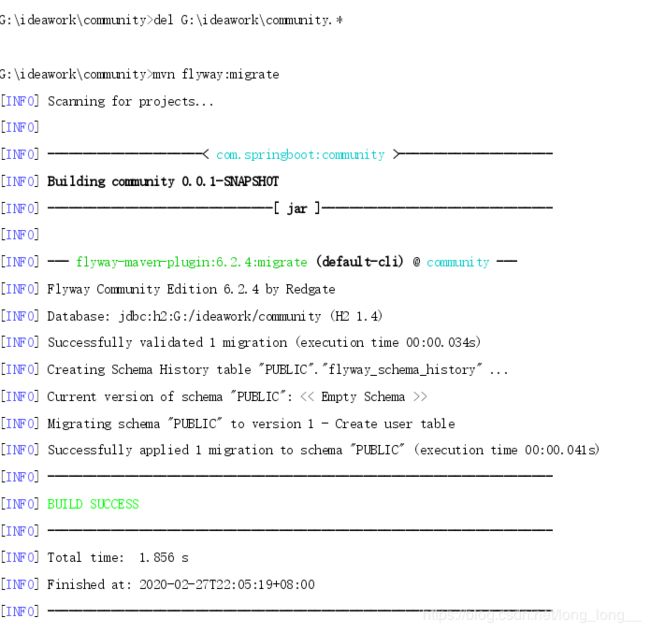
在terminal通过del G:\ideawork\community.*命令将之前的数据库先删去,利用flyway重新建表
此时各模块需要向数据库中添加信息可以通过创建sql文件,进行操作
ALTER TABLE USER add bio VARCHAR(256) NULL ;
控制台再次输入mvn flyway:migrate 命令
该表中会记录每一次对数据库的操作
在对git进行提交时,突然报错git非内部外部命令
而git的path我是确定装好的,我尝试着把git的path放到最后(因为我的javahome因为教学弟装环境重新装了一遍,在path的最后面),然后在启动就成功了。
我推测,javahome是这些利用java环境的前提,所以之前的maven报错,可能也是因为这个原因,导致原来可以识别maven现在只能识别M2了。
8. 使用Bootstrap编写发布问题页面
首先建立第一个文件夹,publish.html
充分利用bootstrap栅格系统及各组件进行html页面的设计
栅格系统是将整个页面分为纵向十二份,利用份数的分配来实现不同界面大小之间的自适应
建立community.css对部分样式进行改造
建立publishcontroller访问publish页面
9. 完成文章发布功能
首先,我们要完成数据库的设计
create table question
(
   id int auto_increment,
   title varchar(50),
   description text,
   gmt_create bigint,
   gmt_modified bigint,
   creator int,
   comment_count int default 0,
   view_count int default 0,
   like_count int default 0,
   tag varchar(256),
   constraint question_pk
      primary key (id)
);
再设计question的模型类,及他的getter和setter方法
public class Question {
    private Integer id;
    private String title;
    private String description;
    private Long gmtCreate;
    private Long gmtModified;
    private Integer creator;
    private String tag;
    private Integer viewCount;
    private Integer likeCount;
    private Integer commentCount;
并设计Mapper的insert方法,添加数据
@Mapper
public interface QuestionMapper {
    @Insert("insert into question (title, description, gmt_create, gmt_modified, creator, tag) values (#{title}, #{description}, #{gmtCreate}, #{gmtModified}, #{creator}, #{tag})")
    void create(Question question);
}
然后我们要完成文章发布界面的前端设计
<html xmlns:th="http://www.thymeleaf.org">
<head>
    <title>Communitytitle>
    <meta http-equiv="Content-Type" content="text/html; charset=UTF-8" />
    <link rel="stylesheet" href="css/bootstrap.min.css">
    <link rel="stylesheet" href="css/bootstrap-theme.min.css">
    <link rel="stylesheet" href="css/community.css">
    <script src="js/bootstrap.min.js" type="application/javascript">script>
head>
<body>
<nav class="navbar navbar-default">
    <div class="container-fluid">

        <div class="navbar-header">
            <button type="button" class="navbar-toggle collapsed" data-toggle="collapse" data-target="#bs-example-navbar-collapse-1" aria-expanded="false">
                <span class="sr-only">社区论坛span>
            button>
            <a class="navbar-brand" href="#">社区论坛a>
        div>


        <div class="collapse navbar-collapse" id="bs-example-navbar-collapse-1">
            <form class="navbar-form navbar-left">
                <div class="form-group">
                    <input type="text" class="form-control" placeholder="搜索话题">
                div>
                <button type="submit" class="btn btn-default">搜索button>
            form>
            <ul class="nav navbar-nav navbar-right">
                <li th:if="${session.user} != null">
                    <a href="/publish">发布a>
                li>
                <li th:if="${session.user} == null"><a href="https://github.com/login/oauth/authorize?client_id=d5c54e7e70dc5d5646a6&redirect_uri=http://localhost:8887/callback&scope=user&state=1">登录a>li>
                <li class="dropdown" th:if="${session.user} != null">
                    <a href="#" class="dropdown-toggle" data-toggle="dropdown" role="button" aria-haspopup="true" aria-expanded="false" th:text="${session.user.getName()}"> <span class="caret">span>a>
                    <ul class="dropdown-menu">
                        <li><a href="#">消息中心a>li>
                        <li><a href="#">个人资料a>li>
                        <li><a href="#">退出登录a>li>
                    ul>
                li>
            ul>
        div>
    div>
nav>
<div class="container-fluid main">
    <div class="row">
        <div class="col-lg-9 col-md-12 col-sm-12 col-xs-12">
            <h2><span class="glyphicon glyphicon-plus" aria-hidden="true">span>发起h2>
            <hr/>

            <form action="/publish" method="post">
                <div class="form-group">
                    <label for="title">问题标题(简单扼要):label>
                    <input type="text" class="form-control" th:value="${title}" id="title" name="title" placeholder="问题标题...">
                div>
                <div class="form-group">
                    <label for="description">问题补充 (必填,请参照右方提示):label>
                    <textarea name="description" th:value="${description}" id="description" class="form-control" cols="30" rows="10">textarea>
                div>
                <div class="form-group">
                    <label for="tag">添加标签:label>
                    <input type="text" class="form-control" th:value="${tag}" id="tag" name="tag" placeholder="请输入标签,以,号隔开">
                div>
                <div class="container-fluid main">
                    <div class="row">

                        <div class="alert alert-danger col-lg-9 col-md-12 col-sm-12 col-xs-12" th:if="${error} != null" th:text="${error}" >div>
                        <div class="col-lg-3 col-md-12 col-sm-12 col-xs-12"><button type="submit" class="btn btn-success btn-publish">发布button>div>
                    div>div>

            form>
        div>
        <div class="col-lg-3 col-md-12 col-sm-12 col-xs-12">
            <h3>问题发起指南h3>
            ·假装此处有描述<br>
            ·假装此处有描述<br>
            ·假装此处有描述<br>
        div>
    div>
div>
body>
html>
然后在publishConroller中接受到表单传来的值,并对错误信息首先进行判断,若没有错误,判断是否处于登陆状态,若处于正常登陆状态,贼将问题打包装入question对象中,并存入数据库。
@Controller
public class PublishController {
    //获得mapper
    @Autowired
    private QuestionMapper questionMapper;

    @Autowired
    //获得userMapper
    private UserMapper userMapper;

    @GetMapping("/publish") //get获得页面,post处理请求
    public String publish(){
        return "publish";
    }

    //接受到publish.html中传来的值,并进行以下操作
    @PostMapping("/publish")
    public String doPublish(
            @RequestParam("title") String title,
            @RequestParam("description") String description,
            @RequestParam("tag") String tag,
            HttpServletRequest request,
            Model model
    ){
        if(title == null || title == ""){
            model.addAttribute("error","标题不能为空");
            return "publish";
        }if(description == null || description == ""){
            model.addAttribute("error","问题补充不能为空");
            return "publish";
        }if(tag == null || tag == ""){
            model.addAttribute("error","标签不能为空");
            return "publish";
        }
        //model能在页面上直接获取到
        model.addAttribute("title", title);
        model.addAttribute("description", description);
        model.addAttribute("tag", tag);
        //拿到user对象,验证是否登录
        User user = null;
        Cookie[] cookies = request.getCookies();//从服务器拿到我们传过去的cookies
        if (cookies != null){
            for (Cookie cookie:cookies) {
                if (cookie.getName().equals("token")){
                    String token = cookie.getValue();
                    user = userMapper.findUserByToken(token);
                    if (user != null){
                        request.getSession().setAttribute("user", user);
                    }
                    break;
                }
            }
        }
        if(user == null){
            model.addAttribute("error","用户未登录");
            return "publish";
        }
        //注入question的值
        Question question = new Question();
        question.setTitle(title);
        question.setDescription(description);
        question.setTag(tag);
        question.setCreator(user.getId());
        question.setGmtCreate(System.currentTimeMillis());
        question.setGmtModified(question.getGmtCreate());

        //创建question对象
        questionMapper.create(question);
        //没有异常的话重定向回首页
        return "redirect:/";
    }
}
点击发布报空指针异常的话可以看我写的解决贴。
10. 添加Lombok支持
每次在实体类中添加一个属性,就要创建他的getter和setter方法,属性多起来的时候,这是非常麻烦的。
此时我们就可以使用Lombok插件,只需在实体类上打上@Data注解,他就会自动默认生成get和set方法。
注意idea版本不够新的话,也就是出现get和set标红报错的情况,需要到settings->plugin->市场中下载Lombok插件。
https://projectlombok.org/
该章节添加了头像属性,avatar_url
在设置user对象属性的环节均需要更新。
11. 首页问题列表功能
首先是前端页面设计,这里直接贴代码,不做过多描述。
<html xmlns:th="http://www.thymeleaf.org">
<head>
    <title>Communitytitle>
    <meta http-equiv="Content-Type" content="text/html; charset=UTF-8" />
    <link rel="stylesheet" href="css/bootstrap.min.css">
    <link rel="stylesheet" href="css/bootstrap-theme.min.css">
    <link rel="stylesheet" href="css/community.css">
    <script src="js/bootstrap.min.js" type="application/javascript">script>
head>
<body>
<nav class="navbar navbar-default">
    <div class="container-fluid">

        <div class="navbar-header">
            <button type="button" class="navbar-toggle collapsed" data-toggle="collapse" data-target="#bs-example-navbar-collapse-1" aria-expanded="false">
                <span class="sr-only">社区论坛span>
            button>
            <a class="navbar-brand" href="/">社区论坛a>
        div>


        <div class="collapse navbar-collapse" id="bs-example-navbar-collapse-1">
            <form class="navbar-form navbar-left">
                <div class="form-group">
                    <input type="text" class="form-control" placeholder="搜索话题">
                div>
                <button type="submit" class="btn btn-default">搜索button>
            form>
            <ul class="nav navbar-nav navbar-right">
                <li th:if="${session.user} != null">
                    <a href="/publish">发布a>
                li>
                <li th:if="${session.user} == null"><a href="https://github.com/login/oauth/authorize?client_id=d5c54e7e70dc5d5646a6&redirect_uri=http://localhost:8887/callback&scope=user&state=1">登录a>li>
                <li class="dropdown" th:if="${session.user} != null">
                    <a href="#" class="dropdown-toggle" data-toggle="dropdown" role="button" aria-haspopup="true" aria-expanded="false" th:text="${session.user.getName()}"> <span class="caret">span>a>
                    <ul class="dropdown-menu">
                        <li><a href="#">消息中心a>li>
                        <li><a href="#">个人资料a>li>
                        <li><a href="#">退出登录a>li>
                    ul>
                li>
            ul>
        div>
    div>
nav>
<div class="container-fluid main">
    <div class="row">
        <div class="col-lg-9 col-md-12 col-sm-12 col-xs-12">
            <h2><span class="glyphicon glyphicon-list" aria-hidden="true">span>发现h2>
            <hr/>
            <div class="media" th:each="question : ${question}">
                <div class="media-left">
                    <a href="#">
                        <img class="media-object img-rounded" th:src="${question.user.avatarUrl}">
                    a>
                div>
                <div class="media-body">
                    <h4 class="media-heading" th:text="${question.title}">h4>
                    <span th:text="${question.description}">span>
                    <span class="text-desc"><span th:text="${question.commentCount}">span> 个回复 •
                        <span th:text="${question.viewCount}">span> 次浏览 • <span th:text="${#dates.format(question.gmtCreate,'dd MMMM yyyy')}">span>span>
                div>
            div>
        div>
        <div class="col-lg-3 col-md-12 col-sm-12 col-xs-12">
            <h3>热门话题h3>
        div>
    div>
div>
body>
html>
其次是对应的indexCtroller,我们需要拿到question数据库中的信息,并以列表形式返回给前端页面。
@Autowired
private QuestionService questionService;

//获取首页问题信息,我们只能拿到question对象而不能直接拿到questionDto,所以就出现了service层
List<QuestionDto> questionList = questionService.list();
model.addAttribute("question", questionList);
在前端页面传输数据的过程中,我们遇到了图像信息传输失败的问题,经过debug发现驼峰命名法的数据都没有传输成功,所以引入了一个配置,将下划线命名法与驼峰命名法相适配。
mybatis.configuration.map-underscore-to-camel-case=true
questionService中,我们将它作为一个userMapper和questionMapper的组合器,用来将获取的questionDto对象装进列表。
//在这里不仅能使用questionMapper,还能使用userMapper,起到一个组装的作用
@Service
public class QuestionService {
    @Autowired
    private QuestionMapper questionMapper;
    @Autowired
    private UserMapper userMapper;
    public List<QuestionDto> list() {
        List<Question> questions = questionMapper.list();
        List<QuestionDto> questionDtoList = new ArrayList<>();
        for (Question question:questions) {
            //creator和user的id关联,拿到creator就是拿到user的id
           User user = userMapper.findById(question.getCreator());
           QuestionDto questionDto = new QuestionDto();
           //这个方法的作用是把question的所有属性copy进questionDto中
            BeanUtils.copyProperties(question, questionDto);
            questionDto.setUser(user);
            questionDtoList.add(questionDto);
        }
        return questionDtoList;
    }
}
questionDto类
@Data
public class QuestionDto {
    //和question近乎完全一样,作为一个过渡类,多了user,方便我们通过question直接获得到user中想要的属性
    private Integer id;
    private String title;
    private String description;
    private Long gmtCreate;
    private Long gmtModified;
    private Integer creator;
    private String tag;
    private Integer viewCount;
    private Integer likeCount;
    private Integer commentCount;
    private User user;
}
12. 问题答疑
这一p对原来的代码做了一些细微的修改
首先因为fastJson支持对驼峰命名法的转化,所以将下划线命名法直接改成了驼峰命名法
private String avatarUrl; //GithubUser

user.setAvatarUrl(githubUser.getAvatarUrl()); //AuthorizeController
其次是发布页面问题补充不能回显的问题,因为textarea中th:value不能回显,改用th:text即可,这里还查出我自己代码的一些问题,我的model放在错误判断之后,所以其实一直没有回显,在错误判断后直接返回错误信息,将model放到错误信息判断之前,即可回显。
//PublishController
//model能在页面上直接获取到,用于回显
model.addAttribute("title", title);
model.addAttribute("description", description);
model.addAttribute("tag", tag);
if(title == null || title == ""){
    model.addAttribute("error","标题不能为空");
    return "publish";
}if(description == null || description == ""){
    model.addAttribute("error","问题补充不能为空");
    return "publish";
}if(tag == null || tag == ""){
    model.addAttribute("error","标签不能为空");
    return "publish";
}
<textarea name="description" th:text="${description}" id="description" class="form-control" cols="30" rows="10">textarea>
13. 自动部署
Maven
    org.springframework.boot
    spring-boot-devtools
    true
然后在settings->compile中勾上[外链图片转存失败,源站可能有防盗链机制,建议将图片保存下来直接上传(img-lGd5CoQV-1583308864787)(C:\Users\lll\AppData\Roaming\Typora\typora-user-images\image-20200302162249087.png)]
然后Ctrl+Shift+Alt+?,选择Registry,打开idea系统配置页面,勾上[外链图片转存失败,源站可能有防盗链机制,建议将图片保存下来直接上传(img-jYcluLKR-1583308864796)(C:\Users\lll\AppData\Roaming\Typora\typora-user-images\image-20200302162437974.png)]
就成功开启了热部署,每次页面的改动,部分信息的输入,系统会自动更新,不需要再重启服务器尝试了。
当然,这会导致cpu占用内存提高,因为时时刻刻要更新,会导致配置较低的电脑变卡,所以如果小项目的话,也可以选择不开启。
14. 分页
我们需要一个对象,将当前页数,每个分页的列表数,以及之前获得的问题信息封装到一起,来完成分页。
于是创建了PaginationDto类
@Data
public class PaginationDto {
    private List<QuestionDto> questions;
    private Boolean showPrevious;
    private Boolean showFirstPage;
    private Boolean showNext;
    private Boolean showEndPage;
    private Integer page;
    private Integer totalPage;
    private List<Integer> pages = new ArrayList<>();

    public void setPagination(Integer totalCount, Integer page, Integer size) {
        if (totalCount % size == 0){
            totalPage = totalCount / size;
        }else{
            totalPage = totalCount / size + 1;
        }
        this.page = page;
        pages.add(page);
        for (int i=1; i<=3; i++){
            if (page - i > 0){
                pages.add(0, page - i);
            }
            if (page + i <= totalPage){
                pages.add(page + i);
            }
        }
        //是否展示上一页
        if (page == 1)
            showPrevious = false;
        else
            showPrevious = true;
        //是否展示下一页
        if (page == totalPage)
            showNext = false;
        else
            showNext = true;
        //是否展示第一页
        if (!pages.contains(1)){
            showFirstPage = true;
        }else {
            showFirstPage = false;
        }
        //是否展示最末页
        if(pages.contains(totalPage)){
            showEndPage = false;
        }else {
            showEndPage = true;
        }
    }
}
setPagination方法来自于QuestionService,我们再原先的基础上添加PaginationDto类,将原先的questionList存入这个类中,并传入我们需要的page和size信息,分别用于存入当前页和每页的记录条数。
@Service
public class QuestionService {
    @Autowired
    private QuestionMapper questionMapper;
    @Autowired
    private UserMapper userMapper;
    public PaginationDto list(Integer page, Integer size) {
        PaginationDto paginationDto = new PaginationDto();
        Integer totalCount = questionMapper.count(); //拿到所有数量
        paginationDto.setPagination(totalCount, page, size); //把所有需要的页面参数存起来
        //防止页面被改变出现-1等越界页面
        if (page < 1){
            page = 1;
        }else if (page > paginationDto.getTotalPage()){
            page = paginationDto.getTotalPage();
        }
        //这一页开头问题的序号
        Integer offset = size * (page - 1);
        List<Question> questions = questionMapper.list(offset, size); //查到每一页的列表
        List<QuestionDto> questionDtoList = new ArrayList<>();
        for (Question question:questions) {
            //creator和user的id关联,拿到creator就是拿到user的id
           User user = userMapper.findById(question.getCreator());
           QuestionDto questionDto = new QuestionDto();
           //这个方法的作用是把question的所有属性copy进questionDto中
            BeanUtils.copyProperties(question, questionDto);
            questionDto.setUser(user);
            questionDtoList.add(questionDto);
        }
        paginationDto.setQuestions(questionDtoList);
        return paginationDto;
    }
}
原先的list方法中添加了新的参数,并且多了新的方法用于查询总的记录条数,这些都需要在mapper接口中进行搜索。
List questions = questionMapper.list(offset, size); //查到每一页的列表
Integer totalCount = questionMapper.count(); //拿到所有数量
//要写一个能把首页问题获取到的方法,以offset为开头序号,每size分一页
@Select("select * from question limit #{offset}, #{size}")
List<Question> list(@Param(value = "offset") Integer offset, @Param(value = "size") Integer size);

//拿到最后一个问题的count
@Select("select count(1) from question;")
Integer count();
然后就是前端信息交互,首先我们需要拿到切换页面时变动的page和size(一般来说size不会变,但还是取到),这些交互在indexController中完成。
@Controller //这个注解会让spring自动扫描这个类,并当成一个bean去管理
public class IndexController {
    @Autowired
    private UserMapper userMapper; //我们需要注入一个userMapper,因为这样才能访问User

    @Autowired
    private QuestionService questionService;

    @GetMapping("/")
    public String hello(HttpServletRequest request,
                        Model model,
                        @RequestParam(name = "page", defaultValue = "1") Integer page,
                        @RequestParam(name = "size", defaultValue = "5") Integer size){
        Cookie[] cookies = request.getCookies();//从服务器拿到我们传过去的cookies
        if (cookies != null){
            for (Cookie cookie:cookies) {
                if (cookie.getName().equals("token")){
                    String token = cookie.getValue();
                    User user = userMapper.findUserByToken(token);
                    if (user != null){
                        request.getSession().setAttribute("user", user);
                    }
                    break;
                }
            }
        }
        //获取首页问题信息,我们只能拿到question对象而不能直接拿到questionDto,所以就出现了service层
        //pagination:此时获取到的已经是包含分页信息的整个对象了
        PaginationDto pagination = questionService.list(page, size);
        model.addAttribute("pagination", pagination);
        //每次index.html发起请求,都会反应到这个页面,
        return "index";
    }
}
最后就是前端界面的设计了,这里利用bookStrap官方文档中分页符的操作,并填以active高亮,利用转义字符显示’’<’‘和’’>’’,同时传输pagination中的各信息进行分页操作。因为涉及大量前端操作就不细讲了,有不会的可以问我,如果我能解答的话会回复的。尽量学会使用thymeleaf和bookstrap官方文档,谷歌浏览器Ctrl+F可以在页面快速查找关键字。
15. 页面拆解
其实就是对公共样式的抽取,相当于设一个函数将代码中重合的部分整合成一个方法。
在拆解页面前我们首先导入前期一直没有添加的jquery.js,这导致bookstrap中的交互功能很多报错不能实施。
thymeleaf中有相关的文档说明,页面搜索关键词fragment。
抽取模式:
<div th:fragment="copy">
      © 2011 The Good Thymes Virtual Grocery
    div>
插入模式:
<div th:insert="~{footer :: copy}">div>
在我们自己项目的具体例子:
<html xmlns:th="http://www.thymeleaf.org">

<body>

<div th:fragment="nav">
    <nav class="navbar navbar-default">
        <div class="container-fluid">

            <div class="navbar-header">
                <button type="button" class="navbar-toggle collapsed" data-toggle="collapse" data-target="#bs-example-navbar-collapse-1" aria-expanded="false">
                    <span class="sr-only">社区论坛span>
                button>
                <a class="navbar-brand" href="/">社区论坛a>
            div>


            <div class="collapse navbar-collapse" id="bs-example-navbar-collapse-1">
                <form class="navbar-form navbar-left">
                    <div class="form-group">
                        <input type="text" class="form-control" placeholder="搜索话题">
                    div>
                    <button type="submit" class="btn btn-default">搜索button>
                form>
                <ul class="nav navbar-nav navbar-right">
                    <li th:if="${session.user} != null">
                        <a href="/publish">提问a>
                    li>
                    <li th:if="${session.user} == null"><a href="https://github.com/login/oauth/authorize?client_id=d5c54e7e70dc5d5646a6&redirect_uri=http://localhost:8887/callback&scope=user&state=1">登录a>li>
                    <li class="dropdown" th:if="${session.user} != null">
                        <a href="#" class="dropdown-toggle" data-toggle="dropdown" role="button" aria-haspopup="true" aria-expanded="false">
                            <span th:text="${session.user.getName()}">span>
                            <span class="caret">span>a>
                        <ul class="dropdown-menu">
                            <li><a href="/profile/questions">我的问题a>li>
                            <li><a href="#">退出登录a>li>
                        ul>
                    li>
                ul>
            div>
        div>
    nav>
div>

body>

html>
插入语句:
<div th:insert="~{navigation :: nav}">div>
16. 个人发布列表的实现
这一p是建立一个类似个人中心的页面,前端页面可参考github中的源码,对应的我们需要一个controller,来将有关用户自己发布的信息筛选出来,并仿照之前首页的格式,将每个问题陈列出来。注意点是对之前分页逻辑运算的部分需要修改,以符合新的计算需要。
此次改动的文件:
-
QuestionService.java
-
PaginationDto.java
-
QuestionMapper.java
-
community.css
新建文件:
- ProfileController.java
- profile.html
17. 拦截器
因为我们之前每一次controller几乎都要首先调用同一段cookies进行判断,确认用户是否处于登录状态,这造成了代码的冗余,所以我们引入拦截器概念,它可以对所有的地址跳转进行拦截,我们把cookie的判断放入拦截器中,并且将它的返回值设成true,默认不拦截任何值。
-
这里遇到了一个问题,就是我的css样式,在设置完拦截器后被拦截。解决方法是将WebConfig中的@EnableMvc去了,这个注解默认全面接管springmvc,并会取消所有默认配置
-
在添加拦截器pre、post、after方法时,windows的快捷键是Ctrl+o
修改完后的拦截器配置代码如下:
@Configuration
public class WebConfig implements WebMvcConfigurer {
    @Autowired
    private SessionInterceptor sessionInterceptor;
    //实现拦截器 要拦截的路径以及不拦截的路径
    @Override
    public void addInterceptors(InterceptorRegistry registry) {
        //注册自定义拦截器,添加拦截路径和排除拦截路径

        registry.addInterceptor(sessionInterceptor).addPathPatterns("/**");
    }
}
此次改动的文件(主要是将所有cookie的判断移入了拦截器中,统一在拦截器中获取user的值):
- IndexController.java
- ProfileController.java
- PublishController.java
新建文件:
- WebConfig.java
- SessionInterceptor.java
18. 问题详情页面
这一p完成了问题详情页面,也就是点击首页的问题,能够进入观看到问题的详细说明,包括侧栏的发起人和相关问题。
除了对question页面跳转的控制文件,几乎全部是前端页面的设计,就不细讲了。
此次改动的文件(附上部分改动的代码):
-
QuestionService.java(获得questionDto对象)
-
public QuestionDto getQuestionDtoById(Integer id) {
    Question question = questionMapper.getQuestionDtoById(id);
    QuestionDto questionDto = new QuestionDto();
    BeanUtils.copyProperties(question, questionDto);
    User user = userMapper.findById(question.getCreator());
    questionDto.setUser(user);
    return questionDto;
}
-
-
QuestionMapper.java(在数据库查找并返回一个确定id的question对象)
-
@Select("select * from question where id = #{id}")
Question getQuestionDtoById(Integer id);
-
-
community.css(编辑部分额外需要的样式)
-
.community-menu{
    color: #999;
    font-size: 13px;
}
-
新建文件:
-
question.html
-
QuestionController.java(获取questionDto对象并注入传给前端)
-
@Controller
public class QuestionController {
    @Autowired
    private QuestionService questionService;
    @GetMapping("/question/{id}")
    public String question(@PathVariable(name = "id") Integer id,
                           Model model){
        QuestionDto questionDto = questionService.getQuestionDtoById(id);
        model.addAttribute("question", questionDto);
        return "question";
    }
}
-
19. 退出登录
这一p主要做了个人栏中退出登录这一部分,退出登录时会清除页面的cookie和session。同时,修复了每次登录都会创建一个新的accoutId相同的用户数据,改为用户如果存在则更新信息,不存在才插入。
此次改动的文件:
- AuthorizeController.java
userService.createOrUpdate(user); //将原先的直接插入改成插入或更新


 @GetMapping("/logout")
    public String logout(HttpServletResponse response,
                         HttpServletRequest request){
        request.getSession().removeAttribute("user");
        Cookie cookie = new Cookie("token", null);
        cookie.setMaxAge(0);
        response.addCookie(cookie);
        return "redirect:/";
    }
新建文件:
- UserService.java(插入或更新)
@Service
public class UserService {
    @Autowired
    private UserMapper userMapper;

    public void createOrUpdate(User user) {
        User dbUser = userMapper.findUserByAccountId(user.getAccountId());
        if (dbUser == null){
            user.setGmtCreate(System.currentTimeMillis());
            user.setGmtModified(user.getGmtCreate());
            //插入
            userMapper.insert(user);
        }else {
            //更新
            dbUser.setAvatarUrl(user.getAvatarUrl());
            dbUser.setName(user.getName());
            dbUser.setGmtModified(System.currentTimeMillis());
            dbUser.setToken(user.getToken());
            userMapper.update(dbUser);
        }
    }
}
20. 隐藏域
<input type="hidden" name="id" th:value="${id}">
我需要页面回显的时候将id传回给我,但我不需要它显示在页面上,这时我们就可以使用hidden将它隐藏。
21. 集成mybatis generator
mybatis generator 官方文档
数据库结构改动时,对于不同需求的查找,以及曾经有过但需要更新属性的增删改查等,都需要重新在mapper上进行修改,为了避免这种麻烦,使系统自动生成对应的mapper方法,我们添加了mybatis generator插件。
导入插件
<plugin>
    <groupId>org.mybatis.generatorgroupId>
    <artifactId>mybatis-generator-maven-pluginartifactId>
    <version>1.4.0version>
    <dependencies>
       <dependency>
           <groupId>com.h2databasegroupId>
           <artifactId>h2artifactId>
           <version>1.4.199version>
       dependency>
    dependencies>
plugin>
根据官方文档对generator.xml内的配置信息进行改动后,每次只需对应增加一条语句,则可自动生成对应的mapper。
<table tableName="user" domainObjectName="User" >table>
<table tableName="question" domainObjectName="Question" >table>
添加完后执行terminal命令。
mvn -Dmybatis.generator.overwrite=true mybatis-generator:generate
照着老师的步骤一步步检查下来,仍然报Table configuration with catalog null, schema null, and table question did not resolve to any tables错误。
去数据库检查发现,我数据库的两张表全都不存在了,重新创建完表后,成功运行。
22. 异常处理
通用上下文异常处理
@ControllerAdvice
public class CustomizeExceptionHandler {
    @ExceptionHandler(Exception.class)
    ModelAndView handle(Throwable ex, Model model) {
        if (ex instanceof CustomizeException){
            model.addAttribute("message", ex.getMessage());
        }else {
            model.addAttribute("message", "服务器冒烟了,要不你稍后再试试!!!");
        }
        return new ModelAndView("error");
    }
}
对应拦截器拦截不到的异常,例如4xx、5xx之类的,需要我们自定义exception包和对应的controller类去处理。
@RequestMapping(
            produces = {"text/html"}
    )
    public ModelAndView errorHtml(HttpServletRequest request, Model model) {
        HttpStatus status = this.getStatus(request);
        if (status.is4xxClientError()){
            model.addAttribute("message", "你这个请求错了吧,要不换个姿势");
        }
        if (status.is5xxServerError()){
            model.addAttribute("message", "服务器冒烟了,要不你稍后再试试!!!");
        }
        return new ModelAndView("error");
    }
23. 增加阅读数的并发问题
这一p我们添加了阅读数的自增功能,但当多人同时阅读时,他们拿到的是当前数据库的同一个数值,比如四个人同时阅读,最后阅读数只会自增一。
所以我们自定义一个mapper方法,保证阅读数VIEW_COUNT的自增每次都会拿到数据库最新的数据自增,通过这个方法来处理并发问题。
  <update id="incView" parameterType="com.springboot.community.model.Question">
    update QUESTION
    set
    VIEW_COUNT = VIEW_COUNT + #{viewCount,jdbcType=INTEGER}
    where ID = #{id}
  update>
24. 实现回复
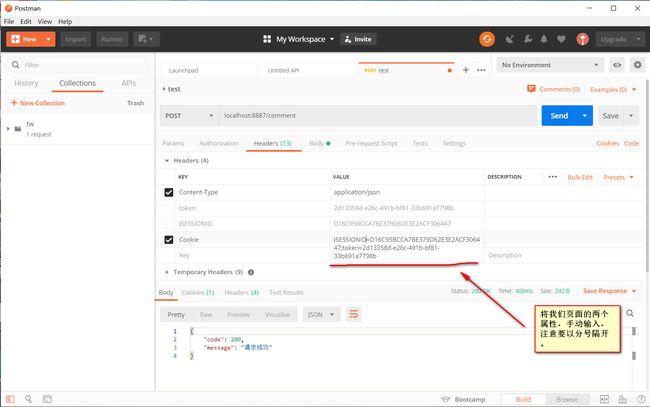
postman软件
使用软件而不是使用插件,会出现user一直为空的问题,这时候我们需要在软件的header中,手动地将cookie传给postman。
