ELK集群搭建及logstash+kibana展示--elasticsearch
第一篇:logstash安装加简单配置
https://blog.csdn.net/mayancheng7/article/details/84754571
第二篇:elasticsearch安装加简单配置
https://blog.csdn.net/mayancheng7/article/details/84767669
第三篇:kibana安装加简单配置
https://blog.csdn.net/mayancheng7/article/details/84771319
官网地址:https://www.elastic.co/cn/downloads
下载链接,最新版的6.5.1。
此处约定es端口为9210,head端口为9220
Elasticsearch Kibana Logstash 记得版本保持一致
wget https://artifacts.elastic.co/downloads/logstash/logstash-6.5.1.tar.gz
wget https://artifacts.elastic.co/downloads/elasticsearch/elasticsearch-6.5.1.tar.gz
wget https://artifacts.elastic.co/downloads/kibana/kibana-6.5.1-linux-x86_64.tar.gz
机器list
| ip | logstash | elasticsearch | Kibana |
| 192.168.3.17 | √ | √ | √ |
| 192.168.3.16 | × | √ | × |
| 192.168.3.18 | × | √ | × |
解压elasticsearch
tar zxvf elasticsearch-6.5.1.tar.gz配置elasticsearch允许head插件跨域访问,此处将所有配置一次性贴出
vim elasticsearch-6.5.1/config/elasticsearch.yml
cluster.name: elk                       #自定义集群名,相同集群内的节点设置相同的集群名
node.name: 192.168.3.17                 #自定义节点名,建议统一采用节点hostname
node.master: true			#true为参加master竞选,false为有投票权,但是不会参加竞选
path.data: /home/yx/ma/elasticsearch-6.5.1/lib  #data存储路径,默认为/var/lib/elasticsearch
path.logs: /home/yx/ma/elasticsearch-6.5.1/logs  #log存储路径,默认为/var/log/elasticsearch
network.host: 0.0.0.0           #es监听地址,采用0.0.0.0,允许所有设备访问
http.port: 9210                         #es监听端口,默认为9200
discovery.zen.ping.unicast.hosts: [192.168.3.18,192.168.3.16]                #集群节点发现列表,可用ip的形式
discovery.zen.minimum_master_nodes: 3   #集群可做master的最小节点数
#跨域访问允许的域名地址,使用正则表达式
http.cors.allow-origin: "*"
http.cors.enabled: true                         #开启跨域访问支持,默认为false
bootstrap.memory_lock: false					#默认为true
bootstrap.system_call_filter: false				#默认为true
另外找两台机器3.16和3.18做集群测试,同样的步骤,配置文件注意修改下边这几个,其它的直接粘贴就好。
node.name: 192.168.3.17                 #自定义节点名,建议统一采用节点hostname
discovery.zen.ping.unicast.hosts: [192.168.3.18,192.168.3.16]                #集群节点发现列表,可用ip的形式
3.16的配置
vim elasticsearch-6.5.1/config/elasticsearch.yml
cluster.name: elk                       #自定义集群名,相同集群内的节点设置相同的集群名
node.name: 192.168.3.16                 #自定义节点名,建议统一采用节点hostname
node.master: true						#true为参加master竞选,false为有投票权,但是不会参加竞选
path.data: /home/yx/ma/elasticsearch-6.5.1/lib  #data存储路径,默认为/var/lib/elasticsearch
path.logs: /home/yx/ma/elasticsearch-6.5.1/logs  #log存储路径,默认为/var/log/elasticsearch
network.host: 0.0.0.0           #es监听地址,采用0.0.0.0,允许所有设备访问
http.port: 9210                         #es监听端口,默认为9200
discovery.zen.ping.unicast.hosts: [192.168.3.18,192.168.3.17]                #集群节点发现列表,可用ip的形式
discovery.zen.minimum_master_nodes: 3   #集群可做master的最小节点数
#跨域访问允许的域名地址,使用正则表达式
http.cors.allow-origin: "*"
http.cors.enabled: true                         #开启跨域访问支持,默认为false
bootstrap.memory_lock: false					#默认为true
bootstrap.system_call_filter: false				#默认为true
3.18的配置
vim elasticsearch-6.5.1/config/elasticsearch.yml
cluster.name: elk                       #自定义集群名,相同集群内的节点设置相同的集群名
node.name: 192.168.3.18                 #自定义节点名,建议统一采用节点hostname
node.master: true						#true为参加master竞选,false为有投票权,但是不会参加竞选
path.data: /home/yx/ma/elasticsearch-6.5.1/lib  #data存储路径,默认为/var/lib/elasticsearch
path.logs: /home/yx/ma/elasticsearch-6.5.1/logs  #log存储路径,默认为/var/log/elasticsearch
network.host: 0.0.0.0           #es监听地址,采用0.0.0.0,允许所有设备访问
http.port: 9210                         #es监听端口,默认为9200
discovery.zen.ping.unicast.hosts: [192.168.3.17,192.168.3.16]                #集群节点发现列表,可用ip的形式
discovery.zen.minimum_master_nodes: 3   #集群可做master的最小节点数
#跨域访问允许的域名地址,使用正则表达式
http.cors.allow-origin: "*"
http.cors.enabled: true                         #开启跨域访问支持,默认为false
bootstrap.memory_lock: false					#默认为true
bootstrap.system_call_filter: false				#默认为true
启动elasticsearch服务。此处启动方式为nohup ,要注意不和logstash冲突。
./bin/elasticsearch -d //后台启动,不占用输入输出位置,首次启动建议不加-d,前台启动方便排错验证es
浏览器输入:http://192.168.3.17:9210/_cat/health?v

此处可以忽略,只是针对5.0之前的说明
5.0以后的版本和之前的版本在安装head插件上有一些区别,之前的版本安装head插件很容易,只需要运行
elasticsearch/bin/plugin -install mobz/elasticsearch-head就可以了,但是5.0之后,head插件换成了采用grunt服务方式启动,需要用npm方式打包安装,稍微复杂一些。
安装nodejs
wget https://nodejs.org/dist/v8.9.3/node-v8.9.3-linux-x64.tar.xz
xz -d node-v8.9.3-linux-x64.tar.xz
tar xf node-v8.9.3-linux-x64.tar
sudo vim /etc/profile
export NODE_HOME="/home/yx/ma/node-v8.9.3-linux-x64/bin/"
export NODE_PATH="/home/yx/ma/node-v8.9.3-linux-x64/lib/node_modules/"
export PATH=$NODE_HOME:$NODE_PATH:$PATH
source /etc/profile
node -v                                             //查看已经成功
    v8.9.3
安装head插件
npm install -g grunt-cli
grunt -V
grunt-cli v1.3.2
安装head
cd elasticsearch-6.5.1/
git clone git://github.com/mobz/elasticsearch-head.git
cd elasticsearch-head
npm install        //如下信息,安装成功。
npm WARN deprecated [email protected]: CoffeeScript on NPM has moved to "coffeescript" (no hyphen)
npm WARN notice [SECURITY] lodash has the following vulnerability: 1 low. Go here for more details: https://nodesecurity.io/advisories?search=lodash&version=3.10.1 - Run `npm i npm@latest -g` to upgrade your npm version, and then `npm audit` to get more info.
npm WARN notice [SECURITY] lodash has the following vulnerability: 1 low. Go here for more details: https://nodesecurity.io/advisories?search=lodash&version=2.4.2 - Run `npm i npm@latest -g` to upgrade your npm version, and then `npm audit` to get more info.
npm WARN notice [SECURITY] debug has the following vulnerability: 1 low. Go here for more details: https://nodesecurity.io/advisories?search=debug&version=2.2.0 - Run `npm i npm@latest -g` to upgrade your npm version, and then `npm audit` to get more info.
npm WARN notice [SECURITY] lodash has the following vulnerability: 1 low. Go here for more details: https://nodesecurity.io/advisories?search=lodash&version=4.3.0 - Run `npm i npm@latest -g` to upgrade your npm version, and then `npm audit` to get more info.
npm WARN deprecated [email protected]: Use the built-in module in node 9.0.0 or newer, instead
npm WARN notice [SECURITY] ws has the following vulnerabilities: 2 high. Go here for more details: https://nodesecurity.io/advisories?search=ws&version=1.0.1 - Run `npm i npm@latest -g` to upgrade your npm version, and then `npm audit` to get more info.
npm WARN notice [SECURITY] debug has the following vulnerability: 1 low. Go here for more details: https://nodesecurity.io/advisories?search=debug&version=0.7.4 - Run `npm i npm@latest -g` to upgrade your npm version, and then `npm audit` to get more info.
npm WARN notice [SECURITY] parsejson has the following vulnerability: 1 high. Go here for more details: https://nodesecurity.io/advisories?search=parsejson&version=0.0.1 - Run `npm i npm@latest -g` to upgrade your npm version, and then `npm audit` to get more info.
npm WARN notice [SECURITY] negotiator has the following vulnerability: 1 high. Go here for more details: https://nodesecurity.io/advisories?search=negotiator&version=0.4.9 - Run `npm i npm@latest -g` to upgrade your npm version, and then `npm audit` to get more info.
> [email protected] install /home/yx/ma/elasticsearch-6.5.1/elasticsearch-head/node_modules/phantomjs-prebuilt
> node install.js
PhantomJS not found on PATH
Downloading https://github.com/Medium/phantomjs/releases/download/v2.1.1/phantomjs-2.1.1-linux-x86_64.tar.bz2
Saving to /tmp/phantomjs/phantomjs-2.1.1-linux-x86_64.tar.bz2
Receiving...
[========================================] 100%
Received 22866K total.
Extracting tar contents (via spawned process)
Removing /home/yx/ma/elasticsearch-6.5.1/elasticsearch-head/node_modules/phantomjs-prebuilt/lib/phantom
Copying extracted folder /tmp/phantomjs/phantomjs-2.1.1-linux-x86_64.tar.bz2-extract-1543401791634/phantomjs-2.1.1-linux-x86_64 -> /home/yx/ma/elasticsearch-6.5.1/elasticsearch-head/node_modules/phantomjs-prebuilt/lib/phantom
Writing location.js file
Done. Phantomjs binary available at /home/yx/ma/elasticsearch-6.5.1/elasticsearch-head/node_modules/phantomjs-prebuilt/lib/phantom/bin/phantomjs
npm notice created a lockfile as package-lock.json. You should commit this file.
npm WARN [email protected] license should be a valid SPDX license expression
npm WARN optional SKIPPING OPTIONAL DEPENDENCY: [email protected] (node_modules/fsevents):
npm WARN notsup SKIPPING OPTIONAL DEPENDENCY: Unsupported platform for [email protected]: wanted {"os":"darwin","arch":"any"} (current: {"os":"linux","arch":"x64"})配置head文件
vim elasticsearch-6.5.1/elasticsearch-head/_site/app.js
4354                         this.base_uri = this.config.base_uri || this.prefs.get("app-base_uri") || "http://192.168.3.17:9210";    //es服务器的ip
vim elasticsearch-6.5.1/elasticsearch-head/Gruntfile.js
90 connect: {
91 server: {
92 options: {
93 hostname: '0.0.0.0',
94 port: 9220, //head本身的端口,注意配置文件里删除本说明和前边的行数显示。
95 base: '.',
96 keepalive: true
97 }
98 }
99 }启动head服务
#可以采用screen放在后台运行,不然退出ssh后grunt进程就关闭了。此处必须进入head目录执行
cd elasticsearch-6.5.1/elasticsearch-head
grunt server &
如下显示就成功启动了
yx@ceshi3-17:~/ma/elasticsearch-6.5.1/elasticsearch-head$ grunt server &
[2] 5551
yx@ceshi3-17:~/ma/elasticsearch-6.5.1/elasticsearch-head$ (node:5551) ExperimentalWarning: The http2 module is an experimental API.
Running "connect:server" (connect) task
Waiting forever...
Started connect web server on http://localhost:9220
服务访问
http://192.168.3.17:9220/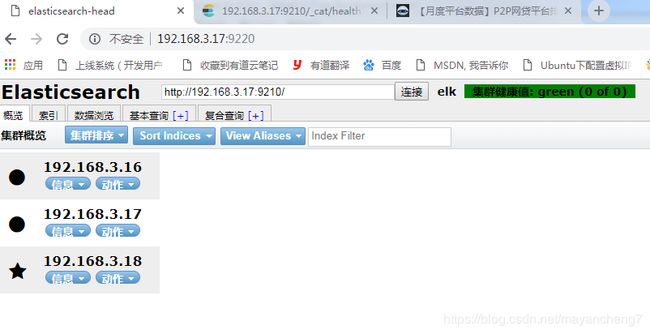
到此,elasticsearch安装完成,以下为附加知识点
查看elasticsearch版本命令
curl -XGET 192.168.3.17:9210
{
  "name" : "192.168.3.17",
  "cluster_name" : "elk",
  "cluster_uuid" : "Fap2j8J2TfWnucuSlrA5Cw",
  "version" : {
    "number" : "6.5.1",
    "build_flavor" : "default",
    "build_type" : "tar",
    "build_hash" : "8c58350",
    "build_date" : "2018-11-16T02:22:42.182257Z",
    "build_snapshot" : false,
    "lucene_version" : "7.5.0",
    "minimum_wire_compatibility_version" : "5.6.0",
    "minimum_index_compatibility_version" : "5.0.0"
  },
  "tagline" : "You Know, for Search"
}
报错1

vim config/elasticsearch.yml
http.cors.allow-origin: "*"
http.cors.enabled: true                         #开启跨域访问支持,默认为false
报错2
ERROR: [3] bootstrap checks failed
[1]: max file descriptors [65535] for elasticsearch process is too low, increase to at least [65536]
解决方法
原因:最大虚拟内存太小
解决方案:切换到root用户下,修改配置文件sysctl.conf

sudo vim /etc/sysctl.conf

添加下面配置:
vm.max_map_count=65536        //此处具体数值大小建议填写报错建议的数值
并执行命令:
sysctl -p
报错3
[2]: memory locking requested for elasticsearch process but memory is not locked解决方法
原因:锁定内存失败

解决方案:
切换到root用户,编辑limits.conf配置文件, 添加类似如下内容:
sudo vim /etc/security/limits.conf

添加如下内容:
* soft memlock unlimited
* hard memlock unlimited
备注:* 代表Linux所有用户名称

保存、退出、重新登录才可生效
临时取消限制
ulimit -l unlimited
报错4
[3]: system call filters failed to install; check the logs and fix your configuration or disable system call filters at your own risk
解决方法
问题原因:因为Centos6不支持SecComp

SecComp是Linux kernel (自从2.6.23版本之后)所支持的一种简洁的sandboxing机制。它能使一个进程进入到一种“安全”运行模式,该模式下的进程只能调用4种系统调用(system calls),即read(), write(), exit()和sigreturn(),否则进程便会被终止。

而ES5.2以后的版本默认bootstrap.system_call_filter为true进行检测,所以导致检测失败,失败后直接导致ES不能启动。
详见 :https://github.com/elastic/elasticsearch/issues/22899
System call filter settingedit
Elasticsearch has attempted to install a system call filter since version 2.1.0. These are enabled by default and could be disabled via bootstrap.seccomp. The naming of this setting is poor since seccomp is specific to Linux but Elasticsearch attempts to install a system call filter on various operating systems. Starting in Elasticsearch 5.2.0, this setting has been renamed to bootstrap.system_call_filter. The previous setting is still support but will be removed in Elasticsearch 6.0.0.

解决方法:在elasticsearch.yml中配置bootstrap.system_call_filter为false,注意要在Memory下面:
bootstrap.memory_lock: false
bootstrap.system_call_filter: false
参考链接:
https://blog.csdn.net/buqutianya/article/details/72026768
https://blog.csdn.net/Hey_WonderfulWorld/article/details/73612929
https://blog.csdn.net/haixwang/article/details/80383942
https://www.cnblogs.com/zhaojiankai/p/7224888.html