Ubuntu18.04 源码编译OpenCV4.1.1
Ubuntu18.04 源码编译OpenCV4.1.1
- 1. 依赖库安装:
- 2. 源码编译
- 3. 环境配置
- 3.1 命令行编译
- 3.2 IDE配置
官方的安装教程:
https://docs.opencv.org/4.1.1/d7/d9f/tutorial_linux_install.html
1. 依赖库安装:
[compiler] sudo apt-get install build-essential
[required] sudo apt-get install cmake git libgtk2.0-dev pkg-config libavcodec-dev libavformat-dev libswscale-dev
[optional] sudo apt-get install python-dev python-numpy libtbb2 libtbb-dev libjpeg-dev libpng-dev libtiff-dev libjasper-dev libdc1394-22-dev
其中安装libjasper-dev时可能会报错:
E: Unable to locate package libjasper-dev
解决方法:
sudo add-apt-repository "deb http://security.ubuntu.com/ubuntu xenial-security main"
sudo apt update
sudo apt install libjasper1 libjasper-dev
其中libjasper1是libjasper-dev的依赖包
2. 源码编译
下载最新版OpenCV和opencv_contrib的源码:
git clone https://github.com/opencv/opencv.git
git clone https://github.com/opencv/opencv_contrib.git
下面说一下本人缺少的库:
GStreamer
sudo apt-get install libgstreamer1.0-0 gstreamer1.0-plugins-base gstreamer1.0-plugins-good gstreamer1.0-plugins-bad gstreamer1.0-plugins-ugly gstreamer1.0-libav gstreamer1.0-doc gstreamer1.0-tools
sudo apt-get -y install libgstreamer-plugins-base1.0-dev
sudo apt-get -y install libgstreamer1.0-dev
avresample
sudo apt-get install libavresample-dev
lapack
sudo apt-get install gfortran
下载lapack源码并解压缩,然后把make.inc.example复制并改名为make.inc,打开终端,输入make。(如果需要具体配置,可翻阅http://www.netlib.org/lapack/lawnspdf/lawn81.pdf)
在安装lapack的时候,还遇到了以下错误:
Makefile:463: recipe for target 'znep.out' failed
ulimit -s unlimited
GTK support
sudo apt-get install libgtkglext1 libgtkglext1-dev
以下给出本人编译时的参数:
cmake -DCMAKE_BUILD_TYPE=Release -DCMAKE_INSTALL_PREFIX=/usr/local -DOPENCV_GENERATE_PKGCONFIG=ON -DOPENCV_EXTRA_MODULES_PATH=/home/xxx/opencv_contrib-master/modules -DBUILD_DOCS=ON -DBUILD_EXAMPLES=ON -DINSTALL_C_EXAMPLES=ON -DWITH_GSTREAMER=ON -DOPENCV_ENABLE_NONFREE=ON -DBUILD_opencv_python2=OFF -DBUILD_opencv_python3=OFF -DWITH_LAPACK=ON -DWITH_EIGEN=ON -DWITH_OPENGL=ON -DWITH_CUDA=ON -WITH_CUFFT=ON -DWITH_CUBLAS=ON -DWITH_CUDNN=ON -WITH_NVCUVID=ON ..
其中,OPENCV_EXTRA_MODULES_PATH是opencv_contrib的下载路径
3. 环境配置
3.1 命令行编译
首先是一份比较完整阐述环境配置的教程可供参考:https://cv-tricks.com/installation/opencv-4-1-ubuntu18-04/
参照Step9,打开编译好的opencv路径中的opencv/build/unix-install/opencv4.pc,修改其中的includedir_old:
prefix=/usr/local
exec_prefix=${prefix}
libdir=${exec_prefix}/lib
includedir_old=${prefix}/include/opencv4/opencv       <= You have to modify this line
includedir_new=${prefix}/include/opencv4
参照Step10,将修改后的opencv4.pc复制到相应位置:
# Create a new directory ‘pkgconfig’ in the location /usr/local/lib/
cd /usr/local/lib/
mkdir pkgconfig

# Move or Copy the opencv4.pc file to the newly created directory
sudo cp ~/Desktop/opencv/build/unix-install/opencv4.pc /usr/local/lib/pkgconfig/
参照Step11,修改系统路径:
# Open .bashrc file
sudo vi ~/.bashrc

# Add the following 2 lines at the end of the file i.e. copy the following lines at the end of .bashrc file.
PKG_CONFIG_PATH=$PKG_CONFIG_PATH:/usr/local/lib/pkgconfig
export PKG_CONFIG_PATH
参照Step13,测试C++编译:
#include "opencv.hpp"

using namespace cv;
using namespace std;

int main( int argc, char** argv )
{
  cout << "OpenCV version : " << CV_VERSION << endl;
  cout << "Major version : " << CV_MAJOR_VERSION << endl;
  cout << "Minor version : " << CV_MINOR_VERSION << endl;
  cout << "Subminor version : " << CV_SUBMINOR_VERSION << endl;
}
在命令行中输入:
 #Compile the program to generate the executable file
g++ -std=c++11 test.cpp `pkg-config --libs --cflags opencv4` -o result

#Execute the program.
./result
3.2 IDE配置
本人使用的IDE是Nsight Eclipse Edition。
具体配置参考:https://devtalk.nvidia.com/default/topic/1010145/jetson-tx1/how-to-use-opencv3-1-with-nvidia-nsight-/post/5157413/#5157413
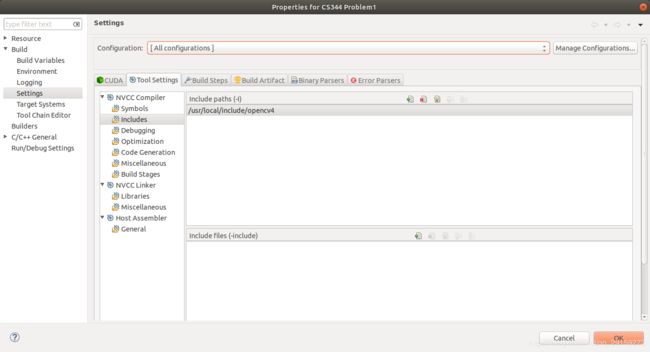
打开Project-->Properties-->Settings,首先是在include中添加opencv的路径:/usr/local/include/opencv4

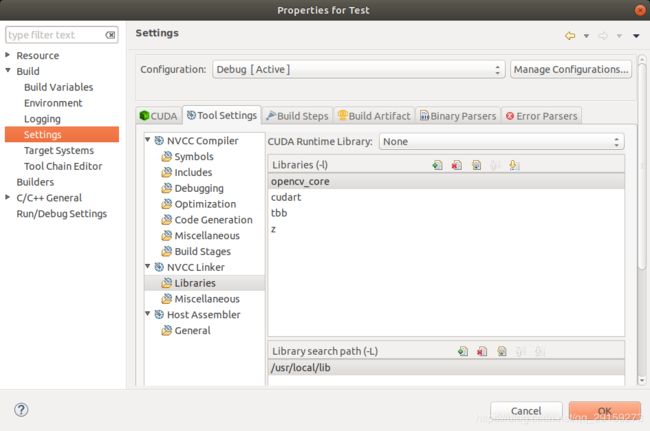
然后在NVCC Linker-->Libraries中添加library:opencv_core、cudart、tbb、z,并且添加library路径:/usr/local/lib

以上在配置时要注意配置的是Debug还是Release,可以选择[All configurations]同时对二者进行配置