Hadoop学习记录(九、Flume安装与使用)
原理详见http://www.cnblogs.com/zhangyinhua/p/7803486.html
1.Flume安装
1.1官网上下载一个稳定版本并解压
1.2添加配置变量
vim /etc/profileexport FLUME_HOME=/usr/local/flume-1.8.0
export PATH=$FLUME_HOME/bin:$PATH1.3添加jdk配置
cp conf/flume-env.sh.template conf/flume-env.sh
vi conf/flume-env.sh
export JAVA_HOME=/usr/lib/jvm/java-1.8.0-openjdk-1.8.0.191.b12-0.el7_5.x86_641.4验证
2.Flume使用demo
2.1在bin目录下新建一个配置文件
vim example.conf# example.conf: A single-node Flume configuration
# Name the components on this agent
a1.sources = r1
a1.sinks = k1
a1.channels = c1
# Describe/configure the source
a1.sources.r1.type = netcat
a1.sources.r1.bind = localhost
a1.sources.r1.port = 44444
# Describe the sink
a1.sinks.k1.type = logger
# Use a channel which buffers events in memory
a1.channels.c1.type = memory
a1.channels.c1.capacity = 1000
a1.channels.c1.transactionCapacity = 100
# Bind the source and sink to the channel
a1.sources.r1.channels = c1
a1.sinks.k1.channel = c12.2启动flume
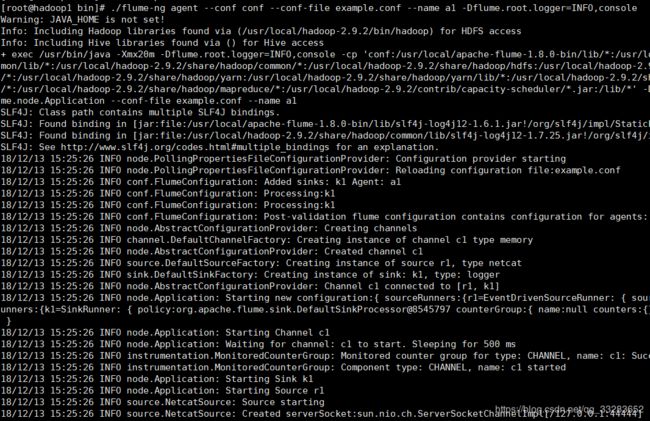
./flume-ng agent --conf conf --conf-file example.conf --name a1 -Dflume.root.logger=INFO,console--conf:Flume通用配置目录
--conf-file:配置文件位置
2.3连接测试
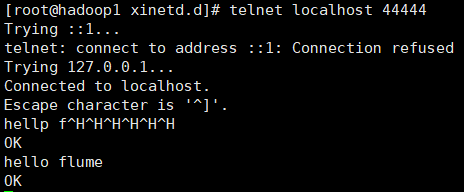
新起一个终端并连接44444端口
telnet localhost 44444输入hello flume
在flume控制台看到输出
 3.Flume单机日志文件显示
3.1新建缓冲目录/tmp/spooldir
3.2新建配置文件
agent1.sources = source1
agent1.sinks = sink1
agent1.channels = channel1

agent1.sources.source1.channels = channel1
agent1.sinks.sink1.channel = channel1

agent1.sources.source1.type = spooldir
agent1.sources.source1.spoolDir = /tmp/spooldir

agent1.sinks.sink1.type = logger

agent1.channels.channel1.type = file
3.3打开flume控制台
flume-ng agent --conf-file spool-to-logger.properties --name agent1 --conf $FLUME_HOME/conf -Dflume.root.logger=INFO,console3.4另起终端在缓冲目录下新建文件
vim /tmp/spooldir/.file1.txt
Hello Flume
mv /tmp/spooldir/.file1.txt /tmp/spooldir/file1.txt
3.5查看控制台输出
4.Flume向hdfs传文件
agent1.sources = source1
agent1.sinks = sink1
agent1.channels = channel1

agent1.sources.source1.channels = channel1
agent1.sinks.sink1.channel = channel1

agent1.sources.source1.type = spooldir
agent1.sources.source1.spoolDir = /tmp/spooldir

agent1.sinks.sink1.type = hdfs
agent1.sinks.sink1.hdfs.path = /tmp/flume
agent1.sinks.sink1.hdfs.filePrefix = events
agent1.sinks.sink1.hdfs.fileSuffix = .log
agent1.sinks.sink1.hdfs.inUsePrefix = _
agent1.sinks.sink1.hdfs.fileType = DataStream

agent1.channels.channel1.type = file
vim /tmp/spooldir/.file2.txt
Hello HDFS Flume
mv /tmp/spooldir/.file2.txt /tmp/spooldir/file2.txt5.Flume其他格式
5.1同时向logger以及hdfs传数据
agent1.sources = source1
agent1.sinks = sink1a sink1b
agent1.channels = channel1a channel1b

agent1.sources.source1.channels = channel1a channel1b
agent1.sources.source1.selector.type = replicating
agent1.sources.source1.selector.optional = channel1b
agent1.sinks.sink1a.channel = channel1a
agent1.sinks.sink1b.channel = channel1b

agent1.sources.source1.type = spooldir
agent1.sources.source1.spoolDir = /tmp/spooldir

agent1.sinks.sink1a.type = hdfs
agent1.sinks.sink1a.hdfs.path = /tmp/flume
agent1.sinks.sink1a.hdfs.filePrefix = events
agent1.sinks.sink1a.hdfs.fileSuffix = .log
agent1.sinks.sink1a.hdfs.fileType = DataStream

agent1.sinks.sink1b.type = logger

agent1.channels.channel1a.type = file
agent1.channels.channel1b.type = memory
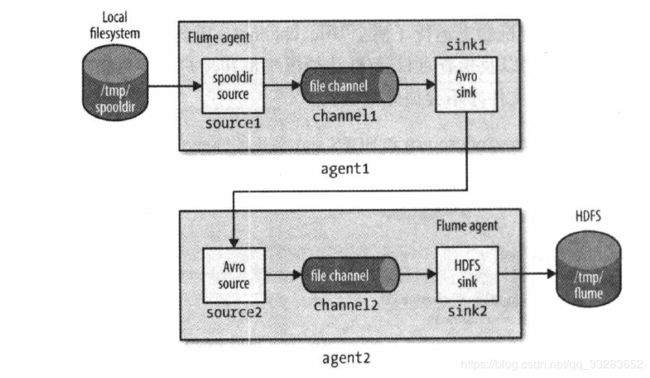
5.2设置一个两层Flume代理
agent1具有spooldir source和Avro sink,并通过file channel连接;agent2具有Avro source,用于监听从agent1的Avro sink发送过来的事件所抵达的端口
# First tier agent

agent1.sources = source1
agent1.sinks = sink1
agent1.channels = channel1

agent1.sources.source1.channels = channel1
agent1.sinks.sink1.channel = channel1

agent1.sources.source1.type = spooldir
agent1.sources.source1.spoolDir = /tmp/spooldir

agent1.sinks.sink1.type = avro
agent1.sinks.sink1.hostname = 192.168.30.138
agent1.sinks.sink1.port = 10000

agent1.channels.channel1.type = file
agent1.channels.channel1.checkpointDir=/tmp/agent1/file-channel/checkpoint
agent1.channels.channel1.dataDirs=/tmp/agent1/file-channel/data

# Second tier agent

agent2.sources = source2
agent2.sinks = sink2
agent2.channels = channel2

agent2.sources.source2.channels = channel2
agent2.sinks.sink2.channel = channel2

agent2.sources.source2.type = avro
agent2.sources.source2.bind = 192.168.30.138
agent2.sources.source2.port = 10000

agent2.sinks.sink2.type = hdfs
agent2.sinks.sink2.hdfs.path = /tmp/flume
agent2.sinks.sink2.hdfs.filePrefix = events
agent2.sinks.sink2.hdfs.fileSuffix = .log
agent2.sinks.sink2.hdfs.fileType = DataStream

agent2.channels.channel2.type = file
agent2.channels.channel2.checkpointDir=/tmp/agent2/file-channel/checkpoint
agent2.channels.channel2.dataDirs=/tmp/agent2/file-channel/data
先启动agent2再启动agent1
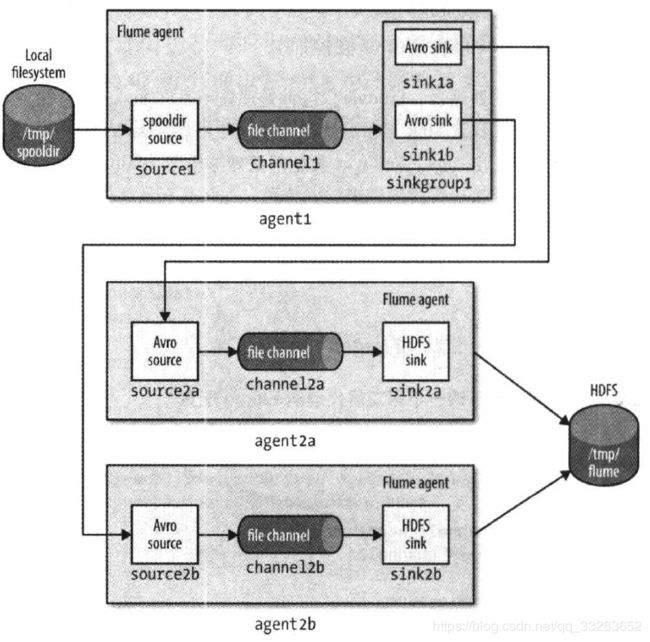
5.3利用sink组在两个Avro端点之间实现负载均衡并做第二层代理
# First tier agent

agent1.sources = source1
agent1.sinks = sink1a sink1b
agent1.sinkgroups = sinkgroup1
agent1.channels = channel1

agent1.sources.source1.channels = channel1
agent1.sinks.sink1a.channel = channel1
agent1.sinks.sink1b.channel = channel1

agent1.sinkgroups.sinkgroup1.sinks = sink1a sink1b
agent1.sinkgroups.sinkgroup1.processor.type = load_balance
agent1.sinkgroups.sinkgroup1.processor.backoff = true

agent1.sources.source1.type = spooldir
agent1.sources.source1.spoolDir = /tmp/spooldir

agent1.sinks.sink1a.type = avro
agent1.sinks.sink1a.hostname = 192.168.30.138
agent1.sinks.sink1a.port = 10000

agent1.sinks.sink1b.type = avro
agent1.sinks.sink1b.hostname = 192.168.30.138
agent1.sinks.sink1b.port = 10001

agent1.channels.channel1.type = file
agent1.channels.channel1.checkpointDir=/tmp/agent1/file-channel/checkpoint
agent1.channels.channel1.dataDirs=/tmp/agent1/file-channel/data

# Second tier agent

agent2a.sources = source2a
agent2a.sinks = sink2a
agent2a.channels = channel2a

agent2a.sources.source2a.channels = channel2a
agent2a.sinks.sink2a.channel = channel2a

agent2a.sources.source2a.type = avro
agent2a.sources.source2a.bind = 192.168.30.138
agent2a.sources.source2a.port = 10000

agent2a.sinks.sink2a.type = hdfs
agent2a.sinks.sink2a.hdfs.path = /tmp/flume
agent2a.sinks.sink2a.hdfs.filePrefix = events-a
agent2a.sinks.sink2a.hdfs.fileSuffix = .log
agent2a.sinks.sink2a.hdfs.fileType = DataStream

agent2a.channels.channel2a.type = file
agent2a.channels.channel2a.checkpointDir=/tmp/agent2a/file-channel/checkpoint
agent2a.channels.channel2a.dataDirs=/tmp/agent2a/file-channel/data

# Second tier agent (running on a different port number)

agent2b.sources = source2b
agent2b.sinks = sink2b
agent2b.channels = channel2b

agent2b.sources.source2b.channels = channel2b
agent2b.sinks.sink2b.channel = channel2b

agent2b.sources.source2b.type = avro
agent2b.sources.source2b.bind = 192.168.30.138
agent2b.sources.source2b.port = 10000

agent2b.sinks.sink2b.type = hdfs
agent2b.sinks.sink2b.hdfs.path = /tmp/flume
agent2b.sinks.sink2b.hdfs.filePrefix = events-b
agent2b.sinks.sink2b.hdfs.fileSuffix = .log
agent2b.sinks.sink2b.hdfs.fileType = DataStream

agent2b.channels.channel2b.type = file
agent2b.channels.channel2b.checkpointDir=/tmp/agent2b/file-channel/checkpoint
agent2b.channels.channel2b.dataDirs=/tmp/agent2b/file-channel/data


