上一篇简单介绍了ASP.NET Core Web项目的结构,本章我们来对项目进行简单的分层和使用Code First的方式建立数据库
一、分层
1、项目说明
之前是想做一个Mvc项目,但是主要还是想学习一下前后端分离方面的内容,并且写博客的目的也是为了学习和记录一些新的东西,所以就改成ASP.NET Core WebApi项目了;
该系列的目标是建立一个博客项目,功能上目前打算实现用户管理、文章管理和评论管理三部分的内容,后续再看情况是否进行功能上的扩展
2、分层规划
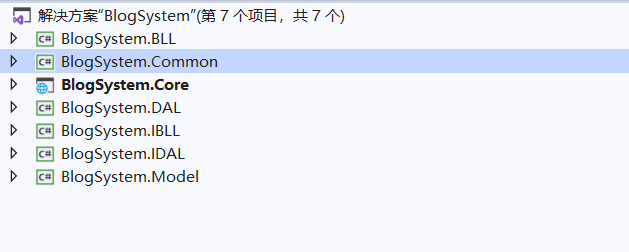
项目逻辑相对简单,这里我们采用简单的三层架构模式,为了解耦为DAL和BLL添加了对应的接口层,另外添加了模型层Model,工具层Common,所以在原先的基础上添加6个.NET Core类库项目,项目结构如下图:
二、建立模型层
1、Model的基类
将model共有的几个栏位提取出来作为基类。分别是Id、创建时间和是否被删除,如下:
    ///
    /// Model的基类
    ///
    public class BaseEntity
    {
        ///
        /// 唯一标识Id
        ///
        public Guid Id { get; set; } = Guid.NewGuid();
        ///
        /// 创建时间
        ///
        public DateTime CreateTime { get; set; } = DateTime.Now;
        ///
        /// 是否被删除(伪删除)
        ///
        public bool IsRemoved { get; set; }
    }
2、用户类
性别是新建的一个枚举类,另外后期可能会写权限方面的东西,所以还有一个用户等级枚举类,默认为普通用户。用户类要继承自刚刚新建的基类,并设定一些特性进行限制,比如限定为必填项等等,当然这边只是对存入数据的一个限定,实际上我们还需要对用户录入页面进行限定,那将是Dto和ViewModel需要处理的事件,这里先不展开
    ///
    /// 性别枚举
    ///
    public enum Gender
    {
        男=0,
        女=1,
        保密=2
    }
    ///
    /// 用户等级枚举
    ///
    public enum Level
    {
        普通用户 = 0,
        会员用户 = 1,
        系统管理员=2
    }
using System;
using System.ComponentModel.DataAnnotations;

namespace BlogSystem.Model
{
    ///
    /// 用户
    ///
    public class User : BaseEntity
    {
        ///
        /// 账户
        ///
        [Required, StringLength(40)]
        public string Account { get; set; }
        ///
        /// 密码
        ///
        [Required, StringLength(200)]
        public string Password { get; set; }
        ///
        /// 头像
        ///
        public string ProfilePhoto { get; set; }
        ///
        /// 出生日期
        ///
        public DateTime BirthOfDate { get; set; }
        ///
        /// 性别
        ///
        public Gender Gender { get; set; }
        ///
        /// 用户等级
        ///
        public Level Level { get; set; } = Level.普通用户;
        ///
        /// 粉丝数
        ///
        public int FansNum { get; set; }
        ///
        /// 关注数
        ///
        public int FocusNum { get; set; }
    }
}
3、用户关注
用户Id和关注用户Id同样是来源于用户表,这里外键的处理方法是引入了两个不同名称的User,但是这样处理会存在级联删除的问题,但由于我们采用的是伪删除的方式,并没有真正的删除,所以我们会在后面的DbContext方法中关闭级联删除以解决此问题
using System;
using System.ComponentModel.DataAnnotations.Schema;

namespace BlogSystem.Model
{
    ///
    /// 用户关注表
    ///
    public class UserFocus : BaseEntity
    {
        ///
        /// 用户编号
        ///
        [ForeignKey(nameof(User))]
        public Guid UserId { get; set; }
        public User User { get; set; }

        ///
        /// 关注用户编号
        ///
        [ForeignKey(nameof(Focus))]
        public Guid FocusId { get; set; }
        public User Focus { get; set; }
    }
}
4、文章类
每篇文章都存在一个发表人,所以我们在这里添加了外键,如下:
using System;
using System.ComponentModel.DataAnnotations;
using System.ComponentModel.DataAnnotations.Schema;

namespace BlogSystem.Model
{
    ///
    /// 文章
    ///
    public class Article : BaseEntity
    {
        ///
        /// 文章标题
        ///
        [Required]
        public string Title { get; set; }
        ///
        /// 文章内容
        ///
        [Required, Column(TypeName = "text")]
        public string Content { get; set; }
        ///
        /// 发表人的Id,用户表的外键
        ///
        [ForeignKey(nameof(User))]
        public Guid UserId { get; set; }
        public User User { get; set; }
        ///
        /// 看好人数
        ///
        public int GoodCount { get; set; }
        ///
        /// 不看好人数
        ///
        public int BadCount { get; set; }
        ///
        /// 文章查看所需等级
        ///
        public Level Level { get; set; } = Level.普通用户;
    }
}
5、分类信息
分类信息需要对应到用户,所以同样存在一个外键对应,建立如下:
using System;
using System.ComponentModel.DataAnnotations;
using System.ComponentModel.DataAnnotations.Schema;

namespace BlogSystem.Model
{
    ///
    /// 分类
    ///
    public class Category : BaseEntity
    {
        ///
        /// 分类名称
        ///
        [Required]
        public string CategoryName { get; set; }
        ///
        /// 分类对应的用户
        ///
        [ForeignKey(nameof(User))]
        public Guid UserId { get; set; }
        public User User { get; set; }
    }
}
6、文章对应的分类
每篇文章对应一个或多个分类,同样存在外键对应关系,建立如下:
using System;
using System.ComponentModel.DataAnnotations.Schema;

namespace BlogSystem.Model
{
    ///
    /// 文章所属分类
    ///
    public class ArticleInCategory : BaseEntity
    {
        ///
        /// 分类Id
        ///
        [ForeignKey(nameof(Category))]
        public Guid CategoryId { get; set; }
        public Category Category { get; set; }

        ///
        /// 文章Id
        ///
        [ForeignKey(nameof(Article))]
        public Guid ArticleId { get; set; }
        public Article Article { get; set; }
    }
}
7、评论功能
评论存在1个帖子对应M个评论,M个评论对应N个回复的情况,所以拆分成文章评论表和评论回复表,如下:
using System;
using System.ComponentModel.DataAnnotations;
using System.ComponentModel.DataAnnotations.Schema;

namespace BlogSystem.Model
{
    ///
    /// 文章评论表
    ///
    public class ArticleComment : BaseEntity
    {
        ///
        /// 评论的文章ID
        ///
        [ForeignKey(nameof(Article))]
        public Guid ArticleId { get; set; }
        public Article Article { get; set; }
        ///
        /// 评论用户ID
        ///
        [ForeignKey(nameof(User))]
        public Guid UserId { get; set; }
        public User User { get; set; }
        ///
        /// 评论内容
        ///
        [Required, StringLength(800)]
        public string Content { get; set; }
    }
}
using System;
using System.ComponentModel.DataAnnotations;
using System.ComponentModel.DataAnnotations.Schema;

namespace BlogSystem.Model
{
    ///
    /// 评论回复表
    ///
    public class CommentReply : BaseEntity
    {
        ///
        /// 回复指向的评论Id
        ///
        [ForeignKey(nameof(ArticleComment))]
        public Guid CommentId { get; set; }
        public ArticleComment ArticleComment { get; set; }
        ///
        /// 回复指向的用户Id
        ///
        [ForeignKey(nameof(ToUser))]
        public Guid ToUserId { get; set; }
        public User ToUser { get; set; }
        ///
        /// 文章ID
        ///
        [ForeignKey(nameof(Article))]
        public Guid ArticleId { get; set; }
        public Article Article { get; set; }
        ///
        /// 用户Id
        ///
        [ForeignKey(nameof(User))]
        public Guid UserId { get; set; }
        public User User { get; set; }
        ///
        /// 回复的内容
        ///
        [Required, StringLength(800)]
        public string Content { get; set; }
    }
}
三、EF迁移
1、数据库选择
VS内置了一个"小型"的SQL Server数据库,这里我们就使用它作为我们的数据库。右击依赖项,选择Nuget包,我们需要安装Microsoft.EntityFrameworkCore.SqlServer和Microsoft.EntityFrameworkCore,但因为依赖关系安装Microsoft.EntityFrameworkCore.SqlServer时会一并装上Microsoft.EntityFrameworkCore,如下:
2、添加DbContext
1、DbContext是实体类与数据库之间的桥梁,负责与数据库进行交互。我们添加一个名为BlogSystemContext的类,继承自DbContext
2、建表时有提到级联删除的问题,EF是默认开启级联删除的,即存在外键的情况下,删除一笔数据,关联数据也会被删除,上面有说明会存在冲突,所以这里我们重写方OnModelCreateing法将其关闭。并在OnConfiguring方法中配置数据库连接,如下:
using Microsoft.EntityFrameworkCore;
using System.Linq;

namespace BlogSystem.Model
{
    public class BlogSystemContext : DbContext
    {
        public BlogSystemContext()
        {
        }

        public BlogSystemContext(DbContextOptions options) : base(options)
        {
        }

        protected override void OnModelCreating(ModelBuilder modelBuilder)
        {
            //关闭级联删除
            var foreignKeys = modelBuilder.Model.GetEntityTypes().SelectMany(m => m.GetForeignKeys()).Where(x => x.DeleteBehavior == DeleteBehavior.Cascade);
            foreach (var foreign in foreignKeys)
            {
                foreign.DeleteBehavior = DeleteBehavior.Restrict;
            }
        }

        protected override void OnConfiguring(DbContextOptionsBuilder optionsBuilder)
        {
            //配置数据库连接
            optionsBuilder.UseSqlServer(@"Server=(localdb)\mssqllocaldb;Database=BlogSystem;Trusted_Connection=True;");
        }

        public DbSet Articles { get; set; }

        public DbSet ArticleComments { get; set; }

        public DbSet ArticleInCategories { get; set; }

        public DbSet Categories { get; set; }

        public DbSet CommentReplies { get; set; }

        public DbSet Users { get; set; }

        public DbSet UserFocuses { get; set; }
    }
}
3、使用Migration进行迁移
1、迁移使用Nuget安装Microsoft.EntityFrameworkCore.Tools和Microsoft.EntityFrameworkCore.Design,由于依赖关系只需要安装Microsoft.EntityFrameworkCore.Tools即可,安装后选择程序包管理控制台,如下:
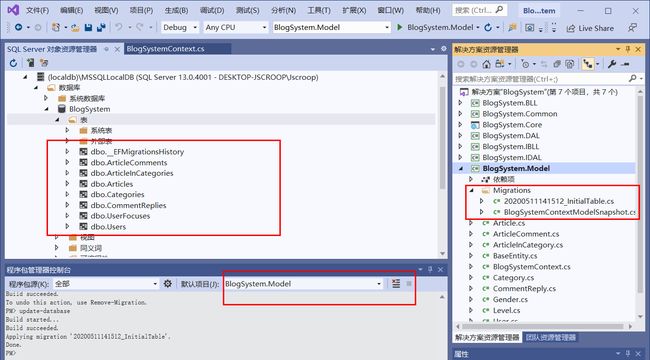
2、迁移前首先要确认默认项目对应的是BlogSystem.Model输入添加迁移指令add-migration InitialTable,成功后会出现Migrations文件夹,里面包含数据库初始化文件和快照文件;执行update-database,成功更新数据表至数据库
本章完~
本人知识点有限,若文中有错误的地方请及时指正,方便大家更好的学习和交流


