电商项目实战第四节: CSS3+HTML5+JS 设计案例【考拉海购网站】之【轮播图特效】
上一节:电商项目实战第三节: CSS3+HTML5+JS 设计案例【考拉海购网站】之【分类导航栏】
文章目录
- 【考拉海购网站】之【轮播图特效】
- 第一步,根据页面布局写相应的html标签
- index.html文件代码
- 第二步,美化轮播图小组件样式
- index.css文件代码
- 第三步,轮播图原理
- 自动切图轮播图原理(初阶版)
- 初阶版轮播图运行效果一览
- 按钮操控轮播图的原理 (进阶版)
- 进阶版轮播图运行效果一览
- 第四步,完成
- index.js文件代码
【考拉海购网站】之【轮播图特效】
轮播图特效如图所示 >>>
第一步,根据页面布局写相应的html标签
这是考拉海购网的轮播图布局情况 >>>
(1)左右两边分别有左切图和右切图按钮
(2)中间时一张宽度非常宽的海报图
(3)底部居中是一个显示轮播图当前序列的条

index.html文件代码
相关解释已经写在代码注释中:
        <div class="RotationChart">

            <a href="">
                <img src="./cd171bbe-1828-4ff0-90a8-9bc45b9908b9T19010292039_1920_400.webp" alt="">
                <img src="./432688c0-d4fc-436f-bb3e-f8452e29db2bT1912311645_1920_400.webp" alt="">
                <img src="./640bc826-5ddf-43ea-9501-9d716240f6d6T19010292032_1920_400.webp" alt="">
                <img src="./7a009d6e-ea47-415d-859a-607fc4a93db0T19010292034_1920_400.webp" alt="">
                <img src="./b5ab8054-fd6c-437b-a646-0b7e193e4a71T19010292052_1920_400.webp" alt="">
            a>

            <span>
                >span> <span>
                < span>

                    <div class="bottomList">
                        <ul>
                            <li>li>
                            <li>li>
                            <li>li>
                            <li>li>
                            <li>li>
                        ul>
                    div>
        div>
图片载入后的模样 >>>

为了让图形集中在一个区域,方便轮播图特效,只需要给img脱离文档流就可以让他们固定到一个位置上,设置属性
img{
	position:absolute;
}
第二步,美化轮播图小组件样式
主要调整轮播图前进后退这两个键,还有底部序列条的样式,相关细节我已经在index.css文件代码中写好了注释
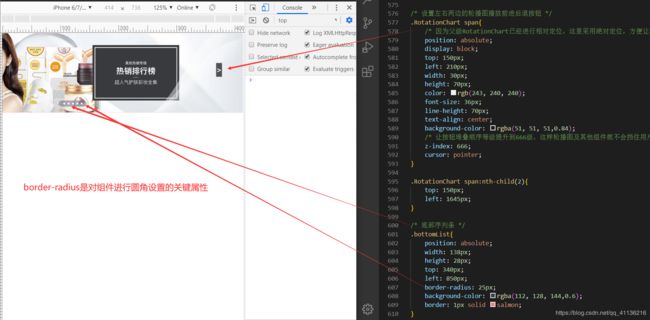
index.css文件代码
/* -------------轮播图------------ */
/* 轮播图父级 */
.RotationChart{
    position: relative;
    width: 1964px;
    height: 400px;
    margin-left: -400px;
    border: 1px solid salmon;
}

/* 对轮播图图片样式进行设计,并定位在一起,方便后期轮播图显示消失的特效设置 */
.RotationChart img{
    position: absolute;
    opacity: 0;
    /* 动画过渡效果 */
    transition: all 0.4s ease;
}

/* 设置左右两边的轮播图播放前进后退按钮 */
.RotationChart span{
    /* 因为父级RotationChart已经进行相对定位,这里采用绝对定位,方便让轮播图的子组件脱离文档流,进行调整组件位置的操作 */
    position: absolute;
    display: block;
    top: 150px;
    left: 210px;
    width: 30px;
    height: 70px;
    color: rgb(243, 240, 240);
    font-size: 36px;
    line-height: 70px;
    text-align: center;
    background-color: rgba(51, 51, 51,0.84);
    /* 让按钮堆叠顺序等级提升到666级,这样轮播图及其他组件就不会挡住用户按按钮的操作 */
    z-index: 666;
    cursor: pointer;
}

.RotationChart span:nth-child(2){
    top: 150px;
    left: 1645px;
}

/* 底部序列条 */
.bottomList{
    position: absolute;
    width: 138px;
    height: 28px;
    top: 340px;
    left: 850px;
    border-radius: 25px;
    background-color: rgba(112, 128, 144,0.6);
    border: 1px solid salmon;
}


.bottomList ul{
    margin-left: -40px;
    margin-top: 6px;
}

/* 对序列条的5个小圆点进行设置,块级元素变圆的秘诀就是通过对border-radius进行设置 */
.bottomList li{
    display: inline-block;
    margin-right: 10px;
    width: 9px;
    height: 9px;
    border-radius: 25px;
    background-color: rgb(255, 255, 255);
    cursor: pointer;
}


.bottomList li:first-child{
    margin-left: 22px;
}
第三步,轮播图原理
自动切图轮播图原理(初阶版)
对图片进行绝对定位后,让它们全部都集中在一个区域,然后全部隐藏(透明度设置为0既可),设定一个计时器定时控制5张图片依次显示和消失,显示和消失的过渡效果采用css的过渡动画属性来设置
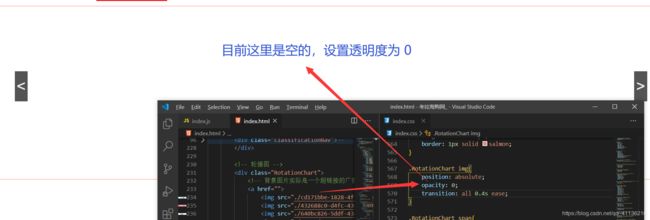
然后给定一个过渡动画,0.4秒的过渡
transition: all 0.4s ease;
//轮播图
var times = 0;
// 获取轮播图图片对象
const rotationImg = document.getElementsByClassName('RotationChart')[0].getElementsByTagName('img');
// 获取序列条小圆点对象
const bottomListLi = document.getElementsByClassName('bottomList')[0].getElementsByTagName('li');

// 初始值,第一次运行的时候第一张图片显示及底部序列条小圆点标记颜色显示
rotationImg[times].style.opacity = 1;
bottomListLi[times].style.backgroundColor = '#d22147';

function rotation() {
    // 设定计时器
    var roatationChart = setInterval(function () {
        // 当次数大于4次时,数组为4的图片(也就是第5张图片)透明度变为0,数组为0的图片透明度变为1
        if (times >= 4) {
            rotationImg[4].style.opacity = 0;
            rotationImg[0].style.opacity = 1;
            times = 0;
        }
        // 当次数小于4次时,以当前次数为下标的数组的图片透明度变为0,下一次为下标的数组的图片透明度变为1
        else if (times < 4) {
            rotationImg[times].style.opacity = 0;
            rotationImg[++times].style.opacity = 1;
        }
        for (let i = 0; i < bottomListLi.length; i++) {
            bottomListLi[i].style.backgroundColor = 'rgb(255, 255, 255)';
        }
        bottomListLi[times].style.backgroundColor = '#d22147';
    }, 4000)
}

rotation(); //定义函数后并不能启用,所以这里还要写这个函数名字来进行调用,才能运行
初阶版轮播图运行效果一览
当然,这只是开始,我们来看下接下来对于按钮操控轮播图的设置
按钮操控轮播图的原理 (进阶版)
为了让轮播图无空白bug,且循环运作,我们应该这样设置允许规则 >>>
(1)点击左侧按钮会切出上一张图片,如果当前图片为第一张,则会切出最末尾的图片(也就是第5张)
(2)点击右侧按钮会切出下一张图片,如果当前图片为最后一张,则会切出最前头的图片(也就是第1张)
(3)点击底部序列条小圆圈,点击第几个就会切出第几张图片,且小圆圈的颜色也在相应位置进行标记
// 按钮操控轮播图
// 获取按钮对象
const RotationButtom = document.getElementsByClassName('RotationChart')[0].getElementsByTagName('span');

//底部序列条颜色改变函数,用于让所有序列小圆圈变白色,然后只指定当前次数所在的序列为暗红色
function bottomListLi_Change() {
    for (let i = 0; i < bottomListLi.length; i++) {
        bottomListLi[i].style.backgroundColor = 'rgb(255, 255, 255)';
    }
    bottomListLi[times].style.backgroundColor = '#d22147';
}

// RotationButtom[0]表示切换下一张图片
RotationButtom[0].onclick = function () {
    clearInterval(rotationImg);
    rotationImg[times].style.opacity = 0;
    times++;
    // 判断条件,当times递增后的值大于4次时,times归零,让图片从第一张图片开始切
    if (times > 4) {
        times = 0;
    }
    rotationImg[times].style.opacity = 1;
    bottomListLi_Change();
}
// RotationButtom[1]表示切换上一张图片
RotationButtom[1].onclick = function () {
    clearInterval(rotationImg);
    rotationImg[times].style.opacity = 0;
    times--;
    // 判断条件,当times递减后的值小于0次时,times跳到第5次切图,意思就是从第一张跳到最后一张
    if (times < 0) {
        times = 4;
    }
    rotationImg[times].style.opacity = 1;
    bottomListLi_Change();
}

//点击相应的序列条小圆圈后切换到相应的图片
for (let i = 0; i < bottomListLi.length; i++) {
    bottomListLi[i].onclick = function () {
        console.log(i);
        for (let i = 0; i < bottomListLi.length; i++) {
            if (bottomListLi[i] === this) {
                times = i;
                bottomListLi_Change();
                for (let z = 0; z < rotationImg.length; z++) {
                    rotationImg[z].style.opacity = 0;
                }
                rotationImg[times].style.opacity = 1;
                // 这个地方和通过按钮操控切图的原理是一样的,这样做的目的是为了循环切图,而不会跳出循环,产生bug
                if (times >= 4) {
                    times = 0;
                } else {
                    times++;
                }
            }
        }
    }
}
进阶版轮播图运行效果一览
第四步,完成
index.js文件代码
//------------轮播图-------------
var times = 0;
// 获取轮播图图片对象
const rotationImg = document.getElementsByClassName('RotationChart')[0].getElementsByTagName('img');
// 获取序列条小圆点对象
const bottomListLi = document.getElementsByClassName('bottomList')[0].getElementsByTagName('li');

// 初始值,第一次运行的时候第一张图片显示及底部序列条小圆点标记颜色显示
rotationImg[times].style.opacity = 1;
bottomListLi[times].style.backgroundColor = '#d22147';

function rotation() {
    // 设定计时器
    var roatationChart = setInterval(function () {
        // 当次数大于4次时,数组为4的图片(也就是第5张图片)透明度变为0,数组为0的图片透明度变为1
        if (times >= 4) {
            rotationImg[4].style.opacity = 0;
            rotationImg[0].style.opacity = 1;
            times = 0;
        }
        // 当次数小于4次时,以当前次数为下标的数组的图片透明度变为0,下一次为下标的数组的图片透明度变为1
        else if (times < 4) {
            rotationImg[times].style.opacity = 0;
            rotationImg[++times].style.opacity = 1;
        }
        for (let i = 0; i < bottomListLi.length; i++) {
            bottomListLi[i].style.backgroundColor = 'rgb(255, 255, 255)';
        }
        bottomListLi[times].style.backgroundColor = '#d22147';
    }, 4000)
}

rotation(); //定义函数后并不能启用,所以这里还要写这个函数名字来进行调用,才能运行


// 按钮操控轮播图
// 获取按钮对象
const RotationButtom = document.getElementsByClassName('RotationChart')[0].getElementsByTagName('span');

//底部序列条颜色改变函数,用于让所有序列小圆圈变白色,然后只指定当前次数所在的序列为暗红色
function bottomListLi_Change() {
    for (let i = 0; i < bottomListLi.length; i++) {
        bottomListLi[i].style.backgroundColor = 'rgb(255, 255, 255)';
    }
    bottomListLi[times].style.backgroundColor = '#d22147';
}

// RotationButtom[0]表示切换下一张图片
RotationButtom[0].onclick = function () {
    clearInterval(rotationImg);
    rotationImg[times].style.opacity = 0;
    times++;
    // 判断条件,当times递增后的值大于4次时,times归零,让图片从第一张图片开始切
    if (times > 4) {
        times = 0;
    }
    rotationImg[times].style.opacity = 1;
    bottomListLi_Change();
}
// RotationButtom[1]表示切换上一张图片
RotationButtom[1].onclick = function () {
    clearInterval(rotationImg);
    rotationImg[times].style.opacity = 0;
    times--;
    // 判断条件,当times递减后的值小于0次时,times跳到第5次切图,意思就是从第一张跳到最后一张
    if (times < 0) {
        times = 4;
    }
    rotationImg[times].style.opacity = 1;
    bottomListLi_Change();
}

//点击相应的序列条小圆圈后切换到相应的图片
for (let i = 0; i < bottomListLi.length; i++) {
    bottomListLi[i].onclick = function () {
        console.log(i);
        for (let i = 0; i < bottomListLi.length; i++) {
            if (bottomListLi[i] === this) {
                times = i;
                bottomListLi_Change();
                for (let z = 0; z < rotationImg.length; z++) {
                    rotationImg[z].style.opacity = 0;
                }
                rotationImg[times].style.opacity = 1;
                // 这个地方和通过按钮操控切图的原理是一样的,这样做的目的是为了循环切图,而不会跳出循环,产生bug
                if (times >= 4) {
                    times = 0;
                } else {
                    times++;
                }
            }
        }
    }
}
下一节:电商项目实战第五节: CSS3+HTML5+JS 设计案例【考拉海购网站】之【商品栏及右侧垂直导航】
