RHCE考试题及讲解
#############
# RHCE 考试 #
#############此次考试汇总你将使用多个操作系统,一台是您面前的物理机桌面系统,其他系统是运行在桌面系统上的已经预装好了的虚拟机上。除非特别指出,所有考试要求都是在虚拟机上完成。你没有 root 权限访问物理机。但是你可以用物理机来测试虚拟机上要求完成的配置。
###########
# 请注意:#
###########
因为考试系统是虚拟机,所以你需要使用桌面上的 vm console 图标来访问虚拟机。您也可以通过 ssh 从桌面系统来访问虚拟机。但是您还没有完成相关考试要求前,是不能通过 ssh 访问虚拟机的。###########
# 请注意: #
###########
在考试期间不允许和其他考生交流。也不允许尝试连接其他考生的主机。测试系统和网络都在监控之中,上述两种情况的发生可能导致您考试成绩为零。################
# 其他配置信息 #
################您在考试中将使用两个系统的信息如下:
serverx.example.com 是一个主要的服务器
dekstopx.example.com 主要用作客户端
(x是您的考试号)两个系统的 root 密码为 redhat
系统的 ip 由 dhcp 提供,您可以视其为正常。或者您可以按照以下信息重新配置静态IP
serverx.example.com 172.25.x.11
desktopx.example.com 172.25.x.10
子网掩码为 255.255.255.0
(x是您的考试号)
您的系统是 dns 域 example.com 的成员,所有 dns 域 example 中的系统都在子网172.25.x.0/24 中,
同样在这个子网中的系统都在 example.com DNS域中。除非特别声明classroom.example.com 提供了集中认证的服务域 EXAMPLE.COM。两个系统 serverx 和 desktopx 已经预先配置成此域的客户端。此域提供了下列账号
用户:ldapuser1
密码:kerberos防火墙默认是打开的,在您认为适当的时候可以关闭,其他火墙的设定可能在单独的要求中。
###############################
# 在评分中您的系统会被重启。#
###############################
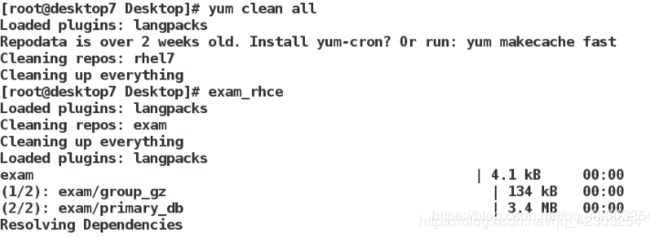
考试环境准备(因为现在不是考试环境,所以先将主机上的server虚拟机和desktop虚拟机进行重置,然后执行脚本获取考试环境。而在真实的考试环境中,这一步的操作是不需要的):
1、在主机上重置server和desktop虚拟机
2、分别在server虚拟机上和desktop虚拟机上,执行脚本获取考试环境
在server虚拟机上,执行脚本,获取考试环境
在desktop虚拟机上,执行脚本,获取考试环境
做题之前需要检查的内容:(在真实的考试环境中,这一步也是必须要做的)
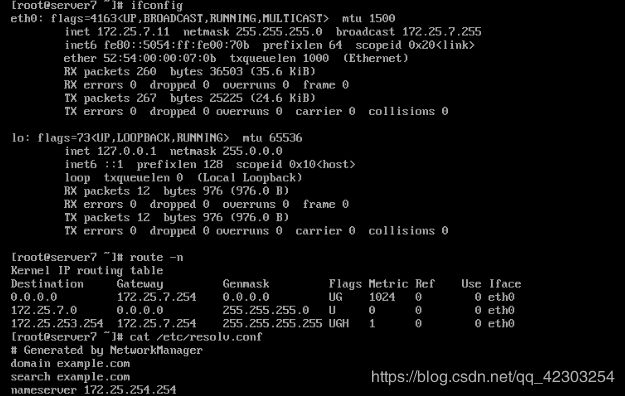
1、分别在server虚拟机和desktop虚拟机上,检查网络
在server虚拟机上,查看网络
在desktopr虚拟机上,查看网络
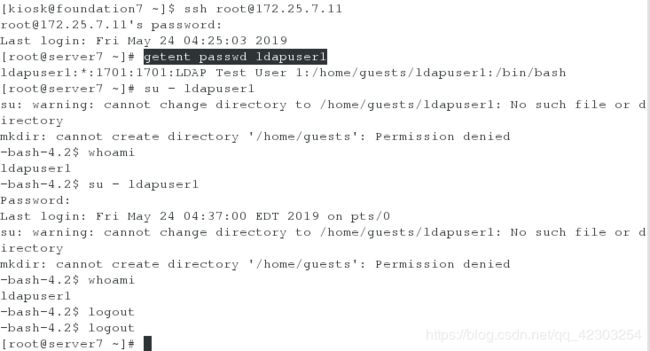
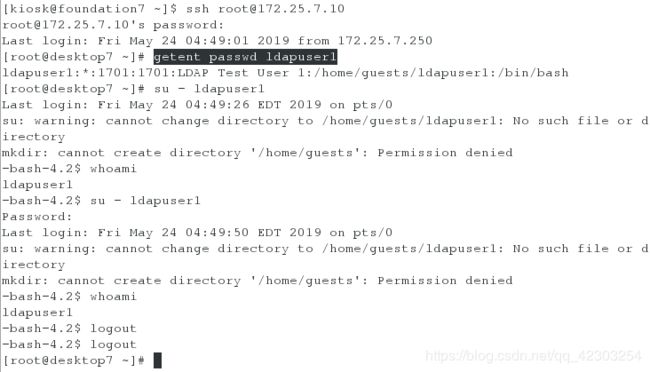
2、在物理机上,通过ssh远程连接server虚拟机和desktop虚拟机。并分别在server虚拟机和desktop虚拟机上,检查ldapuser1是否存在,其密码是否是考试给定的kerberos
在server虚拟机上,查看用户ldapuser1和密码kerberos
在desktop虚拟机上,查看用户ldapuser1和密码kerberos
3、分别在server虚拟机和desktop虚拟机上,检查firewalld服务是否是考试中指定的开启状态
server虚拟机
desktop虚拟机
########
# 题目 #
########
1、配置 selinux
selinux 必须在两个系统 serverx 和 desktopx 中运行 Enforcing 模式
server虚拟机
desktop虚拟机
2、配置 ssh 访问
用户能从域 example.com 内的客户端通过 ssh 远程访问您的两个虚拟系统
在域 my133.org 内的客户端不能访问您的两个虚拟机
server虚拟机
1、查看my133.org这个域对应的IP段
[root@server7 ~]# host -l  my133.org

2、添加策略,使得只有my133.org这个域不能通过ssh连接server虚拟机
[root@server7 ~]# firewall-cmd --permanent --direct --add-rule ipv4 filter INPUT 1 -p tcp --dport 22 -s 192.168.0.0/24 -j REJECT
[root@server7 ~]# systemctl restart firewalld
[root@server7 ~]# firewall-cmd --direct --get-all-rules

3、测试,查看是否是my133.org这个域不能访问,而example.com这个域可以访问
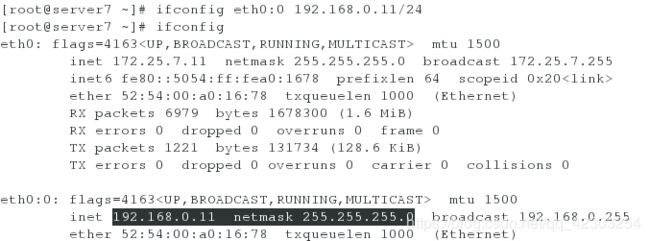
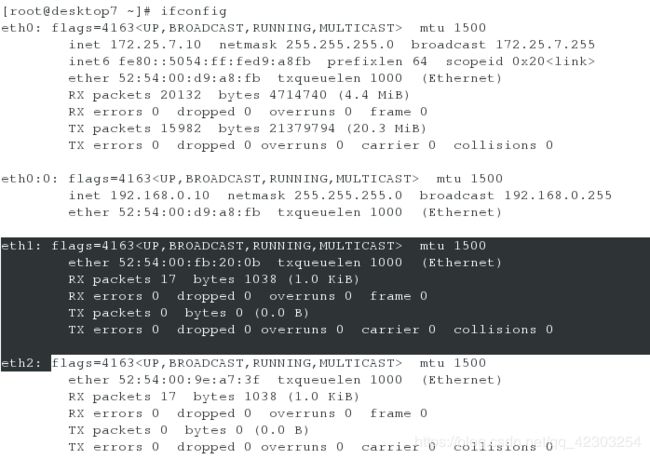
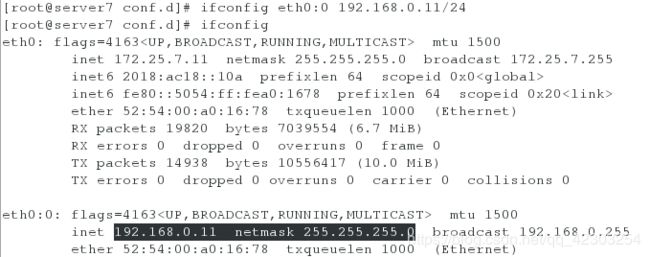
[root@server7 ~]# ifconfig eth0:0 192.168.0.11/24
[root@server7 ~]# ifconfig
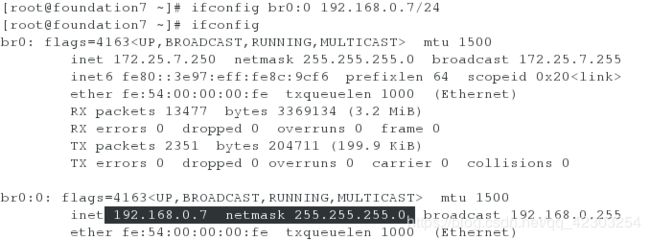
[root@foundation7 ~]# ifconfig br0:0 192.168.0.7/24
[root@foundation7 ~]# ifconfig
[root@foundation7 ~]# ping 192.168.0.11   #首先查看网络是否能是通的,网络通代表配置正确
[root@foundation7 ~]# ssh [email protected]    #其次,查看是否能通过ssh进行连接,不能连接,代表配置正确
[root@foundation7 ~]# ssh [email protected]   #而example域(172.25.x.0/24)的地址可以连接
desktop虚拟机(做法同上——server虚拟机上的操作)
1、查看my133.org这个域对应的IP段
[root@desktop7 ~]# host -l my133.org

2、添加策略,使得只有my133.org这个域不能通过ssh连接server虚拟机
[root@desktop7 ~]# firewall-cmd --permanent --direct --add-rule ipv4 filter INPUT 1 -p tcp --dport 22 -s 192.168.0.0/24 -j REJECT
success
[root@desktop7 ~]# systemctl restart firewalld
[root@desktop7 ~]# firewall-cmd --direct --get-all-rules

3、测试,查看是否是my133.org这个域不能访问,而example.com这个域可以访问
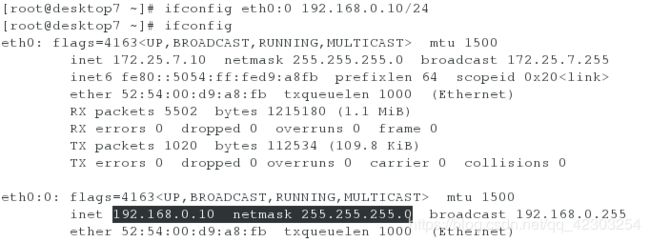
[root@desktop7 ~]# ifconfig eth0:0 192.168.0.10/24
[root@desktop7 ~]# ifconfig
[root@foundation7 ~]# ifconfig br0:0 192.168.0.7/24   #上一步已经做过,这里可以不用再做
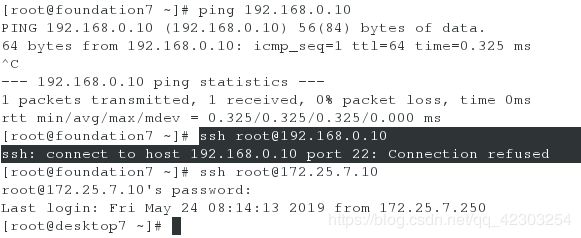
[root@foundation7 ~]# ping 192.168.0.10   #首先查看网络是否能是通的,网络通代表配置正确
[root@foundation7 ~]# ssh [email protected]    #其次,查看是否能通过ssh进行连接,不能连接,代表配置正确
[root@foundation7 ~]# ssh [email protected]   #而example域(172.25.x.0/24)的地址可以连接
3、自定义用户环境
在系统 serverx 和 desktopx 上创建自定义命令 qstat 此命令将执行一下命令:
/bin/ps -Ao pid,tt,user,fname,rsz
此命令对系统中所有用户有效
server虚拟机
[root@server7 ~]# echo "alias qstat='/bin/ps -Ao pid,tt,user,fname,rsz'" >> /etc/bashrc   #注意是追加(即两个>)
[root@server7 ~]# source /etc/bashrc
[root@server7 ~]# qstat   #测试,如果有内容输出,说明配置正确
desktop虚拟机(做法同上——server虚拟机上的操作)
[root@desktop7 ~]# echo "alias qstat='/bin/ps -Ao pid,tt,user,fname,rsz'" >> /etc/bashrc   #注意是追加(即两个>)
[root@desktop ~]# source /etc/bashrc
[root@desktop7 ~]# qstat   #测试,如果有内容输出,说明配置正确
4、配置端口转发
在系统 serverx 中配置端口转发
在 172.25.x.0/24 网络中的系统,访问 server1 的本地端口 5423 将被转发到 80 此设定是永久生效的
server虚拟机
1、安装并开启httpd服务,以提供80端口
[root@server7 ~]# yum install httpd -y
[root@server7 ~]# systemctl start httpd
[root@server7 ~]# systemctl enable httpd
[root@server7 ~]# systemctl status httpd

2、配置172.25.7.0/24网段内的主机可以访问本机的80端口
[root@server7 ~]# firewall-cmd --permanent --add-source=172.25.7.0/24 --zone=trusted
[root@server7 ~]# systemctl restart firewalld
[root@server7 ~]# firewall-cmd --list-all --zone=trusted

3、配置5423端口到80端口的映射
[root@server7 ~]# firewall-cmd --permanent --direct --add-rule ipv4 nat PREROUTING 1 -p tcp --dport 5423 -s 172.25.7.0/24 -j DNAT --to-dest :80
[root@server7 ~]# systemctl restart firewalld.service
[root@server7 ~]# firewall-cmd --direct --get-all-rules

4、在172.25.7.0/24网段的主机上进行测试,这里我选择desktop虚拟机进行测试
[root@desktop7 ~]# firefox &   #分别查看172.25.7.11,172.25.7.11:5423能否看到httpd服务的默认发布页
5、配置链路聚合
在 serverx.example.com 和 desktopx.example.com 之间按以下要求配置一个链接
此链路使用 eth1 和 eth2
此链路在一个接口失效时仍能正常工作
此链路 serverx 使用地址 172.16.x.65/24
此链路 desktopx 使用的地址 172.16.x.75/24
此链路在系统重启之后仍然保持正常状态
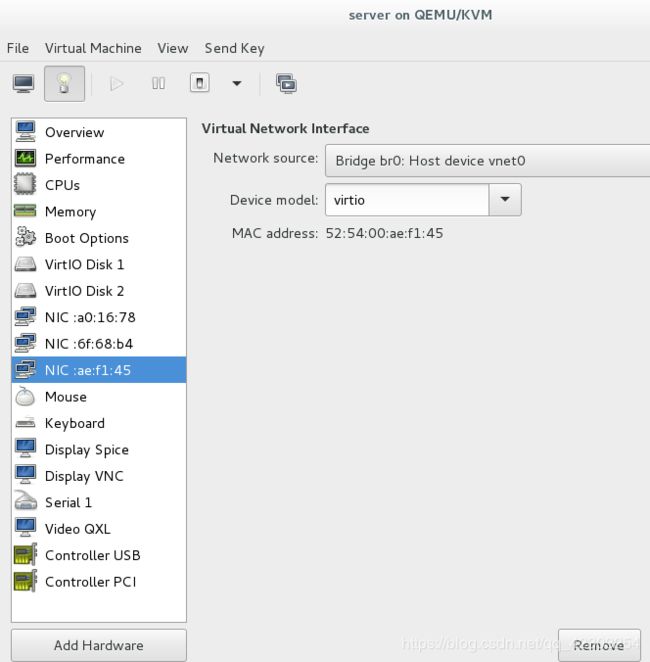
(1)分别在两个虚拟机上添加两块网卡eth1和eth2
(2)配置链路聚合
server虚拟机
[root@server7 ~]# nmcli connection add type team con-name team0 ifname team0 config '{"runner":{"name":"activebackup"}}' ip4 172.16.7.65/24
[root@server7 ~]# nmcli connection add type team-slave con-name eth1 ifname eth1 master team0
[root@server7 ~]# nmcli connection add type team-slave con-name eth2 ifname eth2 master team0


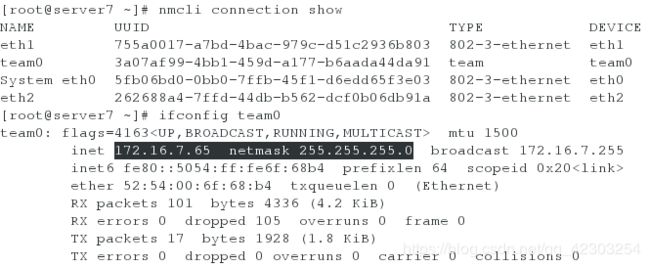
[root@server7 ~]# nmcli connection show
[root@server7 ~]# ifconfig team0
desktop虚拟机
[root@desktop7 ~]# nmcli connection add type team con-name team0 ifname team0 config '{"runner":{"name":"activebackup"}}' ip4 172.16.7.75/24
[root@desktop7 ~]# nmcli connection add type team-slave con-name eth1 ifname eth1 master team0
[root@desktop7 ~]# nmcli connection add type team-slave con-name eth2 ifname eth2 master team0

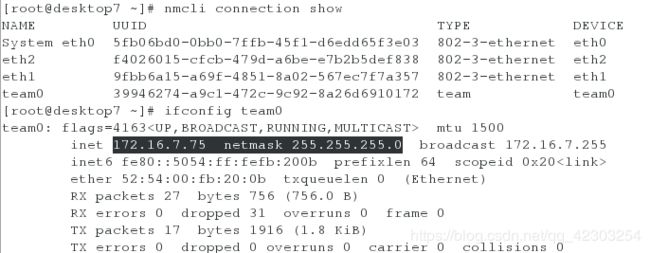
[root@desktop7 ~]# nmcli connection show
[root@desktop7 ~]# ifconfig team0
(3)验证链路聚合
测试server虚拟机上的team0
[root@server7 ~]# ifconfig eth1 down #down掉网卡eth1,看网络是否仍然通着(网络通,代表正确)
[root@server7 ~]# ifconfig eth2 down #继续down掉网卡eth2,看网络是否仍然通着(网络不通,代表正确)
#测试结束之后,打开eth1和eth2网卡
[root@server7 ~]# ifconfig eth1 up
[root@server7 ~]# ifconfig eth2 up
测试desktop虚拟机上的team0
![]()
[root@desktop7 ~]# ifconfig eth1 down #down掉网卡eth1,看网络是否仍然通着(网络通,代表正确)
[root@desktop7 ~]# ifconfig eth2 down #继续down掉网卡eth2,看网络是否仍然通着(网络不通,代表正确)
#测试结束之后,打开eth1和eth2网卡
[root@desktop7 ~]# ifconfig eth1 up
[root@desktop7 ~]# ifconfig eth2 up
6、配置 ipv6 地址
在您的考试系统上配置接口 eth0 使用下列 ipv6 地址
serverx 上的地址 2018:ac18::10a/64
desktopx 上的地址 2018:ac18::11b/64
两个地址可以通信,并且在重新启动后依然生效,两块网卡的 ipv4 地址依然生效
(1)分别在server虚拟机和desktop虚拟机上,配置ipv6的地址
server虚拟机
[root@server7 ~]# nmcli connection modify 'System eth0' ipv6.method manual ipv6.addresses  2018:ac18::10a/64
[root@server7 ~]# systemctl restart network   #值的注意的是,设置ipv6的地址,必须重启网络才能生效
[root@server7 ~]# ifconfig eth0
desktop虚拟机(做法同上——server虚拟机上的操作)
[root@desktop7 ~]# nmcli connection modify 'System eth0' ipv6.method manual ipv6.addresses 2018:ac18::11b/64
[root@desktop7 ~]# systemctl restart network   #值的注意的是,设置ipv6的地址,必须重启网络才能生效
[root@desktop7 ~]# ifconfig eth0
(2)测试ipv6的地址是否通畅
[root@server7 ~]# ping6 2018:ac18::11b   #在server虚拟机上ping desktop虚拟机的ipv6地址
[root@desktop7 ~]# ping6 2018:ac18::10a   #在desktop虚拟机上ping server虚拟机的ipv6地址
7、配置本地邮件服务
在系统 serverx 和 desktopx 上配置邮件服务
这些系统不接收外部发送来的邮件
这些系统上发送的任何邮件都会自动路由到 classroom.example.com
这些系统上发送的邮件显示来自 example.com
您可以通过用户 hal 来测试您的配置,访问:
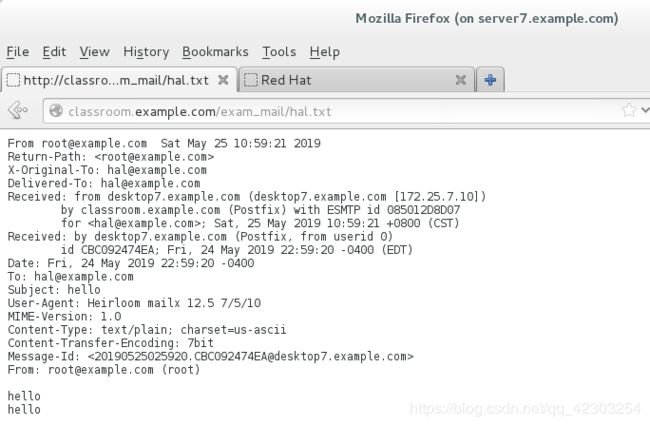
http://classroom.example.com/exam_mail/hal.txt
(x是您的考试号)
server虚拟机
1、查看postfix是否已经安装
[root@server7 ~]# yum list postfix   #查看postfix软件是否已经安装

2、编辑postfix的配置文件,重启postfix服务,并设置postfix服务开机自启
[root@server7 ~]# vim /etc/postfix/main.cf   #编辑postfix的配置文件
 75 myhostname = server7.example.com   #设定本机的主机名
 83 mydomain = example.com   #这行表示,发送的邮件显示example.com
 99 myorigin = $mydomain
116 inet_interfaces = localhost   #这行,是配置文件中默认的,不需要修改。这行表示,不接收外部发送来的邮件
164 mydestination =
313 relayhost = classroom.example.com
[root@server7 ~]# systemctl restart postfix.service
[root@server7 ~]# systemctl enable postfix

3、测试
(1)先在desktop虚拟机上打开浏览器,并输入网址
[root@desktop7 ~]# firefox &
(2)再在server虚拟机上给hal用户发送邮件(因为,浏览器隔几秒就刷新了,如果先在server虚拟机上发送邮件,再在desktop虚拟机上查看,可能在浏览器就看不到内容了)
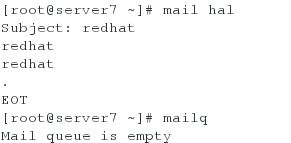
[root@server7 ~]# mail hal   #给hal用户发送邮件
[root@server7 ~]# mailq   #查看邮件队列是不是空的,是空的,则表示邮件发送成功
(3)在desktop的虚拟机上刷新浏览器,能看到发送的邮件,则表示配置成功
desktop虚拟机(做法同上——server虚拟机上的操作)
1、查看postfix是否已经安装
[root@desktop7 ~]# yum list postfix   #查看postfix软件是否已经安装

2、编辑postfix的配置文件,重启postfix服务,并设置postfix服务开机自启
[root@desktop7 ~]# scp [email protected]:/etc/postfix/main.cf /etc/postfix/
 75 myhostname = desktop7.example.com
[root@desktop7 ~]# systemctl restart postfix.service
[root@desktop7 ~]# systemctl enable postfix

3、测试
(1)先在server虚拟机上打开浏览器,并输入网址
[root@server7 ~]# firefox &
(2)再在desktop虚拟机上给hal用户发送邮件(因为,浏览器隔几秒就刷新了,如果先在desktop虚拟机上发送邮件,再在server虚拟机上查看,可能在浏览器就看不到内容了)
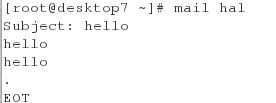
[root@desktop7 ~]# mail hal   #给hal用户发送邮件
[root@desktop7 ~]# mailq   #查看邮件队列是不是空的,是空的,则表示邮件发送成功
(3)在server的虚拟机上刷新浏览器,能看到发送的邮件,则表示配置成功
8、通过 smb 共享目录
在 serverx 上配置 smb 服务
您的 smb 服务必须是 STAFF 工作组的一个成员
共享/groupdir 目录共享名必须是 common
只有 example.com 域的客户可以访问 common 共享
common 必须是可以浏览的
用户 barney 必须能够都取共享的内容,如果需要的话,验证密码是 westos
在server虚拟机上,进行配置
[root@server7 ~]# yum install samba samba-client.x86_64 samba-common -y

[root@server7 ~]# vim /etc/samba/smb.conf
 89         workgroup = STAFF
321         [common]
322         path = /groupdir
323         hosts allow = 172.25.7. 127.
324         browseable = yes
[root@server7 ~]# mkdir /groupdir
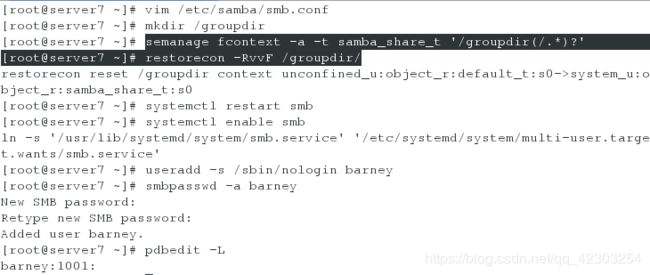
[root@server7 ~]# semanage fcontext -a -t samba_share_t '/groupdir(/.*)?'   #设置/groupdir目录的安全上下文(因为此时selinux是enforcing状态)
[root@server7 ~]# restorecon -RvvF /groupdir/   #修改完安全上下文之后,刷新使其生效
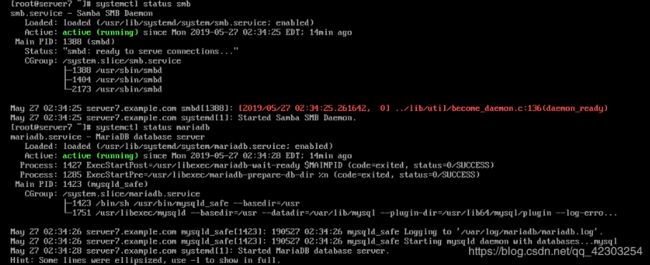
[root@server7 ~]# systemctl restart smb
[root@server7 ~]# systemctl enable smb
[root@server7 ~]# useradd -s /sbin/nologin barney

[root@server7 ~]# smbpasswd -a barney   #添加samba用户barney
[root@server7 ~]# pdbedit -L   #查看samba用户中的成员

[root@server7 ~]# touch /groupdir/file   #建立groupdir目录下的文件,以便进行测试
在desktop虚拟机上,进行测试
[root@desktop7 ~]# yum install samba-client.x86_64 -y
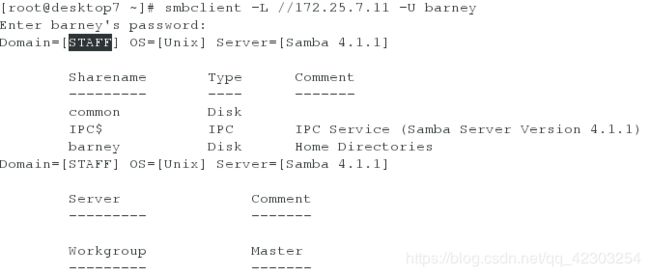
[root@desktop7 ~]# smbclient -L //172.25.7.11 -U barney
[root@desktop7 ~]# smbclient //172.25.7.11/common -U barney
测试完之后,在server虚拟机上删除文件/groupdir/file,然后再在desktop虚拟机上,查看,看file文件是否已经消失
![]()
测试,只有 example.com 域的客户可以访问 common 共享
测试完之后,启动server虚拟机上的firewalld服务
![]()
9、smb 多用户挂载配置
在 serverx 共享通过 smb 目录/data
共享名称 data
共享目录 data 只能被 example.com 域中的客户使用
共享目录 data 必须可以被浏览
用户 manager 必须能以读的方式访问此共享,访问密码是 westos
用户 wolferyne 必须能够以读写的方式访问此共享,访问密码是 westos
此共享永久挂载到 desktopx 主机的 /mnt/westos 目录,并使用用户 manager 作为认证
任何用户通过用户 wolferyne 来临时获取写的权限
在server虚拟机上,进行配置
[root@server7 ~]# mkdir /data
[root@server7 ~]# semanage fcontext -a -t samba_share_t '/data(/.*)?'
[root@server7 ~]# restorecon -RvvF /data/
[root@server7 ~]# vim /etc/samba/smb.conf
325         [data]
326         path = /data
327         hosts allow = 172.25.7. 127.
328         browseable = yes
329         write list = wolferyne

[root@server7 ~]# useradd -s /sbin/nologin manager
[root@server7 ~]# useradd -s /sbin/nologin wolferyne
[root@server7 ~]# smbpasswd -a manager
[root@server7 ~]# smbpasswd -a wolferyne
[root@server7 ~]# pdbedit -L

[root@server7 ~]# systemctl restart smb.service

[root@server7 ~]# setfacl -m u:wolferyne:rwx /data/
![]()
在desktop虚拟机上,进行测试
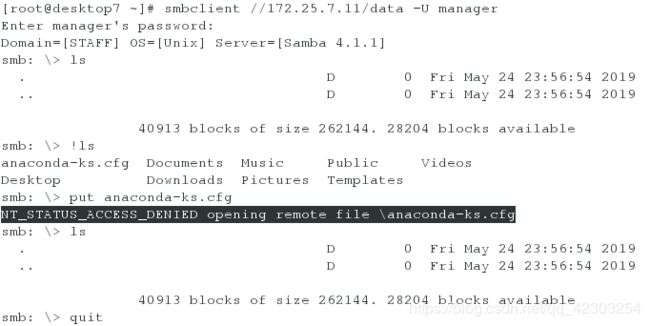
[root@desktop7 ~]# smbclient //172.25.7.11/data -U manager
[root@desktop7 ~]# smbclient //172.25.7.11/data -U wolferyne
测试,只有 example.com 域的客户可以访问 common 共享
测试完之后,启动server虚拟机上的firewalld服务
![]()
在desktop虚拟机上进行配置,使得实现永久挂载
[root@desktop7 ~]# yum install cifs-utils -y

[root@desktop7 ~]# vim /root/exam
username=manager
password=westos
[root@desktop7 ~]# chmod 600 /root/exam

[root@desktop7 ~]# vim /etc/fstab    #其中的参数,通过man mount.cifs来查看
//172.25.7.11/data      /mnt/westos     cifs    defaults,credentials=/root/exam,sec=ntlmssp,multiuser   0 0

[root@desktop7 ~]# mkdir /mnt/westos

[root@desktop7 ~]# mount -a
[root@desktop7 ~]# df   #查看,是否挂载成功
[root@desktop7 ~]# mount   #用来查看挂载参数
![]()
在desktop虚拟机上测试,任何用户通过用户 wolferyne 来临时获取写的权限
[root@desktop7 ~]# su - student
[student@desktop7 ~]$ ls /mnt/westos   #显示“Permission denied”,则表示配置正确

[student@desktop7 ~]$ cifscreds add -u wolferyne 172.25.7.11   #获取wolferyne的身份

[student@desktop7 ~]$ touch /mnt/westos/file
[student@desktop7 ~]$ ls /mnt/westos/
file
[student@desktop7 ~]$ rm -rf /mnt/westos/file
[student@desktop7 ~]$ ls /mnt/westos/
[student@desktop7 ~]$
10、配置 NFS 服务
在 serverx 配置 nfs
以只读的方式共享目录/public 能被 example.com 域中的系统访问
以读写的方式共享目录/protected 能被 example.com 域中的系统访问
访问/protected 需要通过 kerberos 安全加密,您可以使用下面的 url 提供的秘钥
http://classroom.example.com/pub/keytabs/serverx.keytab
目录/protected 应该包含名称为 restricted,拥有人为 ldapuser1 的子目录
用户 ldapuser1 能够使用读写的方式访问/protected/restricted
server虚拟机
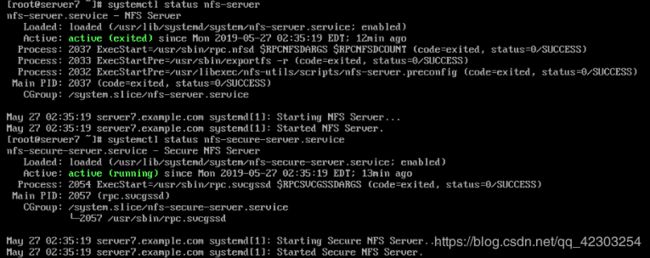
[root@server7 ~]# systemctl start nfs-server
[root@server7 ~]# systemctl enable nfs-server
[root@server7 ~]# systemctl status nfs-server

[root@server7 ~]# mkdir /public
[root@server7 ~]# mkdir /protected
[root@server7 ~]# mkdir /protected/restricted
[root@server7 ~]# chown ldapuser1.ldapuser1 /protected/restricted/
[root@server7 ~]# ll -d /protected/restricted/

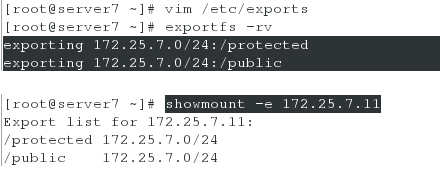
[root@server7 ~]# vim /etc/exports
/public         172.25.7.0/24(ro,async)
/protected      172.25.7.0/24(rw,async,sec=krb5p)
[root@server7 ~]# exportfs -rv
[root@server7 ~]# showmount -e 172.25.7.11   #能看到共享的两个目录,则表示配置正确

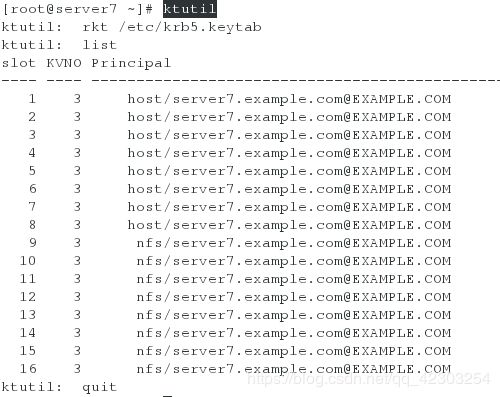
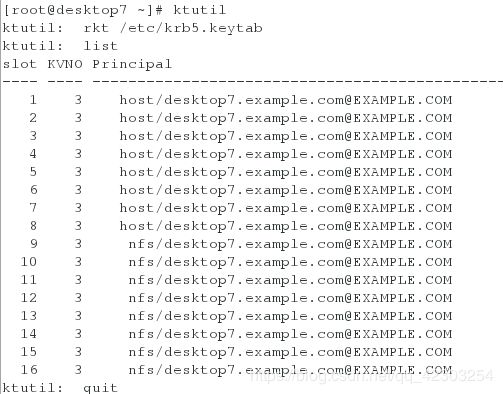
[root@server7 ~]# wget http://classroom.example.com/pub/keytabs/server7.keytab -O /etc/krb5.keytab

[root@server7 ~]# ktutil
ktutil:  rkt /etc/krb5.keytab
ktutil:  list   #看其中列出的主机名是否是自己的主机名

[root@server7 ~]# systemctl start nfs-secure-server
[root@server7 ~]# systemctl enable nfs-secure-server
[root@server7 ~]# systemctl status nfs-secure-server
11、挂载一个 nfs 共享
在 desktopx 上挂载一个来自 serverx.example.com 的 nfs 共享 /public 挂载在下面的目录上/mnt/nfsmount,
/protected 挂载在下面目录上/mnt/nfssecure 并且使用安全方式访问,秘钥:
http://classroom.example.com/pub/keytabs/desktopx.keytab
用户 ldapuser1 能够在/mnt/nfssecure/restricted 上创建文件,
这些文件系统在开机启动时自动挂载
在desktop虚拟机进行配置,实现开机自动挂载
[root@desktop7 ~]# showmount -e 172.25.7.11
Export list for 172.25.7.11:
/protected 172.25.7.0/24
/public    172.25.7.0/24
[root@desktop7 ~]# mkdir -p /mnt/nfsmount
[root@desktop7 ~]# mkdir -p /mnt/nfssecure

[root@desktop7 ~]# wget http://classroom.example.com/pub/keytabs/desktop7.keytab -O /etc/krb5.keytab

[root@desktop7 ~]# ktutil
ktutil:  rkt /etc/krb5.keytab
ktutil:  list   #看列出的主机名,是否是自己的主机名。如果是,则代表配置正确

[root@desktop7 ~]# systemctl start nfs-secure
[root@desktop7 ~]# systemctl enable nfs-secure
[root@desktop7 ~]# systemctl status nfs-secure.service

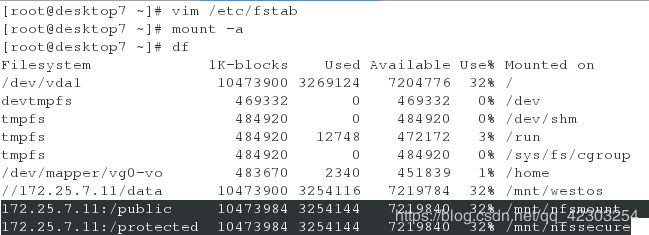
[root@desktop7 ~]# vim /etc/fstab
 12 172.25.7.11:/public     /mnt/nfsmount   nfs     defaults        0 0
 13 172.25.7.11:/protected /mnt/nfssecure  nfs     defaults,sec=krb5p      0 0
[root@desktop7 ~]# mount -a   #值的一提的是:必须先打开nfs-secure服务,再执行"mount -a"命令,否则会报错
[root@desktop7 ~]# df   #查看写入的两个挂载,是否挂载成功
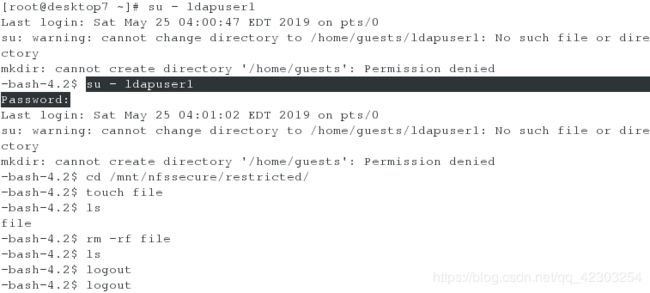
在desktop虚拟机上测试,看用户 ldapuser1 是否能够在/mnt/nfssecure/restricted 上创建文件
1、在server虚拟机上,对/protected/restricted目录,进行acl的设置。
#以防止在desktop虚拟机测试时,ldapuser1不能在/mnt/nfssecure/restricted下创建文件(代表的用户是nfsnobody)
#但有时krb5p这个安全认证方式,就识别为用户ldapuser1,所以此时,即使不在server虚拟机上,进行acl的设置,也不会有错。
[root@server7 ~]# ll -d /protected/restricted/
drwxr-xr-x. 2 ldapuser1 ldapuser1 6 May 25 03:54 /protected/restricted/
[root@server7 ~]# setfacl -m u:nfsnobody:rwx /protected/restricted/
[root@server7 ~]# ll -d /protected/restricted/
drwxrwxr-x+ 2 ldapuser1 ldapuser1 6 May 25 03:54 /protected/restricted/

2、在desktop上进行测试
测试方法一:利用切换用户的方法。此时值的注意的是,必须至少切换两次,即必须要输入密码(krb5p这个安全认证方式所造成的)
[root@desktop7 ~]# su - ldapuser1    #切换两次
-bash-4.2$ su - ldapuser1
Password:

测试方法二:利用ssh的方式
[root@desktop7 ~]# ssh ldapuser1@localhost
12、实现一个 web 服务器
在 serverx 上配置一个站点 http://serverx.exampmle.com从
http://classroom.example.com/pub/materials/station.html
下载文件,并且将文件重名名为 index.html 不要修改该此文件的内容
将文件 index.html 拷贝到您的 web 服务器的 Documentroot 目录下
来自 example.com 域的客户可以访问此 web 服务
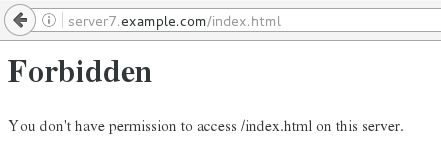
来自 my133.org 域的可以端拒绝访问此 web
在server虚拟机上,进行配置
[root@server7 ~]# wget http://classroom.example.com/pub/materials/station.html -O /var/www/html/index.html

[root@server7 ~]# cd /etc/httpd/conf.d/
[root@server7 conf.d]# vim vhost.conf
  1
  2         DocumentRoot /var/www/html
  3
  4
  5         Order Allow,Deny
  6         Allow from All
  7         Deny from 192.168.0.0/24
  8
[root@server7 conf.d]# systemctl restart httpd.service
在server虚拟机,desktop虚拟机,物理机上进行测试
1、在server虚拟机、desktop虚拟机和物理机上分别编写本地解析文件(物理机上不编写)
[root@server7 ~]# vim /etc/hosts
  6 172.25.7.11     server7.example.com
  7 172.25.7.10     desktop7.example.com

[root@desktop7 ~]# vim /etc/hosts
  6 172.25.7.11     server7.example.com
  7 172.25.7.10     desktop7.example.com

[root@foundation7 ~]# vim /etc/hosts
192.168.0.11    server7.example.com

2、在server虚拟机配置一个my133.org域的ip地址;在物理机配置一个my133.org域的ip地址
[root@server7 conf.d]# ifconfig eth0:0 192.168.0.11/24
[root@server7 conf.d]# ifconfig

[root@foundation7 ~]# ifconfig br0:0 192.168.0.7/24
[root@foundation7 ~]# ifconfig

3、分别在server虚拟机、desktop虚拟机、物理机上进行测试
[root@server7 ~]# firefox &   #输入网址server7.example.com。能看到内容,则表示正确

[root@desktop7 ~]# firefox &   #输入网址server7.example.com。能看到内容,则表示正确

[root@foundation7 ~]# firefox &   #输入网址server7.example.com。看不到内容,则表示正确
![]()
![]()
![]()
![]()
为了更加确认,先停掉server虚拟机上的firewalld服务,然后在物理机进行测试。测试之后,再开启server虚拟机上的firewalld
[root@server7 ~]# systemctl stop firewalld

再次在物理机的浏览器进行测试![]()
[root@server7 ~]# systemctl start firewalld
![]()
13、配置安全 web 服务
站点 https://serverX.example.com 配置 tls 加密一个已签名的证书
从 http://classroom.example.com/pub/tls/certs/westos.crt
从 http://classroom.example.com/pub/tls/private/westos.key
从 http://classroom.example.com/pub/example-ca.crt
在server虚拟机上,进行配置
[root@server7 ~]# yum install mod_ssl.x86_64 -y

[root@server7 ~]# cd /etc/httpd/
[root@server7 httpd]# wget http://classroom.example.com/pub/tls/certs/westos.crt
[root@server7 httpd]# wget http://classroom.example.com/pub/tls/private/westos.key
[root@server7 httpd]# wget http://classroom.example.com/pub/example-ca.crt

[root@server7 httpd]# vim conf.d/ssl.conf
100 SSLCertificateFile /etc/httpd/westos.crt
107 SSLCertificateKeyFile /etc/httpd/westos.key
116 SSLCertificateChainFile /etc/httpd/example-ca.crt
[root@server7 httpd]# systemctl restart httpd.service
在server虚拟机上,进行测试
[root@server7 httpd]# firefox & #输入网址https://server7.example.com
14、配置虚拟主机
在serverx上拓展您的web服务器,为站点
http://wwwx.example.com 创建一个虚拟主机
设定默认发布目录为/var/www/virtual
从classroom.example.com/pub/materials/www.html 下载文件并
重命名为 index.html,不要对文件 index.html 的内容做任何修改
将文件 index.html 放到默认发目录下
确保 barney 用户能在/var/www/virtual 目录下创建文件
在server虚拟机上,进行配置
[root@server7 httpd]# mkdir -p /var/www/virtual
[root@server7 httpd]# wget http://classroom.example.com/pub/materials/www.html -O /var/www/virtual/index.html

[root@server7 httpd]# setfacl -m u:barney:rwx /var/www/virtual/
[root@server7 httpd]# usermod -s /bin/bash barney
[root@server7 httpd]# su - barney   #测试barney用户对/var/www/virtual目录是否可写
[barney@server7 ~]$ cd /var/www/virtual/
[barney@server7 virtual]$ ls
index.html
[barney@server7 virtual]$ touch file
[barney@server7 virtual]$ ls
file  index.html
[barney@server7 virtual]$ rm -rf file
[barney@server7 virtual]$ ls
index.html
[barney@server7 virtual]$ logout
[root@server7 httpd]#

[root@server7 httpd]# vim /etc/httpd/conf.d/vhost.conf
  9
 10         ServerName www7.example.com
 11         DocumentRoot /var/www/virtual
 12
 13
 14         Require all granted
 15
[root@server7 httpd]# systemctl restart httpd
分别在server虚拟机、desktop虚拟机上进行测试
1、分别在server虚拟机和desktop虚拟机上编辑本地解析文件
[root@server7 httpd]# vim /etc/hosts
  6 172.25.7.11     server7.example.com www7.example.com
[root@desktop7 ~]# vim /etc/hosts
  6 172.25.7.11     server7.example.com www7.example.com

2、分别在server虚拟机和desktop虚拟机上进行测试
[root@server7 httpd]# firefox &   #在其中输入网址www7.example.com。能看到内容,表示正确

[root@desktop7 ~]# firefox &   #在其中输入网址www7.example.com。能看到内容,表示正确
![]()
![]()
15、配置您的 serverx 上的 web 服务器
在默认发布目录下创建一个名为 confidential 的目录从
http://classroom.example.com/pub/materials/private.html
下载到这个目录中,并且重命名为 index.html
不要修改这个文件的内容
从 serverx 上,任何人都可以浏览此目录,但是其他系统不能访问此目录中的内容
在server虚拟机上,进行配置
[root@server7 httpd]# mkdir -p /var/www/html/confidential
[root@server7 httpd]# wget http://classroom.example.com/pub/materials/private.html -O /var/www/html/confidential/index.html

[root@server7 httpd]# vim /etc/httpd/conf.d/vhost.conf
  9
 10         Order Deny,Allow
 11         Allow from 172.25.7.11
 12         Allow from localhost
 13         Allow from 127.0.0.1
 14         Allow from server7.example.com
 15         Deny from all
 16
[root@server7 httpd]# systemctl restart httpd
![]()
分别在server虚拟机、desktop虚拟机上进行测试
[root@server7 httpd]# firefox &   #输入网址server7.example.com/confidential。能看到内容,则表示正确

[root@server7 httpd]# firefox &    #输入网址server7.example.com/confidential。看不到内容,则表示正确
16、实现动态 web 内容
在 serverX 上配置提供 web 内容
动态内容由名为 transitive.example.com 的虚拟机提供虚拟机监听端口:8989
从 http://classroom.example.com/pub/materials/script.wsgi
下载一个脚本,然后放到合适的位置,不要修改该此文件内容
客户访问 http://transitive.example.com:8989时应该生成动态的web页面
此站点 必须能被 example.com 域内的所有系统访问
在server虚拟机上,进行配置
[root@server7 httpd]# yum install mod_wsgi -y
[root@server7 httpd]# wget http://classroom.example.com/pub/materials/script.wsgi -O /var/www/cgi-bin/script.wsgi

[root@server7 httpd]# vim /etc/httpd/conf.d/vhost.conf
 25
 26         ServerName transitive.example.com
 27         WSGIScriptAlias / /var/www/cgi-bin/script.wsgi
 28
 29 Listen 8989

[root@server7 httpd]# semanage port -l | grep http
[root@server7 httpd]# semanage port -a -t http_port_t -p tcp 8989
[root@server7 httpd]# semanage port -l | grep http

[root@server7 httpd]# systemctl restart httpd.service
[root@server7 httpd]# netstat -antulpe | grep http   #查看8989端口是否存在
![]()
在server虚拟机上进行测试
1、分别在server虚拟机和desktop虚拟机上编写本地解析文件
[root@server7 httpd]# vim /etc/hosts
  6 172.25.7.11     server7.example.com www7.example.com transitive.example.com
[root@desktop7 ~]# vim /etc/hosts
6 172.25.7.11     server7.example.com www7.example.com transitive.example.com

2、分别在server虚拟机和desktop虚拟机上测试
[root@server7 httpd]# firefox &   输入网址http://transitive.example.com:8989。能看到内容,代表正确
[root@desktop7 ~]# firefox & 输入网址http://transitive.example.com:8989。能看到内容,代表正确![]()
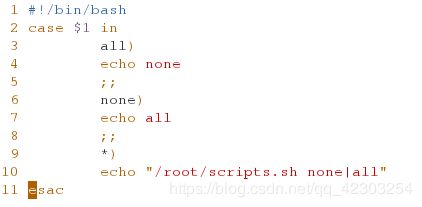
17、创建一个脚本
在 serverx 上创建一个/root/scripts.sh 的脚本,让其提供下列特性
当运行/root/scripts.sh all 输出 none
当运行/root/scripts.sh none 输出 all
当没有任何参数或者参数不时 all 或 none 时,其错误输出产生下列信息
/root/scripts.sh none|all
在server虚拟机上,编写脚本
[root@server7 httpd]# vim /root/scripts.sh
  1 #!/bin/bash
  2 case $1 in
  3         all)
  4         echo none
  5         ;;
  6         none)
  7         echo all
  8         ;;
  9         *)
 10         echo "/root/scripts.sh none|all"
 11 esac
[root@server7 httpd]# chmod +x /root/scripts.sh
在server虚拟机上,测试脚本
18、配置 iscsi 服务端
配置serverx提供一个iscsi服务磁盘名称
iqn.2014-11.com.example:serverx端口 3260
用 iscsi_data 作为后端卷,大小为 3G
此服务只能被 desktopx.example.com 访问
在server虚拟机上,生成一个名为iscsi_data,大小为3G的LV
[root@server7 httpd]# yum install targetcli -y
[root@server7 ~]# systemctl start target
[root@server7 ~]# systemctl enable target.service
[root@server7 ~]# systemctl status target.service

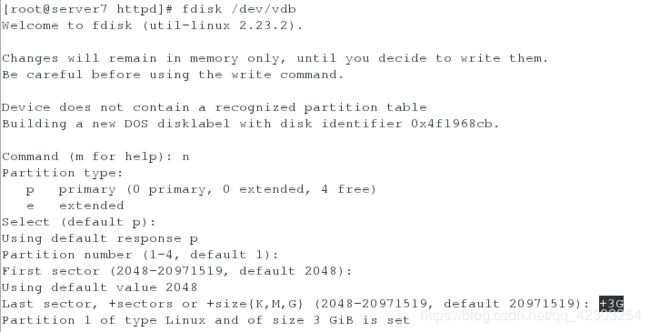
[root@server7 httpd]# fdisk /dev/vdb   #使用磁盘/dev/vdb分区,分区的ID为8e(LVM分区),因为后端卷的名字是给定的,所以需要利用LVM来设定后端卷的名字
[root@server7 httpd]# partprobe   #同步分区表

[root@server7 httpd]# pvcreate /dev/vdb1
[root@server7 httpd]# vgcreate exam /dev/vdb1
[root@server7 httpd]# vgdisplay
[root@server7 httpd]# lvcreate -l 767 -n iscsi_data exam
[root@server7 httpd]# lvs   #查看该LV的大小是否是3g
在server虚拟机上,配置iscsi服务
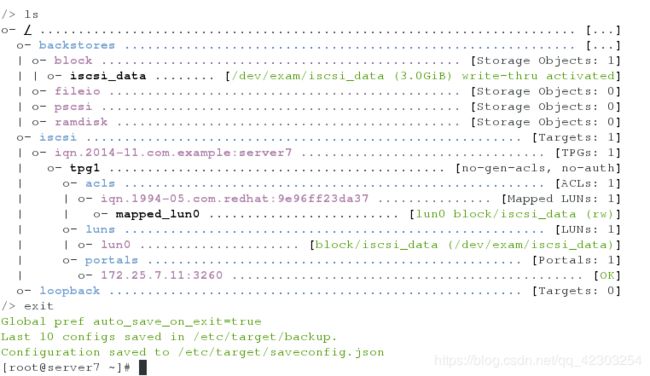
[root@server7 ~]# targetcli
/> backstores/block create iscsi_data /dev/exam/iscsi_data
/> iscsi/ create iqn.2014-11.com.example:server7
/> iscsi/iqn.2014-11.com.example:server7/tpg1/luns create /backstores/block/iscsi_data
/> iscsi/iqn.2014-11.com.example:server7/tpg1/acls create iqn.1994-05.com.redhat:9e96ff23da37
/> iscsi/iqn.2014-11.com.example:server7/tpg1/portals create 172.25.7.11
/> exit

值的注意的是:第四行命令acl后面接的内容,来自于desktop虚拟机上/etc/iscsi/initiatorname.iscsi文件中的内容
[root@desktop7 ~]# cat /etc/iscsi/initiatorname.iscsi
InitiatorName=iqn.1994-05.com.redhat:9e96ff23da37
19、配置 iscsi 的客户端
配置 desktopx 使其能连接在 serverx 上提供的 iscsi
iscsi 设备在系统启动的期间自动加载
块设备 iscsi 上包含一个大小为 1900M 的分区,并格式化为 xfs
此分区自动挂载在/mnt/data 上同时在系统启动的期间自动挂载
在desktop虚拟机上,设置服务开机自启
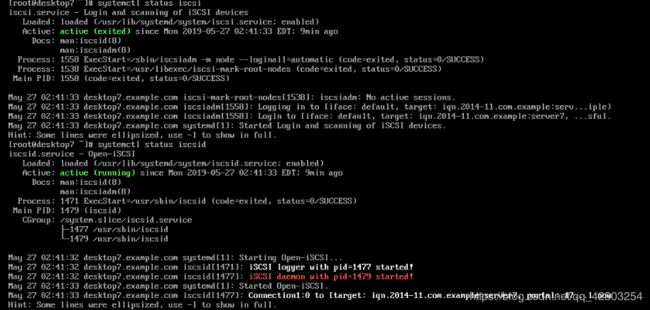
[root@desktop7 ~]# systemctl start iscsi
[root@desktop7 ~]# systemctl enable iscsi
[root@desktop7 ~]# systemctl status iscsi

[root@desktop7 ~]# systemctl start iscsid
[root@desktop7 ~]# systemctl enable iscsid.service
[root@desktop7 ~]# systemctl status iscsid
在desktop虚拟机上,分一个1900M的分区,并格式化为xfs
[root@desktop7 ~]# iscsiadm -m discovery -t st -p 172.25.7.11
[root@desktop7 ~]# iscsiadm -m node -T iqn.2014-11.com.example:server7 -p 172.25.7.11 -l

[root@desktop7 ~]# fdisk -l   #查看是否多了一块磁盘/dev/sda。若是,则表示配置正确

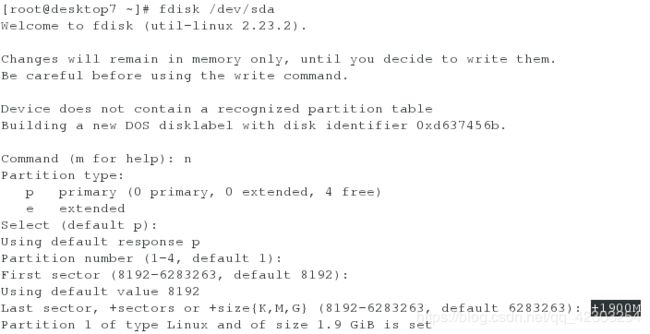
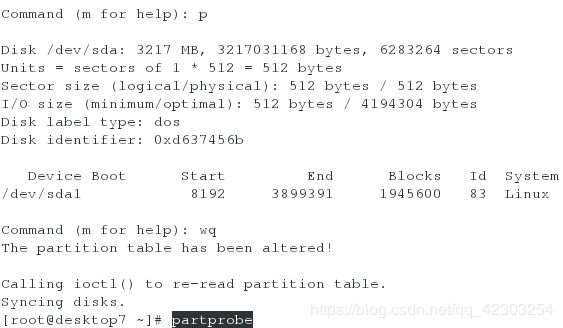
[root@desktop7 ~]# fdisk /dev/sda   #新增一个大小为1900M的分区
[root@desktop7 ~]# partprobe   #刷新分区表

[root@desktop7 ~]# mkfs.xfs /dev/sda1                extsz=4096   blocks=0, rtextents=0
![]()
![]()
在desktop虚拟机上,实现自动挂载
[root@desktop7 ~]# blkid
[root@desktop7 ~]# vim /etc/fstab    #利用UUID号来挂载,因为UUID号是唯一的
 14 UUID="ddb87722-a29d-47d4-ab53-5cb692cb19cc"     /mnt/data       xfs     defaults,_netdev        0 0
[root@desktop7 ~]# vim /etc/fstab
[root@desktop7 ~]# mkdir -p /mnt/data
[root@desktop7 ~]# mount -a
[root@desktop7 ~]# df   #看,是否有/mnt/data的挂载,有,则表示正确
20、配置一个数据库
在 serverx 上创建一个 mariadb,名为 Contacts
数据库应该包含来自数据库复制的内容。复制文件的 url
http://classroom.example.com/pub/materials/users.mdb
数据库只能被 localhost 访问
除了 root 用户,此数据库只能被 Luigi 查询,此用户密码为 westos
超级用户密码为 westos,同时不允许空密码登陆
在server虚拟机上,安装mariadb-server软件,开启并自启服务,并进行安全初始化
[root@server7 ~]# yum install mariadb-server -y
[root@server7 ~]# systemctl start mariadb
[root@server7 ~]# systemctl enable mariadb
[root@server7 ~]# systemctl status mariadb

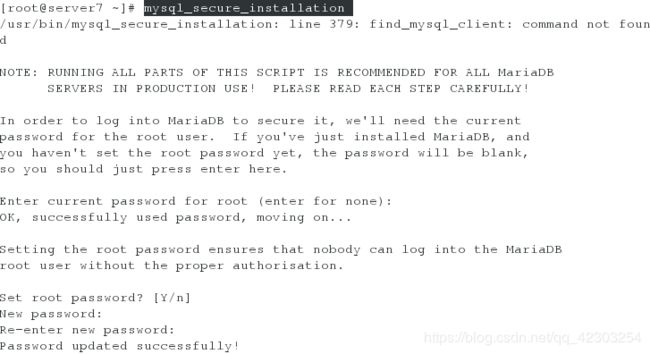
[root@server7 ~]# mysql_secure_installation   #对数据库进行安全初始化的操作,除了输入密码,一路敲击空格
在server虚拟机上,创建数据库,导入数据库相应内容,并进行访问控制
[root@server7 ~]# mysql -uroot -pwestos
MariaDB [(none)]> create database Contacts;
MariaDB [(none)]> show databases;

[root@server7 ~]# wget http://classroom.example.com/pub/materials/users.mdb

[root@server7 ~]# mysql -uroot -pwestos Contacts < users.mdb

[root@server7 ~]# mysql -uroot -pwestos
MariaDB [(none)]> create user Luigi@localhost identified by 'westos';
MariaDB [(none)]> grant SELECT ON Contacts.* to Luigi@localhost;
MariaDB [(none)]> SHOW GRANTS FOR Luigi@localhost;![]()
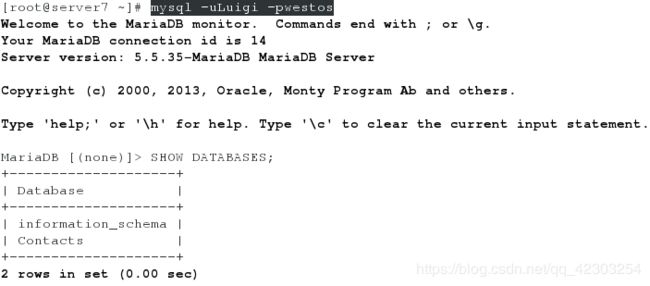
在server虚拟机上,使用Luigi身份登录,进行验证
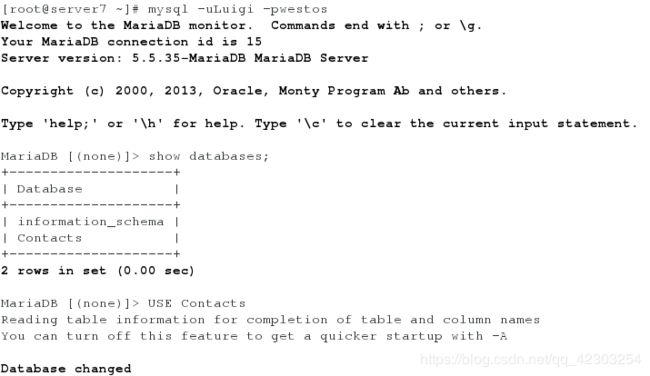
[root@server7 ~]# mysql -uLuigi -pwestos
MariaDB [(none)]> SHOW DATABASES;
MariaDB [(none)]> USE Contacts
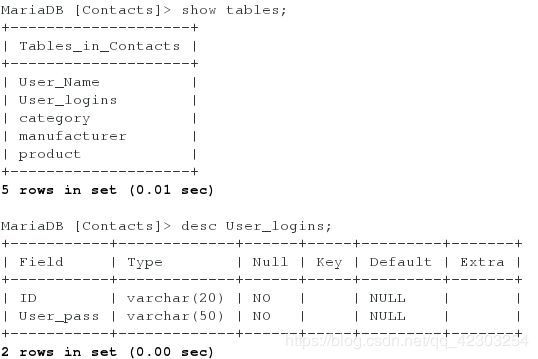
MariaDB [Contacts]> SHOW TABLES;
21、查询数据库
在系统 serverx 上使用数据库 Contacts,并且使用相应 sql 查询以回答
下列问题密码 forsook 的人的名字Brian
select id from User_logins where User_pass = ‘forsook’
select first_name from User_Names where user_id = ‘4178’
有多少人的姓名是 Alan 同时居住在 Cupertino
152
server虚拟机
![]()
值的注意的是:
- 关机时,先关desktop虚拟机(客户端),再关server虚拟机(服务端)。开机时,先开启server虚拟机,再开启desktop虚拟机。
- 第一次关机时,desktop虚拟机会存在关不掉的情况,此时强制关机即可。
重启server虚拟机和desktop虚拟机之后,需要检查的内容如下:
server虚拟机
1、查看team0网络接口及ipv6地址
2、检查各种服务的状态(httpd、sshd、postfix、target、nfs-server、nfs-secure-server、smb、mariadb、)
desktop虚拟机
1、查看team0网络接口及ipv6地址及ipv6地址
2、查看挂载项(4个)
3、查看服务的状态(postfix、nfs-secure、iscsi、iscsid、)


