WebRTC Windows版编译(支持H264+OpenSSL)
摘要
本文介绍了在Windows下编译WebRTC的方法,WebRTC默认支持VP8、VP9(谷歌自己的编码)和BoringSSL
(谷歌的OpenSSL分支,主要修复一些OpenSSL主线的漏洞),本文将介绍在Windows下让WebRTC支持使用更广泛的H264、OpenSSL的方法。
版本
本文使用的版本是57,我下载WebRTC代码的时候最新版本是62,但是为了方便编译切到57版本,57版本在Windows下编译需要Visual Studio 2015。后来我下载了最新的65版本的代码,其编译工具要求Visual Studio 2017,所以这里需要注意,WebRTC Windows版不同版本的编译可能会要求不同的Visual Studio版本。
为什么要支持H264
很简单,为了兼容性。VP8、VP9是谷歌自己的编码,在IOS上目前支持并不好,而H264是事实上的标准,在各个平台支持的很好。但是由于H264并不是谷歌亲生的,所以在传输上与WebRTC本身的代码结合得还不是很完美,例如H264下FEC无法使用,弱网情况下VP8比H264的表现的确要好一些,详细可以参考:https://blog.csdn.net/volvet/article/details/53700049。
为什么要支持OpenSSL
OpenSSL当年曝出HeartBleed等漏洞,谷歌便开启了OpenSSL的BoringSSL分支用于解决这些漏洞,这些漏洞大多被提交到官方的OpenSSL中。目前业内做SSL/TLS应用大多选择OpenSSL,而BoringSSL除了修改了部分漏洞外,接口与OpenSSL是完全一致的,这就导致了大量重复的符号。如果有两个静态库,一个使用OpenSSL,一个使用BoringSSL(例如WebRTC),在链接时由于符号冲突会出现链接错误。如果使用动态库,链接期间不会报错,但是运行期间程序是执行OpenSSL的符号还是BoringSSL的符号不可知,程序的行为无法预计。现在谷歌在很多项目中已经开始使用BoringSSL,其宣称并不想取代OpenSSL,而事实上BoringSSL具有传染性,因为你一旦用了他包含BoringSSL的一个库,其他使用OpenSSL的地方只好舍弃OpenSSL采用BoringSSL。就目前来讲,OpenSSL使用得更广泛(虽然有已知的漏洞),如果你提供一个SDK给别人集成,那么希望兼容性更好,那么有可能需要将BoringSSL改为OpenSSL。
注意:使用动态库并隐藏好符号,可以解决冲突的问题,事实上WebRTC已经提供了隐藏符号的办法,参考:Incorporating BoringSSL into a project(Symbols)。
编译准备
- 已经编译好的OpenSSL,参考我的另外一篇博文:https://blog.csdn.net/sonysuqin/article/details/79674854;
- 安装Cygwin,主要用于执行补丁脚本;
- VPN,下载WebRTC代码最好直接下官网的,需要FAN-QIANG,也有国内人做的镜像,但有可能会缺一些依赖;
编译
主要参考:https://github.com/ipop-project/ipop-project.github.io/wiki/Build-WebRTC-Libraries-for-Windows
这里搬运一下,基本步骤大同小异:
下载依赖
- 安装Visual Studio 2015 Update 2以上版本,安装的时候需要选择MFC、通用Windows开发工具、 Windows 10 SDK (10.0.10586);
- 安装Chromium depot tools,主要就是下载depot_tools.zip,解压后,将其路径加入PATH环境变量;
- 打开CMD,执行一次gclient,会自动下载一些工具,例如git、python等;
下载WebRTC源码
- 创建WebRTC代码目录并进入
mkdir webrtc-checkout
cd webrtc-checkout - 下载代码
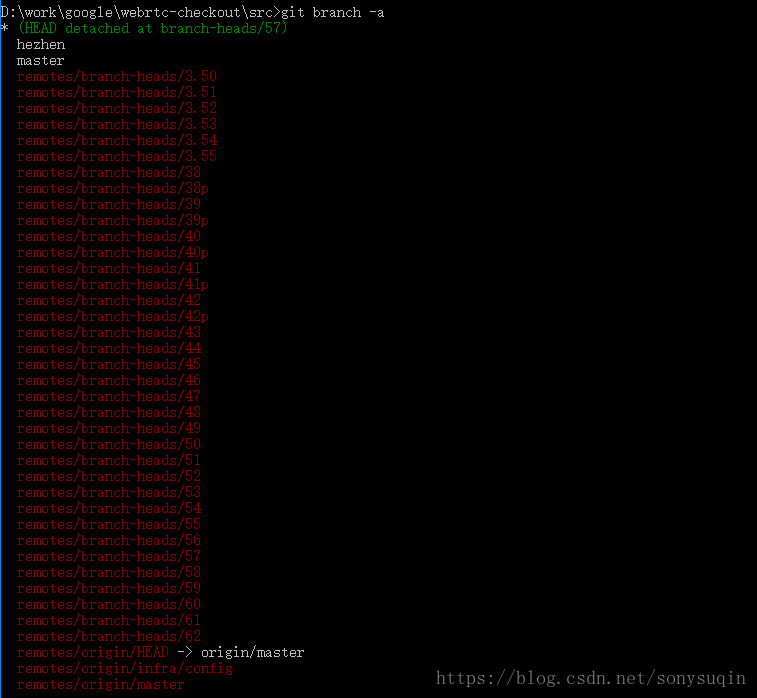
fetch --nohooks webrtc - 切换到57版本
git branch -r
git checkout branch-heads/57 - 同步,下载依赖
gclient sync
最好预留20G的空间。
生成工程
gn gen out/release_vs_h264_openssl --args="is_debug=false target_os=\"win\" target_cpu=\"x86\" is_component_build=false proprietary_codecs=true rtc_use_h264=true ffmpeg_branding=\"Chrome\" rtc_build_ssl=false rtc_ssl_root=\"D:\work\mediasdk\third_party\openssl\win32\include\"" --ide=vs2015这个命令会在out目录下生成一个工作目录release_vs_h264_openssl。
--args内部参数的意义:
| is_debug | 是否是Debug版,这里取false,表示编译Release版。 |
| target_os | 平台类型,可以取值win、android、ios、linux等,这里取win,表示Windows平台。 |
| target_cpu | cpu类型,Windows下可以取x86、x64,这里取x86,对应32位版本。 |
| is_component_build | 是否使用动态运行期库,这里取false,使用静态运行期库,Release版本将对应MT,Debug版将对应MTd。 |
| proprietary_codecs | 是否使用版权编码,也就是H264,这里取true。 |
| rtc_use_h264 | 是否使用H264,这里取true,注意Windows平台编码使用OpenH264,解码使用ffmpeg。 |
| ffmpeg_branding | ffmpeg的分支名,这里采用Chrome的分支。 |
| rtc_build_ssl | 是否编译BoringSSL,这里取false,因为后面我们要替换成OpenSSL。 |
| rtc_ssl_root | OpenSSL的头文件路径,会被写到生成的ninja文件中。 |
--ide=vs2015
这个参数在使用Visual Studio 2015调试的时候需要设置,如果只是编译不调试则没有必要设置。无论有没有这个参数,WebRTC都是用ninja编译系统来编译,也就是说即使用Visual Studio 2015打开了工程编译,也是调用ninja编译。
obj目录下每个.ninja文件都相当于一个Makefile或者说一个工程文件,对应每个模块的编译、链接设置,而主工程obj/webrtc/webrtc.ninja生成的webrtc.lib是我们将要使用的库。
手动打的补丁
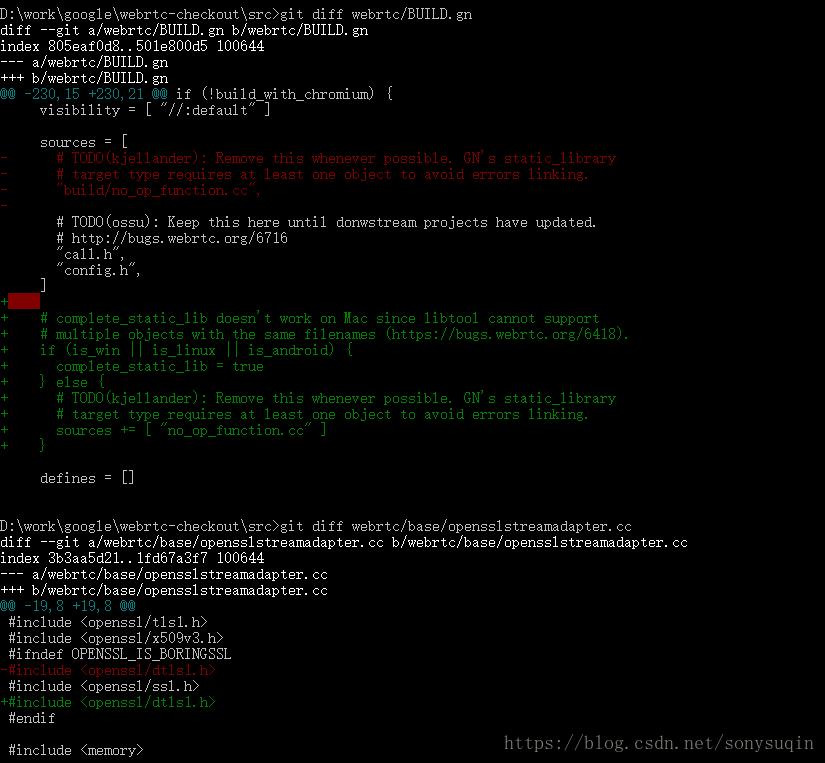
主要是一次性永久生效的修改,主要修改两个文件:
- webrtc/BUILD.gn,修改前生成的静态库webrtc.lib只有几K,修改后会生成完整的静态库;
- webrtc/base/opensslstreamadapter.cc,修改了头文件的顺序,否则会报编译错误。
自动打的补丁
每生成一次工程都要打的补丁,下面贴一个脚本(必须放到工程的obj目录下),用于
- 加入OpenSSL的支持;
- 加入field_trial和metrics这两个库,默认webrtc.ninja没有把这两个库加入,只链接webrtc.lib时可能会报链接错误;
- 删除video_capture_external、device_info_external这两个模块,因为默认webrtc.ninja把video_capture_external、device_info_external、video_capture_internal_impl等模块一起链接进去,符号是重复的,编译的时候会报警,调用的时候可能调到video_capture_external(需要上层实现),实际上video_capture_internal_impl是WebRTC对摄像头的内部实现,如果要自己实现外部的摄像头模块,则应删除video_capture_internal_impl。
#!/bin/bash

boringssl_include="..\/..\/third_party\/boringssl\/src\/include"
boringssl_libs="obj\/third_party\/boringssl\/boringssl.lib\ obj\/third_party\/boringssl\/boringssl_asm.lib"
boringssl_asm_stamp="obj\/third_party\/boringssl\/boringssl_asm_action.stamp"
openssl_include="D$:\/work\/mediasdk\/third_party\/openssl\/win32\/include"
openssl_libs="D$:\/work\/mediasdk\/third_party\/openssl\/win32\/lib\/ssleay32.lib D$:\/work\/mediasdk\/third_party\/openssl\/win32\/lib\/libeay32.lib"
openssl_libdir="D$:\/work\/mediasdk\/third_party\/openssl\/win32\/lib"
openssl_ld="ssleay32.lib\ libeay32.lib"
additional_obj="obj\/webrtc\/system_wrappers\/field_trial_default\/field_trial_default.obj obj\/webrtc\/system_wrappers\/metrics_default\/metrics_default.obj"

patch() {
  local file_name=$1
  echo process $file_name
  has_boringssl_header=`grep $boringssl_include $file_name`
  if [ -n "$has_boringssl_header" ];then
    #echo Found boringssl include dir,replace it and add openssl macro.
    #Replace include
    sed -i "s/$boringssl_include/$openssl_include/g" $file_name

    #Append openssl macro.
    sed -i "/^defines =/s/$/ -DSSL_USE_OPENSSL -DHAVE_OPENSSL_SSL_H -DFEATURE_ENABLE_SSL/" $file_name
  fi

  #Replace boringssl libraries to openssl libraries.
  sed -i "s/$boringssl_libs/$openssl_libs/g" $file_name

  #Delete boringssl asm stamp
  sed -i "s/$boringssl_asm_stamp//g" $file_name

  #Delete boringssl objects.
  sed -i "s/obj\/third_party\/boringssl\/boringssl\/err_data.obj.*obj\/third_party\/boringssl\/boringssl_asm\/sha512-586.o //g" $file_name
}

add_openssl_libs() {
  local file_name=$1
  echo Add openssl lib to $file_name
  #Append openssl library path.
  has_ssl_ld=`grep openssl\/win32\/lib $file_name`
  if [ -z "$has_ssl_ld" ];then
    sed -i "/ldflags =/s/$/ \/LIBPATH:\"$openssl_libdir\"/" $file_name
  fi
  has_ssl_lib=`grep ssleay32.lib $file_name`
  if [ -z "$has_ssl_lib" ];then
    sed -i "s/libs =/& $openssl_ld/" $file_name
  fi
}

grep -r boringssl . | grep -v -e boringssl.ninja -e boringssl_asm.ninja -e boringssl.vcxproj -e boringssl_asm.vcxproj | grep ninja | awk -F : '{print $1}' | sort | uniq | while read line
do
  patch $line
done

fs=('./webrtc/examples/stun_prober.ninja' './webrtc/rtc_unittests.ninja' './webrtc/webrtc_nonparallel_tests.ninja' './webrtc/stats/rtc_stats_unittests.ninja' './webrtc/modules/modules_unittests.ninja')
for f in ${fs[@]};do
  add_openssl_libs $f
done

file_name=./webrtc/webrtc.ninja

#Add field_trial and metrics
has_field_trial=`grep field_trial_default $file_name`
if [ -z "$has_field_trial" ];then
  echo Add field_trial and metrics
  sed -i "s/alink/& $additional_obj/" $file_name
fi

#Delete external capture
echo Delete external capture
sed -i "s/obj\/webrtc\/modules\/video_capture\/video_capture\/device_info_external.obj obj\/webrtc\/modules\/video_capture\/video_capture\/video_capture_external.obj //g" $file_name
执行该脚本需要安装Cygwin,该脚本会先搜索工程目录下所有的ninja文件,找到BoringSSL的头文件、库,替换成OpenSSL的宏、头文件、库,同时该脚本还将修改webrtc.ninja,加入field_trial_default、metrics_default这两个模块,并删除video_capture_external、device_info_external这两个模块。
执行编译
在src目录下,执行
ninja -C out\release_vs_h264_openssl
会进行完整编译,也可以用Visual Studio 2015打开all.sln进行编译。
在obj/webrtc目录下生成的webrtc.lib就是我们要使用的支持H264、OpenSSL的WebRTC静态库。
测试H264
完整编译后会在out\release_vs_h264_openssl目录下生成一个video_loopback工具,用于进行loopback播放。
如果不完整编译,也可以单独执行以下命令来单独编译video_loopback,相应的依赖也将被编译。
ninja -C out\release_vs_h264_openssl video_loopback
video_loopback会调用WebRTC采集摄像头数据、编码、解码、渲染,进入out\release_vs_h264_openssl目录,执行以下命令会看到效果:
video_loopback --codec=H264

注:以上是Debug版的截图,Release版并不打印这些log。