Linux时间系统之RTC时间
一、概述
不知道有没有“时间系统”的说法,我们暂且把它作为Linux中和时间相关的内容的统称吧。Linux时间有两个, 系统时间(Wall Time), RTC时间。
系统时间(WT):由Linux系统软件维持的时间,比如command date:
$ date
2017年 02月 25日 星期六 16:58:10 CST
获取到的就是系统时间。
RTC时间:这个时间来自我们设备上的RTC芯片,通过command hwclock 可以读取:
# hwclock -r  --> root权限才可以运行
2017年02月25日 星期六 17时01分57秒  -0.906462 seconds
我们通过man查看hwclock的介绍:
hwclock - query or set the hardware clock (RTC)接下来,通过代码看下两者的关系。
二、WT时间和RTC时间
WT时间来自于RTC时间,流程是:上电-->RTC驱动加载-->从RTC同步时间到WT时间上代码:
hctosys.c (drivers\rtc)
static int __init rtc_hctosys(void)
{
    struct timespec tv = {
        .tv_nsec = NSEC_PER_SEC >> 1,
    };

    err = rtc_read_time(rtc, &tm);
    err = do_settimeofday(&tv);
    dev_info(rtc->dev.parent,
        "setting system clock to "
        "%d-%02d-%02d %02d:%02d:%02d UTC (%u)\n",
        tm.tm_year + 1900, tm.tm_mon + 1, tm.tm_mday,
        tm.tm_hour, tm.tm_min, tm.tm_sec,
        (unsigned int) tv.tv_sec);
}
late_initcall(rtc_hctosys);late_initcall说明系统在启动流程的后面才会调用该函数去同步时间。关于late_initcall可见最后PS。
接下来从底层到上层进行梳理。
三、RTC时间框架
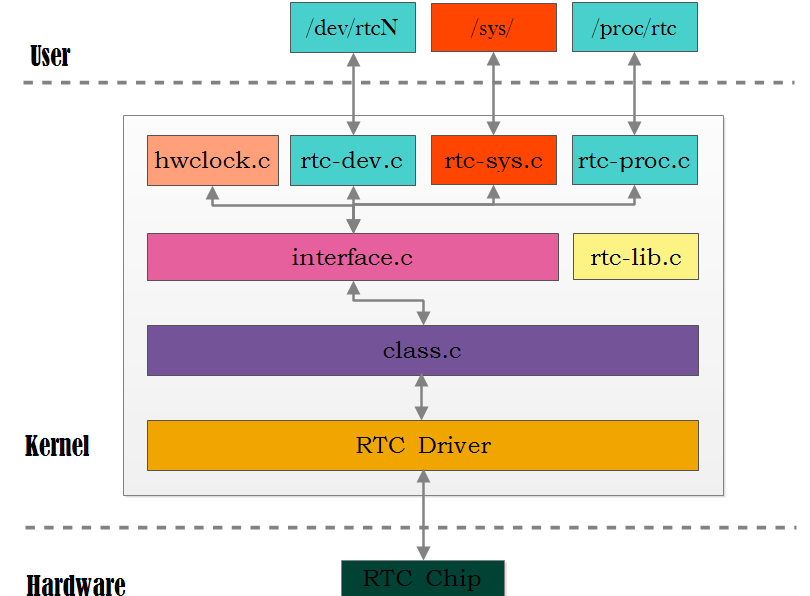
框架如图:
注:图中hwclock.c笔误,实为hctosys.c
- Hardware:提供时间信息(time&alarm),通过一定的接口(比如I2C)和
- RTC Driver:进行交互。Driver完成硬件的访问功能,提供访问接口,以驱动的形式驻留在系统。注册方式由
- class.c:文件提供。驱动注册成功后会构建rtc_device结构体表征的rtc设备,并把rtc芯片的操作方式存放到rtc设备的ops成员中
- interface.c:文件屏蔽硬件相关的细节,向上提供统一的获取/设置时间或Alarm的接口
- rtc-lib.c:文件提供通用的时间操作函数,如rtc_time_to_tm、rtc_valid_tm等
- rtc-dev.c:文件在/dev/目录下创建设备节点供应用层访问,如open、read、ioctl等,访问方式填充到file_operations结构体中
- hctosys.c/rtc-sys.c/rtc-proc.c:看名字就知道其作用
接下来从驱动一层一层看下
四、RTC驱动
驱动主要工作是填充 rtc_class_ops结构体,结构体描述了RTC芯片能够提供的所有操作方式:struct rtc_class_ops {
int (*open)(struct device *);
void (*release)(struct device *);
int (*ioctl)(struct device *, unsigned int, unsigned long);
int (*read_time)(struct device *, struct rtc_time *);
int (*set_time)(struct device *, struct rtc_time *);
int (*read_alarm)(struct device *, struct rtc_wkalrm *);
int (*set_alarm)(struct device *, struct rtc_wkalrm *);
int (*proc)(struct device *, struct seq_file *);
int (*set_mmss)(struct device *, unsigned long secs);
int (*read_callback)(struct device *, int data);
int (*alarm_irq_enable)(struct device *, unsigned int enabled);
};实现:
static const struct rtc_class_ops test_rtc_ops = {
    .read_time    = test_rtc_read_time,
    .set_time    = test_rtc_set_time,
    .read_alarm    = test_rtc_read_alarm,
    .set_alarm    = test_rtc_set_alarm,
    .ioctl         = test_rtc_ioctl,
    .proc        = test_rtc_proc
};
注册:
rtc_device_register(name, dev, &test_rtc_ops, THIS_MODULE);成功的话log:
[    1.531114] test_rtc_init Enter.
[    1.531126] bus: 'i2c': add driver test_rtc
[    1.531189] test_rtc_probe Enter.
[    1.533990] test_rtc_read_time Enter.
[    1.534527] test_rtc_read_time Exit.
[    1.534537] test_rtc_read_alarm Enter.
[    1.534546] test_rtc_read_alarm Exit.
[    1.534556] test_rtc_read_time Enter.
[    1.535083] test_rtc_read_time Exit.
[    1.535237] test_rtc 2-0051: rtc core: registered test_rtc as rtc0
[    1.535250] test_rtc_probe Exit.
五、class.c和RTC驱动注册
class.c文件在RTC驱动注册之前开始得到运行:static int __init rtc_init(void)
{
rtc_class = class_create(THIS_MODULE, "rtc");
rtc_class->suspend = rtc_suspend;
rtc_class->resume = rtc_resume;
rtc_dev_init();
rtc_sysfs_init(rtc_class);
return 0;
}
subsys_initcall(rtc_init);完成:
- 1、创建名为rtc的class
- 2、提供PM相关接口suspend/resume
- 3、rtc_dev_init():动态申请/dev/rtcN的设备号
- 4、rtc_sysfs_init():rtc类具有的device_attribute属性
接着看RTC驱动注册:
struct rtc_device *rtc_device_register(const char *name, struct device *dev,
                    const struct rtc_class_ops *ops,
                    struct module *owner)
{
    struct rtc_device *rtc;
    struct rtc_wkalrm alrm;
    int id, err;

    // 1、Linux支持多个RTC设备,所以需要为每一个设备分配一个ID
    // 对应与/dev/rtc0,/dev/rtc1,,,/dev/rtcN
    id = ida_simple_get(&rtc_ida, 0, 0, GFP_KERNEL);

    // 2、创建rtc_device设备(对象)并执行初始化
    rtc = kzalloc(sizeof(struct rtc_device), GFP_KERNEL);
    rtc->id = id;
    rtc->ops = ops; // 2.1 对应RTC驱动填充的test_rtc_ops
    rtc->owner = owner;
    rtc->irq_freq = 1;
    rtc->max_user_freq = 64;
    rtc->dev.parent = dev;
    rtc->dev.class = rtc_class;// 2.2 rtc_init()创建的rtc_class
    rtc->dev.release = rtc_device_release;

    // 2.3 rtc设备中相关锁、等待队列的初始化
    mutex_init(&rtc->ops_lock);
    spin_lock_init(&rtc->irq_lock);
    spin_lock_init(&rtc->irq_task_lock);
    init_waitqueue_head(&rtc->irq_queue);

    // 2.4 Init timerqueue:我们都知道,手机等都是可以设置多个闹钟的
    timerqueue_init_head(&rtc->timerqueue);
    INIT_WORK(&rtc->irqwork, rtc_timer_do_work);
    // 2.5 Init aie timer:alarm interrupt enable,RTC闹钟中断
    rtc_timer_init(&rtc->aie_timer, rtc_aie_update_irq, (void *)rtc);
    // 2.6 Init uie timer:update interrupt,RTC更新中断
    rtc_timer_init(&rtc->uie_rtctimer, rtc_uie_update_irq, (void *)rtc);
    /* Init pie timer:periodic interrupt,RTC周期性中断 */
    hrtimer_init(&rtc->pie_timer, CLOCK_MONOTONIC, HRTIMER_MODE_REL);
    rtc->pie_timer.function = rtc_pie_update_irq;
    rtc->pie_enabled = 0;

    /* Check to see if there is an ALARM already set in hw */
    err = __rtc_read_alarm(rtc, &alrm);

    // 3、如果RTC芯片中设置了有效的Alarm,则初始化:加入到rtc->timerqueue队列中
    if (!err && !rtc_valid_tm(&alrm.time))
        rtc_initialize_alarm(rtc, &alrm);

    // 4、根据name参数设置rtc的name域
    strlcpy(rtc->name, name, RTC_DEVICE_NAME_SIZE);
    // 5、设置rtc的dev成员中的name域
    dev_set_name(&rtc->dev, "rtc%d", id);

    // 6、/dev/rtc0的rtc作为字符设备进行初始化
    // rtc_dev_prepare-->cdev_init(&rtc->char_dev, &rtc_dev_fops);
    rtc_dev_prepare(rtc);

    // 7、添加rtc设备到系统
    err = device_register(&rtc->dev);

    // 8、rtc设备作为字符设备添加到系统
    // rtc_dev_add_devicec-->dev_add(&rtc->char_dev, rtc->dev.devt, 1)
    // 然后就存在/dev/rtc0了
    rtc_dev_add_device(rtc);
    rtc_sysfs_add_device(rtc);
    // 9、/proc/rtc
    rtc_proc_add_device(rtc);

    dev_info(dev, "rtc core: registered %s as %s\n",
            rtc->name, dev_name(&rtc->dev));

    return rtc;
}
有了 /dev/rtc0后,应用层就可以通过 open/read/ioctl操作RTC设备了,对应与内核的file_operations:
static const struct file_operations rtc_dev_fops = {
    .owner        = THIS_MODULE,
    .llseek        = no_llseek,
    .read        = rtc_dev_read,
    .poll        = rtc_dev_poll,
    .unlocked_ioctl    = rtc_dev_ioctl,
    .open        = rtc_dev_open,
    .release    = rtc_dev_release,
    .fasync        = rtc_dev_fasync,
};
六、硬件抽象层
硬件抽象,即屏蔽具体的硬件细节,为上层用户提供统一的调用接口,使用者无需关心这些接口是怎么实现的。以RTC访问为例,抽象的实现位于interface.c文件,其实现基于class.c中创建的rtc_device设备。
实现原理,以rtc_set_time为例:
int rtc_set_time(struct rtc_device *rtc, struct rtc_time *tm)
{
    int err;
    // 1、参数检测
    err = rtc_valid_tm(tm);

    err = mutex_lock_interruptible(&rtc->ops_lock);
    if (err)
        return err;

    // 2、调用rtc_device中ops结构体的函数指针
    // ops结构体的函数指针已经在RTC驱动中被赋值
    if (!rtc->ops)
        err = -ENODEV;
    else if (rtc->ops->set_time)
        err = rtc->ops->set_time(rtc->dev.parent, tm);
    mutex_unlock(&rtc->ops_lock);
    /* A timer might have just expired */
    schedule_work(&rtc->irqwork);
    return err;
}
七、rtc在文件系统中的呈现
1、rtc在sysfs
之前曾建立过名为rtc的class:
rtc_class = class_create(THIS_MODULE, "rtc");查看之:
# ls /sys/class/rtc/
rtc0
# ls -l /sys/class/rtc/
lrwxrwxrwx root     root              2014-01-02 16:51 rtc0 -> ../../devices/ff660000.i2c/i2c-2/2-0051/rtc/rtc0
我们系统中只有一个RTC,所以编号为rtc0。
同时发现rtc0文件为指向/sys/devices/ff660000.i2c/i2c-2/2-0051/rtc/rtc0的符号链接,RTC芯片是I2C接口,所以rtc0挂载在I2C的总线上,总线控制器地址ff660000,控制器编号为2,RTC芯片作为slave端地址为0x51。
rtc0 设备属性:
void __init rtc_sysfs_init(struct class *rtc_class)
{
	rtc_class->dev_attrs = rtc_attrs;
}
static struct device_attribute rtc_attrs[] = {
	__ATTR(name, S_IRUGO, rtc_sysfs_show_name, NULL),
	__ATTR(date, S_IRUGO, rtc_sysfs_show_date, NULL),
	__ATTR(time, S_IRUGO, rtc_sysfs_show_time, NULL),
	__ATTR(since_epoch, S_IRUGO, rtc_sysfs_show_since_epoch, NULL),
	__ATTR(max_user_freq, S_IRUGO | S_IWUSR, rtc_sysfs_show_max_user_freq,
			rtc_sysfs_set_max_user_freq),
	__ATTR(hctosys, S_IRUGO, rtc_sysfs_show_hctosys, NULL),
	{ },
};
查看之:
ls -l /sys/class/rtc/rtc0/
-r--r--r-- root     root         4096 2014-01-02 16:51 date
-r--r--r-- root     root         4096 2014-01-02 16:51 dev
lrwxrwxrwx root     root              2014-01-02 16:51 device -> ../../../2-0051
-r--r--r-- root     root         4096 2014-01-02 16:51 hctosys
-rw-r--r-- root     root         4096 2014-01-02 16:51 max_user_freq
-r--r--r-- root     root         4096 2014-01-02 16:51 name
drwxr-xr-x root     root              2014-01-02 16:48 power
-r--r--r-- root     root         4096 2014-01-02 16:51 since_epoch
lrwxrwxrwx root     root              2014-01-02 16:51 subsystem -> ../../../../../../class/rtc
-r--r--r-- root     root         4096 2014-01-02 16:51 time
-rw-r--r-- root     root         4096 2014-01-02 16:48 uevent
-rw-r--r-- root     root         4096 2014-01-02 16:51 wakealarm
2、rtc在proc
之前曾rtc0设备加入到了/proc
rtc_device_register
--->rtc_proc_add_device(rtc);

void rtc_proc_add_device(struct rtc_device *rtc)
{
	if (is_rtc_hctosys(rtc))
		proc_create_data("driver/rtc", 0, NULL, &rtc_proc_fops, rtc);
}
查看之:
# cat /proc/driver/rtc
rtc_time	: 17:19:53
rtc_date	: 2014-01-02
alrm_time	: 00:00:00
alrm_date	: 1970-01-01
alarm_IRQ	: no
alrm_pending	: no
update IRQ enabled	: no
periodic IRQ enabled	: no
periodic IRQ frequency	: 1
max user IRQ frequency	: 64
24hr		: yes
信息来源:
rtc_proc_fops
	-->rtc_proc_open
-->rtc_proc_showPS:
关于late_initcall
kernel中__init类型函数都位于.init.text段中,对应的在.initcall.init段中保存相应的函数指针。系统在启动过程中,根据定义在段中的等级值(0~7)从低到高依次执行。定义:
init.h (include\linux)

#define pure_initcall(fn)        __define_initcall(fn, 0)

#define core_initcall(fn)        __define_initcall(fn, 1)
#define core_initcall_sync(fn)        __define_initcall(fn, 1s)
#define postcore_initcall(fn)        __define_initcall(fn, 2)
#define postcore_initcall_sync(fn)    __define_initcall(fn, 2s)
#define arch_initcall(fn)        __define_initcall(fn, 3)
#define arch_initcall_sync(fn)        __define_initcall(fn, 3s)
#define subsys_initcall(fn)        __define_initcall(fn, 4)
#define subsys_initcall_sync(fn)    __define_initcall(fn, 4s)
#define fs_initcall(fn)            __define_initcall(fn, 5)
#define fs_initcall_sync(fn)        __define_initcall(fn, 5s)
#define rootfs_initcall(fn)        __define_initcall(fn, rootfs)
#define device_initcall(fn)        __define_initcall(fn, 6)
#define device_initcall_sync(fn)    __define_initcall(fn, 6s)
#define late_initcall(fn)        __define_initcall(fn, 7)
#define late_initcall_sync(fn)        __define_initcall(fn, 7s)
http://blog.csdn.net/u013686019/article/details/57126940