使用roles实现一键部署rsync
环境
| 主机名 | wanIP | lanIP | 服务 | 角色 |
|---|---|---|---|---|
| m01 | 10.0.0.61 | 172.16.1.61 | Ansible | 控制端 |
| backup | 10.0.0.41 | 172.16.1.41 | rsync服务端 | 被控端 |
| web01 | 10.0.0.7 | 172.16.1.7 | rsync客户端 | 被控端 |
| web02 | 10.0.0.8 | 172.16.1.8 | rsync客户端 | 被控端 |
| nfs | 10.0.0.31 | 172.16.131 | rsync客户端 | 被控端 |
流程分析
1.安装ansible
2.优化ansible
3.推送公钥
4.开启防火墙
5.开启80 443 873 nfs等端口和服务白名单
6.关闭selinux
7.创建同一的用户

1.web backup nfs 安装rsync
2.拷贝rsync配置文件
3.创建服务端backup的备份目录
4.copy密码文件
5.把客户端密码加入环境全局变量文件
6.启动rsync,并加入开机自启动
配置主机清单
[root@m01 ~]# vim /etc/ansible/hosts

[web_group]
web01 ansible_ssh_host=172.16.1.7 asible_ssh_user=root ansible_ssh_port=22
web02 ansible_ssh_host=172.16.1.8 asible_ssh_user=root ansible_ssh_port=22
#web03 ansible_ssh_host=172.16.1.9 asible_ssh_user=root ansible_ssh_port=22

[db_group]
db01 ansible_ssh_host=172.16.1.51 asible_ssh_user=root ansible_ssh_port=22
#db02 ansible_ssh_host=172.16.1.52 asible_ssh_user=root ansible_ssh_port=22
#db03 ansible_ssh_host=172.16.1.53 asible_ssh_user=root ansible_ssh_port=22
#db04 ansible_ssh_host=172.16.1.54 asible_ssh_user=root ansible_ssh_port=22

[nfs_group]
nfs ansible_ssh_host=172.16.1.31 asible_ssh_user=root ansible_ssh_port=22

#[redis_group]
#redis ansible_ssh_host=172.16.1.81 asible_ssh_user=root ansible_ssh_port=22

[lb_group]
lb01 ansible_ssh_host=172.16.1.5 asible_ssh_user=root ansible_ssh_port=22
lb02 ansible_ssh_host=172.16.1.6 asible_ssh_user=root ansible_ssh_port=22

[backup_group]
backup ansible_ssh_host=172.16.1.41 asible_ssh_user=root ansible_ssh_port=22

#[zabbix_group]
#zabbix ansible_ssh_host=172.16.1.71 asible_ssh_user=root ansible_ssh_port=22
#
[m01_group]
m01 ansible_ssh_host=172.16.1.61 asible_ssh_user=root ansible_ssh_port=22
rsync配置文件
uid = www
gid = www
port = 873
fake super = yes
use chroot = no
max connections = 200
timeout = 600
ignore errors
read only = false
list = false

auth users = {{ user_dir_mk }}
secrets file = /etc/rsync.passwd
log file = /var/log/rsyncd.log
[{{ user_dir_mk }}]
comment = welcome to oldboyedu backup!
path = /{{ user_dir_mk }}
########################### rsync服务端roles(rsync_server)
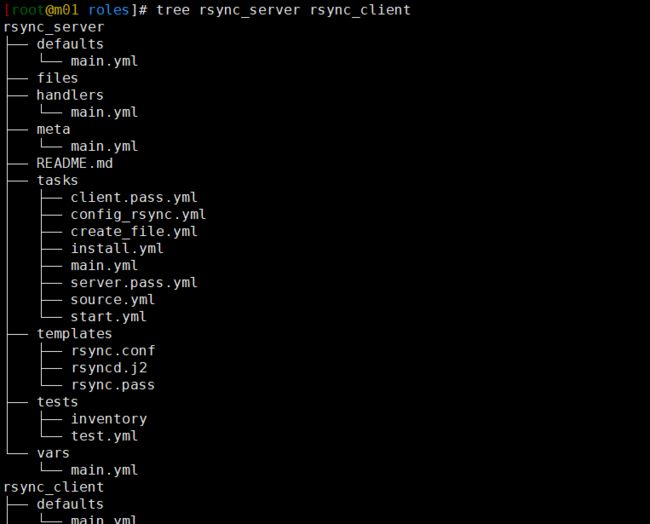
使用ansible-galaxy命令创建角色目录
[root@m01 ansible]# ansible-galaxy init rsync_server
编辑meta目录
[root@m01 rsync_server]# vim meta/main.yml
dependencies:
  - { role: base }
编辑tasks目录
1.使用ansible-galaxy命令创建roles目录
[root@m01 roles]# ansible-galaxy init rsync_server
2.编辑tasks目录中的'.yml文件'
[root@m01 rsync_server]# vim tasks/install.yml
- name: panduan rsync install
  shell: "rpm -q rsync"
  register: rsync_install

- name: install rsync
  yum:
    name: rsync
    state: present
  when: rsync_install.rc != 0
3.拷贝rsync配置文件
[root@m01 rsync_server]# vim tasks/config_rsync.yml
- name: config rsync
  template:
    src: rsyncd.j2
    dest: /etc/rsyncd.conf
  notify:
    - restart rsyncd server
4.创建相关目录
[root@m01 rsync_server]# vim tasks/create_file.yml
- name: Create Backup Dir
  file:
    path: /{{ user_dir_mk }}
    recurse: yes
    owner: www
    group: www
    mode: 0755
    state: directory
5.创建rsync服务端密码文件
[root@m01 rsync_server]# vim tasks/server.pass.yml
- name: Create PASS File
  copy:
    content: "{{ user_dir_mk }}:{{ rsync_pass }}"
    dest: /etc/rsync.passwd
    owner: root
    group: root
    mode: 0600
6.创建启动文件
[root@m01 rsync_server]# vim tasks/start.yml
- name: start rsyncd
  service:
    name: rsyncd
    state: started
    enabled: yes
7.编辑tasks/main.yml
[root@m01 rsync_server]# vim tasks/main.yml
- include: install.yml
- include: client.pass.yml
- include: source.yml
- include: config_rsync.yml
- include: create_file.yml
- include: server.pass.yml
- include: start.yml
编辑template目录
[root@m01 rsync_server]# vim templates/rsyncd.j2
uid = www
gid = www
port = 873
fake super = yes
use chroot = no
max connections = 200
timeout = 600
ignore errors
read only = false
list = false

auth users = {{ user_dir_mk }}
secrets file = /etc/rsync.passwd
log file = /var/log/rsyncd.log
[{{ user_dir_mk }}]

comment = welcome to oldboyedu backup!
path = /{{ user_dir_mk }}
编辑vars目录
[root@m01 rsync_server]# vim vars/main.yml
rsync_pass: 123
user_dir_mk: backup
编辑handlers目录
[root@m01 rsync_server]# vim handlers/main.yml
- name: restart rsyncd server
  service:
    name: rsyncd
    state: restarted
    enabled: true
编辑入口文件
[root@m01 roles]# vim rsync_server.yml
- hosts: backup_group
  roles:
    - { role: base }
    - { role: rsync_server }
执行
[root@m01 roles]# ansible-playbook rsync_server.yml
########################### rsync客户端roles(rsync_clicent)
编辑meta目录
[root@m01 rsync_client]# vim meta/main.yml
dependencies:
  - { role: base }
编辑tasks目录
1.使用ansible-galaxy命令创建roles目录
[root@m01 roles]# ansible-galaxy init rsync_client
2.编辑tasks目录中的'.yml文件'
[root@m01 rsync_client]# vim tasks/install.yml
- name: panduan rsync install
  shell: "rpm -q rsync"
  register: rsync_install

- name: install rsync
  yum:
    name: rsync
    state: present
  when: rsync_install.rc != 0
3.拷贝客户端密码
[root@m01 rsync_client]# vim tasks/client.pass.yml
- name: selicent pass
  copy:
    content: 'export RSYNC_PASSWORD={{ rsync_pass }}'
    dest: /etc/profile.d/rsync.pass
    owner: root
    group: root
    mode: 0600
4.source客户端,使密码文件立即生效
[root@m01 rsync_client]# vim tasks/source.yml
- name: sourse
  shell: "source /etc/profile.d/rsync.pass"
5.创建相关目录
[root@m01 rsync_client]# vim tasks/create_file.yml
- name: Create Backup Dir
  file:
    path: /{{ user_dir_mk }}
    recurse: yes
    owner: www
    group: www
    mode: 0755
    state: directory
6.创建启动文件
[root@m01 rsync_client]# vim tasks/start.yml
- name: start rsyncd
  service:
    name: rsyncd
    state: started
    enabled: yes
7.编辑tasks/main.yml
[root@m01 rsync_client]# vim tasks/main.yml
- include: install.yml
- include: client.pass.yml
- include: source.yml
- include: create_file.yml
- include: start.yml
编辑vars目录
user_dir_mk: backup
编辑入口文件
[root@m01 roles]# vim rsync_client.yml
- hosts: backup_group
  roles:
    - { role: rsync_client }
执行
[root@m01 roles]# ansible-playbook site.yml
注意
1.使用loop代替with_items循环变量的话不会出现粉色警告

2.不同角色中的变量不会冲突

