简介
Masonry 是一个非常好用的iOS开发布局框架,在使用代码布局视图时,相比原生的NSLayoutConstraint,在使用容易度和代码的可阅读程度,都优秀非常多。Masonry使用了链式语法,例如:make.left.equalTo(view.mas_bottom).offset(0);不管是使用还是阅读,都是非常易懂的。
Maosnry的GitHub连接 附上GitHub的连接,在GitHub上,开发者已经对Masonry做了非常详尽的介绍,强烈推荐阅读。
Masonry本质还是基于NSLayoutConstraint进行封装的,而且连报错的信息都优化了。
(
    "=5000)]>",
    "",
    "",
    ""
)

Will attempt to recover by breaking constraint
=5000)]>
上面的报错信息是未封装前的,类似h=--& v=--& V:这样的语法提示信息,一般也是难以理解的。Masonry将其优化成如下:
(
    "",
    "= 5000>",
    "",
    ""
)

Will attempt to recover by breaking constraint
= 5000>
安装
基于CocoaPod进行安装
pod 'Masonry'
在引入Masonry文件时,建议加上#define MAS_SHORTHAND,这样可以简化代码,即去掉了mas_前缀。同时,也建议加上#define MAS_SHORTHAND。这样就可以将@10简化成10。
简化前的代码:
[_tableView mas_makeConstraints:^(MASConstraintMaker *make) {
        make.edges.equalTo(@0);
    }];
简化后的代码:
[_tableView makeConstraints:^(MASConstraintMaker *make) {
        make.edges.equalTo(0);
    }];
引入格式:
#define MAS_SHORTHAND_GLOBALS
#define MAS_SHORTHAND
#import "Masonry.h"
使用
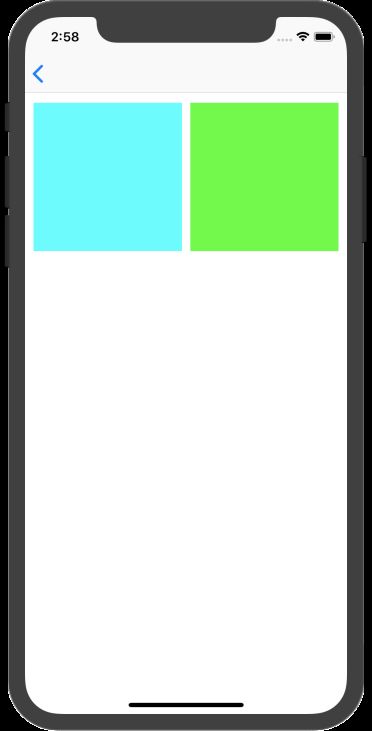
实例1 简单布局
如图,简单布局两个view,如上。
UIView *view1 = [UIView new];
    view1.backgroundColor = [UIColor cyanColor];
    _v1 = view1;
    UIView *view2 = [UIView new];
    view2.backgroundColor = [UIColor greenColor];
    _v2 = view2;

    CGFloat screenWidth = [UIApplication sharedApplication].delegate.window.bounds.size.width;
    CGFloat viewWidth = (screenWidth - 30)/2;

    [self.view addSubview:view1];
    [self.view addSubview:view2];

    [view1 makeConstraints:^(MASConstraintMaker *make) {
        make.left.equalTo(10);
        make.top.equalTo(100); // 与父视图的相同方位数据设置偏移
        make.height.width.equalTo(viewWidth); // 两个方位数据可以一起设置
    }];

    [view2 makeConstraints:^(MASConstraintMaker *make) {
        make.left.equalTo(view1.mas_right).offset(10); // 这里的mas_right不能去掉前缀mas_不然会报内存泄漏
        make.top.equalTo(view1).offset(0);
        make.size.equalTo(viewWidth);
    }];
Masonry布局的语法为:make.left.equalTo(view1.mas_right).offset(10); make表示被布局的视图,equalTo()方法入参为相对应视图的方位数据。这个入参不传入显式视图时:equalTo(0)则表示与父视图的相同方位数据对比。例如:make.left.equalTo(10);表示view1的顶部是相对于其父视图的顶部向下偏移10。
其方位数据有一下可供选择设置布局:
@property (nonatomic, strong, readonly) MASConstraint *left;
@property (nonatomic, strong, readonly) MASConstraint *top;
@property (nonatomic, strong, readonly) MASConstraint *right;
@property (nonatomic, strong, readonly) MASConstraint *bottom;
@property (nonatomic, strong, readonly) MASConstraint *leading;
@property (nonatomic, strong, readonly) MASConstraint *trailing;
@property (nonatomic, strong, readonly) MASConstraint *width;
@property (nonatomic, strong, readonly) MASConstraint *height;
@property (nonatomic, strong, readonly) MASConstraint *centerX;
@property (nonatomic, strong, readonly) MASConstraint *centerY;
@property (nonatomic, strong, readonly) MASConstraint *baseline;
@property (nonatomic, strong, readonly) MASConstraint *firstBaseline;
@property (nonatomic, strong, readonly) MASConstraint *lastBaseline;
@property (nonatomic, strong, readonly) MASConstraint *leftMargin;
@property (nonatomic, strong, readonly) MASConstraint *rightMargin;
@property (nonatomic, strong, readonly) MASConstraint *topMargin;
@property (nonatomic, strong, readonly) MASConstraint *bottomMargin;
@property (nonatomic, strong, readonly) MASConstraint *leadingMargin;
@property (nonatomic, strong, readonly) MASConstraint *trailingMargin;
@property (nonatomic, strong, readonly) MASConstraint *centerXWithinMargins;
@property (nonatomic, strong, readonly) MASConstraint *centerYWithinMargins;
@property (nonatomic, strong, readonly) MASConstraint *edges;
@property (nonatomic, strong, readonly) MASConstraint *size;
@property (nonatomic, strong, readonly) MASConstraint *center;
实例2 动态宽度进行布局
天蓝色的视图宽高设置了一样的数值,只是因为在水平方向上,两个视图的宽度不能超过屏幕的宽度,所以就将天蓝色的视图宽度压缩了。
-(void)showDemo2{

    UIView *view1 = [UIView new];
    view1.backgroundColor = [UIColor cyanColor];
    _v1 = view1;
    UIView *view2 = [UIView new];
    view2.backgroundColor = [UIColor greenColor];
    _v2 = view2;

    CGFloat screenWidth = [UIApplication sharedApplication].delegate.window.bounds.size.width;
    CGFloat viewWidth = (screenWidth - 30)/2;

    [self.view addSubview:view1];
    [self.view addSubview:view2];

    [view1 makeConstraints:^(MASConstraintMaker *make) {
        make.left.equalTo(10);
        make.top.equalTo(100);
        make.height.width.lessThanOrEqualTo(screenWidth);
    }];

    [view2 makeConstraints:^(MASConstraintMaker *make) {
        make.left.equalTo(view1.mas_right).offset(10); // 这里的mas_right不能去掉前缀mas_不然会报内存泄漏
        make.top.equalTo(view1).offset(0);
        make.right.equalTo(-10);
        make.size.equalTo(viewWidth);
    }];
}
这里相较于equalTo()方法,使用了lessThanOrEqualTo()方法,于此类似还有greaterThanOrEqualTo
- (MASConstraint * (^)(id attr))mas_equalTo; // 等于
- (MASConstraint * (^)(id attr))mas_greaterThanOrEqualTo; // 大于或等于
- (MASConstraint * (^)(id attr))mas_lessThanOrEqualTo; // 小于或等于
实例3 使用优先级进行布局
同样和实例2一样,对天蓝色的视图设置的宽度为屏幕宽度,通过调低其布局约束的优先级,动态拉低天蓝色视图的宽度。
-(void)showDemo2{

    UIView *view1 = [UIView new];
    view1.backgroundColor = [UIColor cyanColor];
    _v1 = view1;
    UIView *view2 = [UIView new];
    view2.backgroundColor = [UIColor greenColor];
    _v2 = view2;

    CGFloat screenWidth = [UIApplication sharedApplication].delegate.window.bounds.size.width;
    CGFloat viewWidth = (screenWidth - 30)/2;

    [self.view addSubview:view1];
    [self.view addSubview:view2];

    [view1 makeConstraints:^(MASConstraintMaker *make) {
        make.left.equalTo(10);
        make.top.equalTo(100);
        make.height.equalTo(viewWidth);
        make.width.equalTo(screenWidth).priorityLow();
    }];

    [view2 makeConstraints:^(MASConstraintMaker *make) {
        make.left.equalTo(view1.mas_right).offset(10); // 这里的mas_right不能去掉前缀mas_不然会报内存泄漏
        make.top.equalTo(view1).offset(0);
        make.right.equalTo(-10);
        make.size.equalTo(viewWidth).priorityHigh();
    }];
}
priorityLow()设置低优先级。
make.size.equalTo(viewWidth).priorityHigh(); // 高优先级
make.width.equalTo(screenWidth).priorityMedium(); // 中优先级
make.width.equalTo(screenWidth).priorityLow(); // 低优先级
make.width.equalTo(screenWidth).priority(1000); // 自定义优先级, 0~1000,1000为最高
更新和删除约束
更新原有约束的常量值
[view1 updateConstraints:^(MASConstraintMaker *make) {
        make.width.equalTo(viewWidth);
    }];
将之前所有约束都删除之后,在重新设置新的约束
[view1 remakeConstraints:^(MASConstraintMaker *make) {
        make.left.equalTo(10);
        make.top.equalTo(100);
        make.height.equalTo(viewWidth);
        make.width.equalTo(screenWidth).priority(1000);
    }];


