Harbor私有镜像仓库——高可用
Harbor HA:环境与准备
- 全新安装两台harbor,但不要着急执行./install(如果用旧的要清理下数据)
- 要做Harbor高可用,我们需要准备一台NFS服务器共享两台Harbor的数据存储目录,在生产环境中,我们可以选择Ceph或Glusterfs
- 我们需要一台Postgres数据库给Harbor的clair漏洞扫描组件使用
- 我们需要一台MySQL数据库给Harbor使用
- 我们需要一台redis数据库给session使用
| 主机名 | IP | 用途 | VIP |
|---|---|---|---|
| Harbor-Master | 192.168.100.108 | Harbor镜像仓库-主 | 192.168.100.244 |
| Harbor-Slave | 192.168.100.107 | Harbor镜像仓库-备 | |
| LDNS | 192.168.100.106 | DNS服务器 | NFS服务器端(Harbor HA文件存储) |
harbor+keepalived VIP漂移
(1)在LDNS上搭建nfs服务端
[root@localhost named]# mkdir -p /data/nfs
[root@localhost named]# yum -y install nfs-utils
[root@localhost named]# vim /etc/exports
/data/nfs 192.168.100.0/24(rw,no_root_squash)
[root@localhost named]# systemctl start nfs
(2)在harbor主和备上创建数据挂载目录,并安装nfs节点支持包
#harbor主、备都进行如下操作
[root@localhost named]# yum -y install nfs-utils
[root@localhost ~]# mkdir -p /data/storage
[root@localhost ~]# mount 192.168.100.106:/data/nfs /data/storage

#查看主harbor
[root@localhost ~]# df -hT | grep /data/nfs
192.168.100.106:/data/nfs nfs4       17G  2.2G   15G  13% /data/storage

#查看备harbor
[root@localhost harbor]#  df -hT | grep /data/nfs
192.168.100.106:/data/nfs nfs4       17G  2.2G   15G  13% /data/storage
(3)在docker-client(NFS服务器端)启动一个redis容器
#下载一个redis镜像(alpine系统目前docker领域很火,因为它容量很小,比centos小很多)
[root@localhost named]# docker pull redis:alpine

#启动redis镜像,映射端口
[root@localhost named]# docker run -dit --name redis_test -p 6379:6379 redis:alpine
2932de59b5c3a234fad7817673312b8e1606b0c4c4a45e09ba9396b5fee36782
[root@localhost named]# docker ps -a
CONTAINER ID        IMAGE               COMMAND                  CREATED             STATUS              PORTS                    NAMES
2932de59b5c3        redis:alpine        "docker-entrypoint.s…"   11 seconds ago      Up 8 seconds        0.0.0.0:6379->6379/tcp   redis_test
(4)在docker-client(NFS服务器端)启动一个postgreSQL数据库容器
#下载postgres
[root@localhost named]# docker pull postgres
[root@localhost named]# docker run -dit --name postgres_test -p 5432:5432 -e POSTGRES_PASSWORD=123456 postgres
9c56f91a5f714963e2729dbc3f7a8b77a41860a3d3ffb9ac41adae6e071ae1ed
[root@localhost named]# docker ps -a
CONTAINER ID        IMAGE               COMMAND                  CREATED              STATUS              PORTS                    NAMES
9c56f91a5f71        postgres            "docker-entrypoint.s…"   14 seconds ago       Up 13 seconds       0.0.0.0:5432->5432/tcp   postgres_test
2932de59b5c3        redis:alpine        "docker-entrypoint.s…"   About a minute ago   Up About a minute   0.0.0.0:6379->6379/tcp   redis_test
(5)在docker-client(NFS)服务器端启动一个MySQL数据库容器
#下载MySQL5.6版镜像
[root@localhost ~]# docker pull mysql:5.6
[root@localhost named]# docker images
REPOSITORY          TAG                 IMAGE ID            CREATED             SIZE
postgres            latest              7602d1365872        2 weeks ago         312MB
mysql               5.6                 27e29668a08a        2 weeks ago         256MB
redis               alpine              b42dc832c855        3 weeks ago         40.9MB

#启动MySQL容器,并映射端口
[root@localhost named]# docker run -dit --name mysql_test -p 3306:3306 -e MYSQL_ROOT_PASSWORD=123456 mysql:5.6 --character-set-server=utf8
6a3323210de5df0d28c7dcc3e870cbf9590e3c4dd93accadf4b5654384f0a235
[root@localhost named]# docker ps -a
CONTAINER ID        IMAGE               COMMAND                  CREATED              STATUS              PORTS                    NAMES
6a3323210de5        mysql:5.6           "docker-entrypoint.s…"   23 seconds ago       Up 21 seconds       0.0.0.0:3306->3306/tcp   mysql_test
9c56f91a5f71        postgres            "docker-entrypoint.s…"   About a minute ago   Up About a minute   0.0.0.0:5432->5432/tcp   postgres_test
2932de59b5c3        redis:alpine        "docker-entrypoint.s…"   2 minutes ago        Up 2 minutes        0.0.0.0:6379->6379/tcp   redis_test
(6)最后按照用途,我们分别给数据库改一下名称
[root@localhost named]# docker ps -a
CONTAINER ID        IMAGE               COMMAND                  CREATED              STATUS              PORTS                    NAMES
6a3323210de5        mysql:5.6           "docker-entrypoint.s…"   23 seconds ago       Up 21 seconds       0.0.0.0:3306->3306/tcp   mysql_test
9c56f91a5f71        postgres            "docker-entrypoint.s…"   About a minute ago   Up About a minute   0.0.0.0:5432->5432/tcp   postgres_test
2932de59b5c3        redis:alpine        "docker-entrypoint.s…"   2 minutes ago        Up 2 minutes        0.0.0.0:6379->6379/tcp   redis_test
[root@localhost named]# docker rename postgres_test clair_db
[root@localhost named]# docker rename mysql_test harbor_db
[root@localhost named]# docker rename redis_test session
[root@localhost named]# docker ps -a
CONTAINER ID        IMAGE               COMMAND                  CREATED             STATUS              PORTS                    NAMES
6a3323210de5        mysql:5.6           "docker-entrypoint.s…"   2 minutes ago       Up 2 minutes        0.0.0.0:3306->3306/tcp   harbor_db
9c56f91a5f71        postgres            "docker-entrypoint.s…"   3 minutes ago       Up 3 minutes        0.0.0.0:5432->5432/tcp   clair_db
2932de59b5c3        redis:alpine        "docker-entrypoint.s…"   4 minutes ago       Up 4 minutes        0.0.0.0:6379->6379/tcp   session
Harbor HA:修改配置
- 向mysql_db容器里导入数据表(192.168.100.106)
#在harbor-master上操作
#在解压后的harbor目录里的ha目录下的registry.sql表导入到我们之前在NFS服务端上创建的MySQL容器里
[root@localhost harbor]# ls
common                     docker-compose.yml  harbor.v1.5.0.tar.gz  NOTICE
docker-compose.clair.yml   ha                  install.sh            prepare
docker-compose.notary.yml  harbor.cfg          LICENSE
[root@localhost harbor]# tree ha
ha
├── docker-compose.clair.tpl
├── docker-compose.clair.yml
├── docker-compose.tpl
├── docker-compose.yml				 #需要修改的配置文件
├── registry.sql								#需要导入的mysql表格
└── sample
    ├── active_active
    │   ├── check.sh
    │   └── keepalived_active_active.conf
    └── active_standby
        ├── check_harbor.sh
        └── keepalived_active_standby.conf

3 directories, 9 files

#Harbor-master本地安装mysql客户端连接程序
[root@localhost harbor]# yum -y install mysql
[root@localhost harbor]# which mysql
/usr/bin/mysql
[root@localhost harbor]# cd ha
[root@localhost ha]# vim registry.sql
 220   repository varchar(256) NOT NULL,      #将256修改成254
 291   resource_name varchar(256),                #将256修改成254,因为导入的表格建立的索引超过mysql默认上线767bytes >=254,因此我们需要修改导入的表


#此操作在harbor-master、harbor-slave中操作,修改/data/install/ha/docker-compose.yml配置文件
[root@localhost ha]# vim docker-compose.yml
19        - /data/storage:/storage:z        #修改成我们的nfs共享目录

#远程连接到192.168.100.106(NFS服务器端)的3306端口,导入表registry.sql
[root@localhost harbor]# mysql -uroot -p123456 -h192.168.100.106 -P3306
Welcome to the MariaDB monitor.  Commands end with ; or \g.
Your MySQL connection id is 1
Server version: 5.6.42 MySQL Community Server (GPL)

Copyright (c) 2000, 2018, Oracle, MariaDB Corporation Ab and others.

Type 'help;' or '\h' for help. Type '\c' to clear the current input statement.

MySQL [(none)]> show databases;
+--------------------+
| Database           |
+--------------------+
| information_schema |
| mysql              |
| performance_schema |
+--------------------+
3 rows in set (0.09 sec)

MySQL [(none)]> source ha/registry.sql

MySQL [registry]> show databases;
+--------------------+
| Database           |
+--------------------+
| information_schema |
| mysql              |
| performance_schema |
| registry           |
+--------------------+
4 rows in set (0.00 sec)

MySQL [registry]> exit
Bye
- 修改配置文件
#修改/data/install/harbor.cfg文件
[root@localhost harbor]# cp harbor.cfg{,.bak}
[root@localhost harbor]# vim harbor.cfg
    7  hostname = www.yunjisuan.com
    11  ui_url_protocol = https
    23  ssl_cert = /etc/ssl/harbor/www.yunjisuan.com.crt
    24  ssl_cert_key = /etc/ssl/harbor/www.yunjisuan.com.key
    68  harbor_admin_password = Harbor12345
   130  db_host = 192.168.100.106
   133  db_password = 123456
   136  db_port = 3306
   139  db_user = root
   145  redis_url = 192.168.100.106:6379
   150  clair_db_host = 192.168.100.106
   154  clair_db_password = 123456
   157  clair_db_port = 5432
   160  clair_db_username = postgres
   163  clair_db = postgres
[root@localhost harbor]# scp harbor.cfg 192.168.100.107:/data/install/harbor/
The authenticity of host '192.168.100.107 (192.168.100.107)' can't be established.
ECDSA key fingerprint is SHA256:14NKIeIbfU5Cx3usA72K/AmnoeDt/UyH+SII8+rV1dA.
ECDSA key fingerprint is MD5:60:ab:53:4a:f8:fc:74:2b:93:1e:6f:b3:4c:e4:33:de.
Are you sure you want to continue connecting (yes/no)? yes
Warning: Permanently added '192.168.100.107' (ECDSA) to the list of known hosts.
[email protected]'s password:
harbor.cfg                                                  100% 6745     1.6MB/s   00:00
为Harbor签发域名证书
#创建自己的CA证书
[root@localhost harbor]# cd /data/ssl/
[root@localhost ssl]# openssl req -newkey rsa:4096 -nodes -sha256 -keyout ca.key -x509 -days 365 -out ca.crt
Generating a 4096 bit RSA private key
................................................................................................................................................................................................................................................++
................++
writing new private key to 'ca.key'
-----
You are about to be asked to enter information that will be incorporated
into your certificate request.
What you are about to enter is what is called a Distinguished Name or a DN.
There are quite a few fields but you can leave some blank
For some fields there will be a default value,
If you enter '.', the field will be left blank.
-----
Country Name (2 letter code) [XX]:CN
State or Province Name (full name) []:Beijing
Locality Name (eg, city) [Default City]:Beijing
Organization Name (eg, company) [Default Company Ltd]:yunjisuan
Organizational Unit Name (eg, section) []:yunjisuan
Common Name (eg, your name or your server's hostname) []:www.yunjisuan.com
Email Address []:

#生成证书签名请求
[root@localhost ssl]# openssl req -newkey rsa:4096 -nodes -sha256 -keyout www.yunjisuan.com.key -out www.yunjisuan.com.csr
Generating a 4096 bit RSA private key
..........................................................................................................................................................++
............................++
writing new private key to 'www.yunjisuan.com.key'
-----
You are about to be asked to enter information that will be incorporated
into your certificate request.
What you are about to enter is what is called a Distinguished Name or a DN.
There are quite a few fields but you can leave some blank
For some fields there will be a default value,
If you enter '.', the field will be left blank.
-----
Country Name (2 letter code) [XX]:CN
State or Province Name (full name) []:Beijing
Locality Name (eg, city) [Default City]:Beijing
Organization Name (eg, company) [Default Company Ltd]:yunjisuan
Organizational Unit Name (eg, section) []:yunjisuan
Common Name (eg, your name or your server's hostname) []:www.yunjisuan.com
Email Address []:

Please enter the following 'extra' attributes
to be sent with your certificate request
A challenge password []:
An optional company name []:

#生成注册表主机的证书
[root@localhost ssl]# openssl x509 -req -days 365 -in www.yunjisuan.com.csr -CA ca.crt -CAkey ca.key -CAcreateserial -out www.yunjisuan.com.crt
Signature ok
subject=/C=CN/ST=Beijing/L=Beijing/O=yunjisuan/OU=yunjisuan/CN=www.yunjisuan.com
Getting CA Private Key

#查看证书情况
[root@localhost ssl]# ll
total 24
-rw-r--r--. 1 root root 2049 Jan 16 03:26 ca.crt
-rw-r--r--. 1 root root 3272 Jan 16 03:26 ca.key
-rw-r--r--. 1 root root   17 Jan 16 03:27 ca.srl
-rw-r--r--. 1 root root 1931 Jan 16 03:27 www.yunjisuan.com.crt
-rw-r--r--. 1 root root 1716 Jan 16 03:26 www.yunjisuan.com.csr
-rw-r--r--. 1 root root 3276 Jan 16 03:26 www.yunjisuan.com.key
信任自签发的域名证书
#将自签ca证书添加到系统信任
[root@localhost ssl]# mkdir -p /etc/ssl/harbor     		#主备都创建该目录
[root@localhost ssl]# cp www.yunjisuan.com.crt www.yunjisuan.com.key /etc/ssl/harbor
[root@localhost ssl]# ls /etc/ssl/harbor
www.yunjisuan.com.crt  www.yunjisuan.com.key
[root@localhost ssl]# scp www.yunjisuan.com.crt www.yunjisuan.com.key 192.168.100.107:/etc/ssl/harbor/
[email protected]'s password:
www.yunjisuan.com.crt                                       100% 1931    90.1KB/s   00:00
www.yunjisuan.com.key                                       100% 3276     1.1MB/s   00:00

[root@localhost ssl]# pwd
/data/ssl
[root@localhost ssl]# cp www.yunjisuan.com.crt /etc/pki/ca-trust/source/anchors/
[root@localhost ssl]# scp www.yunjisuan.com.crt 192.168.100.107:/etc/pki/ca-trust/source/anchors/
[email protected]'s password:
www.yunjisuan.com.crt                                       100% 1931   649.5KB/s   00:00
[root@localhost ssl]# scp www.yunjisuan.com.crt 192.168.100.106:/etc/pki/ca-trust/source/anchors/
The authenticity of host '192.168.100.106 (192.168.100.106)' can't be established.
ECDSA key fingerprint is SHA256:14NKIeIbfU5Cx3usA72K/AmnoeDt/UyH+SII8+rV1dA.
ECDSA key fingerprint is MD5:60:ab:53:4a:f8:fc:74:2b:93:1e:6f:b3:4c:e4:33:de.
Are you sure you want to continue connecting (yes/no)? yes
Warning: Permanently added '192.168.100.106' (ECDSA) to the list of known hosts.
[email protected]'s password:
www.yunjisuan.com.crt                                       100% 1931   184.9KB/s   00:00

#让系统ca信任设置立刻生效(三台服务器)
[root@localhost ssl]# update-ca-trust enable
[root@localhost ssl]# update-ca-trust extract
[root@localhost ssl]# systemctl restart docker
Harbor HA:启动Harbor
[root@localhost harbor]# pwd
/data/install/harbor
[root@localhost harbor]# ./install.sh --with-clair --ha					#因此使用了自定义存储路径,安装中途需要yes确认
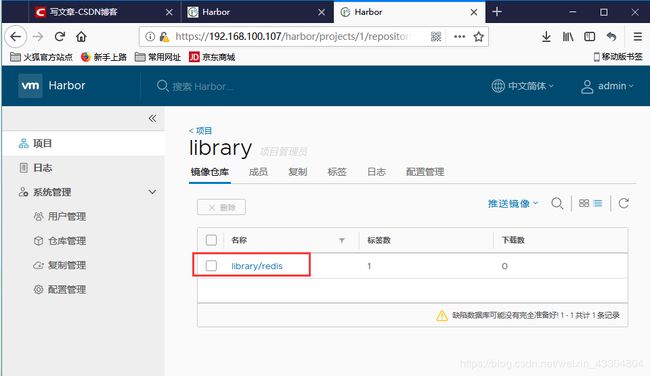
浏览器进行访问测试:

在docker-client(NFS共享存储服务器端)进行镜像上传测试:
[root@localhost nfs]# vim /etc/hosts
192.168.100.108 www.yunjisuan.com
[root@localhost nfs]# docker login -uadmin -pHarbor12345 www.yunjisuan.com
WARNING! Using --password via the CLI is insecure. Use --password-stdin.
WARNING! Your password will be stored unencrypted in /root/.docker/config.json.
Configure a credential helper to remove this warning. See
https://docs.docker.com/engine/reference/commandline/login/#credentials-store

Login Succeeded
[root@localhost nfs]# docker tag redis:alpine www.yunjisuan.com/library/redis:v1
[root@localhost nfs]# docker push www.yunjisuan.com/library/redis:v1
The push refers to repository [www.yunjisuan.com/library/redis]
af40ee23fb60: Pushed
fcfbcd29c0cb: Pushed
3af9641beaed: Pushed
89a6dc26c203: Pushed
9c0f1964b374: Pushed
7bff100f35cb: Pushed
v1: digest: sha256:1e5da7828a6381ff582a65f89b4de7b3cb9c82c0b646f96f56a7b8150f5696e8 size: 1571
[root@localhost nfs]# tree /data/nfs/				#查看NFS服务器共享目录
/data/nfs/
├── 111
└── docker
    └── registry
        └── v2
            ├── blobs
            │   └── sha256
            │       ├── 0b
            │       │   └── 0b981e82e1e29aaaff9d496ba2b9b469ca8bd4d181b592ab9a9a340d61486f49
            │       │       └── data
            │       ├── 1e
            │       │   └── 1e5da7828a6381ff582a65f89b4de7b3cb9c82c0b646f96f56a7b8150f5696e8
            │       │       └── data
            │       ├── 44
            │       │   └── 447ac2b250dc6463b250e6718192602548026fd68ce53149594ca970c381c808
            │       │       └── data
            │       ├── 48
            │       │   └── 48d4c7155ddca648ecdc455df8b7c08dbe25639a3d8f89512beb17b476fcebbf
            │       │       └── data
            │       ├── 6d
            │       │   └── 6d908603dbe800c85e773b1f0e8030064265c74dae7f35a4c984c5892f81eeb7
            │       │       └── data
            │       ├── 70
            │       │   └── 7074f4a1fd03acf7529a8e874503a8417491b3d8de5a1c629d5ad7355b3475fb
            │       │       └── data
            │       ├── b4
            │       │   └── b42dc832c855ab68bf5a1fb6a4069a670aab4bf648626337a6d8487fd892bb6b
            │       │       └── data
            │       └── cd
            │           └── cd784148e3483c2c86c50a48e535302ab0288bebd587accf40b714fffd0646b3
            │               └── data
            └── repositories
                └── library
                    └── redis
                        ├── _layers
                        │   └── sha256
                        │       ├── 0b981e82e1e29aaaff9d496ba2b9b469ca8bd4d181b592ab9a9a340d61486f49
                        │       │   └── link
                        │       ├── 447ac2b250dc6463b250e6718192602548026fd68ce53149594ca970c381c808
                        │       │   └── link
                        │       ├── 48d4c7155ddca648ecdc455df8b7c08dbe25639a3d8f89512beb17b476fcebbf
                        │       │   └── link
                        │       ├── 6d908603dbe800c85e773b1f0e8030064265c74dae7f35a4c984c5892f81eeb7
                        │       │   └── link
                        │       ├── 7074f4a1fd03acf7529a8e874503a8417491b3d8de5a1c629d5ad7355b3475fb
                        │       │   └── link
                        │       ├── b42dc832c855ab68bf5a1fb6a4069a670aab4bf648626337a6d8487fd892bb6b
                        │       │   └── link
                        │       └── cd784148e3483c2c86c50a48e535302ab0288bebd587accf40b714fffd0646b3
                        │           └── link
                        ├── _manifests
                        │   ├── revisions
                        │   │   └── sha256
                        │   │       └── 1e5da7828a6381ff582a65f89b4de7b3cb9c82c0b646f96f56a7b8150f5696e8
                        │   │           └── link
                        │   └── tags
                        │       └── v1
                        │           ├── current
                        │           │   └── link
                        │           └── index
                        │               └── sha256
                        │                   └── 1e5da7828a6381ff582a65f89b4de7b3cb9c82c0b646f96f56a7b8150f5696e8
                        │                       └── link
                        └── _uploads

44 directories, 19 files
Harbor HA:Keepalived安装配置与测试
#在nfs服务器上进行操作
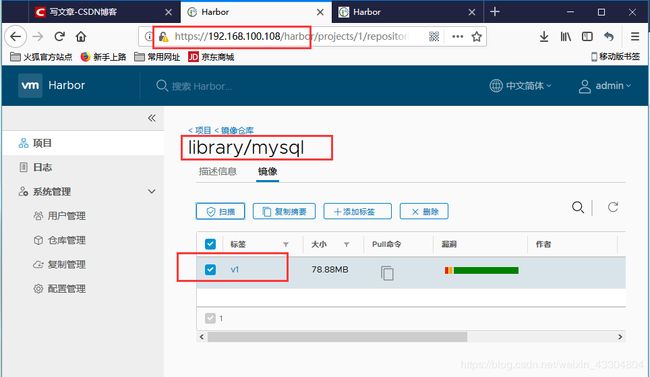
[root@localhost nfs]# docker tag mysql:5.6 www.yunjisuan.com/library/mysql:v1
[root@localhost nfs]#  docker push www.yunjisuan.com/library/mysql:v1
he push refers to repository [www.yunjisuan.com/library/mysql]
de342635916a: Pushed
496c57407cb3: Pushed
d8b4a2f58137: Pushed
a2626e5d6aa6: Pushed
7aea614b1b2b: Pushed
177fca7cd7a8: Pushed
047cc8a3632b: Pushed
6680e06777c4: Pushed
b718c6b527ab: Pushed
f01f1a2037eb: Pushed
7b4e562e58dc: Pushed
v1: digest: sha256:1f937547a80cf6e564dea15d5e3f5f09492cc5ddf57c44289c5467eab52a1355 size: 2621
- harbor-master和harbor-slave安装keepalived
#两台harbor都进行如下操作
[root@localhost harbor]# yum -y install keepalived
[root@localhost ~]# cp /etc/keepalived/keepalived.conf{,.bak}
[root@localhost ~]# vim /etc/keepalived/keepalived.conf
! Configuration File for keepalived

global_defs {
   router_id harbor01
}

vrrp_instance VI_1 {
    state MASTER
    interface ens33
    virtual_router_id 55
    priority 150
    advert_int 1
    authentication {
        auth_type PASS
        auth_pass 1111
    }
    virtual_ipaddress {
        192.168.100.244 dev ens33 label ens33:1
    }
}
[root@localhost harbor]# systemctl start keepalived
[root@localhost harbor]# systemctl enable keepalived
Created symlink from /etc/systemd/system/multi-user.target.wants/keepalived.service to /usr/lib/systemd/system/keepalived.service.
[root@localhost harbor]# ip addr | grep 192.168.100.244
    inet 192.168.100.244/32 scope global ens33

#在harbor-slave上进行相同操作
[root@localhost harbor]# vim /etc/keepalived/keepalived.conf

! Configuration File for keepalived

global_defs {
   router_id harbor02
}

vrrp_instance VI_1 {
    state BACKUP
    interface ens33
    virtual_router_id 55
    priority 100
    advert_int 1
    authentication {
        auth_type PASS
        auth_pass 1111
    }
    virtual_ipaddress {
        192.168.100.244 dev ens33 label ens33:1
    }
}

[root@localhost harbor]# systemctl start keepalived
[root@localhost harbor]# systemctl enable keepalived
Created symlink from /etc/systemd/system/multi-user.target.wants/keepalived.service to /usr/lib/systemd/system/keepalived.service.
[root@localhost harbor]# systemctl status keepalived
● keepalived.service - LVS and VRRP High Availability Monitor
   Loaded: loaded (/usr/lib/systemd/system/keepalived.service; enabled; vendor preset: disabled)
   Active: active (running) since Wed 2019-01-16 05:24:49 EST; 13s ago
 Main PID: 24295 (keepalived)
   CGroup: /system.slice/keepalived.service
           ├─24295 /usr/sbin/keepalived -D
           ├─24296 /usr/sbin/keepalived -D
           └─24297 /usr/sbin/keepalived -D

Jan 16 05:24:49 localhost.localdomain Keepalived_healthcheckers[24296]: Initializing ipvs
Jan 16 05:24:49 localhost.localdomain Keepalived_vrrp[24297]: Registering Kernel netlink r...r
Jan 16 05:24:49 localhost.localdomain Keepalived_vrrp[24297]: Registering Kernel netlink c...l
Jan 16 05:24:49 localhost.localdomain Keepalived_vrrp[24297]: Registering gratuitous ARP s...l
Jan 16 05:24:49 localhost.localdomain Keepalived_vrrp[24297]: Opening file '/etc/keepalive....
Jan 16 05:24:49 localhost.localdomain Keepalived_vrrp[24297]: VRRP_Instance(VI_1) removing....
Jan 16 05:24:49 localhost.localdomain Keepalived_vrrp[24297]: Using LinkWatch kernel netli....
Jan 16 05:24:49 localhost.localdomain Keepalived_vrrp[24297]: VRRP_Instance(VI_1) Entering...E
Jan 16 05:24:49 localhost.localdomain Keepalived_vrrp[24297]: VRRP sockpool: [ifindex(2), ...]
Jan 16 05:24:50 localhost.localdomain Keepalived_healthcheckers[24296]: Opening file '/etc/...
Hint: Some lines were ellipsized, use -l to show in full.
- 进行VIP切换测试


