ELK(elasticsearch+logstash+kibana)+firebeat搭建教程
组合形式:日志文件-->firebeat+logstash-->elasticsearch-->kibana
环境:linux环境centos7及以上系统(建议直接关掉防火墙)
下载地址:
https://www.elastic.co/downloads/past-releases
下载策略:版本一致性,即elk+firebeat版本要一样
ELK是指Elasticsearch + Logstash + Kibaba三个组件的组合。本文讲解一个基于日志文件的ELK平台的搭建过程。
在这个系统中,Elasticsearch主要充当一个全文检索和分析引擎,Logstash是一款分布式日志收集系统,Kibana可以为这个平台提供可视化的Web界面。
ELK的运行依赖于Java环境,JDK可自行安装,本节主要讲Elasticsearch,Logstash和Kibaba的安装和配置过程。
1、Elasticsearch
下载地址:
https://www.elastic.co/downloads/past-releases
下载好后,上传到(m000表示虚拟机ip地址)m000:/usr/local/elk路径下解压缩,设置/usr/local/elasticsearch软连接指向该路径。进入ES_HOME/config目录中编辑elasticsearch.yml文件。设置
network.host: m000,
http.port: 9200设置访问地址和端口号,否则不能在浏览器中访问。设置
cluster.name: es_cluster,
node.name: m000,这两个参数主要设置ES集群的集群名称,以及这台机器在集群中的名称。设置
path.data: /usr/local/elasticsearch/data,
path.logs: /usr/local/elasticsearch/logs,这两个参数主要设置ES存储data和log的路径。
配置好后启动输入
ES_HOME/bin/elasticsearch命令启动es(加入参数-d,es会在后台运行),正常启动如下图:

在另外一个命令窗口中检查启动状态,

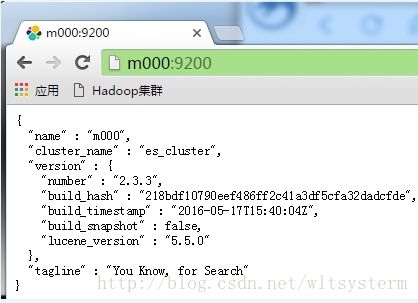
也可在页面上查看,输入m000:9200,

2、elasticsearch-head安装
自定一个目录然后:
1、下载elasticsearch-head并解压
在线下载:wget
https://github.com/mobz/elasticsearch-head/archive/master.zip
或者到github下载:https://github.com/mobz/elasticsearch-head
unzip elasticsearch-head-master.zip //解压zip文件
mv elasticsearch-head-master.zip /home/ntc/code/elasticsearch-head //解压到自定义目录并修改文件夹名为elasticsearch-head
没有安装wget,需要安装,安装命令如下:
yum -y install wget
没有安装unzip。利用一句命令就可以解决了。命令是:
yum install -y unzip zip
2、安装node
由于head插件本质上还是一个nodejs的工程,因此需要安装node,使用npm来安装依赖的包。(npm可以理解为maven)
wget
https:
//npm.taobao.org/mirrors/node/latest-v4.x/node-v4.4.7-linux-x64.tar.gz
tar
-zxvf node-v4.
4.7
-linux-x64.
tar
.gz
解压完node的安装文件后,需要配置下环境变量,编辑/etc/profile,添加

保存后别忘记立即执行以下
source /etc/profile
这个时候可以测试一下node是否生效:

3、安装grunt
grunt是一个很方便的构建工具,可以进行打包压缩、
测试
、执行等等的工作,5.0里的head插件就是通过grunt启动的。因此需要安装一下grunt:
cd /home/ntc/code/elasticsearch-head
安装nodejs
npm install -g grunt-cli //执行后会生成node_modules文件夹
npm install
注:
5.0以上,elasticsearch-head 不能放在
elasticsearch
的
plugins
、
modules
目录下,否则elasticsearch启动会报错
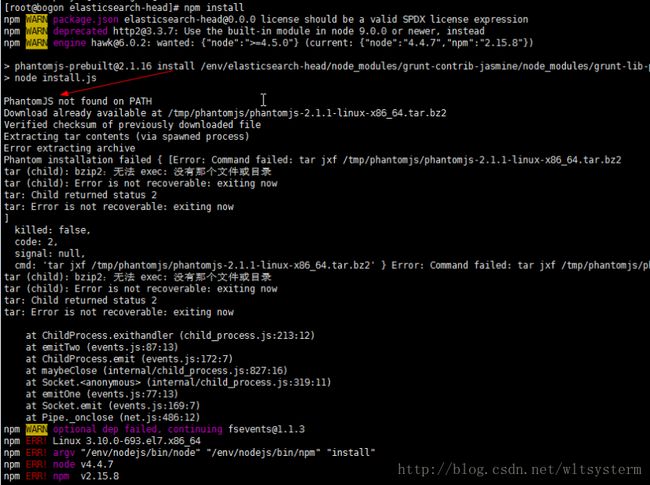
linux使用npm install报错

解决方法
安装phantomjs
1、下载phantomjs:
https://bitbucket.org/ariya/phantomjs/downloads/phantomjs-2.1.1-linux-x86_64.tar.bz2
2、直接解压下载好的安装包并添加环境变量
tar -xjvf phantomjs-2.1.1-linux-x86_64.tar.bz2PHANTOMJS_HOME=/env/phantomjs211/bin
export PATH=$PATH:$PHANTOMJS
报错:

解决:缺少bzip2包
yum install -y bzip2
测试
phantomjs -v
CentOS - 执行phantomjs报错
报错信息:phantomjs: error while loading shared libraries: libfreetype.so.6: cannot open shared object file: No such file or directory
解决方法:
执行
# sudo yum install freetype
如果还报错
执行
# sudo yum install fontconfig freetype libfreetype.so.6
4、修改head源码
vi /home/ntc/code/elasticsearch-head/Gruntfile.
js
connect: { server: { options: { port: 9100, hostname: '*', base: '.', keepalive: true } }}
增加hostname属性,设置为*
修改连接地址:
目录:vi /home/ntc/code/elasticsearch-head/_site/app.js
修改head的连接地址:
this.base_uri = this.config.base_uri || this.prefs.get("app-base_uri") || "http://localhost:9200";
把localhost修改成你es的服务器地址,如:
this.base_uri = this.config.base_uri || this.prefs.get("app-base_uri") || "http://192.168.40.133:9200";
5、运行head 启动nodejs
cd /home/ntc/code/elasticsearch-head //先跳转到head目录下grunt server //若想在后台运行,结尾追加“&”

3、Logstash
下载地址:
https://www.elastic.co/downloads/past-releases
下载好后,上传到m000:/usr/local/elk路径下解压缩,设置/usr/local/logstash软连接指向该路径。
接下来用Logstash将Hadoop的yarn日志加载进来,进入LS_HOME,新建一个config_file目录存储自定义配置文件log.conf。
input { file {
#type要小写,不然会发现在elasticsearch-head里头找不到当前的logstash type => "hadoop-yarnlog"
#path:要读取的log文件位置 path => "/usr/local/hadoop/logs/yarn-hadoop-resourcemanager-m000.log" }}output { elasticsearch { hosts => "m000:9200" index => "logstash-%{type}-%{+YYYY.MM.dd}" template_overwrite => true }}
启动Logstash,
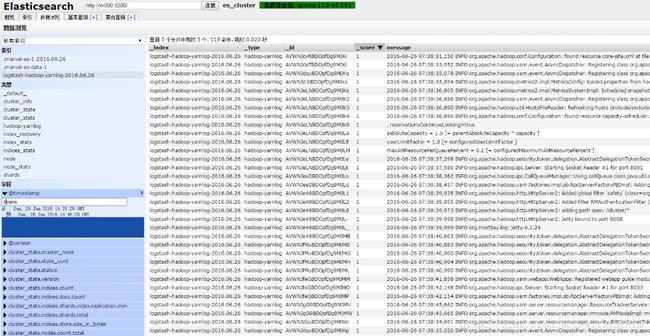
LS_HOME/bin/logstash agent -f config_file/log.conf在ES的head页面可以看到多了一个logstash-hadoop-yarnlog的文件

可以在数据浏览,基本查询,复合查询中对该文件进行相关的查询操作。比如输入时间参数查看最近4分钟的日志文件:

4、Kibana
下载地址:
https://www.elastic.co/downloads/past-releases
下载好后,上传到m000:/usr/local/elk路径下解压缩,设置/usr/local/kibana软连接指向该路径。进入KB_HOME/config文件夹,编辑kibana.yml文件,设置
server.port: 5601,
server.host: "m000,
elasticsearch.url: "http://m000:9200"。
启动kibaba,
KB_HOME/bin/kibana, 正常启动可以在控制台中看到如下信息:
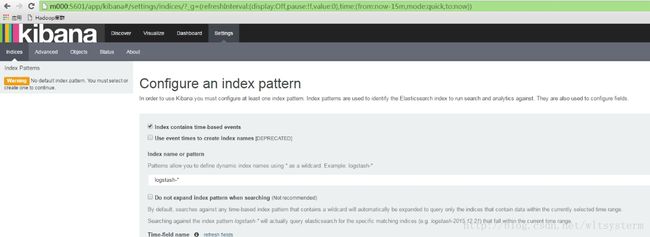
在浏览器中输入m000:5601,可以看到如下页面:
看到上图中的界面,表示ELK已经正常配置了,点击Create–>Discover
可以看到加载的日志文件中的一些数据。
最后继续在Kibana中把marvel插件安装完成。输入
KB_HOME/bin/kibana plugin --install marvel --url file:///usr/local/elk/marvel-2.3.3.tar.gz如下图
启动kibana,浏览器访问m000:5601
上面内容完成了elk的基本搭建。下面要将firebeat整合进入到elk中,这个时候firebeat承担的角色是日志采集功能。logstash因为有丰富的过滤功效,承担日志格式化功能。
5、firebeat+elk整合
1.下载和安装
https://www.elastic.co/downloads/beats/filebeat
或者
wget https://download.elastic.co/beats/filebeat/filebeat-1.3.0-x86_64.tar.gztar -zxvf filebeat-1.3.0-x86_64.tar.gz
2、配置文件
2.1配置
编辑filebeat.yml
vim filebeat.yml
默认监控日志配置
filebeat: prospectors: - paths: - /var/log/*.log input_type: log
按照要求修改为
filebeat: prospectors: - paths:
#要监控的日志文件地址 - /www/wwwRUNTIME/www.lanmps.com/order/*.log input_type: log document_type: order-www.lanmps.comoutput: #elasticsearch: # hosts: ["localhost:9200"] logstash: hosts: ["10.1.5.65:5044"]...其他部分没有改动,不需要修改
注意:如果filebeat直接输出到elasticsearch那么kibana里面要
创建以下索引匹配模式: filebeat-*
2.2 说明
1.paths:指定要监控的日志,目前按照Go语言的glob函数处理。没有对配置目录做递归处理,比如配置的如果是:
/var/log/* /*.log
则只会去/var/log目录的所有子目录中寻找以”.log”结尾的文件,而不会寻找/var/log目录下以”.log”结尾的文件。
2. input_type:指定文件的输入类型log(默认)或者stdin。
3. document_type:设定Elasticsearch输出时的document的type字段,也可以用来给日志进行分类。
把 elasticsearch和其下的所有都注释掉(这里Filebeat是新安装的,只注释这2处即可)
output: #elasticsearch: # hosts: ["localhost:9200"]
开启 logstash(删除这两行前的#号),并把localhost改为logstash服务器地址
logstash: hosts: ["10.1.5.65:5044"]
下面是对logstash的配置进行修改
如果开启logstash了,那么Logstash配置中要设置监听端口 5044:
增加端口
input { beats { port => 5044 }}
3.启动
3.1 测试
./filebeat -e -c filebeat.yml -d "Publish"
如果能看到一堆东西输出,表示正在向elasticsearch或logstash发送日志。
如果是elasticsearch可以浏览:
http://localhost:9200/_search?pretty 如果有新内容返回,表示ok
测试正常后,Ctrl+C结束
3.2启动
nohup ./filebeat -e -c filebeat.yml >/dev/null 2>&1 &
上面会转入后台运行
或者:
./filebeat -e -c filebeat.yml
3.3停止
查找进程 ID
ps -ef |grep filebeat
KILL他
kill -9 id


