MongoDB + Express 入门及案例代码
文章目录
- MongoDB + Express
- 预备知识与后续知识及项目案例
- MongoDB基础
- 一、数据库概述及环境搭建
- 1、为什么要使用数据库
- 2、什么是数据库
- 3、MongoDB数据库下载安装
- 4、MongoDB可视化软件
- 5、MongoDB的简单使用
- (一)简介
- (二)安装
- (三)
- (四)使用过程中的一些奇奇怪怪的错误
- 注:中文文件路径乱码问题真的很傻逼
- 服务器没有响应控制功能
- 发生系统错误1058
- MongoDB错误:Failed global initialization:FileNotOpen: Failed to open “XXX”
- 6、数据库相关概念
- 7、Mongoose第三方包
- 8、数据库连接
- 9、创建数据库
- 二、MongoDB增删改查操作
- 1、创建集合和文档
- 2、mongoDB数据库导入数据
- 3、查找文档
- 4、删除文档和更新文档
- 5、mongoose验证
- 6、集合关联及实现
- 7、案例:用户信息增删改查
- 三、模板引擎artTemplate
- 1、模板引擎的基础概念
- 2、模板引擎语法
- 3、[案例介绍 – 学生档案管理](#studentfile)
- 四、Express框架
- 1、Express框架简介及初体验
- 2、Express中间件
- 3、Express框架请求处理
- 4、express-art-template模板引擎
- 附:案例
- 案例:用户信息增删改查
- 案例:学生档案管理
MongoDB + Express
预备知识与后续知识及项目案例
HTML入门与进阶以及HTML5
CSS
JS-上
JS-下
jQuery
Node.js + Gulp 知识点汇总
MongoDB + Express 入门及案例代码
Vue项目开发-仿蘑菇街电商APP
MongoDB基础
一、数据库概述及环境搭建
1、为什么要使用数据库
- 动态网站中的数据都是存储在数据库中的
- 数据库可以用来持久存储客户端通过表单收集的用户信息
- 数据库软件本身可以对数据进行高效的管理
2、什么是数据库
数据库即存储数据的仓库,可以将数据进行有序的分门别类的存储。它是独立于语言之外的软件,可以通过API去操作它。
常见的数据库软件有:mysql、mongoDB、oracle。
3、MongoDB数据库下载安装
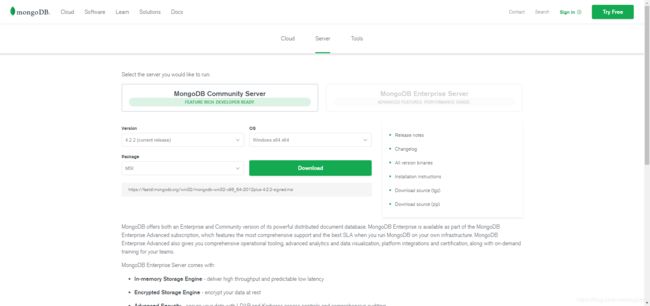
下载地址:https://www.mongodb.com/download-center/community
4、MongoDB可视化软件
MongoDB可视化操作软件,是使用图形界面操作数据库的一种方式。
5、MongoDB的简单使用
(一)简介
MongoDB是一款强大、灵活、且易于扩展的通用型数据库
MongoDB 是由C++语言编写的,是一个基于分布式文件存储的开源数据库系统。
在高负载的情况下,添加更多的节点,可以保证服务器性能。
MongoDB 旨在为WEB应用提供可扩展的高性能数据存储解决方案。
MongoDB 将数据存储为一个文档,数据结构由键值(key=>value)对组成。MongoDB 文档类似于 JSON 对象。字段值可以包含其他文档,数组及文档数组。
(二)安装
//注:最好就是路径全英,不然你会吐血死的
#1、安装路径为D:\vue前端视频学习\Node\MongoDB,将D:\vue前端视频学习\Node\MongoDB\bin目录加入环境变量

#2、新建目录与文件
D:\vue\Node\MongoDB\data\db
D:\vue\Node\MongoDB\log\mongod.log

#3、新建配置文件mongod.cfg,参考:https://docs.mongodb.com/manual/reference/configuration-options/
systemLog:
   destination: file
   path: "D:\vue\Node\MongoDB\log\mongod.log"
   logAppend: true
storage:
   journal:
      enabled: true
   dbPath: "D:\vue\Node\MongoDB\data\db"
net:
   bindIp: 0.0.0.0
   port: 27017
setParameter:
   enableLocalhostAuthBypass: false

#4、制作系统服务
mongod --config "D:\vue\Node\MongoDB\bin\mongod.cfg" --bind_ip 0.0.0.0 --install
或者直接在命令行指定配置
mongod --bind_ip 0.0.0.0 --port 27017 --logpath D:\vue\Node\MongoDB\log\mongod.log --logappend --dbpath   D:\vue\Node\MongoDB\data\db --serviceName "MongoDB" --serviceDisplayName "MongoDB" --install

#5、启动\关闭
net start MongoDB
net stop MongoDB

#6、登录
mongo

链接:http://www.runoob.com/mongodb/mongodb-window-install.html
当没有账号密码登录的时候,默认就是管理员登录。,因为刚刚做系统服务install的时候没有指定
–auth(没有指定则没有权限认证这一说),(相当于mysql跳过授权表启动一样)
2、账号管理
#账号管理:https://docs.mongodb.com/master/tutorial/enable-authentication/
#1、创建有权限的用户
 use admin
  db.createUser(
    {
      user: "root", #这个root可以随便写
      pwd: "123",
      roles: [ { role: "root", db: "admin" } ] #权限,role是root说明是管理员,
    }
  )
 use test
  db.createUser(
    {
      user: "egon",
      pwd: "123",
      roles: [ { role: "readWrite", db: "test" }, #针对test库有读写权限,操作自己的库有读写权限
      { role: "read", db: "db1" } ] #针对db1库读权限,操作其他库有读权限
    }
  )

#2、重启数据库
mongod --remove
mongod --config "C:\mongodb\mongod.cfg" --bind_ip 0.0.0.0 --install --auth或者mongod --bind_ip 0.0.0.0 --port 27017 --logpath D:\MongoDB\log\mongod.log --logappend --dbpathD:\MongoDB\data\db --serviceName "MongoDB" --serviceDisplayName "MongoDB" --install --auth
#3、登录:注意使用双引号而非单引号
mongo --port 27017 -u "root" -p "123" --authenticationDatabase "admin"

也可以在登录之后用db.auth("账号","密码")登录
mongo
use admin
db.auth("root","123")

#推荐博客:https://www.cnblogs.com/zhoujinyi/p/4610050.html

创建账号密码+开启认证机制
3、命令行shell
#1、mongo 127.0.0.1:27017/config #连接到任何数据库config

#2、mongo --nodb #不连接到任何数据库

#3、启动之后,在需要时运行new Mongo(hostname)命令就可以连接到想要的mongod了:
> conn=new Mongo('127.0.0.1:27017')
connection to 127.0.0.1:27017
> db=conn.getDB('admin')
admin

#4、help查看帮助

#5、mongo时一个简化的JavaScript shell,是可以执行JavaScript脚本的
(三)
启动 MongoDB Service
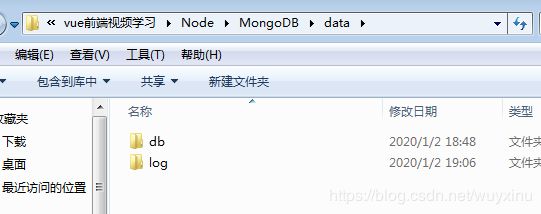
需要创建数据库路径和日志文件
D:\vue前端视频学习\Node\MongoDB\data\db
D:\vue前端视频学习\Node\MongoDB\data\log\mongo.log
启动服务
mongod --dbpath “D:\vue\Node\MongoDB\data\db” --logpath “D:\vue\Node\MongoDB\data\log\mongod.log”
服务启动好之后运行mongodb
再打开一个窗口运行mongo
这里我已经配置过环境变量了 没配置环境变量的在根目录下执行
看到上面的运行结果 说明mongodb已经打开
为了方便每次启动创建一个config文件 启动服务
用记事本打开就行
写入数据库地址 和日志文件地址
dbpath=D:\vue\Node\MongoDB\data\db
logpath=D:\vue\Node\MongoDB\data\log\mongod.log
安装服务 必须要在有管理员权限的命令行里面执行
windows+x选择windows powershell(管理员)
mongod --config “D:\vue\Node\MongoDB\mongod.config” --serviceName “MongoDB” --install
完成服务的安装
也可已删除
mongod --remove serviceName “MongoDB”
输入 services.msc 查看有没有 MongoDB的服务
点击启动
或者 直接输入 net start MongoDB(必须是有管理员权限的)
停止服务 net stop MongoDB
(四)使用过程中的一些奇奇怪怪的错误
注:中文文件路径乱码问题真的很傻逼
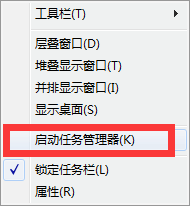
我们在平时的工作中经常碰到这样的情况:更改文件夹名称时总提示有文件或程序在运行,而实际上我们并没有打开文件夹里的文件或程序。这时其实是有后台程序在运行,我们需要将其找出来关掉就可以了。下面将简单介绍如何操作。
- 点击鼠标右键,点结束进程
- 关掉运行的程序后 就可以更改文件夹名称了
来源:百度经验
服务器没有响应控制功能
如图,如果通过下列代码,添加服务后,使用net start命令出现这样的问题时,可以参考下我的解决方法。
先删除之前的serviceName —> sc delete mongodb
然后,
D:\vue\Node\MongoDB>mongod --dbpath D:\vue\Node\MongoDB
data\db --logpath D:\vue\Node\MongoDB\log\mongodb.log --logappend –
serviceName MongoDB --auth --install
解决方法:
出现这个问题一般是路径有问题。
1)请注意你所有的路径没有错,包括mongod所在路径,日志所在路径等;
2)不要加入多余的“\”,如“D:\MongoDB\Data”这个,千万不要写成“D:\MongoDB\Data\”。
发生系统错误1058
"D:\vue\Node\MongoDB\bin\mongod.exe" --remove
mongod --config "D:\vue\Node\MongoDB\bin\mongod.cfg" --install
MongoDB错误:Failed global initialization:FileNotOpen: Failed to open “XXX”
将MongoDB服务器作为Windows服务运行
重新打开一个cmd终端(一定要管理员身份C:\Windows\System32\cmd.exe,右键以管理员身份运行,这个超级重要),继续来到并目录下,输入
mongod --config “D:\vue\Node\MongoDB\bin\mongod.cfg” --install
输入上述命令之后出现了一些错误
Failed to open “D:\vue前端视频学习\Node\MongoDB\log\mongod.log”
研究后发现是没有创建这些文件,手动创建这些文件后重新打开cmd命令行,进入到bin里面,继续输入上面命令即可。
(我的问题是之前中文路径,然后导致的中文乱码问题,之后修改了路径,文件路径不对)
6、数据库相关概念
在一个数据库软件中可以包含多个数据仓库,在每个数据仓库中可以包含多个数据集合,每个数据集合中可以包含多条文档(具体的数据)。
| 术语 | 解释说明 |
|---|---|
| database | 数据库,mongoDB数据库软件中可以建立多个数据库 |
| collection | 集合,一组数据的集合,可以理解为JavaScript中的数组 |
| document | 文档,一条具体的数据,可以理解为JavaScript中的对象 |
| field | 字段,文档中的属性名称,可以理解为JavaScript中的对象属性 |
7、Mongoose第三方包
使用Node.js操作MongoDB数据库需要依赖Node.js第三方包mongoose
使用npm install mongoose命令下载
8、数据库连接
启动MongoDB
在命令行工具中运行net start mongoDB即可启动MongoDB,否则MongoDB将无法连接。
使用mongoose提供的connect方法即可连接数据库。
// 引入mongoose第三方模块 用来操作数据库
const mongoose = require('mongoose');
// 数据库连接
mongoose.connect('mongodb://localhost/playground', { useNewUrlParser: true})
	// 连接成功
	.then(() => console.log('数据库连接成功'))
	// 连接失败
	.catch(err => console.log(err, '数据库连接失败'));
9、创建数据库
在MongoDB中不需要显式创建数据库,如果正在使用的数据库不存在,MongoDB会自动创建。
二、MongoDB增删改查操作
1、创建集合和文档
创建集合分为两步,一是对对集合设定规则,二是创建集合,创建mongoose.Schema构造函数的实例即可创建集合。
  // 设定集合规则
 const courseSchema = new mongoose.Schema({
     name: String,
     author: String,
     isPublished: Boolean
 });
  // 创建集合并应用规则
 const Course = mongoose.model('Course', courseSchema); // courses
// 引入mongoose第三方模块 用来操作数据库
const mongoose = require('mongoose');
// 数据库连接
mongoose.connect('mongodb://localhost/playground', { useNewUrlParser: true})
	// 连接成功
	.then(() => console.log('数据库连接成功'))
	// 连接失败
	.catch(err => console.log(err, '数据库连接失败'));

// 创建集合规则
const courseSchema = new mongoose.Schema({
	name: String,
	author: String,
	isPublished: Boolean
});

// 使用规则创建集合
// 1.集合名称
// 2.集合规则
const Course = mongoose.model('Course', courseSchema) // courses

// 创建文档
const course = new Course({
	name: 'node.js基础',
	author: 'wuyuxin',
	isPublished: true
});
// 将文档插入到数据库中
course.save();
创建文档实际上就是向集合中插入数据。
分为两步:
- 创建集合实例。
- 调用实例对象下的save方法将数据保存到数据库中。
  // 创建集合实例
 const course = new Course({
     name: 'Node.js course',
     author: 'wuyuxin',
     tags: ['node', 'backend'],
     isPublished: true
 });
  // 将数据保存到数据库中
 course.save();
Course.create({name: 'JavaScript基础', author: 'wuyuxin', isPublish: true}, (err, doc) => {
     //  错误对象
    console.log(err)
     //  当前插入的文档
    console.log(doc)
});

Course.create({name: 'JavaScript基础', author: 'wuyuxin', isPublish: true})
      .then(doc => console.log(doc))
      .catch(err => console.log(err))
// 引入mongoose第三方模块 用来操作数据库
const mongoose = require('mongoose');
// 数据库连接
mongoose.connect('mongodb://localhost/playground', { useNewUrlParser: true})
	// 连接成功
	.then(() => console.log('数据库连接成功'))
	// 连接失败
	.catch(err => console.log(err, '数据库连接失败'));

// 创建集合规则
const courseSchema = new mongoose.Schema({
	name: String,
	author: String,
	isPublished: Boolean
});

// 使用规则创建集合
// 1.集合名称
// 2.集合规则
const Course = mongoose.model('Course', courseSchema) // courses

// 向集合中插入文档
// Course.create({name: 'Javascript', author: 'wuyuxin', isPublished: false}, (err, result) => {
// 	console.log(err)
// 	console.log(result)
// })

Course.create({name: 'Javascript123', author: 'wuyuxin', isPublished: false})
	  .then(result => {
	  	console.log(result)
	  })
2、mongoDB数据库导入数据
mongoimport –d 数据库名称 –c 集合名称 –file 要导入的数据文件
找到mongodb数据库的安装目录,将安装目录下的bin目录放置在环境变量中。
3、查找文档
//  根据条件查找文档(条件为空则查找所有文档)
Course.find().then(result => console.log(result))
// 返回文档集合
[{
    _id: 5c0917ed37ec9b03c07cf95f,
    name: 'node.js基础',
    author: 'wuyuxin‘
},{
     _id: 5c09dea28acfb814980ff827,
     name: 'Javascript',
     author: 'wuyuxin‘
}]
//  根据条件查找文档
Course.findOne({name: 'node.js基础'}).then(result => console.log(result))
// 返回文档
 {
    _id: 5c0917ed37ec9b03c07cf95f,
    name: 'node.js基础',
    author: 'wuyuxin‘
}
 //  匹配大于 小于
 User.find({age: {$gt: 20, $lt: 50}}).then(result => console.log(result))

  //  匹配包含
User.find({hobbies: {$in: ['敲代码']}}).then(result => console.log(result))

 //  选择要查询的字段
 User.find().select('name email').then(result => console.log(result))

 // 将数据按照年龄进行排序
 User.find().sort('age').then(result => console.log(result))

 //  skip 跳过多少条数据  limit 限制查询数量
 User.find().skip(2).limit(2).then(result => console.log(result))
// 引入mongoose第三方模块 用来操作数据库
const mongoose = require('mongoose');
// 数据库连接
mongoose.connect('mongodb://localhost/playground', { useNewUrlParser: true})
	// 连接成功
	.then(() => console.log('数据库连接成功'))
	// 连接失败
	.catch(err => console.log(err, '数据库连接失败'));

// 创建集合规则
const userSchema = new mongoose.Schema({
	name: String,
	age: Number,
	email: String,
	password: String,
	hobbies: [String]
});

// 使用规则创建集合
const User = mongoose.model('User', userSchema);

// 查询用户集合中的所有文档
// User.find().then(result => console.log(result));
// 通过_id字段查找文档
// User.find({_id: '5c09f267aeb04b22f8460968'}).then(result => console.log(result))

// findOne方法返回一条文档 默认返回当前集合中的第一条文档
// User.findOne({name: '李四'}).then(result => console.log(result))
// 查询用户集合中年龄字段大于20并且小于40的文档
// 1.User.find({age: {$gt: 20, $lt: 40}}).then(result => console.log(result))
// 2.查询用户集合中hobbies字段值包含足球的文档
// User.find({hobbies: {$in: ['足球']}}).then(result => console.log(result))
// 3.选择要查询的字段
// User.find().select('name email -_id').then(result => console.log(result))
// 4.根据年龄字段进行升序排列
// User.find().sort('age').then(result => console.log(result))
// 5.根据年龄字段进行降序排列
// User.find().sort('-age').then(result => console.log(result))
// 查询文档跳过前两条结果 限制显示3条结果
User.find().skip(2).limit(3).then(result => console.log(result))
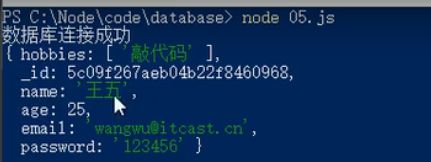
图依次为为1-5的执行结果
4、删除文档和更新文档
 // 删除单个
Course.findOneAndDelete({}).then(result => console.log(result))
 // 删除多个
User.deleteMany({}).then(result => console.log(result))
// 引入mongoose第三方模块 用来操作数据库
const mongoose = require('mongoose');
// 数据库连接
mongoose.connect('mongodb://localhost/playground', { useNewUrlParser: true})
	// 连接成功
	.then(() => console.log('数据库连接成功'))
	// 连接失败
	.catch(err => console.log(err, '数据库连接失败'));

// 创建集合规则
const userSchema = new mongoose.Schema({
	name: String,
	age: Number,
	email: String,
	password: String,
	hobbies: [String]
});

// 使用规则创建集合
const User = mongoose.model('User', userSchema);

// 查找到一条文档并且删除
// 返回删除的文档
// 如何查询条件匹配了多个文档 那么将会删除第一个匹配的文档
// User.findOneAndDelete({_id: '5c09f267aeb04b22f8460968'}).then(result => console.log(result))
// 删除多条文档
// {} 即删除所有文档
User.deleteMany({}).then(result => console.log(result))
// 更新单个
User.updateOne({查询条件}, {要修改的值}).then(result => console.log(result))
// 更新多个
User.updateMany({查询条件}, {要更改的值}).then(result => console.log(result))
// 引入mongoose第三方模块 用来操作数据库
const mongoose = require('mongoose');
// 数据库连接
mongoose.connect('mongodb://localhost/playground', { useNewUrlParser: true})
	// 连接成功
	.then(() => console.log('数据库连接成功'))
	// 连接失败
	.catch(err => console.log(err, '数据库连接失败'));

// 创建集合规则
const userSchema = new mongoose.Schema({
	name: String,
	age: Number,
	email: String,
	password: String,
	hobbies: [String]
});

// 使用规则创建集合
const User = mongoose.model('User', userSchema);
// 找到要删除的文档并且删除
// 返回是否删除成功的对象
// 如果匹配了多条文档, 只会删除匹配成功的第一条文档
// User.updateOne({name: '李四'}, {age: 120, name: '李狗蛋'}).then(result => console.log(result))
// 找到要删除的文档并且删除
User.updateMany({}, {age: 300}).then(result => console.log(result))
5、mongoose验证
在创建集合规则时,可以设置当前字段的验证规则,验证失败就则输入插入失败。
- required: true 必传字段
- minlength:3 字符串最小长度
- maxlength: 20 字符串最大长度
- min: 2 数值最小为2
- max: 100 数值最大为100
- enum: [‘html’, ‘css’, ‘javascript’, ‘node.js’]
- trim: true 去除字符串两边的空格
- validate: 自定义验证器
- default: 默认值
获取错误信息:error.errors[‘字段名称’].message
// 引入mongoose第三方模块 用来操作数据库
const mongoose = require('mongoose');
// 数据库连接
mongoose.connect('mongodb://localhost/playground', { useNewUrlParser: true})
	// 连接成功
	.then(() => console.log('数据库连接成功'))
	// 连接失败
	.catch(err => console.log(err, '数据库连接失败'));

const postSchema = new mongoose.Schema({
	title: {
		type: String,
		// 必选字段
		required: [true, '请传入文章标题'],
		// 字符串的最小长度
		minlength: [2, '文章长度不能小于2'],
		// 字符串的最大长度
		maxlength: [5, '文章长度最大不能超过5'],
		// 去除字符串两边的空格
		trim: true
	},
	age: {
		type: Number,
		// 数字的最小范围
		min: 18,
		// 数字的最大范围
		max: 100
	},
	publishDate: {
		type: Date,
		// 默认值
		default: Date.now
	},
	category: {
		type: String,
		// 枚举 列举出当前字段可以拥有的值
		enum: {
			values: ['html', 'css', 'javascript', 'node.js'],
			message: '分类名称要在一定的范围内才可以'
		}
	},
	author: {
		type: String,
		validate: {
			validator: v => {
				// 返回布尔值
				// true 验证成功
				// false 验证失败
				// v 要验证的值
				return v && v.length > 4
			},
			// 自定义错误信息
			message: '传入的值不符合验证规则'
		}
	}
});

const Post = mongoose.model('Post', postSchema);

Post.create({title:'aa', age: 60, category: 'java', author: 'bd'})
	.then(result => console.log(result))
	.catch(error => {
		// 获取错误信息对象
		const err = error.errors;
		// 循环错误信息对象
		for (var attr in err) {
			// 将错误信息打印到控制台中
			console.log(err[attr]['message']);
		}
	})
6、集合关联及实现
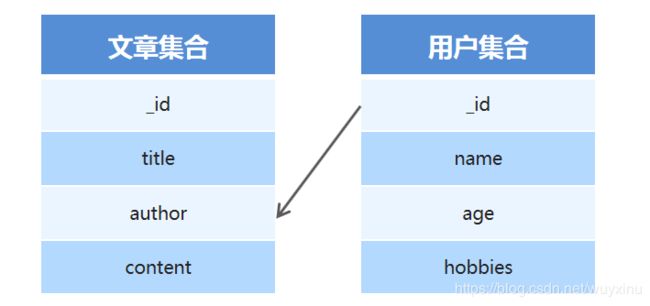
通常不同集合的数据之间是有关系的,例如文章信息和用户信息存储在不同集合中,但文章是某个用户发表的,要查询文章的所有信息包括发表用户,就需要用到集合关联。
- 使用id对集合进行关联
- 使用populate方法进行关联集合查询
集合关联实现
// 用户集合
const User = mongoose.model('User', new mongoose.Schema({ name: { type: String } }));
// 文章集合
const Post = mongoose.model('Post', new mongoose.Schema({
    title: { type: String },
    // 使用ID将文章集合和作者集合进行关联
    author: { type: mongoose.Schema.Types.ObjectId, ref: 'User' }
}));
//联合查询
Post.find()
      .populate('author')
      .then((err, result) => console.log(result));
// 引入mongoose第三方模块 用来操作数据库
const mongoose = require('mongoose');
// 数据库连接
mongoose.connect('mongodb://localhost/playground', { useNewUrlParser: true})
	// 连接成功
	.then(() => console.log('数据库连接成功'))
	// 连接失败
	.catch(err => console.log(err, '数据库连接失败'));

// 用户集合规则
const userSchema = new mongoose.Schema({
	name: {
		type: String,
		required: true
	}
});
// 文章集合规则
const postSchema = new mongoose.Schema({
	title: {
		type: String
	},
	author: {
		type: mongoose.Schema.Types.ObjectId,
		ref: 'User'
	}
});
// 用户集合
const User = mongoose.model('User', userSchema);
// 文章集合
const Post = mongoose.model('Post', postSchema);

// 创建用户
// User.create({name: 'itheima'}).then(result => console.log(result));
// 创建文章
// Post.create({titile: '123', author: '5c0caae2c4e4081c28439791'}).then(result => console.log(result));
Post.find().populate('author').then(result => console.log(result))
7、案例:用户信息增删改查
- 搭建网站服务器,实现客户端与服务器端的通信
- 连接数据库,创建用户集合,向集合中插入文档
- 当用户访问/list时,将所有用户信息查询出来
- 将用户信息和表格HTML进行拼接并将拼接结果响应回客户端
- 当用户访问/add时,呈现表单页面,并实现添加用户信息功能
- 当用户访问/modify时,呈现修改页面,并实现修改用户信息功能
- 当用户访问/delete时,实现用户删除功能
案例代码位于文章尾部
三、模板引擎artTemplate
1、模板引擎的基础概念
模板引擎是第三方模块。
让开发者以更加友好的方式拼接字符串,使项目代码更加清晰、更加易于维护。
[外链图片转存失败,源站可能有防盗链机制,建议将图片保存下来直接上传(img-Fuqaag9Q-1581247691179)(C:\Users\Administrator\AppData\Roaming\Typora\typora-user-images\1578413164979.png)]
art-template模板引擎
- 在命令行工具中使用 npm install art-template 命令进行下载
- 使用const template = require(‘art-template’)引入模板引擎
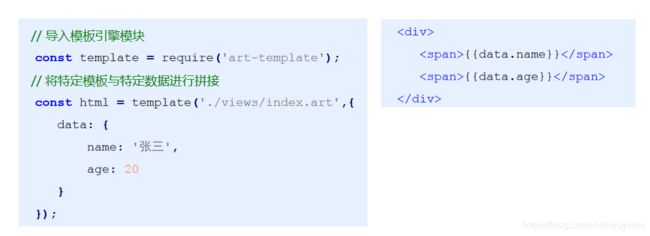
- 告诉模板引擎要拼接的数据和模板在哪 const html = template(‘模板路径’, 数据);
- 使用模板语法告诉模板引擎,模板与数据应该如何进行拼接
art-template代码示例
2、模板引擎语法
art-template同时支持两种模板语法:标准语法和原始语法。
标准语法可以让模板更容易读写,原始语法具有强大的逻辑处理能力。
标准语法: {{ 数据 }}
原始语法:<%=数据 %>
输出
将某项数据输出在模板中,标准语法和原始语法如下:
标准语法:{{ 数据 }}
原始语法:<%=数据 %>
 {{value}}
 {{a ? b : c}}
 {{a + b}}


 <%= value %>
 <%= a ? b : c %>
 <%= a + b %>
原文输出
如果数据中携带HTML标签,默认模板引擎不会解析标签,会将其转义后输出。
标准语法:{{@ 数据 }}
原始语法:<%-数据 %>
 {{@ value }}

 <%- value %>
条件判断
 {{if 条件}} ... {{/if}}
 {{if v1}} ... {{else if v2}} ... {{/if}}

 <% if (value) { %> ... <% } %>
 <% if (v1) { %> ... <% } else if (v2) { %> ... <% } %>
循环
标准语法:{{each 数据}} {{/each}}
原始语法:<% for() { %> <% } %>
 {{each target}}
     {{$index}} {{$value}}
 {{/each}}

 <% for(var i = 0; i < target.length; i++){ %>
     <%= i %> <%= target[i] %>
 <% } %>
子模版
使用子模板可以将网站公共区块(头部、底部)抽离到单独的文件中。
标准语法:{{include ‘模板’}}
原始语法:<%include(‘模板’) %>
 {{include './header.art'}}

 <% include('./header.art') %>
模板继承
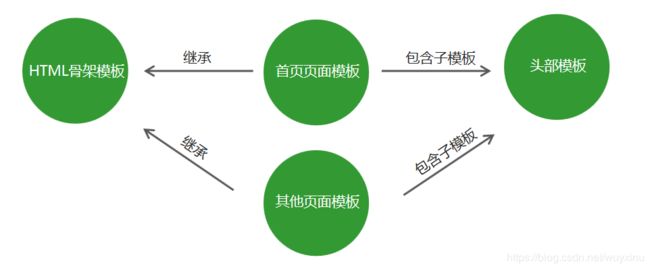
使用模板继承可以将网站HTML骨架抽离到单独的文件中,其他页面模板可以继承骨架文件。
模板继承示例
         HTML骨架模板
         {{block 'head'}}{{/block}}


         {{block 'content'}}{{/block}}
 {{extend './layout.art'}}
 {{block 'head'}}  {{/block}}
 {{block 'content'}} This is just an awesome page. {{/block}}
模板配置
- 向模板中导入变量 template.defaults.imports.变量名 = 变量值;
- 设置模板根目录 template.defaults.root = 模板目录
- 设置模板默认后缀 template.defaults.extname = ‘.art’
3、案例介绍 – 学生档案管理
目标:模板引擎应用,强化node.js项目制作流程。
知识点:http请求响应、数据库、模板引擎、静态资源访问。
制作流程
- 建立项目文件夹并生成项目描述文件
- 创建网站服务器实现客户端和服务器端通信
- 连接数据库并根据需求设计学员信息表
- 创建路由并实现页面模板呈递
- 实现静态资源访问
- 实现学生信息添加功能
- 实现学生信息展示功能
第三方模块 router
功能:实现路由
使用步骤:
- 获取路由对象
- 调用路由对象提供的方法创建路由
- 启用路由,使路由生效
const getRouter = require('router')
const router = getRouter();
router.get('/add', (req, res) => {
    res.end('Hello World!')
})
server.on('request', (req, res) => {
    router(req, res)
})
第三方模块 serve-static
功能:实现静态资源访问服务
步骤:
- 引入serve-static模块获取创建静态资源服务功能的方法
- 调用方法创建静态资源服务并指定静态资源服务目录
- 启用静态资源服务功能
const serveStatic = require('serve-static')
const serve = serveStatic('public')
server.on('request', () => {
    serve(req, res)
})
server.listen(3000)
添加学生信息功能步骤分析
- 在模板的表单中指定请求地址与请求方式
- 为每一个表单项添加name属性
- 添加实现学生信息功能路由
- 接收客户端传递过来的学生信息
- 将学生信息添加到数据库中
- 将页面重定向到学生信息列表页面
学生信息列表页面分析
- 从数据库中将所有的学生信息查询出来
- 通过模板引擎将学生信息和HTML模板进行拼接
- 将拼接好的HTML模板响应给客户端
四、Express框架
1、Express框架简介及初体验
1.1 Express框架是什么
Express是一个基于Node平台的web应用开发框架,它提供了一系列的强大特性,帮助你创建各种Web应用。我们可以使用 npm install express 命令进行下载。
1.2 Express框架特性
- 提供了方便简洁的路由定义方式
- 对获取HTTP请求参数进行了简化处理
- 对模板引擎支持程度高,方便渲染动态HTML页面
- 提供了中间件机制有效控制HTTP请求
- 拥有大量第三方中间件对功能进行扩展
1.3 原生Node.js与Express框架对比之路由
 app.on('request', (req, res) => {
     // 获取客户端的请求路径
     let { pathname } = url.parse(req.url);
     // 对请求路径进行判断 不同的路径地址响应不同的内容
     if (pathname == '/' || pathname == 'index') {
        res.end('欢迎来到首页');
     } else if (pathname == '/list') {
        res.end('欢迎来到列表页页');
     } else if (pathname == '/about') {
        res.end('欢迎来到关于我们页面')
     } else {
        res.end('抱歉, 您访问的页面出游了');
     }
 });
 // 当客户端以get方式访问/时
 app.get('/', (req, res) => {
     // 对客户端做出响应
     res.send('Hello Express');
 });

 // 当客户端以post方式访问/add路由时
 app.post('/add', (req, res) => {
    res.send('使用post方式请求了/add路由');
 });
1.4 原生Node.js与Express框架对比之获取请求参数
 app.on('request', (req, res) => {
    // 获取GET参数
    let {query} = url.parse(req.url, true);
    // 获取POST参数
    let postData = '';
    req.on('data', (chunk) => {
        postData += chunk;
    });
    req.on('end', () => {
        console.log(querystring.parse(postData)
    }));
 });
 app.get('/', (req, res) => {
    // 获取GET参数
    console.log(req.query);
 });

 app.post('/', (req, res) => {
    // 获取POST参数
    console.log(req.body);
 })
1.5 Express初体验
使用Express框架创建web服务器及其简单,调用express模块返回的函数即可。
 // 引入Express框架
 const express = require('express');
 // 使用框架创建web服务器
 const app = express();
 // 当客户端以get方式访问/路由时
 app.get('/', (req, res) => {
    // 对客户端做出响应 send方法会根据内容的类型自动设置请求头
    res.send('Hello Express'); // Hello Express {say: 'hello'}
 });
 // 程序监听3000端口
 app.listen(3000);
2、Express中间件
2.1 什么是中间件
中间件就是一堆方法,可以接收客户端发来的请求、可以对请求做出响应,也可以将请求继续交给下一个中间件继续处理。

中间件主要由两部分构成,中间件方法以及请求处理函数。
中间件方法由Express提供,负责拦截请求,请求处理函数由开发人员提供,负责处理请求。
 app.get('请求路径', '处理函数')   // 接收并处理get请求
 app.post('请求路径', '处理函数')  // 接收并处理post请求
可以针对同一个请求设置多个中间件,对同一个请求进行多次处理。
默认情况下,请求从上到下依次匹配中间件,一旦匹配成功,终止匹配。
可以调用next方法将请求的控制权交给下一个中间件,直到遇到结束请求的中间件。
 app.get('/request', (req, res, next) => {
     req.name = "张三";
     next();
 });
 app.get('/request', (req, res) => {
     res.send(req.name);
 });
2.2 app.use中间件用法
app.use 匹配所有的请求方式,可以直接传入请求处理函数,代表接收所有的请求。
 app.use((req, res, next) => {
     console.log(req.url);
     next();
 });
app.use 第一个参数也可以传入请求地址,代表不论什么请求方式,只要是这个请求地址就接收这个请求。
 app.use('/admin', (req, res, next) => {
     console.log(req.url);
     next();
 });
2.3 中间件应用
- 路由保护,客户端在访问需要登录的页面时,可以先使用中间件判断用户登录状态,用户如果未登录,则拦截请求,直接响应,禁止用户进入需要登录的页面。
- 网站维护公告,在所有路由的最上面定义接收所有请求的中间件,直接为客户端做出响应,网站正在维护中。
- 自定义404页面
2.4 错误处理中间件
在程序执行的过程中,不可避免的会出现一些无法预料的错误,比如文件读取失败,数据库连接失败。
错误处理中间件是一个集中处理错误的地方。
 app.use((err, req, res, next) => {
     res.status(500).send('服务器发生未知错误');
 })
当程序出现错误时,调用next()方法,并且将错误信息通过参数的形式传递给next()方法,即可触发错误处理中间件。
 app.get("/", (req, res, next) => {
     fs.readFile("/file-does-not-exist", (err, data) => {
         if (err) {
            next(err);
         }
     });
});
2.5 捕获错误
在node.js中,异步API的错误信息都是通过回调函数获取的,支持Promise对象的异步API发生错误可以通过catch方法捕获。
异步函数执行如果发生错误要如何捕获错误呢?
try catch 可以捕获异步函数以及其他同步代码在执行过程中发生的错误,但是不能其他类型的API发生的错误。
 app.get("/", async (req, res, next) => {
     try {
         await User.find({name: '张三'})
     }catch(ex) {
         next(ex);
     }
 });
3、Express框架请求处理
3.1 构建模块化路由
 const express = require('express')
 // 创建路由对象
 const home = express.Router();
 // 将路由和请求路径进行匹配
 app.use('/home', home);
  // 在home路由下继续创建路由
 home.get('/index', () => {
          //  /home/index
         res.send('欢迎来到博客展示页面');
 });
 // home.js
 const home = express.Router();
 home.get('/index', () => {
     res.send('欢迎来到博客展示页面');
 });
 module.exports = home;
 // admin.js
 const admin = express.Router();
 admin.get('/index', () => {
     res.send('欢迎来到博客管理页面');
 });
 module.exports = admin;
 // app.js
 const home = require('./route/home.js');
 const admin = require('./route/admin.js');
 app.use('/home', home);
 app.use('/admin', admin);
3.2 GET参数的获取
Express框架中使用req.query即可获取GET参数,框架内部会将GET参数转换为对象并返回。
 // 接收地址栏中问号后面的参数
 // 例如: http://localhost:3000/?name=zhangsan&age=30
 app.get('/', (req, res) => {
    console.log(req.query); // {"name": "zhangsan", "age": "30"}
 });
3.3 POST参数的获取
Express中接收post请求参数需要借助第三方包 body-parser。
 // 引入body-parser模块
 const bodyParser = require('body-parser');
 // 配置body-parser模块
 app.use(bodyParser.urlencoded({ extended: false }));
 // 接收请求
 app.post('/add', (req, res) => {
    // 接收请求参数
    console.log(req.body);
 })
3.4 Express路由参数
 app.get('/find/:id', (req, res) => {
     console.log(req.params); // {id: 123}
 });
localhost:3000/find/123
3.5 静态资源的处理
通过Express内置的express.static可以方便地托管静态文件,例如img、CSS、JavaScript 文件等。
app.use(express.static('public'));
现在,public 目录下面的文件就可以访问了。
http://localhost:3000/images/kitten.jpg
http://localhost:3000/css/style.css
http://localhost:3000/js/app.js
http://localhost:3000/images/bg.png
http://localhost:3000/hello.html
4、express-art-template模板引擎
模板引擎
为了使art-template模板引擎能够更好的和Express框架配合,模板引擎官方在原art-template模板引擎的基础上封装了express-art-template。
使用npm install art-template express-art-template命令进行安装。
  // 当渲染后缀为art的模板时 使用express-art-template
 app.engine('art', require('express-art-template'));
  // 设置模板存放目录
 app.set('views', path.join(__dirname, 'views'));
  // 渲染模板时不写后缀 默认拼接art后缀
 app.set('view engine', 'art');
 app.get('/', (req, res) => {
     // 渲染模板
     res.render('index');
 });
app.locals 对象
将变量设置到app.locals对象下面,这个数据在所有的模板中都可以获取到。
 app.locals.users = [{
     name: '张三',
     age: 20
 },{
     name: '李四',
     age: 20
}]
附:案例
案例:用户信息增删改查
// 搭建网站服务器,实现客户端与服务器端的通信
// 连接数据库,创建用户集合,向集合中插入文档
// 当用户访问/list时,将所有用户信息查询出来
// 实现路由功能
// 呈现用户列表页面
// 从数据库中查询用户信息 将用户信息展示在列表中
// 将用户信息和表格HTML进行拼接并将拼接结果响应回客户端
// 当用户访问/add时,呈现表单页面,并实现添加用户信息功能
// 当用户访问/modify时,呈现修改页面,并实现修改用户信息功能
// 修改用户信息分为两大步骤
// 1.增加页面路由 呈现页面
// 1.在点击修改按钮的时候 将用户ID传递到当前页面
// 2.从数据库中查询当前用户信息 将用户信息展示到页面中
// 2.实现用户修改功能
// 1.指定表单的提交地址以及请求方式
// 2.接受客户端传递过来的修改信息 找到用户 将用户信息更改为最新的
// 当用户访问/delete时,实现用户删除功能
const http = require('http');
const url = require('url');
const querystring = require('querystring');
require('./model/index.js');
const User = require('./model/user');
// 创建服务器
const app = http.createServer();
// 为服务器对象添加请求事件
app.on('request', async (req, res) => {
// 请求方式
const method = req.method;
// 请求地址
const { pathname, query } = url.parse(req.url, true);
if (method == 'GET') {
// 呈现用户列表页面
if (pathname == '/list') {
// 查询用户信息
let users = await User.find();
// html字符串
let list = `
用户列表
添加用户
用户名
年龄
爱好
邮箱
操作
`;
// 对数据进行循环操作
users.forEach(item => {
list += `
${item.name}
${item.age}
`;
item.hobbies.forEach(item => {
list += `${item}`;
})
list += `
${item.email}
${item._id}" class="btn btn-danger btn-xs">删除
${item._id}" class="btn btn-success btn-xs">修改
`;
});
list += `
`;
res.end(list);
}else if (pathname == '/add') {
// 呈现添加用户表单页面
let add = `
用户列表
添加用户
`;
res.end(add)
}else if (pathname == '/modify') {
let user = await User.findOne({_id: query.id});
let hobbies = ['足球', '篮球', '橄榄球', '敲代码', '抽烟', '喝酒', '烫头', '吃饭', '睡觉', '打豆豆']
console.log(user)
// 呈现修改用户表单页面
let modify = `
用户列表
修改用户
`;
res.end(modify)
}else if (pathname == '/remove') {
// res.end(query.id)
await User.findOneAndDelete({_id: query.id});
res.writeHead(301, {
Location: '/list'
});
res.end();
}
}else if (method == 'POST') {
// 用户添加功能
if (pathname == '/add') {
// 接受用户提交的信息
let formData = '';
// 接受post参数
req.on('data', param => {
formData += param;
})
// post参数接受完毕
req.on('end', async () => {
let user = querystring.parse(formData)
// 将用户提交的信息添加到数据库中
await User.create(user);
// 301代表重定向
// location 跳转地址
res.writeHead(301, {
Location: '/list'
});
res.end();
})
}else if (pathname == '/modify') {
// 接受用户提交的信息
let formData = '';
// 接受post参数
req.on('data', param => {
formData += param;
})
// post参数接受完毕
req.on('end', async () => {
let user = querystring.parse(formData)
// 将用户提交的信息添加到数据库中
await User.updateOne({_id: query.id}, user);
// 301代表重定向
// location 跳转地址
res.writeHead(301, {
Location: '/list'
});
res.end();
})
}
}
});
// 监听端口
app.listen(3000);
index.js
const mongoose = require('mongoose');
// 数据库连接 27017是mongodb数据库的默认端口
mongoose.connect('mongodb://localhost/playground', { useNewUrlParser: true })
	.then(() => console.log('数据库连接成功'))
	.catch(() => console.log('数据库连接失败'));
user.js
const mongoose = require('mongoose');
// 创建用户集合规则
const userSchema = new mongoose.Schema({
	name: {
		type: String,
		required: true,
		minlength: 2,
		maxlength: 20
	},
	age: {
		type: Number,
		min: 18,
		max: 80
	},
	password: String,
	email: String,
	hobbies: [ String ]
});

// 创建集合 返回集合构造函数
const User = mongoose.model('User', userSchema);

module.exports = User;
案例:学生档案管理
app.js
// 引入http模块
const http = require('http');
// 引入模板引擎
const template = require('art-template');
// 引入path模块
const path = require('path');
// 引入静态资源访问模块
const serveStatic = require('serve-static');
// 引入处理日期的第三方模块
const dateformat = require('dateformat');

const router = require('./route/index');
// 实现静态资源访问服务
const serve = serveStatic(path.join(__dirname, 'public'))

// 配置模板的根目录
template.defaults.root = path.join(__dirname, 'views');
// 处理日期格式的方法
template.defaults.imports.dateformat = dateformat;

// 数据库连接
require('./model/connect');

// 创建网站服务器
const app = http.createServer();
// 当客户端访问服务器端的时候
app.on('request', (req, res) => {
	// 启用路由功能
	router(req, res, () => {})
	// 启用静态资源访问服务功能
	serve(req, res, () => {})
});
// 端口监听
app.listen(80);
console.log('服务器启动成功');
views/index.art
学生档案
views\list.art
	学员信息


		学员信息

			姓名
			年龄
			性别
			邮箱地址
			爱好
			所属学院
			入学时间

		{{each students}}

				{{$value.name}}
				{{$value.age}}
				{{$value.sex == '0' ? '男' : '女'}}
				{{$value.email}}

					{{each $value.hobbies}}
						{{$value}}
					{{/each}}

				{{$value.collage}}
				{{dateformat($value.enterDate, 'yyyy-mm-dd')}}

		{{/each}}
route\index.js
// 引入router模块
const getRouter = require('router');
// 获取路由对象
const router = getRouter();
// 学生信息集合
const Student = require('../model/user');
// 引入模板引擎
const template = require('art-template');
// 引入querystring模块
const querystring = require('querystring');

// 呈递学生档案信息页面
router.get('/add', (req, res) => {
	let html = template('index.art', {});
	res.end(html);
})

// 呈递学生档案信息列表页面
router.get('/list', async (req, res) =>{
	// 查询学生信息
	let students = await Student.find();
	console.log(students);
	let html = template('list.art', {
		students: students
	})
	res.end(html)
})
// 实现学生信息添加功能路由
router.post('/add', (req, res) => {
	// 接收post请求参数
	let formData = '';
	req.on('data', param => {
		formData += param;
	});
	req.on('end', async () => {
		await Student.create(querystring.parse(formData))
		res.writeHead(301, {
			Location: '/list'
		});
		res.end()
	})
});

module.exports = router;
public\css\list.css
body {
	padding: 0;
	margin: 0;
}

table {
	border-collapse: collapse;
}

table, td, th {
	text-align: center;
	line-height: 30px;
	border: 1px solid #CCC;
}

caption {
	font-weight: bold;
	font-size: 24px;
	margin-bottom: 10px;
}

table {
	width: 960px;
	margin: 50px auto;
}

a {
	text-decoration: none;
	color: #333;
}

a:hover {
	text-decoration: underline;
	color: #000;
}
public\css\main.css
body {
	padding: 0;
	margin: 0;
}

table {
	border-collapse: collapse;
}

table, td, th {
	text-align: center;
	line-height: 30px;
	border: 1px solid #CCC;
}

caption {
	font-weight: bold;
	font-size: 24px;
	margin-bottom: 10px;
}

table {
	width: 960px;
	margin: 50px auto;
}

a {
	text-decoration: none;
	color: #333;
}

a:hover {
	text-decoration: underline;
	color: #000;
}
model\connect.js
const mongoose = require('mongoose');
// 连接数据库
mongoose.connect('mongodb://localhost/playground', { useNewUrlParser: true })
	.then(() => console.log('数据库连接成功'))
	.catch(() => console.log('数据库连接失败'))
model\user.js
const mongoose = require('mongoose');
// 创建学生集合规则
const studentsSchema = new mongoose.Schema({
	name: {
		type: String,
		required: true,
		minlength: 2,
		maxlength: 10
	},
	age: {
		type: Number,
		min: 10,
		max: 25
	},
	sex: {
		type: String
	},
	email: String,
	hobbies: [ String ],
	collage: String,
	enterDate: {
		type: Date,
		default: Date.now
	}
});
// 创建学生信息集合
const Student = mongoose.model('Student', studentsSchema);
// 将学生信息集合进行导出
module.exports = Student;

