手写SpringMVC框架(简易版)
SpringMVC简介
SpringMVC是当前最优秀的MVC框架,自从Spring 2.5版本发布后,由于支持注解配置,易用性有了大幅度的提高。Spring 3.0更加完善,实现了对Struts 2的超越。现在越来越多的开发团队选择了Spring MVC。
- Spring为展现层提供的基于MVC设计理念的优秀的Web框架,是目前最主流的MVC框架之一
- Spring3.0后全面超越Struts2,成为最优秀的MVC框架
- Spring MVC通过一套MVC注解,让POJO成为处理请求的控制器,而无须实现任何接口。
- 支持REST风格的URL请求
- 采用了松散耦合可插拔组件结构,比其他MVC框架更具扩展性和灵活性
SpringMVC运行流程
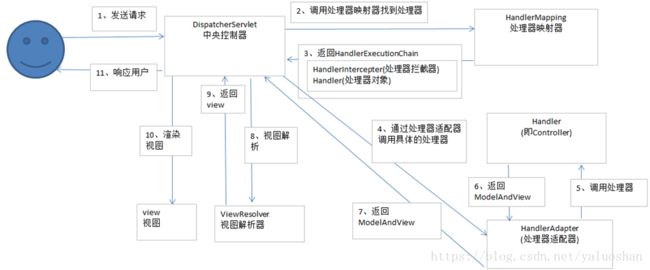
执行过程如图所示:
⑴用户发送请求至前端控制器DispatcherServlet。
⑵ DispatcherServlet收到请求调用HandlerMapping处理器映射器。
⑶ 处理器映射器根据请求url找到具体的处理器,生成处理器对象及处理器拦截器(如果有则生成)一并返回给DispatcherServlet。
⑷ DispatcherServlet通过HandlerAdapter处理器适配器调用处理器。
⑸ 执行处理器(Controller,也叫后端控制器)。
⑹ Controller执行完成返回ModelAndView。
⑺ HandlerAdapter将controller执行结果ModelAndView返回给DispatcherServlet。
⑻ DispatcherServlet将ModelAndView传给ViewReslover视图解析器。
⑼ ViewReslover解析后返回具体View。
⑽ DispatcherServlet对View进行渲染视图(即将模型数据填充至视图中)。
⑾ DispatcherServlet响应用户。
从上面可以看出,DispatcherServlet有接收请求,响应结果,转发等作用。有了DispatcherServlet之后,可以减少组件之间的耦合度。
SpringMVC九大组件
HandlerMapping
是用来查找Handler的。在SpringMVC中会有很多请求,每个请求都需要一个Handler处理,具体接收到一个请求之后使用哪个Handler进行处理,这就是HandlerMapping需要做的事。
HandlerAdapter
从名字上看,它就是一个适配器。因为SpringMVC中的Handler可以是任意的形式,只要能处理请求就ok,但是Servlet需要的处理方法的结构却是固定的,都是以request和response为参数的方法。如何让固定的Servlet处理方法调用灵活的Handler来进行处理呢?这就是HandlerAdapter要做的事情。
小结:Handler是用来干活的工具;HandlerMapping用于根据需要干的活找到相应的工具;HandlerAdapter是使用工具干活的人。
HandlerExceptionResolver
其它组件都是用来干活的。在干活的过程中难免会出现问题,出问题后需要有一个专门的角色对异常情况进行处理,在SpringMVC中就是HandlerExceptionResolver。具体来说,此组件的作用是根据异常设置ModelAndView,之后再交给render方法进行渲染。
ViewResolver
ViewResolver用来将String类型的视图名和Locale解析为View类型的视图。View是用来渲染页面的,也就是将程序返回的参数填入模板里,生成html(也可能是其它类型)文件。这里就有两个关键问题:使用哪个模板?用什么技术(规则)填入参数?这其实是ViewResolver主要要做的工作,ViewResolver需要找到渲染所用的模板和所用的技术(也就是视图的类型)进行渲染,具体的渲染过程则交由不同的视图自己完成。
RequestToViewNameTranslator
ViewName是根据ViewName查找View,但有的Handler处理完后并没有设置View也没有设置ViewName,这时就需要从request获取ViewName了,如何从request中获取ViewName就是RequestToViewNameTranslator要做的事情了。RequestToViewNameTranslator在Spring MVC容器里只可以配置一个,所以所有request到ViewName的转换规则都要在一个Translator里面全部实现。
LocaleResolver
解析视图需要两个参数:一是视图名,另一个是Locale。视图名是处理器返回的,Locale是从哪里来的?这就是LocaleResolver要做的事情。LocaleResolver用于从request解析出Locale,Locale就是zh-cn之类,表示一个区域,有了这个就可以对不同区域的用户显示不同的结果。SpringMVC主要有两个地方用到了Locale:一是ViewResolver视图解析的时候;二是用到国际化资源或者主题的时候。
ThemeResolver
用于解析主题。SpringMVC中一个主题对应一个properties文件,里面存放着跟当前主题相关的所有资源、如图片、css样式等。SpringMVC的主题也支持国际化,同一个主题不同区域也可以显示不同的风格。SpringMVC中跟主题相关的类有 ThemeResolver、ThemeSource和Theme。主题是通过一系列资源来具体体现的,要得到一个主题的资源,首先要得到资源的名称,这是ThemeResolver的工作。然后通过主题名称找到对应的主题(可以理解为一个配置)文件,这是ThemeSource的工作。最后从主题中获取资源就可以了。
MultipartResolver
用于处理上传请求。处理方法是将普通的request包装成MultipartHttpServletRequest,后者可以直接调用getFile方法获取File,如果上传多个文件,还可以调用getFileMap得到FileName->File结构的Map。此组件中一共有三个方法,作用分别是判断是不是上传请求,将request包装成MultipartHttpServletRequest、处理完后清理上传过程中产生的临时资源。
FlashMapManager
用来管理FlashMap的,FlashMap主要用在redirect中传递参数。
SpringMVC工程结构与代码
该项目最终的工程文件及目录如下:

1、新建一个Maven项目,可以设置勾选自动生成web.xml,也可以自己手动添加,在pom.xml中导入javax.servlet-api,仅需要导入这一个包就可以啦。
<project xmlns="http://maven.apache.org/POM/4.0.0"
         xmlns:xsi="http://www.w3.org/2001/XMLSchema-instance"
         xsi:schemaLocation="http://maven.apache.org/POM/4.0.0 http://maven.apache.org/xsd/maven-4.0.0.xsd">
    <modelVersion>4.0.0modelVersion>
    <groupId>cn.edu.whugroupId>
    <artifactId>SpringMVCByHandartifactId>
    <version>1.0-SNAPSHOTversion>

    <properties>
        <project.build.sourceEncoding>UTF-8project.build.sourceEncoding>
        <maven.compiler.source>1.8maven.compiler.source>
        <maven.compiler.target>1.8maven.compiler.target>
        <java.version>1.8java.version>
    properties>

    <dependencies>
        <dependency>
            <groupId>javax.servletgroupId>
            <artifactId>javax.servlet-apiartifactId>
            <version>3.0.1version>
            <scope>providedscope>
        dependency>
    dependencies>
project>
2、在生成的web.xml中配置一个MyDispatcherServlet,用于拦截符合“/”的请求,配置一个myapplication.properties文件,用于配置需要扫描的包名。
<web-app xmlns="http://xmlns.jcp.org/xml/ns/javaee"
         xmlns:xsi="http://www.w3.org/2001/XMLSchema-instance"
         xsi:schemaLocation="http://xmlns.jcp.org/xml/ns/javaee http://xmlns.jcp.org/xml/ns/javaee/web-app_3_1.xsd"
         version="3.1">
    <servlet>
        <servlet-name>MyMVCservlet-name>
        <servlet-class>cn.edu.whu.MVCByHand.servlet.MyDispatcherServletservlet-class>
        <init-param>
            <param-name>contextConfigLocationparam-name>
            <param-value>myapplication.propertiesparam-value>
        init-param>
        <load-on-startup>1load-on-startup>
    servlet>
    <servlet-mapping>
        <servlet-name>MyMVCservlet-name>
        <url-pattern>/*url-pattern>
    servlet-mapping>
web-app>
如在myapplication.properties文件中,配置的包名为:
scanPackage=cn.edu.whu.MVCByHand3、创建自己的注解@MyController,@MyService,@MyRequesMapping,@RequestParam,@MyAutowired等。
//@MyAutowired注解代码:
package cn.edu.whu.MVCByHand.annotation;
import java.lang.annotation.*;

/**
 * Description:自定义注解@MyAutoWired实现自动注入
 * Author:CXJ
 * Date: 2018-06-16 20:33
 * Remark:
 */
@Target(ElementType.FIELD)
@Retention(RetentionPolicy.RUNTIME)
@Documented
public @interface MyAutowired {
    String value() default "";
}


//@MyController注解代码:
package cn.edu.whu.MVCByHand.annotation;
import java.lang.annotation.*;

@Target(ElementType.TYPE)
@Retention(RetentionPolicy.RUNTIME)
@Documented
public @interface MyController {
    String value() default "";
}


//@MyRequestMapping注解代码:
package cn.edu.whu.MVCByHand.annotation;
import java.lang.annotation.*;

@Target({ElementType.TYPE,ElementType.METHOD})
@Retention(RetentionPolicy.RUNTIME)
@Documented
public @interface MyRequestMapping {
    String value();
}


//@MyRequestParam注解代码
package cn.edu.whu.MVCByHand.annotation;
import java.lang.annotation.*;

@Target(ElementType.PARAMETER)
@Retention(RetentionPolicy.RUNTIME)
@Documented
public @interface MyRequestParam {
    String value();
}


//@MyService注解代码
package cn.edu.whu.MVCByHand.annotation;
import java.lang.annotation.*;

@Target(ElementType.TYPE)
@Retention(RetentionPolicy.RUNTIME)
@Documented
public @interface MyService {
    String value() default "";
}
4、创建MyDispatcherServlet这个类,继承HttpServlet,重写init()、doGet()、doPost(),以及实现自动注入、请求匹配等代码:
package cn.edu.whu.MVCByHand.servlet;

import cn.edu.whu.MVCByHand.annotation.MyAutowired;
import cn.edu.whu.MVCByHand.annotation.MyController;
import cn.edu.whu.MVCByHand.annotation.MyRequestMapping;
import cn.edu.whu.MVCByHand.annotation.MyService;
import javax.servlet.ServletConfig;
import javax.servlet.ServletException;
import javax.servlet.http.HttpServlet;
import javax.servlet.http.HttpServletRequest;
import javax.servlet.http.HttpServletResponse;
import java.io.File;
import java.io.IOException;
import java.io.InputStream;
import java.lang.reflect.Field;
import java.lang.reflect.Method;
import java.net.URL;
import java.util.*;
import java.util.logging.Logger;

/**
 * Description:MVC框架的请求分发中转
 * Author:CXJ
 * Date: 2018-06-16 18:12
 * Remark:继承HttpServlet,重写init方法、doGet、doPost方法
 */
public class MyDispatcherServlet extends HttpServlet {

    private Logger log=Logger.getLogger("init");

    private Properties properties = new Properties();

    private List classNames = new ArrayList<>();

    private Map ioc = new HashMap<>();
//handlerMapping的类型可以自定义为Handler
    private Map handlerMapping = new  HashMap<>();

    private Map controllerMap  =new HashMap<>();

    @Override
    public void init(ServletConfig config) throws ServletException {
        super.init();
        log.info("初始化MyDispatcherServlet");
        //1.加载配置文件,填充properties字段;
        doLoadConfig(config.getInitParameter("contextConfigLocation"));

        //2.根据properties,初始化所有相关联的类,扫描用户设定的包下面所有的类
        doScanner(properties.getProperty("scanPackage"));

        //3.拿到扫描到的类,通过反射机制,实例化,并且放到ioc容器中(k-v  beanName-bean) beanName默认是首字母小写
        doInstance();

        // 4.自动化注入依赖
        doAutowired();

        //5.初始化HandlerMapping(将url和method对应上)
        initHandlerMapping();

        doAutowired2();
    }

    @Override
    protected void doPost(HttpServletRequest req, HttpServletResponse resp) throws ServletException, IOException {
        // 注释掉父类实现,不然会报错:405 HTTP method GET is not supported by this URL
        //super.doPost(req, resp);
        log.info("执行MyDispatcherServlet的doPost()");
        try {
            //处理请求
            doDispatch(req,resp);
        } catch (Exception e) {
            resp.getWriter().write("500!! Server Exception");
        }
    }

    @Override
    protected void doGet(HttpServletRequest req, HttpServletResponse resp) throws ServletException, IOException {
        // 注释掉父类实现,不然会报错:405 HTTP method GET is not supported by this URL
        //super.doGet(req, resp);
        log.info("执行MyDispatcherServlet的doGet()");
        try {
            //处理请求
            doDispatch(req,resp);
        } catch (Exception e) {
            resp.getWriter().write("500!! Server Exception");
        }
    }

    private void doDispatch(HttpServletRequest req, HttpServletResponse resp) throws Exception {
        if(handlerMapping.isEmpty()){
            return;
        }
        String url =req.getRequestURI();
        String contextPath = req.getContextPath();
        url=url.replace(contextPath, "").replaceAll("/+", "/");
        // 去掉url前面的斜杠"/",所有的@MyRequestMapping可以不用写斜杠"/"
        if(url.lastIndexOf('/')!=0){
            url=url.substring(1);
        }
        if(!this.handlerMapping.containsKey(url)){
            resp.getWriter().write("404 NOT FOUND!");
            log.info("404 NOT FOUND!");
            return;
        }
        Method method =this.handlerMapping.get(url);
        //获取方法的参数列表
        Class[] parameterTypes = method.getParameterTypes();

        //获取请求的参数
        Map parameterMap = req.getParameterMap();
        //保存参数值
        Object [] paramValues= new Object[parameterTypes.length];
        //方法的参数列表
        for (int i = 0; i//根据参数名称,做某些处理
            String requestParam = parameterTypes[i].getSimpleName();
            if (requestParam.equals("HttpServletRequest")){
                //参数类型已明确,这边强转类型
                paramValues[i]=req;
                continue;
            }
            if (requestParam.equals("HttpServletResponse")){
                paramValues[i]=resp;
                continue;
            }
            if(requestParam.equals("String")){
                for (Map.Entry param : parameterMap.entrySet()) {
                    String value =Arrays.toString(param.getValue()).replaceAll("\\[|\\]", "").replaceAll(",\\s", ",");
                    paramValues[i]=value;
                }
            }
        }
        //利用反射机制来调用
        try {
            //第一个参数是method所对应的实例 在ioc容器中
            //method.invoke(this.controllerMap.get(url), paramValues);
            method.invoke(this.controllerMap.get(url), paramValues);
        } catch (Exception e) {
            e.printStackTrace();
        }
    }

    /**
     * Description:  根据配置文件位置,读取配置文件中的配置信息,将其填充到properties字段
     * Params:
      * @param location: 配置文件的位置
     * return: void
     * Author: CXJ
     * Date: 2018/6/16 19:07
     */
    private void  doLoadConfig(String location){

        //把web.xml中的contextConfigLocation对应value值的文件加载到流里面
        InputStream resourceAsStream = this.getClass().getClassLoader().getResourceAsStream(location);
        try {
            //用Properties文件加载文件里的内容
            log.info("读取"+location+"里面的文件");
            properties.load(resourceAsStream);
        } catch (IOException e) {
            e.printStackTrace();
        }finally {
            //关流
            if(null!=resourceAsStream){
                try {
                    resourceAsStream.close();
                } catch (IOException e) {
                    e.printStackTrace();
                }
            }
        }

    }

    /**
     * Description:  将指定包下扫描得到的类,添加到classNames字段中;
     * Params:
      * @param packageName: 需要扫描的包名
     * return: void
     * Author: CXJ
     * Date: 2018/6/16 19:05
     */
    private void doScanner(String packageName) {

        URL url  =this.getClass().getClassLoader().getResource("/"+packageName.replaceAll("\\.", "/"));
        File dir = new File(url.getFile());
        for (File file : dir.listFiles()) {
            if(file.isDirectory()){
                //递归读取包
                doScanner(packageName+"."+file.getName());
            }else{
                String className =packageName +"." +file.getName().replace(".class", "");
                classNames.add(className);
            }
        }
    }

    /**
     * Description:  将classNames中的类实例化,经key-value:类名(小写)-类对象放入ioc字段中
     * Params:
      * @param :
     * return: void
     * Author: CXJ
     * Date: 2018/6/16 19:09
     */
    private void doInstance() {

        if (classNames.isEmpty()) {
            return;
        }
        for (String className : classNames) {
            try {
                //把类搞出来,反射来实例化(只有加@MyController需要实例化)
                Class clazz =Class.forName(className);
                if(clazz.isAnnotationPresent(MyController.class)){
                    ioc.put(toLowerFirstWord(clazz.getSimpleName()),clazz.newInstance());
                }else if(clazz.isAnnotationPresent(MyService.class)){
                    MyService myService=clazz.getAnnotation(MyService.class);
                    String beanName=myService.value();
                    if ("".equals(beanName.trim())){
                        beanName=toLowerFirstWord(clazz.getSimpleName());
                    }

                    Object instance= clazz.newInstance();
                    ioc.put(beanName,instance);
                    Class[] interfaces=clazz.getInterfaces();
                    for (Class i:interfaces){
                        ioc.put(i.getName(),instance);
                    }
                }
                else{
                    continue;
                }
            } catch (Exception e) {
                e.printStackTrace();
                continue;
            }
        }
    }

    /**
     * Description:自动化的依赖注入
     * Params:
      * @param :
     * return: void
     * Author: CXJ
     * Date: 2018/6/16 20:40
     */
    private void doAutowired(){

        if (ioc.isEmpty()){
            return;
        }
        for (Map.Entry entry:ioc.entrySet()){
            //包括私有的方法,在spring中没有隐私,@MyAutowired可以注入public、private字段
            Field[] fields=entry.getValue().getClass().getDeclaredFields();
            for (Field field:fields){
                if (!field.isAnnotationPresent(MyAutowired.class)){
                    continue;
                }
                MyAutowired autowired= field.getAnnotation(MyAutowired.class);
                String beanName=autowired.value().trim();
                if ("".equals(beanName)){
                    beanName=field.getType().getName();
                }
                field.setAccessible(true);
                try {
                    field.set(entry.getValue(),ioc.get(beanName));
                }catch (Exception e){
                    e.printStackTrace();
                    continue;
                }

            }
        }
    }

    private void doAutowired2(){

        if (controllerMap.isEmpty()){
            return;
        }
        for (Map.Entry entry:controllerMap.entrySet()){
            //包括私有的方法,在spring中没有隐私,@MyAutowired可以注入public、private字段
            Field[] fields=entry.getValue().getClass().getDeclaredFields();
            for (Field field:fields){
                if (!field.isAnnotationPresent(MyAutowired.class)){
                    continue;
                }
                MyAutowired autowired= field.getAnnotation(MyAutowired.class);
                String beanName=autowired.value().trim();
                if ("".equals(beanName)){
                    beanName=field.getType().getName();
                }
                field.setAccessible(true);
                try {
                    field.set(entry.getValue(),ioc.get(beanName));
                }catch (Exception e){
                    e.printStackTrace();
                    continue;
                }

            }
        }
    }

    /**
     * Description:  初始化HandlerMapping(将url和method对应上)
     * Params:
      * @param :
     * return: void
     * Author: CXJ
     * Date: 2018/6/16 19:12
     */
    private void initHandlerMapping(){

        if(ioc.isEmpty()){
            return;
        }
        try {
            for (Map.Entry entry: ioc.entrySet()) {
                Class clazz = entry.getValue().getClass();
                if(!clazz.isAnnotationPresent(MyController.class)){
                    continue;
                }

                //拼url时,是controller头的url拼上方法上的url
                String baseUrl ="";
                if(clazz.isAnnotationPresent(MyRequestMapping.class)){
                    MyRequestMapping annotation = clazz.getAnnotation(MyRequestMapping.class);
                    baseUrl=annotation.value();
                }
                Method[] methods = clazz.getMethods();
                for (Method method : methods) {
                    if(!method.isAnnotationPresent(MyRequestMapping.class)){
                        continue;
                    }
                    MyRequestMapping annotation = method.getAnnotation(MyRequestMapping.class);
                    String url = annotation.value();

                    url =(baseUrl+"/"+url).replaceAll("/+", "/");
                    handlerMapping.put(url,method);
                    controllerMap.put(url,clazz.newInstance());
                    System.out.println(url+","+method);
                }
            }

        } catch (Exception e) {
            e.printStackTrace();
        }

    }

    /**
     * Description:  将字符串中的首字母小写
     * Params:
      * @param name:
     * return: java.lang.String
     * Author: CXJ
     * Date: 2018/6/16 19:13
     */
    private String toLowerFirstWord(String name){

        char[] charArray = name.toCharArray();
        charArray[0] += 32;
        return String.valueOf(charArray);
    }

}
5、新建TestService接口及其实现类TestServiceImpl,可以将TestService注入到后面的Controller中使用。
package cn.edu.whu.MVCByHand.service;

import cn.edu.whu.MVCByHand.annotation.MyService;

/**
 * Description:
 * Author:CXJ
 * Date: 2018-06-16 20:44
 * Remark:
 */

public interface TestService {
    void printParam(String param);
}
package cn.edu.whu.MVCByHand.service;
import cn.edu.whu.MVCByHand.annotation.MyService;
/**
* Description:
* Author:CXJ
* Date: 2018-06-16 20:45
* Remark:
*/
@MyService
public class TestServiceImpl implements TestService {
@Override
public void printParam(String param) {
System.out.println("接收到的参数为: "+param);
}
}6、然后使用自己的@MyController等注解实现一个Controller类
import cn.edu.whu.MVCByHand.service.TestService;
import cn.edu.whu.MVCByHand.service.TestServiceImpl;
import javax.servlet.http.HttpServletRequest;
import javax.servlet.http.HttpServletResponse;
import java.io.IOException;

/**
 * Description:
 * Author:CXJ
 * Date: 2018-06-16 18:39
 * Remark:
 */

@MyController()
@MyRequestMapping("test1")
public class Test1Controller {

    @MyAutowired
    private TestService testService;

    @MyRequestMapping("test")
    public void myTest(HttpServletRequest request, HttpServletResponse response,
                      @MyRequestParam("param") String param){
        try {
            response.getWriter().write( "Test1Controller:the param you send is :"+param);
            testService.printParam(param);
        } catch (IOException e) {
            e.printStackTrace();
        }
    }
}
package cn.edu.whu.MVCByHand.controller;
import cn.edu.whu.MVCByHand.annotation.MyController;
import cn.edu.whu.MVCByHand.annotation.MyRequestMapping;
import cn.edu.whu.MVCByHand.annotation.MyRequestParam;
import javax.servlet.http.HttpServletRequest;
import javax.servlet.http.HttpServletResponse;
import java.io.IOException;
/**
* Description:
* Author:CXJ
* Date: 2018-06-16 18:39
* Remark:
*/
@MyController
@MyRequestMapping("test2")
public class Test2Controller {
@MyRequestMapping("test")
public void myTest(HttpServletRequest request, HttpServletResponse response,
@MyRequestParam("param") String param){
try {
response.getWriter().write( "Test2Controller:the param you send is :"+param);
} catch (IOException e) {
e.printStackTrace();
}
}
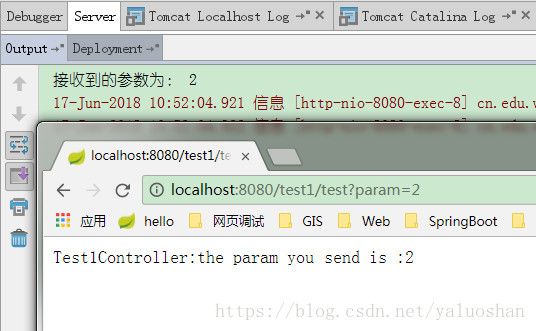
}7、至此,一个简单的MVC框架就实现了,调试一下,发现已经成功注入了TestService。输入路径与参数,测试一下是否能正常响应,结果显示,完全没问题啊。

SpringMVC实现过程
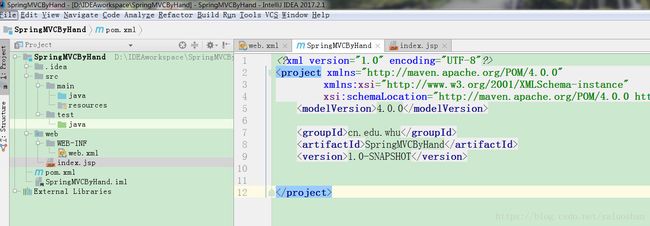
1、新建一个Maven工程,工程结构如图,新建MyDispatcherServlet类,在web.xml中配置DispatcherServlet,作为整个应用的入口。
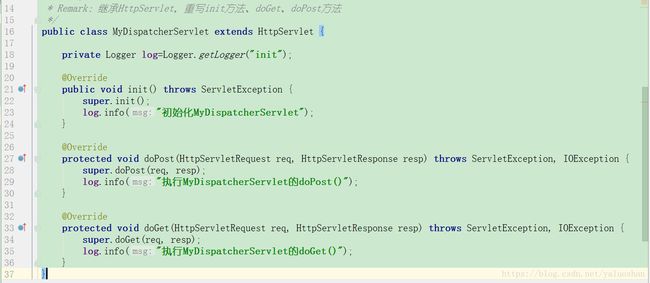
2、MyDispatcherServlet类继承自HttpServlet,重写init(),doGet(),doPost()方法,如图:
3、实现@MyController,@MyService,@MyRequesMapping,@RequestParam等注解,实现注解后,可即时使用注解,如图:

4、在DispatcherServlet的init()中,加载配置文件,获取扫描包的路径,如图,本例扫描到配置文件中的包名为cn.edu.whu.MVCByHand.controller。

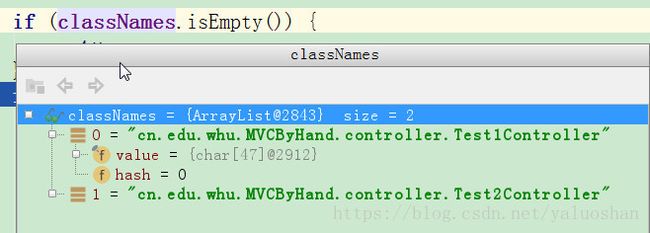
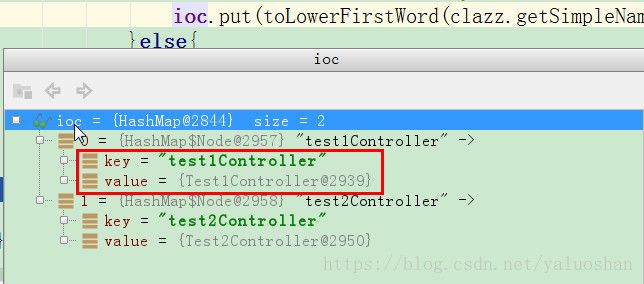
5、根据包名,扫描所有的类名,拿到扫描到的类,通过反射机制,实例化,并且放到ioc容器中(采用key-value数据结构),如图,本例中扫描到controller包中的Test1Controller与Test2Controller类,并将其实例化后,填入到ioc容器中。
6、初始化HandlerMapping(采用key-value数据结构),结合@MyController、@MyRequesMapping,将url和method对应上,如图,本例中,绑定路径’test1/test’与Test1Controller中的myTest()。

7、实现doDispatcher()方法,根据请求的url与参数,找到对应的方法(如路径不存在,请求到错误页面),利用反射机制调用该方法,重写DispatcharServlet的doGet(),doPost(),根据请求类型,调用doDispatcher()方法。
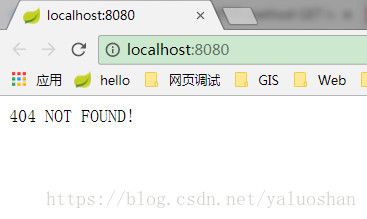
8、至此,简单的SpringMVC就实现了,做一个测试,如图:

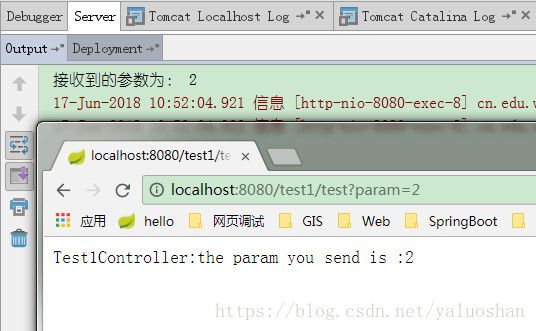
9、 重新调试一下,发现已经成功注入了TestService。输入路径与参数,测试一下是否能正常响应,结果显示,完全没问题啊。

参考文献:
咕泡学院公开课-Tom_20180419_看透Spring源码能解决哪些问题?
https://my.oschina.net/liughDevelop/blog/1622646
https://blog.csdn.net/xia4820723/article/details/51418676
https://www.cnblogs.com/baiduligang/p/4247164.html