MacOS以及centos7上安装 elasticsearch
MacOS 安装
使用:
brew install elasticsearch
进行安装, 报错:
elasticsearch: Java 1.8 is required to install this formula.
Install AdoptOpenJDK 8 with Homebrew Cask:
  brew cask install homebrew/cask-versions/adoptopenjdk8
安装提示安装 Java 1.8 :
brew cask install homebrew/cask-versions/adoptopenjdk8
安装成功后,再次执行:
brew install elasticsearch
启动:
elasticsearch
启动之后访问 9200 端口:
{
"name": "nxxnl3B",
"cluster_name": "elasticsearch_furuiyang",
"cluster_uuid": "8vBkjLCoTXSDq1zl77CDVA",
"version": {
"number": "6.8.1",
"build_flavor": "oss",
"build_type": "tar",
"build_hash": "1fad4e1",
"build_date": "2019-06-18T13:16:52.517138Z",
"build_snapshot": false,
"lucene_version": "7.7.0",
"minimum_wire_compatibility_version": "5.6.0",
"minimum_index_compatibility_version": "5.0.0"
},
"tagline": "You Know, for Search"
}
centos7 安装
(1) 安装 java 环境
$ sudo yum install java-1.8.0-openjdk.x86_64
(2) 查看版本确认安装成功
$ java -version
openjdk version "1.8.0_222"
OpenJDK Runtime Environment (build 1.8.0_222-b10)
OpenJDK 64-Bit Server VM (build 25.222-b10, mixed mode)
(3) 下载 es
wget https://artifacts.elastic.co/downloads/elasticsearch/elasticsearch-5.6.2.rpm
(4) 安装 es
rpm -ivh elasticsearch-5.6.2.rpm
(5) 尝试启动
systemctl enable elasticsearch
(6)查看状态
systemctl status elasticsearch
(7) 状态启动失败
$ systemctl status elasticsearch
● elasticsearch.service - Elasticsearch
   Loaded: loaded (/usr/lib/systemd/system/elasticsearch.service; enabled; vendor preset: disabled)
   Active: inactive (dead)
     Docs: http://www.elastic.co
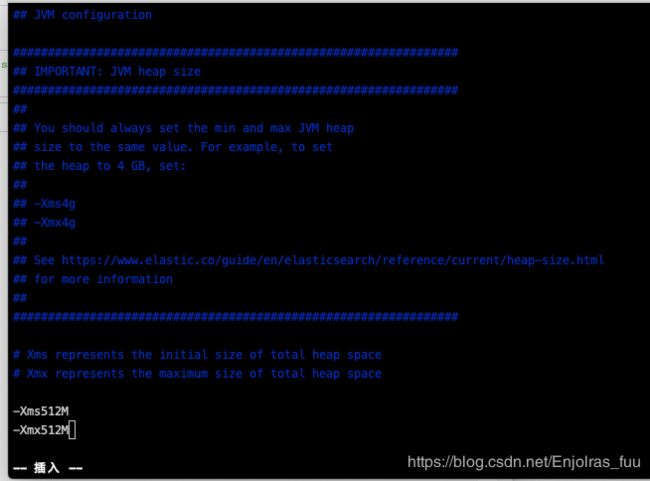
(8) 没有启动成功可能是机器内存小,在 /etc/elasticsearch 下 修改 jvm.options, 如图:

(9)修改之后再次启动以及查看状态:
systemctl start elasticsearch   //启动
systemctl status elasticsearch  //状态
运行 python 对接测试
(1) 安装 es 的 python 客户端库
$ pip3 install elasticsearch
(2) 测试用例代码:
from elasticsearch import Elasticsearch
# 建立与Elasticsearch的连接,需要创建一个Elasticsearch类的实例,并将连接URL作为参数传递:
es = Elasticsearch('http://localhost:9200')
# Elasticsearch中的数据需要被写入索引中。 与关系数据库不同,数据只是一个JSON对象。 以下示例将一个包含text字段的对象写入名为my_index的索引:
es.index(index='my_index', doc_type='my_index', id=1, body={'text': 'this is a test'})
# 如果需要,索引可以存储不同类型的文档,在本处可以根据不同的格式将doc_type参数设置为不同的值。 						我要将所有文档存储为相同的格式,因此我将文档类型设置为索引名称。对于存储的每个文档,Elasticsearch使用了一个唯一的ID来索引含有数据的JSON对象。
# 让我们在这个索引上存储第二个文档:
es.index(index='my_index', doc_type='my_index', id=2, body={'text': 'a second test'})
# 现在,该索引中有两个文档,我可以发布自由格式的搜索。 在本例中,我要搜索this test:
# es.search()调用的响应是一个包含搜索结果的Python字典:
es.search(index='my_index', body={'query': {'match': {'text': 'this test'}}})
# 随意为此索引添加更多条目并尝试不同的搜索。 完成试验后,可以使用以下命令删除索引:
es.indices.delete('my_index')
7.31 附件问题说明
(demo) [root@furuiyang elasticsearch]$ systemctl status elasticsearch
● elasticsearch.service - Elasticsearch
   Loaded: loaded (/usr/lib/systemd/system/elasticsearch.service; enabled; vendor preset: disabled)
   Active: failed (Result: signal) since 三 2019-07-31 15:09:41 CST; 13min ago
     Docs: http://www.elastic.co
  Process: 21318 ExecStart=/usr/share/elasticsearch/bin/elasticsearch -p ${PID_DIR}/elasticsearch.pid --quiet -Edefault.path.logs=${LOG_DIR} -Edefault.path.data=${DATA_DIR} -Edefault.path.conf=${CONF_DIR} (code=killed, signal=KILL)
  Process: 21316 ExecStartPre=/usr/share/elasticsearch/bin/elasticsearch-systemd-pre-exec (code=exited, status=0/SUCCESS)
 Main PID: 21318 (code=killed, signal=KILL)

7月 31 15:06:33 furuiyang systemd[1]: Starting Elasticsearch...
7月 31 15:06:33 furuiyang systemd[1]: Started Elasticsearch.
7月 31 15:06:34 furuiyang elasticsearch[21318]: OpenJDK 64-Bit Server VM warning: If the number of processors is expected to increase from one, then you should configure the num...lGCThreads=N
7月 31 15:09:41 furuiyang systemd[1]: elasticsearch.service: main process exited, code=killed, status=9/KILL
7月 31 15:09:41 furuiyang systemd[1]: Unit elasticsearch.service entered failed state.
7月 31 15:09:41 furuiyang systemd[1]: elasticsearch.service failed.
Hint: Some lines were ellipsized, use -l to show in full.
按照提示没有找到相关配置的地方, 在我删除了服务器一个 800M的文件后正常启动了,猜想可能是内存问题。留待解决。
