ROS探索总结(十)(十一)(十二)——语音控制 机器视觉 坐标系统
ROS探索总结(十)——语音控制
如今语音识别在PC机和智能手机上炒的火热,ROS走在技术的最前沿当然也不会错过这么帅的技术。ROS中使用了CMU Sphinx和Festival开源项目中的代码,发布了独立的语音识别包,而且可以将识别出来的语音转换成文字,然后让机器人智能处理后说话。
一、语音识别包
1、安装
- $ sudo apt-get install gstreamer0.10-pocketsphinx
- $ sudo apt-get install ros-fuerte-audio-common
- $ sudo apt-get install libasound2
- $ svn checkout http://albany-ros-pkg.googlecode.com/svn/trunk/rharmony
- $ rosmake pocketsphinx
2、测试
首先,插入你的麦克风设备,然后在系统设置里测试麦克风是否有语音输入。
然后,运行包中的测试程序:
- $ roslaunch pocketsphinx robocup.launch
《ros by example》这本书中写得测试还是很准确的,但是我在测试中感觉识别相当不准确,可能是我的英语太差了吧。
- $ rostopic echo /recognizer/output

二、语音库
1、查看语音库
- $ roscd pocketsphinx/demo
- $ more robocup.corpus
2、添加语音库
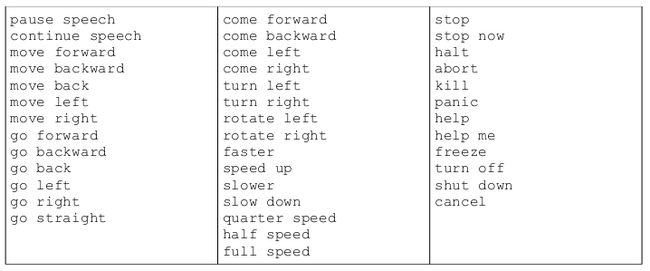
首先看看例子中要添加的文本信息:
- $ roscd rbx1_speech/config
- $ more nav_commands.txt

然后我们要把这个文件在线生成语音信息和库文件,这一步需要登陆网站http://www.speech.cs.cmu.edu/tools/lmtool-new.html,根据网站的提示上传文件,然后在线编译生成库文件。

- $ roscd rbx1_speech/config
- $ rename -f 's/3026/nav_commands/' *
-
-
- output="screen">
-
-
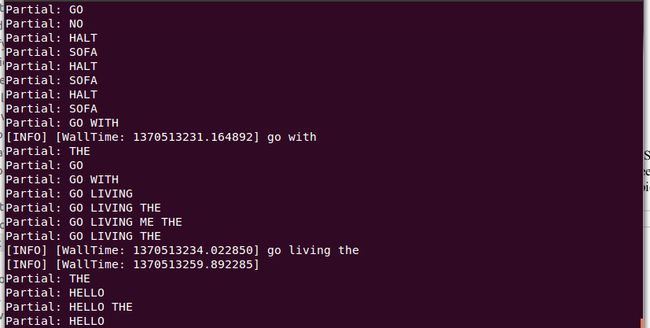
通过之前的命令来测试一下效果如何吧:
- $ roslaunch rbx1_speech voice_nav_commands.launch
- $ rostopic echo /recognizer/output
三、语音控制
1、机器人控制节点
在pocketsphinx包中本身有一个语音控制发布Twist消息的例程voice_cmd_vel.py,rbx1_speech包对其进行了一些简化修改,在nodes文件夹里可以查看voice_nav.py文件:
- #!/usr/bin/env python
- """
- voice_nav.py
- Allows controlling a mobile base using simple speech commands.
- Based on the voice_cmd_vel.py script by Michael Ferguson in
- the pocketsphinx ROS package.
- See http://www.ros.org/wiki/pocketsphinx
- """
- import roslib; roslib.load_manifest('rbx1_speech')
- import rospy
- from geometry_msgs.msg import Twist
- from std_msgs.msg import String
- from math import copysign
- class VoiceNav:
- def __init__(self):
- rospy.init_node('voice_nav')
- rospy.on_shutdown(self.cleanup)
- # Set a number of parameters affecting the robot's speed
- self.max_speed = rospy.get_param("~max_speed", 0.4)
- self.max_angular_speed = rospy.get_param("~max_angular_speed", 1.5)
- self.speed = rospy.get_param("~start_speed", 0.1)
- self.angular_speed = rospy.get_param("~start_angular_speed", 0.5)
- self.linear_increment = rospy.get_param("~linear_increment", 0.05)
- self.angular_increment = rospy.get_param("~angular_increment", 0.4)
- # We don't have to run the script very fast
- self.rate = rospy.get_param("~rate", 5)
- r = rospy.Rate(self.rate)
- # A flag to determine whether or not voice control is paused
- self.paused = False
- # Initialize the Twist message we will publish.
- self.cmd_vel = Twist()
- # Publish the Twist message to the cmd_vel topic
- self.cmd_vel_pub = rospy.Publisher('cmd_vel', Twist)
- # Subscribe to the /recognizer/output topic to receive voice commands.
- rospy.Subscriber('/recognizer/output', String, self.speech_callback)
- # A mapping from keywords or phrases to commands
- self.keywords_to_command = {'stop': ['stop', 'halt', 'abort', 'kill', 'panic', 'off', 'freeze', 'shut down', 'turn off', 'help', 'help me'],
- 'slower': ['slow down', 'slower'],
- 'faster': ['speed up', 'faster'],
- 'forward': ['forward', 'ahead', 'straight'],
- 'backward': ['back', 'backward', 'back up'],
- 'rotate left': ['rotate left'],
- 'rotate right': ['rotate right'],
- 'turn left': ['turn left'],
- 'turn right': ['turn right'],
- 'quarter': ['quarter speed'],
- 'half': ['half speed'],
- 'full': ['full speed'],
- 'pause': ['pause speech'],
- 'continue': ['continue speech']}
- rospy.loginfo("Ready to receive voice commands")
- # We have to keep publishing the cmd_vel message if we want the robot to keep moving.
- while not rospy.is_shutdown():
- self.cmd_vel_pub.publish(self.cmd_vel)
- r.sleep()
- def get_command(self, data):
- # Attempt to match the recognized word or phrase to the
- # keywords_to_command dictionary and return the appropriate
- # command
- for (command, keywords) in self.keywords_to_command.iteritems():
- for word in keywords:
- if data.find(word) > -1:
- return command
- def speech_callback(self, msg):
- # Get the motion command from the recognized phrase
- command = self.get_command(msg.data)
- # Log the command to the screen
- rospy.loginfo("Command: " + str(command))
- # If the user has asked to pause/continue voice control,
- # set the flag accordingly
- if command == 'pause':
- self.paused = True
- elif command == 'continue':
- self.paused = False
- # If voice control is paused, simply return without
- # performing any action
- if self.paused:
- return
- # The list of if-then statements should be fairly
- # self-explanatory
- if command == 'forward':
- self.cmd_vel.linear.x = self.speed
- self.cmd_vel.angular.z = 0
- elif command == 'rotate left':
- self.cmd_vel.linear.x = 0
- self.cmd_vel.angular.z = self.angular_speed
- elif command == 'rotate right':
- self.cmd_vel.linear.x = 0
- self.cmd_vel.angular.z = -self.angular_speed
- elif command == 'turn left':
- if self.cmd_vel.linear.x != 0:
- self.cmd_vel.angular.z += self.angular_increment
- else:
- self.cmd_vel.angular.z = self.angular_speed
- elif command == 'turn right':
- if self.cmd_vel.linear.x != 0:
- self.cmd_vel.angular.z -= self.angular_increment
- else:
- self.cmd_vel.angular.z = -self.angular_speed
- elif command == 'backward':
- self.cmd_vel.linear.x = -self.speed
- self.cmd_vel.angular.z = 0
- elif command == 'stop':
- # Stop the robot! Publish a Twist message consisting of all zeros.
- self.cmd_vel = Twist()
- elif command == 'faster':
- self.speed += self.linear_increment
- self.angular_speed += self.angular_increment
- if self.cmd_vel.linear.x != 0:
- self.cmd_vel.linear.x += copysign(self.linear_increment, self.cmd_vel.linear.x)
- if self.cmd_vel.angular.z != 0:
- self.cmd_vel.angular.z += copysign(self.angular_increment, self.cmd_vel.angular.z)
- elif command == 'slower':
- self.speed -= self.linear_increment
- self.angular_speed -= self.angular_increment
- if self.cmd_vel.linear.x != 0:
- self.cmd_vel.linear.x -= copysign(self.linear_increment, self.cmd_vel.linear.x)
- if self.cmd_vel.angular.z != 0:
- self.cmd_vel.angular.z -= copysign(self.angular_increment, self.cmd_vel.angular.z)
- elif command in ['quarter', 'half', 'full']:
- if command == 'quarter':
- self.speed = copysign(self.max_speed / 4, self.speed)
- elif command == 'half':
- self.speed = copysign(self.max_speed / 2, self.speed)
- elif command == 'full':
- self.speed = copysign(self.max_speed, self.speed)
- if self.cmd_vel.linear.x != 0:
- self.cmd_vel.linear.x = copysign(self.speed, self.cmd_vel.linear.x)
- if self.cmd_vel.angular.z != 0:
- self.cmd_vel.angular.z = copysign(self.angular_speed, self.cmd_vel.angular.z)
- else:
- return
- self.cmd_vel.linear.x = min(self.max_speed, max(-self.max_speed, self.cmd_vel.linear.x))
- self.cmd_vel.angular.z = min(self.max_angular_speed, max(-self.max_angular_speed, self.cmd_vel.angular.z))
- def cleanup(self):
- # When shutting down be sure to stop the robot!
- twist = Twist()
- self.cmd_vel_pub.publish(twist)
- rospy.sleep(1)
- if __name__=="__main__":
- try:
- VoiceNav()
- rospy.spin()
- except rospy.ROSInterruptException:
- rospy.loginfo("Voice navigation terminated.")
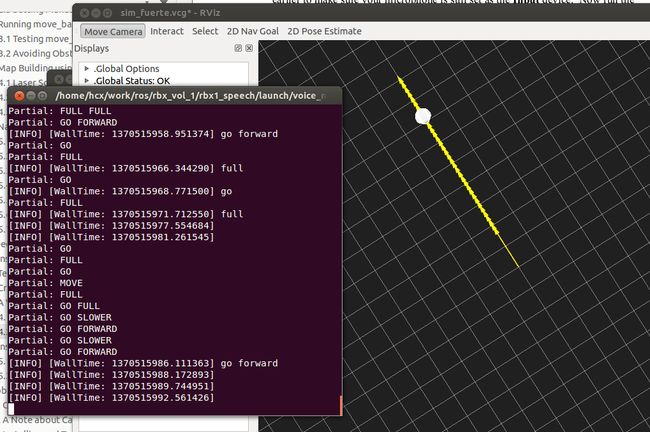
2、仿真测试
首先是运行一个机器人模型:
- $ roslaunch rbx1_bringup fake_turtlebot.launch
- $ rosrun rviz rviz -d `rospack find rbx1_nav`/sim_fuerte.vcg
- $ rxconsole
- $ roslaunch rbx1_speech voice_nav_commands.launch
- $ roslaunch rbx1_speech turtlebot_voice_nav.launch
四、播放语音
运行下面的命令:
- $ rosrun sound_play soundplay_node.py
- $ rosrun sound_play say.py "Greetings Humans. Take me to your leader."
- $ sudo apt-get install festvox-don
- $ rosrun sound_play say.py "Welcome to the future" voice_don_diphone
在rbx1_speech/nodes文件夹中有一个让机器人说话的节点talkback.py:
- #!/usr/bin/env python
- """
- talkback.py - Version 0.1 2012-01-10
- Use the sound_play client to say back what is heard by the pocketsphinx recognizer.
- Created for the Pi Robot Project: http://www.pirobot.org
- Copyright (c) 2012 Patrick Goebel. All rights reserved.
- This program is free software; you can redistribute it and/or modify
- it under the terms of the GNU General Public License as published by
- the Free Software Foundation; either version 2 of the License, or
- (at your option) any later version.5
- This program is distributed in the hope that it will be useful,
- but WITHOUT ANY WARRANTY; without even the implied warranty of
- MERCHANTABILITY or FITNESS FOR A PARTICULAR PURPOSE. See the
- GNU General Public License for more details at:
- http://www.gnu.org/licenses/gpl.htmlPoint
- """
- import roslib; roslib.load_manifest('rbx1_speech')
- import rospy
- from std_msgs.msg import String
- from sound_play.libsoundplay import SoundClient
- import sys
- class TalkBack:
- def __init__(self, script_path):
- rospy.init_node('talkback')
- rospy.on_shutdown(self.cleanup)
- # Set the default TTS voice to use
- self.voice = rospy.get_param("~voice", "voice_don_diphone")
- # Set the wave file path if used
- self.wavepath = rospy.get_param("~wavepath", script_path + "/../sounds")
- # Create the sound client object
- self.soundhandle = SoundClient()
- # Wait a moment to let the client connect to the
- # sound_play server
- rospy.sleep(1)
- # Make sure any lingering sound_play processes are stopped.
- self.soundhandle.stopAll()
- # Announce that we are ready for input
- self.soundhandle.playWave(self.wavepath + "/R2D2a.wav")
- rospy.sleep(1)
- self.soundhandle.say("Ready", self.voice)
- rospy.loginfo("Say one of the navigation commands...")
- # Subscribe to the recognizer output and set the callback function
- rospy.Subscriber('/recognizer/output', String, self.talkback)
- def talkback(self, msg):
- # Print the recognized words on the screen
- rospy.loginfo(msg.data)
- # Speak the recognized words in the selected voice
- self.soundhandle.say(msg.data, self.voice)
- # Uncomment to play one of the built-in sounds
- #rospy.sleep(2)
- #self.soundhandle.play(5)
- # Uncomment to play a wave file
- #rospy.sleep(2)
- #self.soundhandle.playWave(self.wavepath + "/R2D2a.wav")
- def cleanup(self):
- self.soundhandle.stopAll()
- rospy.loginfo("Shutting down talkback node...")
- if __name__=="__main__":
- try:
- TalkBack(sys.path[0])
- rospy.spin()
- except rospy.ROSInterruptException:
- rospy.loginfo("Talkback node terminated.")
- $ roslaunch rbx1_speech talkback.launch
----------------------------------------------------------------
机器视觉在计算机时代已经越来越流行,摄像头价格越来越低廉,部分集成深度传感器的混合型传感器也逐渐在研究领域普及,例如微软推出的Kinect,而且与之配套的软件功能十分强大,为开发带来了极大的便利。ROS集成了Kinect的的驱动包OpenNI,而且使用OpenCV库可以进行多种多样的图像处理。
注:本章内容及代码均参考《ROS by Example》书中的第十章。
一、图像显示
1、安装驱动包
- $sudo apt-get install ros-fuerte-openni-kinect
2、测试
- $roslaunch rbx1_vision openni_node_fuerte.launch
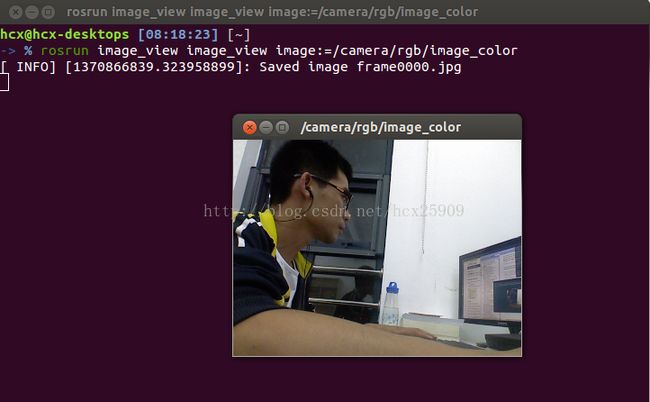
然后我们调用ROS的image_view包来直接显示摄像头的数据库。image_view包的介绍可以参考:
- $rosrun image_view image_view image:=/camera/rgb/image_color
我们可以看到弹出了一个独立的图像显示框:
3、分析数据
- rostopic echo /camera/rgb/image_color
然后就会看到数据刷刷的在显示,有没有感觉看不清楚,我们使用终端的重定向功能将数据全部存储到文件中:
- rostopic echo /camera/rgb/image_color > test
好了,现在看看文件中是不是已经有数据了,我们来看一下其中的一帧数据:
- header:
- seq: 19285
- stamp:
- secs: 1370867560
- nsecs: 538447820
- frame_id: camera_rgb_optical_frame
- height: 240
- width: 320
- encoding: rgb8
- is_bigendian: 0
- step: 960
- data: [223, 225, 225, 220, 225, 225……………..
我们可以验证一下data中到底有多少个数据,这个很简单了,数一下就行了,不过好像有点多,我使用的是linux的“wc”命令。首先我一帧数据复制到单独的文件中,每个数据都是用“,”号隔开的,只要计算“,”的数量就知道数据的数量了。

4、rviz显示图像
首先按照上一节的方法运行kinect节点,然后打开rviz:
- rosrun rviz rviz
然后修改“Fixed Frame”为/camera_rgb_color,修改“Target Frame”为

二、深度显示
1、显示深度图像
- roslaunch openni_launch openni.launch
这一步我使用的是ROS安装openni包中的节点,使用与前面相同的命令运行的节点在后面无法产生深度数据。
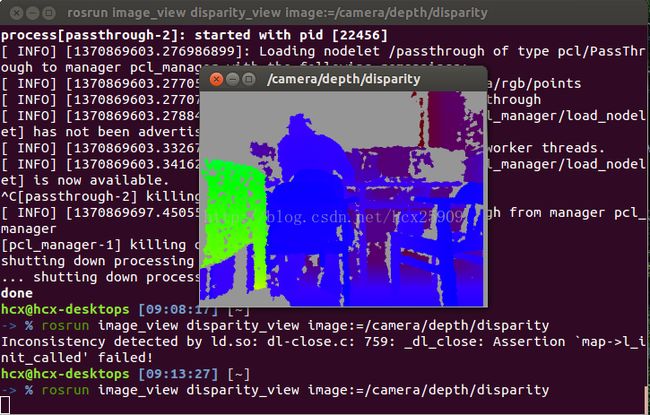
然后同样适用iamge_view包就可以简单的显示深度图像了:
- rosrun image_view disparity_view image:=/camera/depth/disparity
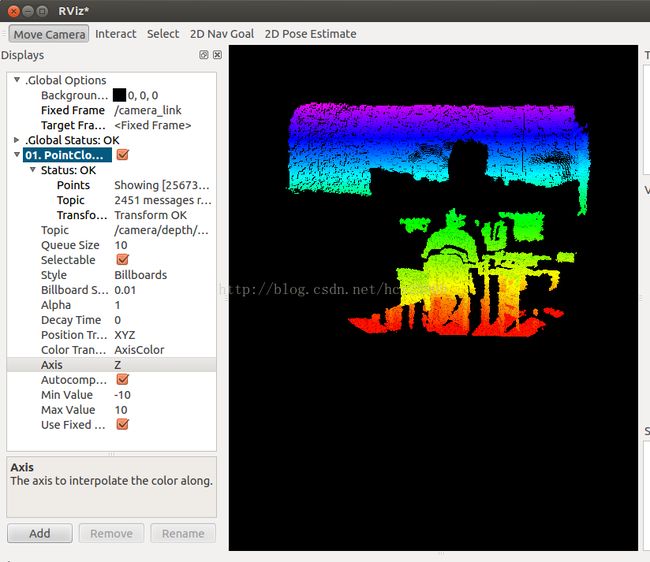
2、rviz中显示深度
- rosrun rviz rviz
然后修改“Fixed Frame”和“Target Frame”,在add中添加PointCloud2类型,修改“topic”,具体参数如下图所示
----------------------------------------------------------------
ROS探索总结(十二)——坐标系统
在机器人的控制中,坐标系统是非常重要的,在ROS使用tf软件库进行坐标转换。
相关链接:http://www.ros.org/wiki/tf/Tutorials#Learning_tf
一、tf简介
1、安装turtle包
- $ rosdep install turtle_tf rviz
- $ rosmake turtle_tf rviz
2、运行demo
运行简单的demo:- $ roslaunch turtle_tf turtle_tf_demo.launch
然后就会看到两只小乌龟了。
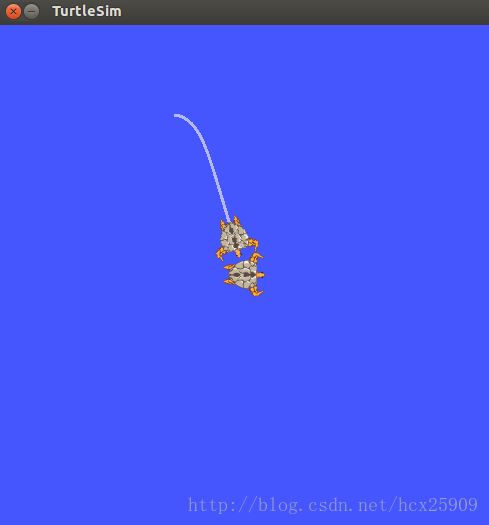
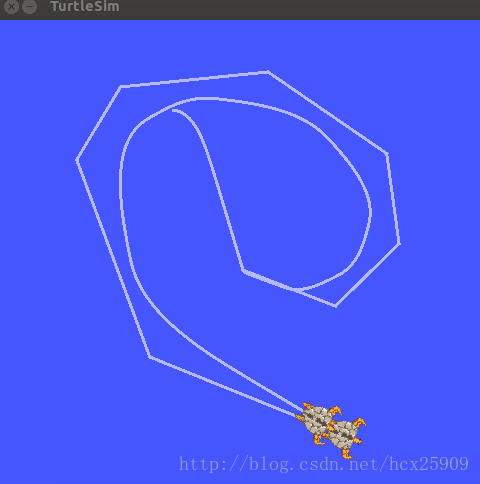
可以发现,第二只乌龟会跟随你移动的乌龟进行移动。
3、demo分析
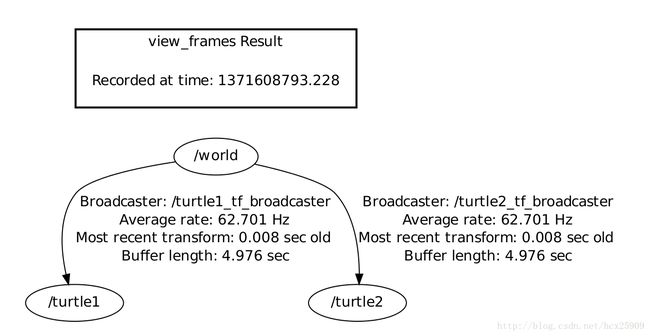
这个例程使用tf建立了三个参考系:a world frame, a turtle1 frame, and a turtle2 frame。然后使用tf broadcaster发布乌龟的参考系,并且使用tf listener计算乌龟参考系之间的差异,使得第二只乌龟跟随第一只乌龟。
我们可以使用tf工具来具体研究。
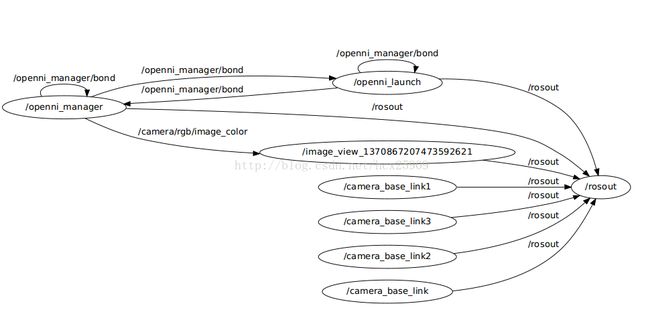
- $ rosrun tf view_frames
然后会看到一些提示,并且生成了一个frames.pdf文件。
tf还提供了一个tf_echo工具来查看两个广播参考系之间的关系。我们可以看一下第二只得乌龟坐标是怎么根据第一只乌龟得出来的。

- $ rosrun tf tf_echo turtle1 turtle2

- $ rosrun rviz rviz -d `rospack find turtle_tf`/rviz/turtle_rviz.vcg

下面我们就来详细分析这个实例。
二、Writing a tf broadcaster
1、创建包
- $ roscd tutorials
- $ roscreate-pkg learning_tf tf roscpp rospy turtlesim
- $ rosmake learning_tf
2、broadcast transforms
我们首先看一下如何把参考系发布到tf。代码文件:/nodes/turtle_tf_broadcaster.py
- #!/usr/bin/env python
- import roslib
- roslib.load_manifest('learning_tf')
- import rospy
- import tf
- import turtlesim.msg
- def handle_turtle_pose(msg, turtlename):
- br = tf.TransformBroadcaster()
- br.sendTransform((msg.x, msg.y, 0),
- tf.transformations.quaternion_from_euler(0, 0, msg.theta),
- rospy.Time.now(),
- turtlename,
- "world") #发布乌龟的平移和翻转
- if __name__ == '__main__':
- rospy.init_node('turtle_tf_broadcaster')
- turtlename = rospy.get_param('~turtle') #获取海龟的名字(turtle1,turtle2)
- rospy.Subscriber('/%s/pose' % turtlename,
- turtlesim.msg.Pose,
- handle_turtle_pose,
- turtlename) #订阅 topic "turtleX/pose"
- rospy.spin()
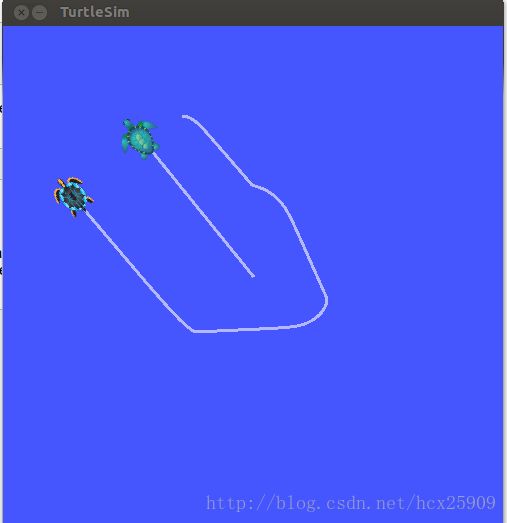
创建launch文件start_demo.launch:
运行:
- $ roslaunch learning_tf start_demo.launch
可以看到界面中只有移植乌龟了,打开tf_echo的信息窗口:
- $ rosrun tf tf_echo /world /turtle1

三、Writing a tf listener
这一步,我们将看到如何使用tf进行参考系转换。首先写一个tf listener(nodes/turtle_tf_listener.py):- #!/usr/bin/env python
- import roslib
- roslib.load_manifest('learning_tf')
- import rospy
- import math
- import tf
- import turtlesim.msg
- import turtlesim.srv
- if __name__ == '__main__':
- rospy.init_node('tf_turtle')
- listener = tf.TransformListener() #TransformListener创建后就开始接受tf广播信息,最多可以缓存10s
- rospy.wait_for_service('spawn')
- spawner = rospy.ServiceProxy('spawn', turtlesim.srv.Spawn)
- spawner(4, 2, 0, 'turtle2')
- turtle_vel = rospy.Publisher('turtle2/command_velocity', turtlesim.msg.Velocity)
- rate = rospy.Rate(10.0)
- while not rospy.is_shutdown():
- try:
- (trans,rot) = listener.lookupTransform('/turtle2', '/turtle1', rospy.Time(0))
- except (tf.LookupException, tf.ConnectivityException, tf.ExtrapolationException):
- continue
- angular = 4 * math.atan2(trans[1], trans[0])
- linear = 0.5 * math.sqrt(trans[0] ** 2 + trans[1] ** 2)
- turtle_vel.publish(turtlesim.msg.Velocity(linear, angular))
- rate.sleep()
-
- ...
-
- name="listener" />
四、Adding a frame
1、tf消息结构

2、建立固定参考系(fixed frame)
- #!/usr/bin/env python
- import roslib
- roslib.load_manifest('learning_tf')
- import rospy
- import tf
- if __name__ == '__main__':
- rospy.init_node('my_tf_broadcaster')
- br = tf.TransformBroadcaster()
- rate = rospy.Rate(10.0)
- while not rospy.is_shutdown():
- br.sendTransform((0.0, 2.0, 0.0),
- (0.0, 0.0, 0.0, 1.0),
- rospy.Time.now(),
- "carrot1",
- "turtle1") #建立一个新的参考系,父参考系为turtle1,并且距离父参考系2米
- rate.sleep()
-
- ...
-
- name="broadcaster_fixed" />
- (trans,rot) = self.tf.lookupTransform("/turtle2", "/carrot1", rospy.Time(0))
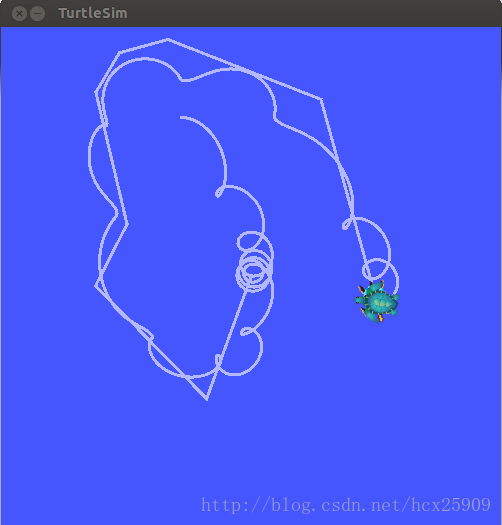
3、建立移动参考系(moving frame)
- #!/usr/bin/env python
- import roslib
- roslib.load_manifest('learning_tf')
- import rospy
- import tf
- import math
- if __name__ == '__main__':
- rospy.init_node('my_tf_broadcaster')
- br = tf.TransformBroadcaster()
- rate = rospy.Rate(10.0)
- while not rospy.is_shutdown():
- t = rospy.Time.now().to_sec() * math.pi
- br.sendTransform((2.0 * math.sin(t), 2.0 * math.cos(t), 0.0),
- (0.0, 0.0, 0.0, 1.0),
- rospy.Time.now(),
- "carrot1",
- "turtle1")
- rate.sleep()
----------------------------------------------------------------
欢迎大家转载我的文章。
转载请注明:转自古-月
http://blog.csdn.net/hcx25909
欢迎继续关注我的博客