Manage Vision resources for efficient execution of a Core ML image classifier, and use SpriteKit to display image classifier output in AR.
管理Vision资源以有效执行Core ML图像分类器,并使用SpriteKit在AR中显示图像分类器输出。
Overview
This sample app runs an ARKit world-tracking session with content displayed in a SpriteKit view. The app uses the Vision framework to pass camera images to a Core ML classifier model, displaying a label in the corner of the screen to indicate whether the classifier recognizes anything in view of the camera. After the classifier produces a label for the image, the user can tap the screen to place that text in AR world space.
Note
The Core ML image classifier model doesn’t recognize and locate the 3D positions of objects. (In fact, the Inceptionv3 model attempts only to identify an entire scene.) When the user taps the screen, the app adds a label at a real-world position corresponding to the tapped point. How closely a label appears to relate to the object it names depends on where the user taps.
概述
此示例应用运行一个ARKit世界追踪Session,内容显示在SpriteKit视图中。 该应用程序使用Vision框架将相机图像传递给核心ML分类器模型,在屏幕的角落显示标签以指示分类器是否识别相机视图中的任何内容。 分类器为图像生成标签后,用户可以点击屏幕将该文本放置在AR世界空间中。
注意
核心ML图像分类器模型不识别和定位对象的3D位置。 (实际上,Inceptionv3模型只会尝试识别整个场景。)当用户点击屏幕时,应用程序会在与点击点相对应的现实世界位置添加一个标签。 标签看起来与它命名的对象有多密切相关,取决于用户点击的位置。
Implement the Vision/Core ML Image Classifier
The sample code’s classificationRequest property, classifyCurrentImage()method, and processClassifications(for:error:) method manage:
A Core ML image-classifier model, loaded from an mlmodel file bundled with the app using the Swift API that Core ML generates for the model
VNCoreMLRequest and VNImageRequestHandler objects for passing image data to the model for evaluation
For more details on using VNImageRequestHandler, VNCoreMLRequest, and image classifier models, see the Classifying Images with Vision and Core ML sample-code project.
实现视觉/核心ML图像分类器
示例代码的classificationRequest属性,classifyCurrentImage()方法和processClassifications(用于:错误:)方法管理:
核心ML图像分类器模型,从使用Core ML为模型生成的Swift API与应用捆绑在一起的mlmodel文件加载
VNCoreMLRequest和VNImageRequestHandler对象,用于将图像数据传递到模型进行评估
有关使用VNImageRequestHandler,VNCoreMLRequest和图像分类器模型的更多详细信息,请参阅使用Vision和Core ML示例代码项目对图像进行分类。
Run the AR Session and Process Camera Images
The sample ViewController class manages the AR session and displays AR overlay content in a SpriteKit view. ARKit captures video frames from the camera and provides them to the view controller in the session:didUpdateFrame: method, which then calls the classifyCurrentImage() method to run the Vision image classifier.
运行ARSession并处理相机图像
示例ViewController类管理ARSession并在SpriteKit视图中显示AR叠加内容。 ARKit从摄像头捕获视频帧,并将它们提供给会话中的视图控制器:didUpdateFrame:方法,然后调用classifyCurrentImage()方法运行Vision图像分类器。

Serialize Image Processing for Real-Time Performance
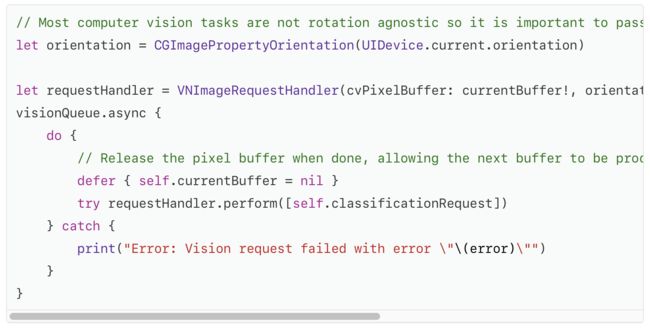
The classifyCurrentImage() method uses the view controller’s currentBufferproperty to track whether Vision is currently processing an image before starting another Vision task.
为实时性能序列化图像处理
classifyCurrentImage()方法使用视图控制器的currentBuffer属性来跟踪Vision在开始另一个Vision任务之前是否正在处理图像。
Important
Making sure only one buffer is being processed at a time ensures good performance. The camera recycles a finite pool of pixel buffers, so retaining too many buffers for processing could starve the camera and shut down the capture session. Passing multiple buffers to Vision for processing would slow down processing of each image, adding latency and reducing the amount of CPU and GPU overhead for rendering AR visualizations.
In addition, the sample app enables the usesCPUOnly setting for its Vision request, freeing the GPU for use in rendering.
重要
确保一次只处理一个缓冲区,以确保良好的性能。 相机回收有限的像素缓冲池,因此保留太多缓冲区以进行处理可能会导致相机不能使用并关闭捕捉Session。 将多个缓冲区传递给Vision进行处理会减慢每个图像的处理速度,增加延迟并减少渲染AR可视化的CPU和GPU开销。
此外,示例应用程序还为其Vision请求启用了usesCPUOnly设置,释放GPU以用于渲染。
Visualize Results in AR
The processClassifications(for:error:) method stores the best-match result label produced by the image classifier and displays it in the corner of the screen. The user can then tap in the AR scene to place that label at a real-world position. Placing a label requires two main steps.
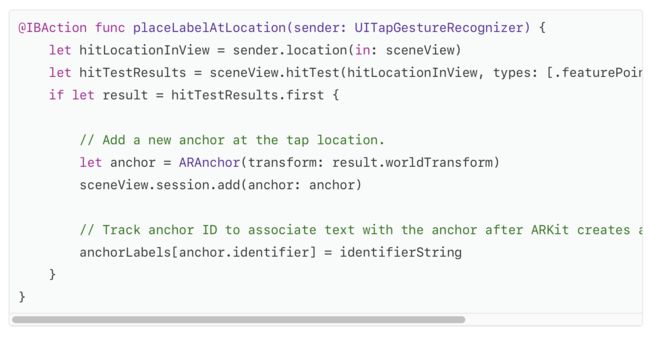
First, a tap gesture recognizer fires the placeLabelAtLocation(sender:) action. This method uses the ARKit hitTest:types: method to estimate the 3D real-world position corresponding to the tap, and adds an anchor to the AR session at that position.
在AR中显示结果
processClassifications(for:error :)方法存储由图像分类器生成的最佳匹配结果标签,并将其显示在屏幕的角落。 用户然后可以点击AR场景以将该标签放置在真实世界的位置。 放置标签需要两个主要步骤。
首先,轻击手势识别器触发placeLabelAtLocation(发件人:)操作。 此方法使用ARKit hitTest:types:方法来估计与水龙头相对应的3D真实世界位置,并向该位置的ARSession添加锚点。
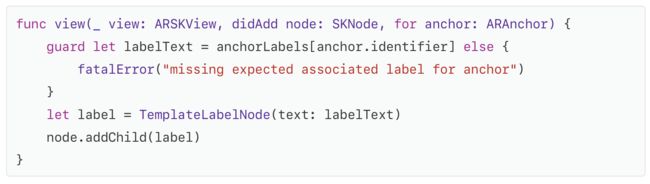
Next, after ARKit automatically creates a SpriteKit node for the newly added anchor, the view:didAddNode:forAnchor: delegate method provides content for that node. In this case, the sample TemplateLabelNode class creates a styled text label using the string provided by the image classifier.
接下来,在ARKit为新添加的锚点自动创建一个SpriteKit节点之后,view:didAddNode:forAnchor:delegate方法为该节点提供内容。 在这种情况下,示例TemplateLabelNode类将使用图像分类器提供的字符串创建样式文本标签。