1112_Springboot+Mybaits+Mysql数据库增删改查操作——上路
Springboot+Mybaits+Mysql数据库增删改查操作
疯人愿的疯言疯语
2017.11.03 16:37* 字数 754 阅读 414评论 0喜欢 4
最近在老师的建议下,参加了一个学习小组,主要了解Spring Cloud微服务架构的应用开发,在初次搭建好环境后,这一次使用Spring boot+Mybatis完成对数据库的一些简单操作,作为新手,下面就是我整个做的过程,查阅了许多网上的资料,这里面很多都是学习别人的东西,自己说的也可能不专业,权当自己记录复习。
1.任务要求
image.png
image.png
2.工程创建
springboot工程建立就不说了,这里主要说一下pom.xml文件添加的依赖,如下:
            org.springframework.boot
            spring-boot-starter-web


            org.mybatis.spring.boot
            mybatis-spring-boot-starter
            1.3.1


            com.github.pagehelper
            pagehelper-spring-boot-starter
            1.2.1


            org.projectlombok
            lombok
还有就是application.yml文件的数据库配置:
spring:
  application:
    name: mysql-service
  datasource:
      driver-class-name: com.mysql.jdbc.Driver
      url: jdbc:mysql://localhost:3306/spring-c?useUnicode=true&characterEncoding=UTF-8
      username: root
      password: hui19970201
3.应用文件创建及说明
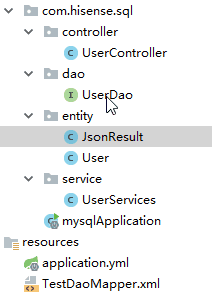
新建一个应用,目录结构如下:
image.png
entity层
(1)根据要求在entity层创建User实体类,内容如下:
@Getter
@Setter
public class User {
    private String userId;

    private String userCode;

    @Max(value = 100, message = "年龄不能大于100岁")
    @Min(value = 18, message = "必须年满18岁!")
    private int age;

    @Pattern(regexp = "[a-za-z0-9._%+-]+@[a-za-z0-9.-]+\\.[a-za-z]{2,4}", message = "邮件格式错误")
    private String mail;

    @Length(min = 11, max = 11, message = "手机号长度必须为11位")
    private String phone;

    private int groupId;
    private Date createTime;
    private String createBy;
    private Date modifiedTime;
    private String modifiedBy;
}
(2)根据要求在entity层创建JsonResult实体类,内容如下:
@Data
public class JsonResult {

    private Long total;
    private String message;
    private boolean status;
    private Object data;

    public JsonResult(String message, boolean status) {

        this.message = message;
        this.status = status;
    }

    public JsonResult(Long total, String message, boolean status) {
        this.total = total;
        this.message = message;
        this.status = status;
    }

    public JsonResult(String message, boolean status, Object data) {
        this.message = message;
        this.status = status;
        this.data = data;
    }

    public JsonResult(Long total, String message, boolean status, Object data) {
        this.total = total;
        this.message = message;
        this.status = status;
        this.data = data;
    }
}
(3)一些解释
首先是用来lombok的注解@Data,@Getter,@Setter减少了代码了,就不用那么多的get和set方法了,当然你也可以使用IDE的generate来生成,随自己喜好就行,如果使用的是IDEA,这里注意引入依赖之后还需要下载lombok的插件,重启就能生效了;然后就是用Validator,主要是校验用户提交的数据的合理性,这里大家可以百度一下具体的用法,下面是一些常见的注解及实际用法(复制别人的):
@null           验证对象是否为空
@notnull     验证对象是否为非空
@asserttrue       验证 boolean 对象是否为 true
@assertfalse      验证 boolean 对象是否为 false
@min           验证 number 和 string 对象是否大等于指定的值
@max           验证 number 和 string 对象是否小等于指定的值
@decimalmin    验证 number 和 string 对象是否大等于指定的值,小数存在精度
@decimalmax    验证 number 和 string 对象是否小等于指定的值,小数存在精度
@size           验证对象(array,collection,map,string)长度是否在给定的范围之内
@digits       验证 number 和 string 的构成是否合法
@past           验证 date 和 calendar 对象是否在当前时间之前
@future       验证 date 和 calendar 对象是否在当前时间之后
@pattern     验证 string 对象是否符合正则表达式的规则
@Email     验证邮箱

实际例子:
@size (min=3, max=20, message="用户名长度只能在3-20之间")
@size (min=6, max=20, message="密码长度只能在6-20之间")
@pattern (regexp="[a-za-z0-9._%+-]+@[a-za-z0-9.-]+\\.[a-za-z]{2,4}", message="邮件格式错误")
@Length(min = 5, max = 20, message = "用户名长度必须位于5到20之间")
@Email(message = "比如输入正确的邮箱")
@NotNull(message = "用户名称不能为空")
@Max(value = 100, message = "年龄不能大于100岁")
@Min(value= 18 ,message= "必须年满18岁!" )
@AssertTrue(message = "bln4 must is true")
@AssertFalse(message = "blnf must is falase")
@DecimalMax(value="100",message="decim最大值是100")
DecimalMin(value="100",message="decim最小值是100")
@NotNull(message = "身份证不能为空")
@Pattern(regexp="^(\\d{18,18}|\\d{15,15}|(\\d{17,17}[x|X]))$", message="身份证格式错误")
dao层
代码如下:
@Mapper//这里的Mapper是Mybatis自己定义的注解。
public interface UserDao {
    //插入数据
    @Insert("insert into user(userId,userCode,age,mail,phone,groupId," +
            "createTime,createBy,modifiedTime,modifiedBy)" +
            "values (#{userId,jdbcType=VARCHAR}, #{userCode,jdbcType=VARCHAR}, #{age,jdbcType=INTEGER}," +
            "#{mail,jdbcType=VARCHAR}, #{phone,jdbcType=VARCHAR}, #{groupId,jdbcType=INTEGER}," +
            "#{createTime,jdbcType=TIMESTAMP}, #{createBy,jdbcType=VARCHAR}, #{modifiedTime,jdbcType=TIMESTAMP}," +
            "#{modifiedBy,jdbcType=VARCHAR})")
    void insertUser(User user);
    //更新数据
    @Update("update user set userId=#{userId,jdbcType=VARCHAR}," +
            "            userCode=#{userCode,jdbcType=VARCHAR}," +
            "            age=#{age,jdbcType=INTEGER}," +
            "            mail=#{mail,jdbcType=VARCHAR}," +
            "            phone=#{phone,jdbcType=VARCHAR}," +
            "            groupId=#{groupId,jdbcType=INTEGER}," +
            "            createTime=#{createTime,jdbcType=TIMESTAMP}," +
            "            createBy=#{createBy,jdbcType=VARCHAR}," +
            "            modifiedTime=#{modifiedTime,jdbcType=TIMESTAMP}," +
            "            modifiedBy=#{modifiedBy,jdbcType=VARCHAR} where userId=#{userId,jdbcType=VARCHAR}")
    void updateUser(User  user);

    //根据userId删除一个用户的数据
    @Delete("delete from user where useId = #{useId,jdbcType=VARCHAR}")
    void deletdUserById(String userId);
    //根据userCode删除一个用户的数据
    @Delete("delete from user where userCode = #{userCode,jdbcType=VARCHAR}")
    void deletdUserByCode(String userCode);
    //根据userCode取出一个用户的数据

    @Select("select * from user WHERE userCode = #{userCode,jdbcType=VARCHAR}")
    User getUserByCode(String userCode);
    //根据userId取出一个用户的数据
    @Select("select * from user WHERE userId = #{userId,jdbcType=VARCHAR}")
    User getUserById(String userId);
    @Select("select userCode,age,phone,modifiedTime from user ORDER BY modifiedTime DESC")
    List getUserList();

}
这里使用mybatis注解的方式@Insert、@Update、@Delete、@Select来进行数据库的数据库操作,当然也可使用Mapper映射文件,我个人觉得简单的sql操作使用注解,麻烦的还是使用Mapper文件比较好。这里推荐几篇文章。
MyBatis 3(中文版) 第四章 使用注解配置SQL映射器
Mybatis中Mapper映射文件详解
service层
代码如下:
@Service
public class UserServices {
   @Autowired
   private UserDao userDao;

   public JsonResult add(User user){
       User User= userDao.getUserByCode(user.getUserCode());
       if(User!=null){
           return new JsonResult("userCode已存在",false);
       }
       user.setUserId(UUID.randomUUID().toString());
       user.setCreateTime(new Date());
       user.setModifiedTime(new Date());
       userDao.insertUser(user);
       return new JsonResult("success",true);
   }

   public JsonResult delete(String userId,String userCode){
       User User=null;
       if(userId==null&&userCode==null){
           return new JsonResult("缺少参数userId或userCode",false);
       }else if(userId==null){
           User= userDao.getUserByCode(userCode);
           if(User==null){
               return new JsonResult("userCode不存在,无法删除",false);
           }
           userDao.deletdUserByCode(userCode);
       }else {
           User= userDao.getUserById(userId);
           if(User==null){
               return new JsonResult("userId不存在,无法删除",false);
           }
           userDao.deletdUserById(userId);
       }

       return new JsonResult("success",true);
   }

   public JsonResult update(User  user){
       User User= userDao.getUserById(user.getUserId());
       if(User==null){
           return new JsonResult("没有此userId",false);
       }

       user.setModifiedTime(new Date());
       userDao.updateUser(user);
       return  new JsonResult("success",true);
   }

   public JsonResult detail(String userId, String userCode){
       User User=null;
       if(userId==null){
           User= userDao.getUserByCode(userCode);
       }else if(userCode==null){
           User= userDao.getUserById(userId);
       }
       System.out.println(User);
       return  new JsonResult("success",true,User);
   }

   public JsonResult list(int pageNum,int pageSize){
       PageHelper.startPage(pageNum, pageSize);
       List list= userDao.getUserList();
       //把list包装成PageInfo对象才能序列化,该插件也默认实现了一个PageInfo
       PageInfo pageInfo = new PageInfo(list);
       //得到总的数据条数
       Long total=pageInfo.getTotal();
       return  new JsonResult(total,"success",true,list);
   }
}
这里主要看一下list()方法,这里采用了pagehelper插件,pageNum为页面页数,pageSize为一页数据的数量,需要把把list包装成PageInfo对象才能序列化,使用getTotal()方法得到数据的条数。pagehelper插件的的依赖引入如下,一直遇到报空错误,更新一下版本就好了。
Spring Boot+Mybatis+Pagehelper分页
controller层
代码如下:
@RestController //使用这个方法代表rest风格的控制器
public class UserController {

    @Autowired
    private UserServices userServices; //注入服务方法;

    @RequestMapping(value = "/add", method= RequestMethod.POST)
    public Object add(@Valid @RequestBody User user, BindingResult result){
        if(result.hasErrors()){
            String msg="";
            List fieldErrors=result.getFieldErrors();
            for (FieldError fieldError:fieldErrors){
                msg+=fieldError.getDefaultMessage()+",";
            }
            return new JsonResult(msg.substring(0,msg.length()-1),false);
        }
        return userServices.add(user);
    }

    @RequestMapping(value = "/delete",method= RequestMethod.POST)
    public Object delete(String userId,String userCode){
        return userServices.delete(userId,userCode);
    }

    @RequestMapping(value = "/update",method= RequestMethod.POST)
    public Object update(@RequestBody User  user){
        return userServices.update(user);
    }

    @RequestMapping(value = "/detail",method= RequestMethod.GET)
    public Object detail(String userId,String userCode){
        return  userServices.detail(userId,userCode);
    }

    @RequestMapping(value = "/list",method= RequestMethod.GET)
    public Object list(){
        int pageNum=1;
        int pageSize=5;
        return userServices.list(pageNum,pageSize);
    }
}
这里的@RequestBody代表参数的传入得是json格式,Validator注解@Valid说明需要检查的对象,如果有错误,错误结果都会传入BindingResult,里面就是具体的用法了。
59. Spring Boot Validator校验【从零开始学Spring Boot】
程序入口
@SpringBootApplication()
public class mysqlApplication {
    public static void main(String[] args){
        SpringApplication.run(mysqlApplication.class,args);
    }
}
4.测试
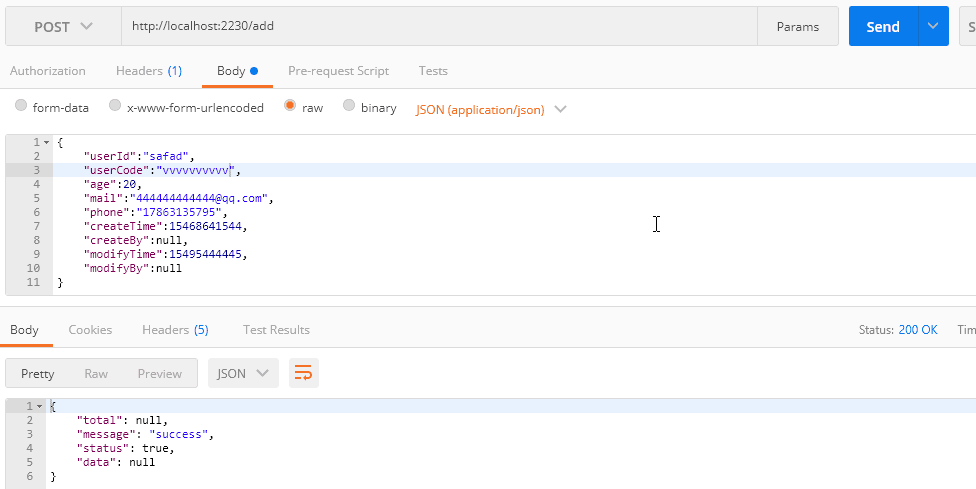
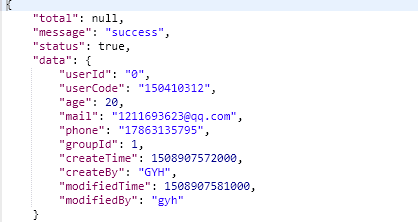
测试采用google浏览器的postman插件来发送get/post请求,部分结果如下:
add
add_failed
add_success
detail
detail_get
detail_result
list
list
------------------------------------
Mapper
-----------------------------------
@Mapper
public interface DemoMapper {
//增
@Insert("INSERT INTO demo(name,age)VALUES(#{name},#{age})")
@Options(useGeneratedKeys=true, keyProperty="id", keyColumn="id") //获取插入后自动生成的主键,keyProperty对应类属性名,keyColumn对应数据库字段名
int add(Demo demo);
//删
@Delete("DELETE FROM demo WHERE id=#{id}")
boolean deleteById(int id);
//查
@Select("SELECT * FROM demo WHERE id=#{id}")
Demo findById(int id);
@Select("SELECT * FROM demo WHERE login=#{login} AND password=#{password}")
Demo findByObject(@Param("login") String login,@Param("password") String password);
//改,注意:需要指定参数映射@Param,如不指定,可按下面的方法执行
@Update("UPDATE demo SET name=#{name} WHERE id =#{id}")
boolean updateById(@Param("name") String name,@Param("id") int id);
@Update("UPDATE demo SET name=#{name} WHERE id =#{id}")
boolean update_2ById(Demo demo);
//批量增
@InsertProvider(type = LoginProvider.class,method = "insert")
int insert(@Param("demoList")List
//批量删
@DeleteProvider(type = LoginProvider.class,method = "delete")
boolean delete(@Param("demoList")List
//批量查
@Select("SELECT * FROM demo")
List
@SelectProvider(type = LoginProvider.class,method = "find2")
List
//批量改
@UpdateProvider(type = LoginProvider.class,method = "update")
boolean update(@Param("demoList")List
}


