spring boot实现邮箱验证码注册
最近在设计自己的博客系统,涉及到用户注册与登录验证。
注册这地方我先采用最传统的邮箱验证码方式。具体的实现方式如下:
1.有关如何配置spring boot发送邮件,请参考我的另一篇文章:
https://blog.csdn.net/IndexMan/article/details/87563438
2.搞懂第1步再继续下面的操作
项目源码:https://gitee.com/indexman/mailtest.git
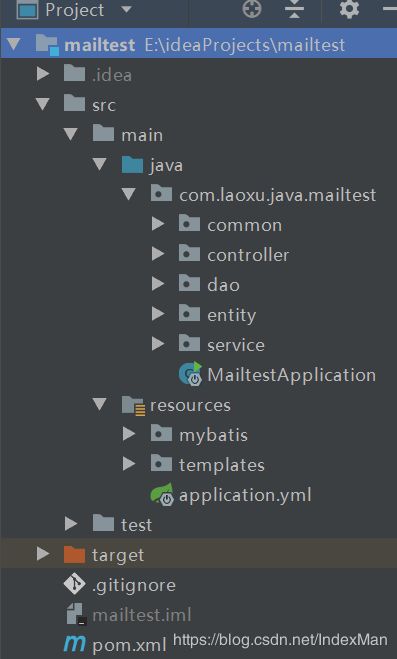
项目总体结构:
1.创建表
创建数据库:test
编码:uft-8
执行以下SQL
SET FOREIGN_KEY_CHECKS=0;

-- ----------------------------
-- Table structure for user
-- ----------------------------
DROP TABLE IF EXISTS `user`;
CREATE TABLE `user` (
  `id` int(11) NOT NULL AUTO_INCREMENT,
  `username` varchar(100) DEFAULT NULL,
  `password` varchar(100) DEFAULT NULL,
  `email` varchar(100) DEFAULT NULL,
  `active_code` varchar(100) DEFAULT NULL,
  `active_status` int(11) DEFAULT '0',
  PRIMARY KEY (`id`)
) ENGINE=InnoDB DEFAULT CHARSET=utf8;
2.搭建spring boot环境
2.1 配置pom.xml文件
    4.0.0

        org.springframework.boot
        spring-boot-starter-parent
        2.0.6.RELEASE


    com.laoxu.java
    mailtest
    0.0.1-SNAPSHOT
    mailtest
    Demo project for Spring Boot


        1.8


            org.springframework.boot
            spring-boot-starter-web


            org.springframework.boot
            spring-boot-starter-mail


            org.springframework.boot
            spring-boot-starter-thymeleaf


            org.mybatis.spring.boot
            mybatis-spring-boot-starter
            1.3.2


            com.alibaba
            druid
            1.1.12


            org.springframework.boot
            spring-boot-starter-jdbc


            mysql
            mysql-connector-java
            runtime


            org.projectlombok
            lombok
            true


            org.springframework.boot
            spring-boot-starter-test
            test


                org.springframework.boot
                spring-boot-maven-plugin
2.2 配置application.yml文件
server:
  port: 8080
spring:
  # 配置发送方信息
  mail:
    host: smtp.qq.com
    username: [email protected]  # 邮箱地址
    password: wlcfnoewxcbaeb123 # 授权码
    properties:
      mail:
        smtp:
          ssl:
            enable: true
  # thymeleaf
  thymeleaf:
    cache: false
    prefix: classpath:/templates/
    suffix: .html
  mvc:
    date-format: yyyy-MM-dd
  # mysql
  datasource:
    driver-class-name: com.mysql.jdbc.Driver
    username: root
    password: root123
    url: jdbc:mysql://localhost:3306/test?useUnicode=true&characterEncoding=UTF-8&zeroDateTimeBehavior=convertToNull&serverTimezone=GMT&useSSL=false
    type: com.alibaba.druid.pool.DruidDataSource
# mybatis
mybatis:
  config-location: classpath:mybatis/mybatis-config.xml
  mapper-locations: classpath:mybatis/mapper/*.xml
2.3 工具类
/**
 * @description: ID管理类
 * @author: luohanye
 * @create: 2019-04-19
 **/
public class IDUtils {
    public static final Logger logger = LoggerFactory.getLogger(IDUtils.class);

    public static String getUUID(){
        return UUID.randomUUID().toString().replace("-","");
    }

    public static void main(String[] args) {

        System.out.println(getUUID());
        logger.debug("test");
    }
}
3.编写User模型
/**
 * @description: 用户
 * @author: luohanye
 * @create: 2019-04-17
 **/

@Data
public class User implements Serializable {
    private Integer id;
    private String username;
    private String password;
    private String email;
    // 激活状态 0 未激活 1 已激活
    private Integer activeStatus;
    // 激活码
    private String activeCode;
}
4.编写UserDao
@Component
public interface UserDao {
    /**
     *  注册
     * @param user
     */
    void insert(User user);

    /**
     *  根据激活码查询用户
     * @param activeCode
     * @return
     */
    User selectUserByActiveCode(String activeCode);

    /**
     *  更新用户
     * @param user
     */
    void update(User user);

    /**
     *  查询用户
     * @param user
     * @return
     */
    User select(User user);
}
5.编写mapper文件
insert into user ( username, password,email,active_status,active_code)
values (#{username}, #{password}, #{email},#{activeStatus},#{activeCode})
update user
set active_status=#{activeStatus},username=#{username},password=#{password},
email=#{email}, active_status=#{activeStatus},active_code=#{activeCode}
where id=#{id}
6.编写UserService及其实现
public interface UserService {
    /**
     *  用户注册
     * @param user
     */
    void add(User user);

    /**
     *  根据激活码查找用户
     * @param activeCode
     * @return
     */
    User getUserByActiveCode(String activeCode);

    /**
     * 修改
     * @param user
     */
    void modify(User user);

    /**
     * 登录
     * @param user
     * @return
     */
    User get(User user);
}
/**
 * @description:
 * @author: luohanye
 * @create: 2019-04-18
 **/
@Service
@Transactional
public class UserServiceImpl implements UserService {
    @Autowired
    private UserDao userDao;

    @Autowired
    private MailService mailService;

    @Override
    public void add(User user) {
        userDao.insert(user);
        //获取激活码
        String code = user.getActiveCode();
        System.out.println("激活码:"+code);
        //主题
        String subject = "来自罗汉爷网站的激活邮件";
        //上面的激活码发送到用户注册邮箱
        String context = "激活请点击:"+code+"";
        //发送激活邮件
        mailService.sendMimeMail (user.getEmail(),subject,context);
    }

    @Override
    public User getUserByActiveCode(String activeCode) {
        return userDao.selectUserByActiveCode(activeCode);
    }

    @Override
    public void modify(User user) {
        userDao.update(user);
    }

    @Override
    public User get(User user) {
        return userDao.select(user);
    }
}
7.编写MailService及其实现
public interface MailService {
    /**
     *  发送多媒体类型邮件
     * @param to
     * @param subject
     * @param content
     */
    void sendMimeMail(String to, String subject, String content);

    void sendInlineResourceMail(String to, String subject, String content, String rscPath, String rscId);
}
/**
* @description: 邮件处理类
* @author: luohanye
* @create: 2019-04-19
**/
@Service
public class MailServiceImpl implements MailService {
private final Logger logger = LoggerFactory.getLogger(this.getClass());
@Autowired
JavaMailSenderImpl mailSender;
@Value("${spring.mail.username}")
private String from;
@Override
public void sendMimeMail(String to, String subject, String content) {
MimeMessage message = mailSender.createMimeMessage();
MimeMessageHelper helper = null;
try {
helper = new MimeMessageHelper(message, true);
helper.setFrom(from);
helper.setSubject(subject);
helper.setTo(to);
helper.setText(content, true);
mailSender.send(message);
//日志信息
logger.info("邮件已经发送。");
} catch (MessagingException e) {
logger.error("发送邮件时发生异常!", e);
}
}
@Override
public void sendInlineResourceMail(String to, String subject, String content, String rscPath, String rscId) {
MimeMessage message = mailSender.createMimeMessage();
MimeMessageHelper helper = null;
try{
helper = new MimeMessageHelper(message, true);
helper.setFrom(from);
helper.setSubject(subject);
helper.setTo(to);
helper.setText(content, true);
FileSystemResource fs = new FileSystemResource(new File(rscPath));
helper.addInline(rscId, fs);
mailSender.send(message);
}catch (MessagingException e) {
logger.error("发送邮件时发生异常!", e);
}
}
}
8.前端页面
去看源码。
9.编写UserController
@Controller
@RequestMapping("/user")
public class UserController {
    @Autowired
    private UserService userService;

    /**
     *  注册
     * @param user
     * @return
     */
    @RequestMapping(value = "/register")
    public String register(User user){
        user.setActiveStatus(0);
        String activeCode = IDUtils.getUUID();
        user.setActiveCode(activeCode);
        userService.add(user);

        return "success";
    }

    /**
     *  校验激活码
     * @param code
     * @return
     */
    @RequestMapping(value = "/checkCode")
    public String checkCode(String code){
        User user = userService.getUserByActiveCode(code);
        //如果用户不等于null,把用户状态修改status=1
        if (user !=null){
            user.setActiveStatus(1);
            //把code验证码清空,已经不需要了
            user.setActiveCode("");
            userService.modify(user);

            return "activeSuccess";
        }

        return "login";
    }

    /**
     * 登录
     * @return login
     */
    @RequestMapping(value = "/loginPage")
    public String login(){
        return "login";
    }

    /**
     * 登录
     */
    @RequestMapping(value = "/login")
    public String login(User user, Model model){
        User u = userService.get(user);
        if (u !=null){
            return "welcome";
        }
        return "error";
    }
}
10.编写IndexController
@Controller
public class IndexController {
    @RequestMapping("/")
    public String index(){
        return "index";
    }
}
11.测试应用
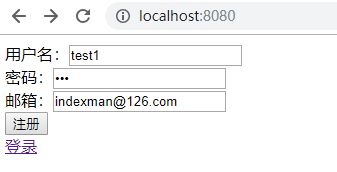
11.1 注册
11.2 激活
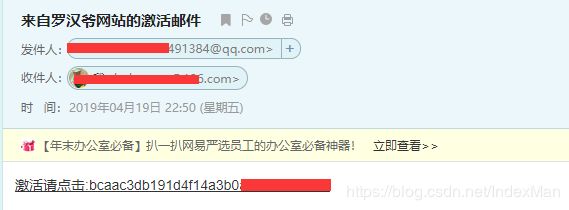
登录注册邮箱查看邮件:
点击激活链接:
11.3 登录成功
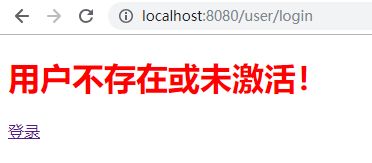
11.4 登录失败
项目源码:https://gitee.com/indexman/mailtest.git


