在go标准库net/http搭建的Server中使用Swaggo自动生成Restful API文档
关于Swaggo
Swag将Go的注释转换为Swagger2.0文档。我们为流行的 Go Web Framework 创建了各种插件,这样可以与现有Go项目快速集成(使用Swagger UI)。
支持的Web框架
- gin
- echo
- buffalo
- net/http
快速开始
-
将注释添加到API源代码中,请参阅声明性注释格式。
-
使用如下命令下载swag:
go get -u github.com/swaggo/swag/cmd/swag
go get -u github.com/swaggo/http-swagger
go get -u github.com/alecthomas/template
前两个命令分别安装swag和http-swagger:
swag:该库将Go批注转换为Swagger 2.0文档(swagger.json / swagger.yaml),随后由http-swagger使用,以为Swagger UI提供服务。
http-swagger:该库使用swag生成的文档帮助提供Swagger UI
第三个命令是安装模板,这是Go的text/template包的分支。 swag生成的docs.go文件中需要此依赖关系,而在没有该依赖关系的情况下运行应用程序时,我们会看到一个错误。
- 检查是否安装成功
$ swag -v
swag version v1.6.5
- 在包含
main.go文件的项目根目录运行swag init。这将会解析注释并生成需要的文件(docs文件夹和docs/docs.go)。
swag init
确保导入了生成的docs/docs.go文件,这样特定的配置文件才会被初始化。如果通用API指数没有写在main.go中,可以使用-g标识符来告知swag。
swag init -g http/api.go
生成Swagger文档
1.在代码中添加注释
我们首先通过注释我们的main方法来添加整个项目的一般描述。这些注解只不过是方法定义之前的注释,如下所示。
// @title RESTful API
// @version 1.0
// @description RESTful API 文档.
// @host localhost:8888
// @BasePath /
func main() {
	router := mux.NewRouter()
	router.PathPrefix("/swagger").Handler(httpSwagger.WrapHandler)
	http.ListenAndServe(":8888", router)
}
其中:
titile: 文档标题version: 版本description,termsOfService,contact ...这些都是一些声明,可不写。host,BasePath: 如果你想直接swagger调试API,这两项需要填写正确。前者为服务文档的端口,ip。后者为基础路径,像我这里就是“/api/v1”。- 在原文档中还有
securityDefinitions.basic,securityDefinitions.apikey等,这些都是用来做认证的,我这里暂不展开。
我希望这些注释是不言自明的。有关更多信息,可在swag github页面上找到所有可能的注释的详尽列表。
现在,我们已经添加了项目级别的文档,让我们向每个单独的API添加文档。
首先自定义几个返回给前端的数据结构:SwaggerAccount、SwaggerAccounts、SwaggerIssue
type SwaggerAccount struct {
	ID string `json:"ID"`
	Company string `json:"company"`
	Email string `json:"email"`
	Name string `json:"name"`
	Password string `json:"password"`
	Status string  `json:"status"`
}

type SwaggerIssue struct {
	Company string `json:"company"`
	Token   string `json:"token"`
}
接下来,我们需要在每个路由处理函数上加上注释,如:
// @Summary 查询所有用户帐号
// @Description 查询所有用户帐号
// @Tags Account
// @Accept  json
// @Produce  json
// @Param X-Namespace header string true "命名空间"
// @Success 200 {anrry} SwaggerAccount "帐号的数组"
// @Router /v/1/accounts [get]
func (p *AccountProcessor) ProcessRetrieveMany(ctx context.Context) error {

// @Summary 添加用户帐号(注册)
// @Description 添加用户帐号、用户注册
// @Tags Account
// @Accept  json
// @Produce  json
// @Param X-Namespace header string true "命名空间"
// @Param name body string true "用户名" default(admin)
// @Param password formData string true "密码"
// @Param email formData string true "邮箱帐号"
// @Param company formData string true "命名空间"
// @Param status formData string true "用户帐号的状态" Enums(Active, Disabled)
// @Success 204 "No Content"
// @Router /v/1/accounts [post]
func (p *AccountProcessor) ProcessCreate(ctx context.Context) error {

// @Summary 用户登录
// @Description 用户登录
// @Tags Issue
// @Accept  json
// @Produce  json
// @Param X-Namespace header string true "命名空间"
// @Param realm body string true "The authentication realm." default(Vince)
// @Param name body string true "用户名" default(admin)
// @Param password body string true "密码"
// @Success 200 {object} SwaggerIssue "命名空间和token"
// @Router /v/1/issue [post]
func (p *IssueProcessor) ProcessCreate(ctx context.Context) error {
这些注释会出现在API文档对应的位置,这里我们主要详细说说下面参数:
Tags
Tags 是用来给API分组的。
Accept
接收的参数类型,支持表单(mpfd) , JSON(json)等,更多如下表。
Produce
返回的数据结构,一般都是json, 其他支持如下表:
| Mime Type | 声明 |
|---|---|
| application/json | json |
| text/xml | xml |
| text/plain | plain |
| html | html |
| multipart/form-data | mpfd |
| application/x-www-form-urlencoded | x-www-form-urlencoded |
| application/vnd.api+json | json-api |
| application/x-json-stream | json-stream |
| application/octet-stream | octet-stream |
| image/png | png |
| image/jpeg | jpeg |
| image/gif | gif |
Param
参数,从前往后分别是:
// @Param name body string true “用户名” default(admin)
// @Param password formData string true “密码”@Param
1.参数名2.参数类型3.参数数据类型4.是否必须5.参数描述6.其他属性
-
1.参数名
参数名就是我们解释参数的名字。
2.参数类型
参数类型主要有5种:
-
path该类型参数直接拼接在URL中,如Demo中HandleGetFile:// @Param id path integer true "文件ID" -
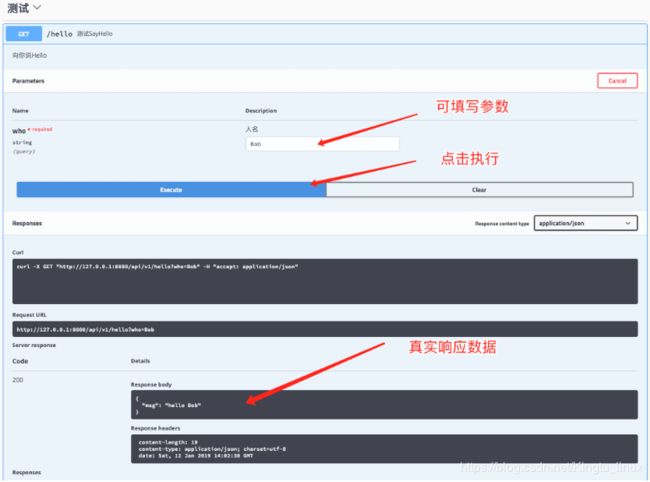
query该类型参数一般是组合在URL中的,如Demo中HandleHello// @Param who query string true "人名" -
formData该类型参数一般是POST,PUT方法所用,如Demo中HandleLogin// @Param user formData string true "用户名" default(admin) -
body当Accept是JSON格式时,我们使用该字段指定接收的JSON类型// @Param param body main.JSONParams true "需要上传的JSON" -
header请求头中传递的参数
-
-
3.参数数据类型
数据类型主要支持一下几种:
- string (string)
- integer (int, uint, uint32, uint64)
- number (float32)
- boolean (bool)
注意,如果你是上传文件可以使用
file, 但参数类型一定是formData, 如下:// @Param file formData file true "文件" -
4.是否是必须
表明该参数是否是必须需要的,必须的在文档中会黑体标出,测试时必须填写。
-
5.参数描述
就是参数的一些说明
-
6.其他属性
除了上面这些属性外,我们还可以为该参数填写一些额外的属性,如枚举,默认值,值范围等。如下:
枚举
// @Param enumstring query string false "string enums" Enums(A, B, C)
// @Param enumint query int false "int enums" Enums(1, 2, 3)
// @Param enumnumber query number false "int enums" Enums(1.1, 1.2, 1.3)

值添加范围
// @Param string query string false "string valid" minlength(5) maxlength(10)
// @Param int query int false "int valid" mininum(1) maxinum(10)

设置默认值// @Param default query string false "string default" default(A)
而且这些参数是可以组合使用的,如:
// @Param enumstring query string false "string enums" Enums(A, B, C) default(A)
Success
指定成功响应的数据。格式为:
// @Success
1.HTTP响应码{2.响应参数类型}3.响应数据类型4.其他描述
-
1.HTTP响应码
也就是200,400,500那些。
-
2.响应参数类型 / 3.响应数据类型
返回的数据类型,可以是自定义类型,可以是json。
- 自定义类型
在平常的使用中,我都会返回一些指定的模型序列化JSON的数据,这时,就可以这么写:
// @Success 200 {object} main.File其中,模型直接用
包名.模型即可。你会说,假如我返回模型数组怎么办?这时你可以这么写:// @Success 200 {anrry} main.File将如你只是返回其他的数据格式可如下写:
// @Success 200 {string} string "" -
4.其他描述
可以添加一些说明。
Failure
同Success。
Router
指定路由与HTTP方法。格式为:
// @Router
/path/to/handle[HTTP方法]
不用加基础路径哦。
2.生成swagger.json
完成对main方法和所有API的注释后,我们将使用以下swag init命令生成swagger文档:
# In your project dir (~/GOPATH/src/swaggo-orders-api normally)
swag init -g orders.go
我们应该会看到类似的输出,如果您好奇的话,可以导航到docs目录并查看swagger.json文件。
$ swag init
2020/06/08 18:54:01 Generate swagger docs....
2020/06/08 18:54:01 Generate general API Info, search dir:./
2020/06/08 18:54:01 Generating processor.SwaggerAccount
2020/06/08 18:54:01 Generating processor.SwaggerAccounts
2020/06/08 18:54:01 Generating processor.SwaggerIssue
2020/06/08 18:54:01 create docs.go at  docs/docs.go
2020/06/08 18:54:01 create swagger.json at  docs/swagger.json
2020/06/08 18:54:01 create swagger.yaml at  docs/swagger.yaml
3. Swagger UI
此步骤非常简单(非常类似于前面的步骤)。我们在这里所做的只是导入 httpSwagger库,以及我们在第2步中生成的庞大文档。如果您_对导入中的疑问,这只是一种导入副作用包的方法。(等等,这也不是很清楚!)这意味着我们的代码没有显式调用包中的任何方法,但是包可能执行诸如注册处理程序之类的操作。
import (
	... ...

	_ "github.com/apiserver/docs"// docs is generated by Swag CLI, you have to import it.
	"github.com/gorilla/mux"
	httpSwagger "github.com/swaggo/http-swagger"

    ... ...
)
除了为所有API指定路由之外,我们还必须在main方法中定义一条路由,以使用Swagger UI服务该PathPrefix方法。
// @title RESTful Server API
// @version 1.0
// @description API Server 的接口文档.
// @host localhost:8888
// @BasePath /
func main() {
	router := mux.NewRouter()
	router.PathPrefix("/swagger").Handler(httpSwagger.WrapHandler)
	http.ListenAndServe(":8888", router)
}
上面的代码段显示了main添加Swag注释后的方法,以及swagger UI的路由。
最后,当我们完成所有API的处理后,现在该带他们兜风了。 要运行该应用程序,请导航到您的项目目录,然后运行以下命令:
go gun main.go
您可以通过在 http://localhost:8888/swagger/index.html 加载swagger UI来看到您的作品栩栩如生
如果一切顺利,我们应该会看到如下所示的UI:
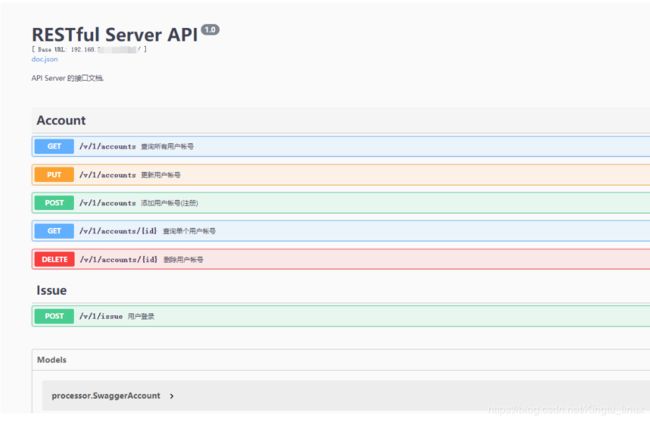
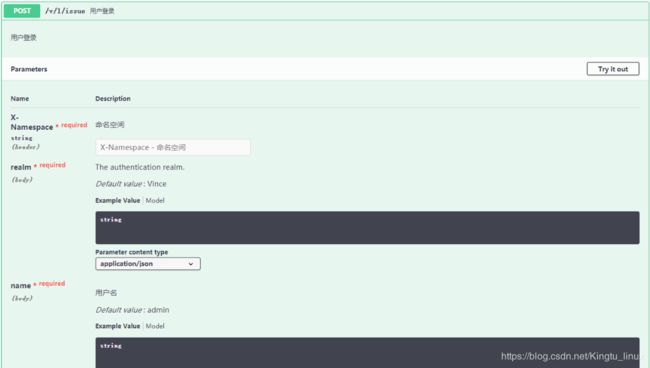
此时,该API的相关描述已经生成了,我们点击Try it out还可以直接测试该API。
您还可以在以下位置查看swagger json:
http://http://localhost:8888/swagger/doc.json
Swagger还提供了使用Swagger编辑器在线显示Swagger文档的选项。您可以只复制doc.json或的内容,doc.yaml然后将其粘贴到页面左半部分的编辑器中,而右半部分则显示swagger的UI。
参考链接:
- Swagger UI setup for Go REST API using Swaggo
- 官方文档
- Go学习笔记(六) | 使用swaggo自动生成Restful API文档