ConcurrentLinkedQueue的出入队源码简析
ConcurrentLinkedQueue其实就是一个并发安全的Queue,底层的数据结构使用的是链表,因为使用的是链表,所以源码中会有大量的指针操作,这篇博文就以画图的方式来解析源码
首先写一个小demo,然后按照这个demo的逻辑来还原一下源码的出队入队流程
public class ConcurrentLinkedQueueTest {
    static ConcurrentLinkedQueue queue = new ConcurrentLinkedQueue();

    public static void main(String[] args) throws Exception{
        for (int i = 0; i < 2; i++) {
            int num = i;
            new Thread() {
                @Override
                public void run() {
                	// 两个线程执行入队操作
                    queue.offer(num);
                }
            }.start();
        }

        Thread.sleep(100);

        Iterator iterator = queue.iterator();
        while (iterator.hasNext())  {
            System.out.println(iterator.next());
        }

        System.out.println("---------------------");

        for (int i = 0; i < 2; i++) {
            new Thread() {
                @Override
                public void run() {
                	// 两个线程执行出队操作
                    System.out.println(queue.poll());
                }
            }.start();
        }
    }
}
第一步是初始化一个ConcurrentLinkedQueue,来看看源码
private transient volatile Node<E> head;

private transient volatile Node<E> tail;

public ConcurrentLinkedQueue() {
    head = tail = new Node<E>(null);
}
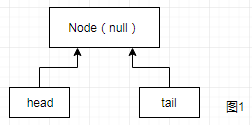
初始化的方法中,head和tail,你可以认为他们是两个指针,他们都指向了同一个值为null的Node节点,Node节点中包含了一个item,代表了这个Node的值,还有next指针,指向了下一个Node节点,就是我们所说的单向链表的意思,见图1
在上面的代码中,我们创建了两个线程,都向我们创建的ConcurrentLinkedQueue中加入了一个元素,来看看offer方法的源码
public boolean offer(E e) {
    // 检查元素是否为null
    checkNotNull(e);
    // 封装新节点,这个Node节点中的值就是我们要入队的元素
    final Node<E> newNode = new Node<E>(e);

    // t、p都是指针,这里t指针指向tail指针指向的那个空的Node节点,同理p也指向了同一个Node节点
    for (Node<E> t = tail, p = t;;) {
    	// q指针指向了p的next指针指向的节点,这里q指向的是一个空的Node节点,见图2
        Node<E> q = p.next;
        // q == null满足,进入if判断
        if (q == null) {
            // 关键代码,这个CAS操作就将新的节点挂载到了队列的单向链表中,即p指针指向的那个Node节点,而且CAS操作也保证了并发安全性
            // 只有一个线程能够成功执行这个CAS操作,执行失败的线程则进入下一次的for循环
            if (p.casNext(null, newNode)) {
            	// 第一个线程成功执行CAS,q指针指向的Node节点的item变成了我们要加入队列的元素,假设就是1,见图3
            	// 这里p指针和t指针还是指向了同一个Node,所以这里的if判断为false
                if (p != t)
                    casTail(t, newNode);
                // 第一个线程CAS操作成功,返回true
                return true;
            }
        }
        else if (p == q)
            p = (t != (t = tail)) ? t : head;
        else
            p = (p != t && t != (t = tail)) ? t : q;
    }
}
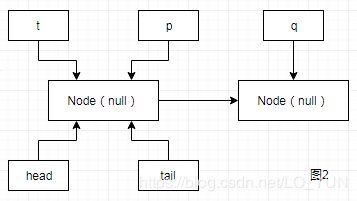
这幅图中的q指针指向了p的next节点,一开始的时候,因为没有这样一个Node节点,所以也是指向了一个空的Node节点

第一个线程执行完毕之后,第二个线程会再次进入offer方法中的for循环,为了不混淆注释,我这里再贴一遍for循环的代码,来分析第二个线程的执行流程
for (Node<E> t = tail, p = t;;) {
    Node<E> q = p.next;
    // 参考图3,所以此时q != null
    if (q == null) {
        if (p.casNext(null, newNode)) {
            if (p != t)
                casTail(t, newNode);
            return true;
        }
    }
    // 参考图3,p != q
    else if (p == q)
        p = (t != (t = tail)) ? t : head;
    // 进入这个else判断
    else
    	// 根据图3,我们可以得出(p != t && t != (t = tail))返回的是false,所以这里p = q,可以画出图4
    	// 执行完成之后,第二次进入for循环
        p = (p != t && t != (t = tail)) ? t : q;
}
p指针由指向空的Node节点,变为了跟q指向同一个Node

再次进入for循环
for (Node<E> t = tail, p = t;;) {
	// 在图4中,p指针的位置已经改变,所以这里q指针又指向了下一个空的Node节点,见图5
    Node<E> q = p.next;
    // 图5中,q == null,进入if判断
    if (q == null) {
    	// 尝试CAS将q指针指向新加入的元素,假设添加的元素是2
        if (p.casNext(null, newNode)) {
        	// 图5中p != t就已经满足了,所以if判断为true
            if (p != t)
            	// CAS操作将tail指针指向新的Node节点,见图6
                casTail(t, newNode);
            return true;
        }
    }
    else if (p == q)
        p = (t != (t = tail)) ? t : head;
    else
        p = (p != t && t != (t = tail)) ? t : q;
}
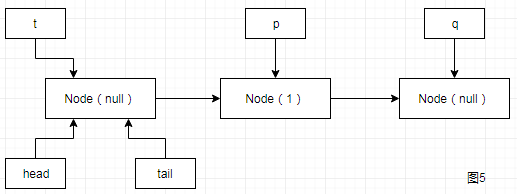
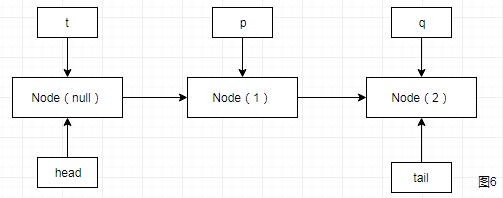
如果我们将t、p、q这些辅助指针都去掉的话,最终会变成这样

可以看到,最后的结果就是将我们需要加入的元素加入到了一个单向链表的结构中,源码中通过了各种的指针变换来实现这个效果,画图能够帮助我们更加形象的理解这个流程
ConcurrentLinkedQueue保证并发安全,其实就是使用了CAS操作,辅助以各种指针的变换来实现
看完了入队的操作,接下来我们再使用这个队列来解析一下出队的源码
public E poll() {
    restartFromHead:
    for (;;) {
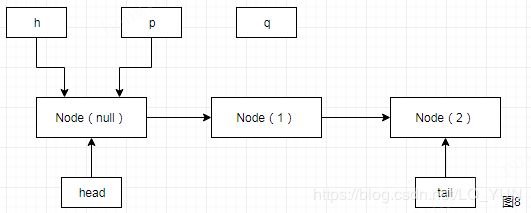
    	// 先将这些指针画出来,见图8
        for (Node<E> h = head, p = h, q;;) {
        	// p指针指向的Node节点的item为null
            E item = p.item;

            if (item != null && p.casItem(item, null)) {
                if (p != h) // hop two nodes at a time
                    updateHead(h, ((q = p.next) != null) ? q : p);
                return item;
            }
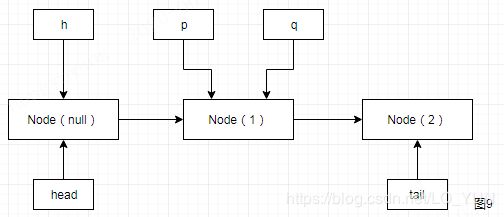
            // 一开始q指针没有指向任何Node节点,q = p.next将q指针指向了p的下一个Node节点,也就是item为1的Node
            else if ((q = p.next) == null) {
                updateHead(h, p);
                return null;
            }
            // 条件不满足
            else if (p == q)
                continue restartFromHead;
            // 将p指针指向q指针指向的Node节点,见图9
            else
                p = q;
        }
    }
}
for (Node<E> h = head, p = h, q;;) {
	// item此时等于1
    E item = p.item;
	// item != null为true,然后CAS操作将p指针指向的Node节点的item置为null,即将1设置为null,相当于弹出了队头的元素
	// 这个casItem操作就能保证只有一个线程能够成功完成出队操作,CAS操作失败的线程继续下一次循环
    if (item != null && p.casItem(item, null)) {
    	// 此时p != h
        if (p != h) // hop two nodes at a time
        	// (q = p.next) != null)这一步先将q指针又指向了p的下一个Node节点,判断q现在指向的Node节点是否为null
        	// 此时q指针Node节点的item为2,所以这一步实际是updateHead(h, q),最后具体分析了一下updateHead方法
            updateHead(h, ((q = p.next) != null) ? q : p);
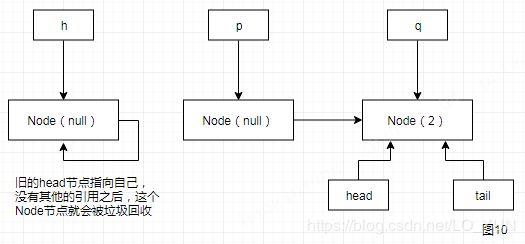
        // 返回item,第一个线程执行poll操作完成,见图10
        return item;
    }
    else if ((q = p.next) == null) {
        updateHead(h, p);
        return null;
    }
    else if (p == q)
        continue restartFromHead;
    else
        p = q;
}

/**
 * Tries to CAS head to p. If successful, repoint old head to itself
 * as sentinel for succ(), below.
 */
final void updateHead(Node<E> h, Node<E> p) {
	// updateHead(h, q),这里会通过CAS操作将h指针指向q指针的Node节点
    if (h != p && casHead(h, p))
    	// 通过上面的注释,我们可以知道如果CAS操作成功,repoint old head to itself还会将旧的head指针指向自己
        h.lazySetNext(h);
}
public E poll() {
    restartFromHead:
    for (;;) {
    	// 指针位置重置,见图11
        for (Node<E> h = head, p = h, q;;) {
        	// item = 2
            E item = p.item;
			// item != null为true,然后CAS操作将p指针指向的Node节点的item置为null,即将2设置为null
            if (item != null && p.casItem(item, null)) {
            	// 不满足
                if (p != h) // hop two nodes at a time
                    updateHead(h, ((q = p.next) != null) ? q : p);
                // 返回item的值,第二个线程poll操作完成,见图12
                return item;
            }
            else if ((q = p.next) == null) {
                updateHead(h, p);
                return null;
            }
            else if (p == q)
                continue restartFromHead;
            else
                p = q;
        }
    }
}
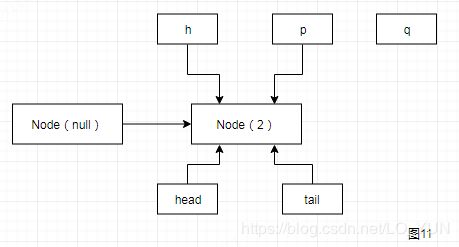
当队列元素全部完成出队之后,去掉了辅助指针之后就如下图所示
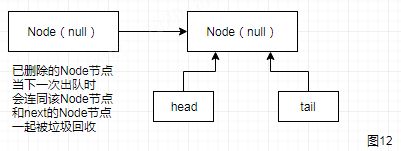
可能你会奇怪为什么还有一个已经删除的Node节点挂载在前面
if (p != h) // hop two nodes at a time
	updateHead(h, ((q = p.next) != null) ? q : p);
上面的这一块代码里面的注释就已经说明了,更新head指针时会一次性跳两个节点,并不是每次出队时都更新head节点,当head节点里有元素时,直接弹出head节点里的元素,而不会更新head节点。只有当head节点里没有元素时,出队操作才会更新head节点
这么做的好处是减少了CAS更新head节点的消耗,从而提高出队效率,所以队列出队整体看起来是这样的

通过画图来演示出入队的过程可以帮助我们理解源码是如何实现的,而ConcurrentLinkedQueue保证并发安全的方式就是使用CAS操作,多个线程只有一个线程能成功执行操作,执行失败的线程重复进入循环再次尝试执行CAS,直至操作完成
