分分钟解决iOS开发中App启动广告的功能
分分钟解决iOS开发中App启动广告的功能
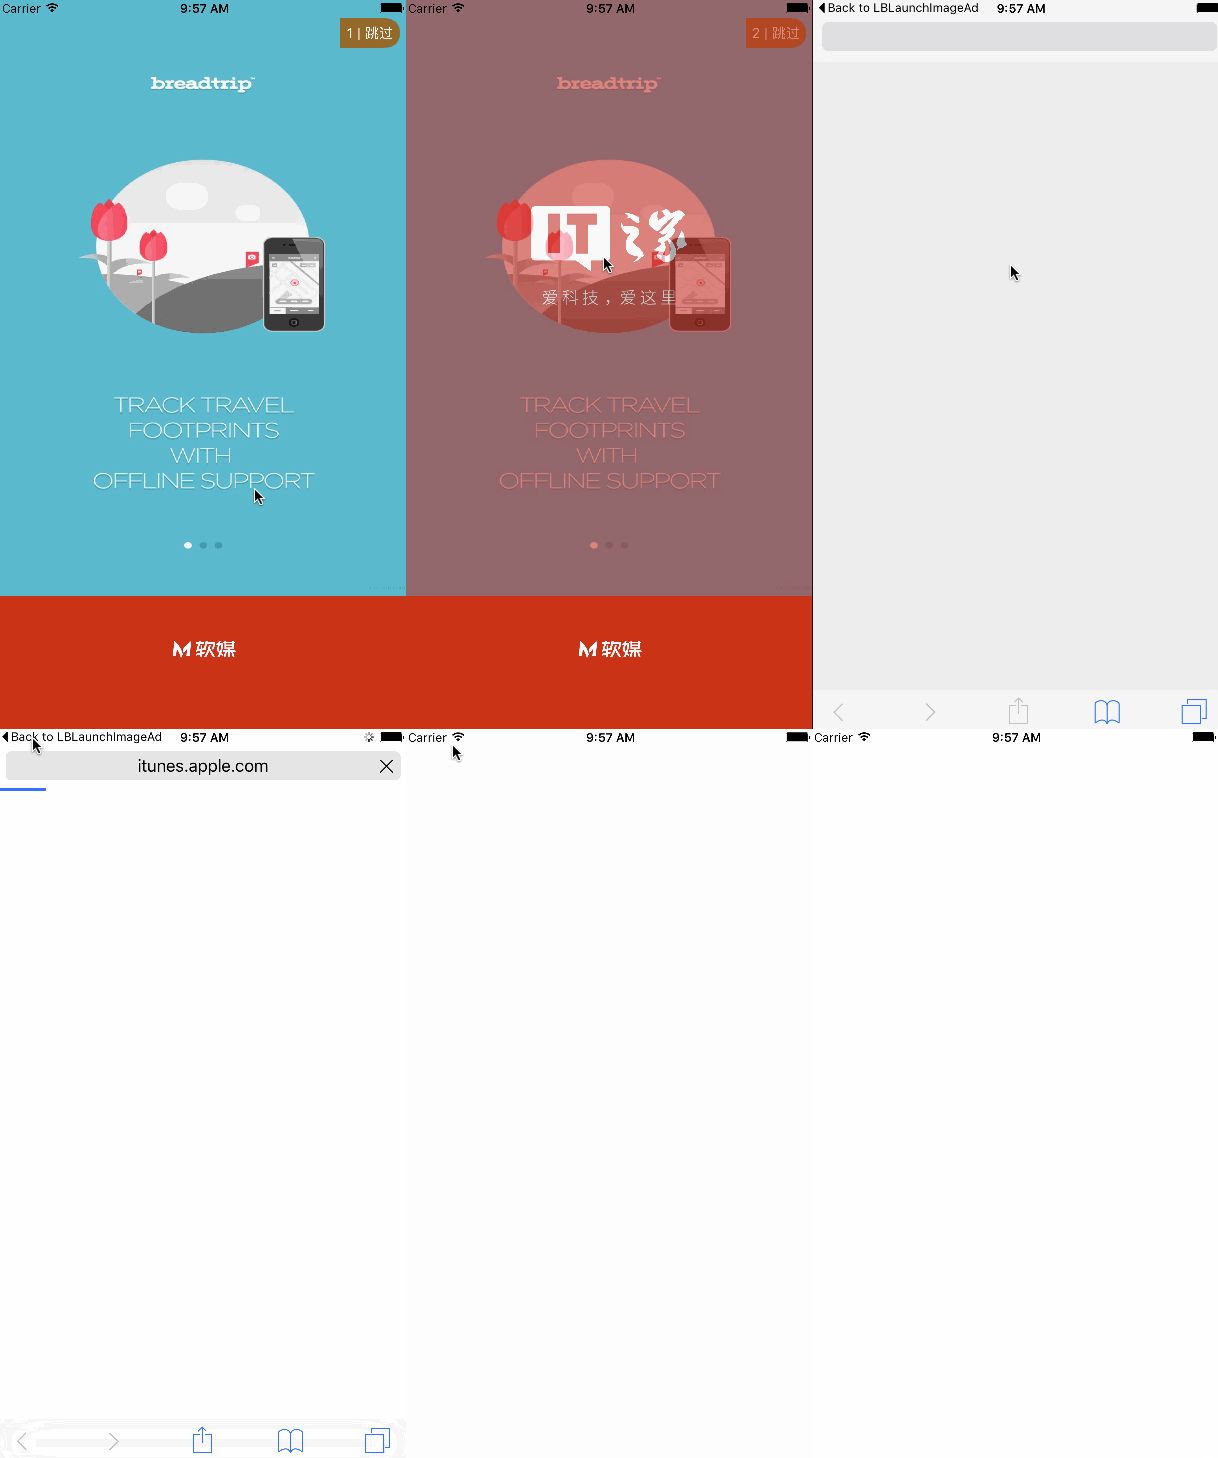
前不久有朋友需要一个启动广告的功能,我说网上有挺多的,他说,看的不是很理想。想让我写一个,于是乎,抽空写了一个,代码通俗易懂,简单的封装了一下,各种事件用block回调的,有俩种样式的广告,一种是全屏广告,另一种是下面露logo的,类似网页新闻的启动广告。依赖SDWebImage主要用来下载网络的广告图片,一般项目里面网络图片都用的这个框架,所以在此不做过多的阐述。下面让我们来看看我封装的过程,对于新手来说,可以学习一下这种封装的思想。
1.首先建一个继承View的LBLaunchImageAdView
.h文件 代码如下:
//
// LBLaunchImageAdView.h
// LBLaunchImageAd
// 技术交流群:534926022(免费) 511040024(0.8/人付费)
// Created by gold on 16/6/8.
// Copyright © 2016年 Bison. All rights reserved.
// iOS开发学习app下载https://itunes.apple.com/cn/app/it-blog-for-ios-developers/id1067787090?mt=8
typedef enum {
FullScreenAdType = 1,//全屏的广告
LogoAdType = 0,//带logo的广告
}AdType;
#import 里面主要重写了init方法,init方法方便我们在调用封装的类初始化时传递一些参数,在此,我只传递了三个必要的参数,其他参数都用@property属性来调配,达到自己想要的效果,再有就是一个block的回调函数,主要处理各种事件。下面我们看看.m文件里面实现的部分
//
//  LBLaunchImageAdView.m
//  LBLaunchImageAd
//  技术交流群:534926022(免费) 511040024(0.8/人付费)
//  Created by gold on 16/6/8.
//  Copyright © 2016年 Bison. All rights reserved.
//  iOS开发学习app下载https://itunes.apple.com/cn/app/it-blog-for-ios-developers/id1067787090?mt=8

#import "LBLaunchImageAdView.h"

@interface LBLaunchImageAdView()
{
    NSTimer *countDownTimer;
}
@property (strong, nonatomic) NSString *isClick;
@property (assign, nonatomic) NSInteger secondsCountDown; //倒计时总时长
@end

@implementation LBLaunchImageAdView

- (instancetype)initWithWindow:(UIWindow *)window andType:(NSInteger)type andImgUrl:(NSString *)url
{
    self = [super init];
    if (self) {
        self.window = window;
        _secondsCountDown = 0;
        [window makeKeyAndVisible];
        //获取启动图片
        CGSize viewSize = window.bounds.size;
        //横屏请设置成 @"Landscape"
        NSString *viewOrientation = @"Portrait";

        NSString *launchImageName = nil;

        NSArray* imagesDict = [[[NSBundle mainBundle] infoDictionary] valueForKey:@"UILaunchImages"];
        for (NSDictionary* dict in imagesDict)

        {
            CGSize imageSize = CGSizeFromString(dict[@"UILaunchImageSize"]);
            if (CGSizeEqualToSize(imageSize, viewSize) && [viewOrientation isEqualToString:dict[@"UILaunchImageOrientation"]])

            {
                launchImageName = dict[@"UILaunchImageName"];
            }

        }
        UIImage * launchImage = [UIImage imageNamed:launchImageName];
        self.backgroundColor = [UIColor colorWithPatternImage:launchImage];
        self.frame = CGRectMake(0, 0, mainWidth, mainHeight);
        if (type == FullScreenAdType) {
            self.aDImgView = [[UIImageView alloc]initWithFrame:CGRectMake(0, 0, mainWidth, mainHeight)];

        }else{
            self.aDImgView = [[UIImageView alloc]initWithFrame:CGRectMake(0, 0, mainWidth, mainHeight - mainWidth/3)];
        }

        self.skipBtn = [UIButton buttonWithType:UIButtonTypeCustom];
        self.skipBtn.frame = CGRectMake(mainWidth - 70, 20, 60, 30);
        self.skipBtn.backgroundColor = [UIColor brownColor];
        self.skipBtn.titleLabel.font = [UIFont systemFontOfSize:14];
        [self.skipBtn addTarget:self action:@selector(skipBtnClick) forControlEvents:UIControlEventTouchUpInside];
        [self.aDImgView addSubview:self.skipBtn];
        UIBezierPath *maskPath = [UIBezierPath bezierPathWithRoundedRect:self.skipBtn.bounds byRoundingCorners:UIRectCornerBottomRight | UIRectCornerTopRight cornerRadii:CGSizeMake(15, 15)];
        CAShapeLayer *maskLayer = [[CAShapeLayer alloc] init];
        maskLayer.frame = self.skipBtn.bounds;
        maskLayer.path = maskPath.CGPath;
        self.skipBtn.layer.mask = maskLayer;
        SDWebImageManager *manager = [SDWebImageManager sharedManager];
        [manager downloadImageWithURL:[NSURL URLWithString:url] options:0 progress:^(NSInteger receivedSize, NSInteger expectedSize) {

        } completed:^(UIImage *image, NSError *error, SDImageCacheType cacheType, BOOL finished, NSURL *imageURL) {
            if (image) {
                 [self.aDImgView setImage:[self imageCompressForWidth:image targetWidth:mainWidth]];
            }
        }];
        self.aDImgView.tag = 1101;
        self.aDImgView.backgroundColor = [UIColor redColor];
        [self addSubview:self.aDImgView];
        UITapGestureRecognizer *tap = [[UITapGestureRecognizer alloc]initWithTarget:self action:@selector(activiTap:)];
        // 允许用户交互
        self.aDImgView.userInteractionEnabled = YES;
        [self.aDImgView addGestureRecognizer:tap];

        CABasicAnimation *opacityAnimation = [CABasicAnimation animationWithKeyPath:@"opacity"];
        opacityAnimation.duration = 0.8;
        opacityAnimation.fromValue = [NSNumber numberWithFloat:0.0];
        opacityAnimation.toValue = [NSNumber numberWithFloat:0.8];

        opacityAnimation.timingFunction = [CAMediaTimingFunction functionWithName:kCAMediaTimingFunctionEaseIn];

        [self.aDImgView.layer addAnimation:opacityAnimation forKey:@"animateOpacity"];
        countDownTimer = [NSTimer scheduledTimerWithTimeInterval:1 target:self selector:@selector(onTimer) userInfo:nil repeats:YES];
        [self.window addSubview:self];
    }
    return self;
}

#pragma mark - 点击广告
- (void)activiTap:(UITapGestureRecognizer*)recognizer{
    _isClick = @"1";
    [self startcloseAnimation];
}

#pragma mark - 开启关闭动画
- (void)startcloseAnimation{
    CABasicAnimation *opacityAnimation = [CABasicAnimation animationWithKeyPath:@"opacity"];
    opacityAnimation.duration = 0.5;
    opacityAnimation.fromValue = [NSNumber numberWithFloat:1.0];
    opacityAnimation.toValue = [NSNumber numberWithFloat:0.3];
    opacityAnimation.removedOnCompletion = NO;
    opacityAnimation.fillMode = kCAFillModeForwards;

    [self.aDImgView.layer addAnimation:opacityAnimation forKey:@"animateOpacity"];
    [NSTimer scheduledTimerWithTimeInterval:opacityAnimation.duration
                                     target:self
                                   selector:@selector(closeAddImgAnimation)
                                   userInfo:nil
                                    repeats:NO];

}

- (void)skipBtnClick{
    _isClick = @"2";
    [self startcloseAnimation];
}

#pragma mark - 关闭动画完成时处理事件
-(void)closeAddImgAnimation
{
    [countDownTimer invalidate];
    countDownTimer = nil;
    self.hidden = YES;
    self.aDImgView.hidden = YES;
    self.hidden = YES;
    if ([_isClick integerValue] == 1) {

        if (self.clickBlock) {//点击广告
            self.clickBlock(1100);
        }
    }else if([_isClick integerValue] == 2){
        if (self.clickBlock) {//点击跳过
            self.clickBlock(1101);
        }
    }else{
        if (self.clickBlock) {//点击跳过
            self.clickBlock(1102);
        }
    }


}

- (void)onTimer {

    if (_adTime == 0) {
        _adTime = 6;
    }
    if (_secondsCountDown < _adTime) {
        _secondsCountDown++;
        [self.skipBtn setTitle:[NSString stringWithFormat:@"%ld | 跳过",_secondsCountDown] forState:UIControlStateNormal];
    }else{

        [countDownTimer invalidate];
        countDownTimer = nil;
        [self startcloseAnimation];

    }
}

#pragma mark - 指定宽度按比例缩放
- (UIImage *)imageCompressForWidth:(UIImage *)sourceImage targetWidth:(CGFloat)defineWidth {
    UIImage *newImage = nil;
    CGSize imageSize = sourceImage.size;
    CGFloat width = imageSize.width;
    CGFloat height = imageSize.height;
    CGFloat targetWidth = defineWidth;
    CGFloat targetHeight = height / (width / targetWidth);
    CGSize size = CGSizeMake(targetWidth, targetHeight);
    CGFloat scaleFactor = 0.0;
    CGFloat scaledWidth = targetWidth;
    CGFloat scaledHeight = targetHeight;
    CGPoint thumbnailPoint = CGPointMake(0.0, 0.0);

    if(CGSizeEqualToSize(imageSize, size) == NO){

        CGFloat widthFactor = targetWidth / width;
        CGFloat heightFactor = targetHeight / height;

        if(widthFactor > heightFactor){
            scaleFactor = widthFactor;
        }
        else{
            scaleFactor = heightFactor;
        }
        scaledWidth = width * scaleFactor;
        scaledHeight = height * scaleFactor;

        if(widthFactor > heightFactor){

            thumbnailPoint.y = (targetHeight - scaledHeight) * 0.5;

        }else if(widthFactor < heightFactor){

            thumbnailPoint.x = (targetWidth - scaledWidth) * 0.5;
        }
    }

    //    UIGraphicsBeginImageContext(size);
    UIGraphicsBeginImageContextWithOptions(size, NO, [UIScreen mainScreen].scale);
    CGRect thumbnailRect = CGRectZero;
    thumbnailRect.origin = thumbnailPoint;
    thumbnailRect.size.width = scaledWidth;
    thumbnailRect.size.height = scaledHeight;

    [sourceImage drawInRect:thumbnailRect];

    newImage = UIGraphicsGetImageFromCurrentImageContext();

    if(newImage == nil){
        NSLog(@"scale image fail");
    }

    UIGraphicsEndImageContext();
    return newImage;
}

@end UI部分由于没有什么需要重用的地方,所以没有再另外抽取出来方法,全部放在init方法里面,显得有点臃肿。UI部分在此不做过多的阐述,里边主要运用了一个渐变的动画,利用CABasicAnimation中的opacity,有兴趣的朋友可以看看源码, 再有就是一个图片重构的方法,防止图片变形。
下面我们说下怎么集成我封装的这个功能吧,挺简单的,首先来看看代码:
- (BOOL)application:(UIApplication *)application didFinishLaunchingWithOptions:(NSDictionary *)launchOptions {

    /* FullScreenAdType 全屏广告
     * LogoAdType 带logo的广告类似网易广告,值得注意的是启动图片必须带logo图
     * ImgUrl  图片url
     */
    LBLaunchImageAdView * adView = [[LBLaunchImageAdView alloc]initWithWindow:self.window andType:LogoAdType andImgUrl:@"http://www.uisheji.com/wp-content/uploads/2013/04/19/app-design-uisheji-ui-icon20121_55.jpg"];

    //各种回调
    adView.clickBlock = ^(NSInteger tag){
        switch (tag) {
            case 1100:{
                NSLog(@"点击广告回调");
                TestViewController *vc = [[TestViewController alloc]init];
                vc.view.backgroundColor = [UIColor whiteColor];
                [self.window.rootViewController presentViewController:vc animated:YES completion:^{

                }];
            }
                break;
            case 1101:
                NSLog(@"点击跳过回调");
                break;
            case 1102:
                NSLog(@"倒计时完成后的回调");
                break;
            default:
                break;
        }

    };

    return YES;
}
首先在AppDelegate.m导入头文件#import "LBLaunchImageAdView.h",然后在didFinishLaunchingWithOptions方法里面初始化一下,最后就是一些点击的回调事件了。到此,讲解完毕,最后丢上效果图和下载地址。
下载地址-------戳这里
转自:http://www.jianshu.com/p/10c35dfc0a4a

