一、安装Locust
安装Locust之前先安装的库:
gevent库:第三方库,gevent为python提供了比较完善的协程支持。使用gevent,可以获得极高的并发性能。
pip install gevent==1.1.2
flask库:Flask是一个使用 Python 编写的轻量级 Web 应用框架。
pip install flask==0.10.1
requests库:用python写过接口测试的朋友应该都不陌生,Requests 是用Python语言编写,基于 urllib,采用 Apache2 Licensed 开源协议的 HTTP 库。它比 urllib 更加方便,可以节约我们大量的工作,完全满足 HTTP 测试需求。
pip install requests==2.10.0
msgpack-python库:比JSON快10倍的序列化包。
pip install msgpack-python==0.4.2
six库:six 提供了一些简单的工具用来封装 Python 2 和 Python 3 之间的差异性。
pip install six==1.10.0
pyzmq库:Pyzmq是zeromq的Python绑定。
pip install pyzmq==15.2.0
安装库的过程中可能会遇到一些报错信息:
ReadTimeoutError: HTTPSConnectionPool(host='pypi.python.org', port=443): Read timed out.
解决方案:
更新pip版本到pip官网下载:https://pypi.python.org/simple/pip/
比如下载pip-9.0.1-py2.py3-none-any.whl
pip install pip-9.0.1-py2.py3-none-any.whl
如果还报错再执行:
pip --default-timeout=100 install -U pip
其他第三方库都安装完成后,接下来再安装locust:
pip install locustio
安装locustio库时可能会报错:
error:command 'gcc' failed with exit status 1
解决方案:yum install gcc python-devel
安装完成后,执行:locust--help
看到如下locust相关命令介绍,说明安装成功。
Usage: locust [options] [LocustClass [LocustClass2 ... ]]
Options:
-h, --help show this help message and exit
-H HOST, --host=HOST Host to load test in the following format:
http://10.21.32.33
--web-host=WEB_HOST Host to bind the web interface to. Defaults to '' (all
interfaces)
-P PORT, --port=PORT, --web-port=PORT
Port on which to run web host
-f LOCUSTFILE, --locustfile=LOCUSTFILE
Python module file to import, e.g. '../other.py'.
Default: locustfile
--master Set locust to run in distributed mode with this
process as master
--slave Set locust to run in distributed mode with this
process as slave
--master-host=MASTER_HOST
Host or IP address of locust master for distributed
load testing. Only used when running with --slave.
Defaults to 127.0.0.1.
--master-port=MASTER_PORT
The port to connect to that is used by the locust
master for distributed load testing. Only used when
running with --slave. Defaults to 5557. Note that
slaves will also connect to the master node on this
port + 1.
--master-bind-host=MASTER_BIND_HOST
Interfaces (hostname, ip) that locust master should
bind to. Only used when running with --master.
Defaults to * (all available interfaces).
--master-bind-port=MASTER_BIND_PORT
Port that locust master should bind to. Only used when
running with --master. Defaults to 5557. Note that
Locust will also use this port + 1, so by default the
master node will bind to 5557 and 5558.
--no-web Disable the web interface, and instead start running
the test immediately. Requires -c and -r to be
specified.
-c NUM_CLIENTS, --clients=NUM_CLIENTS
Number of concurrent clients. Only used together with
--no-web
-r HATCH_RATE, --hatch-rate=HATCH_RATE
The rate per second in which clients are spawned. Only
used together with --no-web
-n NUM_REQUESTS, --num-request=NUM_REQUESTS
Number of requests to perform. Only used together with
--no-web
-L LOGLEVEL, --loglevel=LOGLEVEL
Choose between DEBUG/INFO/WARNING/ERROR/CRITICAL.
Default is INFO.
--logfile=LOGFILE Path to log file. If not set, log will go to
stdout/stderr
--print-stats Print stats in the console
--only-summary Only print the summary stats
-l, --list Show list of possible locust classes and exit
--show-task-ratio print table of the locust classes' task execution
ratio
--show-task-ratio-json
print json data of the locust classes' task execution
ratio
-V, --version show program's version number and exit
二、使用Locust测试淘宝首页
#locust_taobao.py
#!/usr/bin/env python
#-*-coding:utf-8-*-
#author:@TT
from locust import HttpLocust, TaskSet, task
#定义用户行为
class UserBehavior(TaskSet):
@task
def taobao_page(self): #定义一个方法访问淘宝首页
self.client.get("/")
class WebsiteUser(HttpLocust):
task_set = UserBehavior
min_wait = 3000 #用户等待时间下限
max_wait = 5000 #用户等待时间上限
执行:
locust -f locust_taobao.py --host=https://www.taobao.com
提示:Starting web monitor at *.8089
Starting Locust 0.7.5
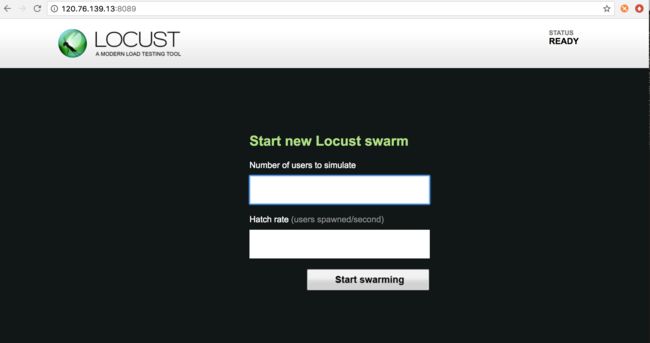
说明已经启动成功,浏览器输入:http://120.76.139.13:8089即可看到设置页面,并监控
Number of users to simulate:设置需要模拟的用户数量,这次只是为了演示,设置为10;
Hatch rate:每秒需要启动的用户数量,这次只是为了演示,设置为2;
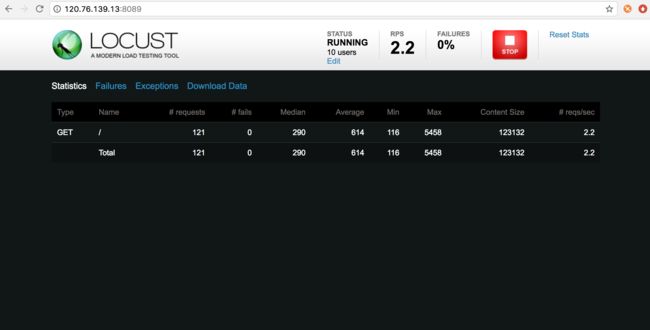
点击『start swarming』,开始了性能测试:
Type:请求的类型;
Name:请求的url或者自定义的统计分组名字;
requests:当前请求的数量;
fails:当前请求失败的数量;
Median:中间值,一半的服务器响应时间高于该值,而另一半的服务器响应时间低于该值(毫秒);
Average:所有请求的平均响应时间(毫秒);
Min:请求最小响应时间(毫秒);
Max:请求最大响应时间(毫秒);
Content Size:单个请求的大小(字节);
reqs/sec:每秒请求的个数;

