Linux系统启动原理及故障排除
centos6系统启动过程及相关配置文件
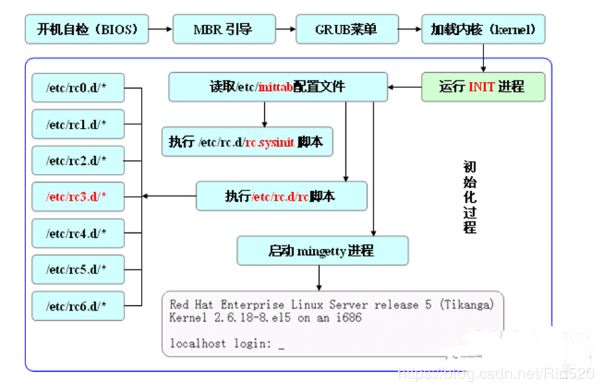
centos6系统启动过程
 读取硬盘中 MBR 的 boot Loader 就是 grub引导
GRUB(GRand Unified Bootloader简称“GRUB”)是一个来自GNU项目的多操作系统启动程序。
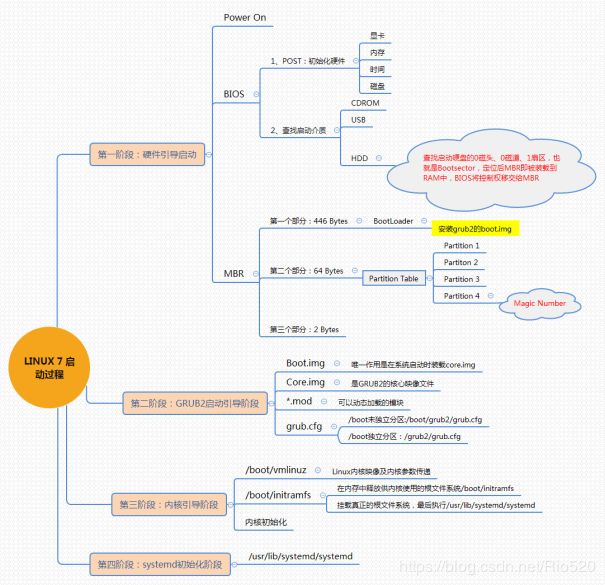
MBR的硬盘的0柱面、0磁头、1扇区称为主引导扇区(也叫主引导记录MBR)。它由三个部分组成,主引导程序、硬盘分区表DPT(Disk Partition table)和硬盘有效标志(55AA)。
互动:为什么MBR分区表,只能分4个主分区?
注:磁盘默认一个扇区大小为:512字节。MBR由以下3部分组成:
第一部分是:主引导程序(boot loader)占446个字节。主引导程序,它负责从活动分区中装载,并运行系统引导程序。
第二部分是Partition table区(分区表),即DPT,占64个字节,硬盘中分区有多少以及每一分区的大小都记在其中。每个分区表项长16个字节,16*4=64字节。为分区项1、分区项2、分区项3、分区项4。64字节只存4个分区表。
第三部分是MBR有效标识位,占2个字节,固定为55AA。如果这个标志位0xAA55,就认为这个是MBR。
所以:16*4+446+2=512
3. 依据 boot loader 的设定,到引导分区加载 Kernel ,Kernel 会开始侦测硬件并加载驱劢程序;
4. 在硬件驱动成功后,Kernel 会主动执行 init 程序,而 init 会取得 run-level 信息;
5. init 执行 /etc/rc.d/rc.sysinit 文件来准备软件执行的作业环境 (如网络、时区等);
6. init 执行 run-level 下各个服务并启动 (script 方式);
7. init 执行开机后自动运行脚本 /etc/rc.d/rc.local 文件;
8. init 执行虚拟终端机控制程序 mingetty 来启动 login 程序,最后就等待用户登入啦;
[root@localhost ~]#vim /boot/grub/grub.conf
default=0    设定默认启动菜单项,当系统中有多个内核时,0表示默认加载第1个,1表示第2个内核
timeout=5    菜单项等待选项时间为5s
splashimage=(hd0,0)/grub/splash.xpm.gz    指明菜单背景图片路径为
hiddenmenu  隐藏菜单
title CentOS (2.6.32-358.6.1.el6.x86_64)  定义菜单项
    root (hd0,0)  grub查找stage2及kernel文件所在设备分区,grub的根
    kernel /vmlinuz-2.6.32-358.6.1.el6.x86_64 ro root=/dev/vg_have/lv_root rd_NO_LUKS LANG=en_US.UTF-8 SYSFONT=latarcyrheb-sun16 crashkernel=auto rhgb quiet      启动的内核
    initrd /initramfs-2.6.32-358.6.1.el6.x86_64.img      内核匹配的ramfs文件
修改系统启动级别:
[root@localhost ~]# vim /etc/inittab
# Default runlevel. The runlevels used are:
#   0 - halt (Do NOT set initdefault to this)
#   1 - Single user mode
#   2 - Multiuser, without NFS (The same as 3, if you do not have networking)
#   3 - Full multiuser mode
#   4 - unused
#   5 - X11
#   6 - reboot (Do NOT set initdefault to this)
#
id:3:initdefault:    #这里决定系统启动的级别
/etc/rc.d/rc.sysinit shell脚本 作用:系统初始化: 像:主机名 和/etc/fstab 都在这里指定了,完成了包括mount分区 激活swap 加载modules等重要的工作.
启动对应级别下的服务如: init 3 级别
/etc/rc.d/rc3.d/(这里的程序/服务S开头的全部开机执行;K开头的表示开机不执行,表明了关机时顺序)
rcn.d (n为1到6) 是对应于不同的runlevel下起不同的服务. 这些目录下都是一些符号连接, 连接到/etc/rc.d/init.d下的一些文件.以S开头的表示要启动, 以K开头的不启动.
第一个字母后面的数值是一个优先级.
[root@localhost ~]# ll /etc/rc.d/rc3.d/ | grep network
lrwxrwxrwx. 1 root root 17 9月 17 23:33 S10network -> …/init.d/network
#表示network是第10个启动的服务。 所以init是顺序启动系统,需要一个一个服务启动成功,再执行下一步操作,启动系统比较慢。而centos7中的systemd可以并行启动多个服务,启动比较快。
[root@localhost ~]# vim /etc/init.d/network

看有chkconfig的那一行, 2345表示在runlevel 2 3 4 5下被启动, 10是为此服务的启动顺序, 90为关机时,关闭此服务的顺序
[root@localhost ~]# chkconfig --list  | grep network

注:该输出结果只显示 SysV 服务,并不包含
原生 systemd 服务。SysV 配置数据
可能被原生 systemd 配置覆盖。

      要列出 systemd 服务,请执行 'systemctl list-unit-files'。
      查看在具体 target 启用的服务请执行
      'systemctl list-dependencies [target]'。

network        	0:关	1:关	2:开	3:开	4:开	5:开	6:关
[root@localhost ~]#  ll /etc/rc.d/rc3.d/ | grep network
lrwxrwxrwx. 1 root root 17 9月  17 23:33 S10network -> ../init.d/network   #开机顺序
[root@localhost ~]# chkconfig network off
[root@localhost ~]#  ll /etc/rc.d/rc3.d/ | grep network
lrwxrwxrwx. 1 root root 17 10月  7 19:40 K90network -> ../init.d/network  #只显示k90关机顺序了
[root@localhost ~]# chkconfig --list network

注:该输出结果只显示 SysV 服务,并不包含
原生 systemd 服务。SysV 配置数据
可能被原生 systemd 配置覆盖。

      要列出 systemd 服务,请执行 'systemctl list-unit-files'。
      查看在具体 target 启用的服务请执行
      'systemctl list-dependencies [target]'。

network        	0:关	1:关	2:关	3:关	4:关	5:关	6:关
所有服务都运行成功后,设置开机自动执行某个命令: /etc/rc.local
[root@localhost ~]#  vim /etc/rc.local
[root@localhost ~]# ll !$
ll /etc/rc.local
lrwxrwxrwx. 1 root root 13 9月  17 23:33 /etc/rc.local -> rc.d/rc.local

[root@localhost ~]# ll /etc/rc.d/rc.local
-rw-r--r--. 1 root root 473 10月  7 19:42 /etc/rc.d/rc.local
运行mingetty命令,打开tty1-6
[root@localhost ~]#ps -axu | grep ming
[root@localhost ~]# runlevel             #查看系统启动级别
N 3
centos7系统启动过程及相关配置文件
centos7系统启动过程
CentOS7引导顺序
- UEFi或BIOS初始化,运行POST开机自检
- 选择启动设备
- 引导装载程序, centos7是grub2
- 加载装载程序的配置文件:/etc/grub.d/ /etc/default/grub /boot/grub2/grub.cfg
- 加载内核选项
- 加载initramfs初始化伪文件系统
- 内核初始化,centos7使用systemd代替init
- 执行initrd.target所有单元,包括挂载/etc/fstab
- 从initramfs根文件系统切换到磁盘根目录
- systemd执行默认target配置,配置文件/etc/systemd/system/default.target
- systemd执行sysinit.target初始化系统及basic.target准备操作系统
- systemd启动multi-user.target下的本机与服务器服务
- systemd执行multi-user.target下的/etc/rc.d/rc.local
- Systemd执行multi-user.target下的getty.target及登录服务
- systemd执行graphical需要的服务
[root@localhost ~]# find /boot/ -name *img*
/boot/grub2/i386-pc/core.img
/boot/grub2/i386-pc/boot.img
/boot/initramfs-0-rescue-d066315b08f84511b875af67943f1746.img
/boot/initramfs-3.10.0-957.el7.x86_64.img
Systemd运行原理-了解一下
Systemd概述:systemd即为system daemon [ˈdi:mən] 守护进程,是linux下的一种init软件,开发目标是提供更优秀的框架以表示系统服务间的依赖关系,并依此实现系统初始化时服务的并行启动,同时达到降低Shell的系统开销的效果,最终代替现在常用的System V与BSD风格init程序。
与多数发行版使用的System V风格init相比,systemd采用了以下新技术: (1) 采用Socket激活式与总线激活式服务,以提高相互依赖的各服务的并行运行性能; (2) 用Cgroups代替PID来追踪进程,以此即使是两次fork之后生成的守护进程也不会脱离systemd的控制。
unit对象:unit表示不同类型的systemd对象,通过配置文件进行标识和配置;文件中主要包含了系统服务、监听socket、保存的系统快照以及其它与init相关的信息
Systemd配置文件:
• /usr/lib/systemd/system/ #这个目录存储每个服务的启动脚本,类似于之前的/etc/init.d/
• /run/systemd/system/ #系统执行过程中所产生的服务脚本,比上面目录优先运行
• /etc/systemd/system/ #管理员建立的执行脚本,类似于/etc/rc.d/rcN.d/Sxx类的功能,比上面目录优先运行
注意: 对于新创建的unit文件,或者修改了的unit文件,要通知systemd重载此配置文件,而后可以选择重启
[root@localhost ~]# systemctl daemon-reload
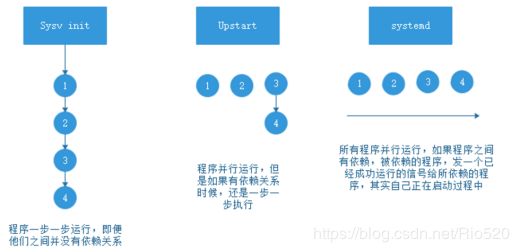
centos5-6-7 3个系统版本启动过程:
CentOS 5: SysV init CentOS 6: Upstart CentOS 7: Systemd
管理系统服务
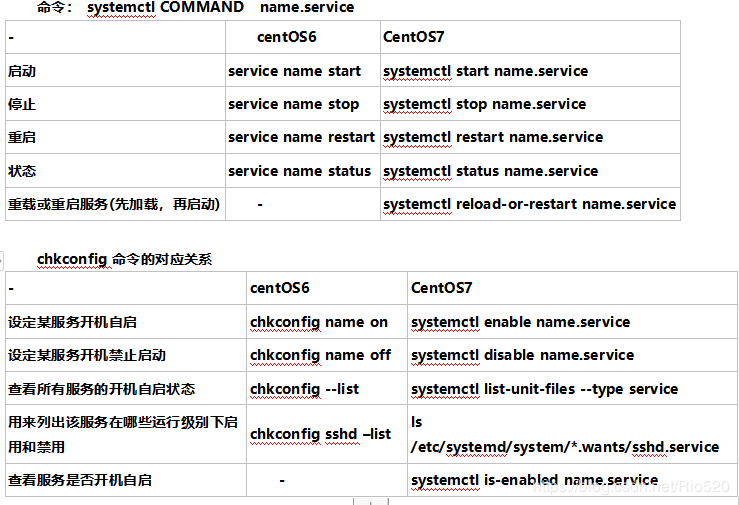
服务状态
 [root@localhost ~]# systemctl list-unit-files    #显示状态
UNIT FILE                                     STATE
proc-sys-fs-binfmt_misc.automount             static
dev-hugepages.mount                           static
dev-mqueue.mount                              static
proc-sys-fs-binfmt_misc.mount                 static
sys-fs-fuse-connections.mount                 static
sys-kernel-config.mount                       static
sys-kernel-debug.mount                        static
tmp.mount                                     disabled
brandbot.path                                 disabled
systemd-ask-password-console.path             static
systemd-ask-password-plymouth.path            static
systemd-ask-password-wall.path                static
session-1.scope                               static
session-2.scope                               static
arp-ethers.service                            disabled
auditd.service                                enabled
[email protected]                               enabled
blk-availability.service                      disabled
brandbot.service                              static
[email protected]                        static
chrony-wait.service                           disabled
chronyd.service                               enabled
console-getty.service                         disabled
console-shell.service                         disabled
[email protected]                      static
cpupower.service                              disabled
crond.service                                 enabled
dbus-org.fedoraproject.FirewallD1.service     enabled
• loaded:Unit配置文件已处理
• active(running):一次或多次持续处理的运行
• active(exited):成功完成一次性的配置
• active(waiting):运行中,等待一个事件
• inactive:不运行
• enabled:开机启动
• disabled:开机不启动
• static:开机不启动,但可被另一个启用的服务激活
运行级别
centos6下Linux运行级别0-6的各自含义
0: 关机模式
1:单用户模式 ,用于破解root密码
2:无网络,支持的多用户模式
3:有网络支持的多用户模式(一般叫字符界面,工作中最长使用的模式)
4:保留,未使用
5:有网络支持,支持图形界面,支持的多用户模式(图形界面)
6:重新引导系统,及重启
可以在不同级别下,设置服务是否随系统启动运行。在centOS7上运行级别的含义已经和之前不同了,已由.target来代替运行级别,我们可以称target为目标态,我们可以通过target定制更符合我们工作运行环境。
[root@localhost ~]# ls /usr/lib/systemd/system/*.target     #查看我们的机器上有多少个target
/usr/lib/systemd/system/basic.target               /usr/lib/systemd/system/poweroff.target
/usr/lib/systemd/system/bluetooth.target           /usr/lib/systemd/system/printer.target
/usr/lib/systemd/system/cryptsetup-pre.target      /usr/lib/systemd/system/reboot.target
/usr/lib/systemd/system/cryptsetup.target          /usr/lib/systemd/system/remote-cryptsetup.target
/usr/lib/systemd/system/ctrl-alt-del.target        /usr/lib/systemd/system/remote-fs-pre.target
/usr/lib/systemd/system/default.target             /usr/lib/systemd/system/remote-fs.target
/usr/lib/systemd/system/emergency.target           /usr/lib/systemd/system/rescue.target
/usr/lib/systemd/system/final.target               /usr/lib/systemd/system/rpcbind.target
/usr/lib/systemd/system/getty-pre.target           /usr/lib/systemd/system/runlevel0.target
/usr/lib/systemd/system/getty.target               /usr/lib/systemd/system/runlevel1.target
/usr/lib/systemd/system/graphical.target           /usr/lib/systemd/system/runlevel2.target
/usr/lib/systemd/system/halt.target                /usr/lib/systemd/system/runlevel3.target
/usr/lib/systemd/system/hibernate.target           /usr/lib/systemd/system/runlevel4.target
/usr/lib/systemd/system/hybrid-sleep.target        /usr/lib/systemd/system/runlevel5.target
/usr/lib/systemd/system/initrd-fs.target           /usr/lib/systemd/system/runlevel6.target
/usr/lib/systemd/system/initrd-root-fs.target      /usr/lib/systemd/system/shutdown.target
/usr/lib/systemd/system/initrd-switch-root.target  /usr/lib/systemd/system/sigpwr.target
/usr/lib/systemd/system/initrd.target              /usr/lib/systemd/system/sleep.target
/usr/lib/systemd/system/iprutils.target            /usr/lib/systemd/system/slices.target
/usr/lib/systemd/system/kexec.target               /usr/lib/systemd/system/smartcard.target
/usr/lib/systemd/system/local-fs-pre.target        /usr/lib/systemd/system/sockets.target
/usr/lib/systemd/system/local-fs.target            /usr/lib/systemd/system/sound.target
/usr/lib/systemd/system/machines.target            /usr/lib/systemd/system/suspend.target
/usr/lib/systemd/system/multi-user.target          /usr/lib/systemd/system/swap.target
/usr/lib/systemd/system/network-online.target      /usr/lib/systemd/system/sysinit.target
/usr/lib/systemd/system/network-pre.target         /usr/lib/systemd/system/system-update.target
/usr/lib/systemd/system/network.target             /usr/lib/systemd/system/timers.target
/usr/lib/systemd/system/nss-lookup.target          /usr/lib/systemd/system/time-sync.target
/usr/lib/systemd/system/nss-user-lookup.target     /usr/lib/systemd/system/umount.target
/usr/lib/systemd/system/paths.target
[root@localhost ~]# ll /usr/lib/systemd/system/*.target   | grep runlevel
lrwxrwxrwx. 1 root root  15 9月  17 23:33 /usr/lib/systemd/system/runlevel0.target -> poweroff.target
lrwxrwxrwx. 1 root root  13 9月  17 23:33 /usr/lib/systemd/system/runlevel1.target -> rescue.target
lrwxrwxrwx. 1 root root  17 9月  17 23:33 /usr/lib/systemd/system/runlevel2.target -> multi-user.target
lrwxrwxrwx. 1 root root  17 9月  17 23:33 /usr/lib/systemd/system/runlevel3.target -> multi-user.target
lrwxrwxrwx. 1 root root  17 9月  17 23:33 /usr/lib/systemd/system/runlevel4.target -> multi-user.target
lrwxrwxrwx. 1 root root  16 9月  17 23:33 /usr/lib/systemd/system/runlevel5.target -> graphical.target
lrwxrwxrwx. 1 root root  13 9月  17 23:33 /usr/lib/systemd/system/runlevel6.target -> reboot.target
注: 发现在runlevel2-4 都是调用multi-user.target这个unit。所以在centos7上runlevel2-4是一个意思
[root@localhost ~]# systemctl list-unit-files --type target #查看所有target的状态
[root@localhost ~]# systemctl list-dependencies runlevel3.target #查看3级别Unit 的所有依赖。Unit 之间存在依赖关系:A 依赖于 B,就意味着 Systemd 在启动 A 的时候,同时会去启动 B。也可以理解也
运行级别下都开启哪些服务
在centOS7上所谓的目标态,其实就是由各种指定的服务和基础target组合而成的。
总结:centos6和7运行级别的变化
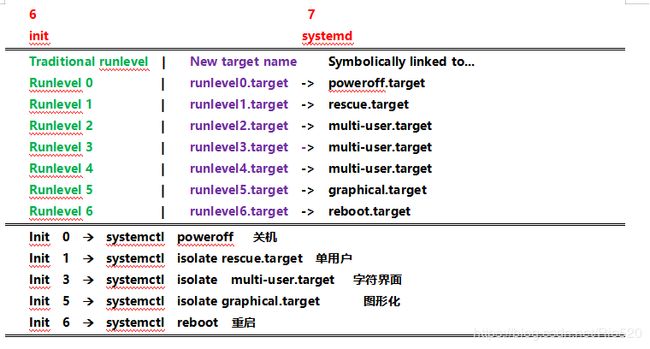
运行级别的切换
1、在centOS6上,我们切换级别使用init,在centOS7上虽然也能使用,但是调用的不再是原来的程序了。centos7使用systemctl isolate name.target来切换target。 # isolate [ˈaɪsəleɪt] 分离,隔离
[root@localhost ~]# init 3   #切换到字符界面
[root@localhost ~]# init 5   #切换到图形界面
centos7切换到字符界面
[root@localhost ~]# systemctl isolate multi-user.target
或
[root@localhost ~]# systemctl isolate runlevel3.target
centos7设置默认系统默认启动级别
systemctl set-default name.target来修改我们的目标态。
我们看一下我们的默认目标态究竟为何物。
[root@localhost ~]# ll /etc/systemd/system/default.target
lrwxrwxrwx. 1 root root 37 9月 17 23:35 /etc/systemd/system/default.target -> /lib/systemd/system/multi-user.target

注:它其实就是创建了一个软链接到指定的target上去了
默认系统启动使用3级别字符界面
[root@localhost ~]# systemctl set-default multi-user.target
Removed symlink /etc/systemd/system/default.target.
Created symlink from /etc/systemd/system/default.target to /usr/lib/systemd/system/multi-user.target.

[root@localhost ~]# ll /etc/systemd/system/default.target
lrwxrwxrwx. 1 root root 41 10月  7 20:10 /etc/systemd/system/default.target -> /usr/lib/systemd/system/multi-user.target
默认系统启动使用5级别图形界面
[root@localhost ~]# systemctl set-default  graphical.target
Removed symlink /etc/systemd/system/default.target.
Created symlink from /etc/systemd/system/default.target to /usr/lib/systemd/system/graphical.target.
在centOS6上,我们的grub文件是/boot/grub/grub.conf
在centOS7使用grub2,配置文件改成/boot/grub2/grub.cfg了,但是功能还是大致一样的都是用于加载内核的,不过在centOS7上设置默认启动项发生了一些变化。
如果我们的系统中有两个内核?改变默认启动的内核顺序?
centos7修改内核启动顺序
 [root@localhost ~]# vim /etc/default/grub
GRUB_TIMEOUT=5   #开机时 grub 默认5秒后启动内核
GRUB_DISTRIBUTOR="$(sed 's, release .*$,,g' /etc/system-release)"
改:GRUB_DEFAULT= saved
为:GRUB_DEFAULT= 1   #这里我们改成1,0代表第一个内核,1代表第二个,以此类推。
UB_DISABLE_SUBMENU=true
GRUB_TERMINAL_OUTPUT="console"
GRUB_CMDLINE_LINUX="crashkernel=auto rhgb quiet net.ifnames=0"
GRUB_DISABLE_RECOVERY="true"
[root@localhost ~]# grub2-mkconfig -o /boot/grub2/grub.cfg  #修改完成后,并没有立即生效,使用此命令来生成grub.cfg文件,我们在下次启动的时候就会默认选择新的默认内核。
[root@localhost ~]# uname -r
3.10.0-957.el7.x86_64
[root@localhost ~]# reboot
[root@localhost ~]# uname -r   #重启成功后, 发现加载的内核变了
centos6修改内核启动顺序-了解
[root@localhost ~]# vim /boot/grub/grub.conf
改:10 default=0
为:10 default=1
[root@localhost ~]# reboot
加密grub防止黑客通过单用户系统破解root密码
如何防止别人恶意通过单用户系统破解root密码,进入系统窃取数据?
给grub加密,不让别人通过grub进入单用户。
基于centos6进行grub加密
[root@localhost ~]# grub-md5-crypt
Password: 123456
Retype password: 123456
1 1 1oaqo5$3d/cmTosm68jTw6o1wCu31
[root@localhost init]# vim /boot/grub/grub.conf
#boot=/dev/sda
default=0
timeout=5
splashimage=(hd0,0)/grub/splash.xpm.gz
hiddenmenu
password --md5 1 1 1oaqo5$3d/cmTosm68jTw6o1wCu31
title Red Hat Enterprise Linux (2.6.32-220.el6.x86_64)
root (hd0,0)
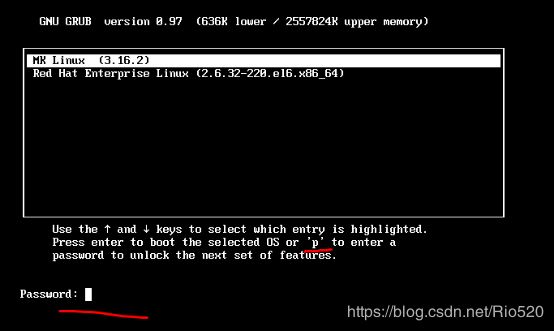
如图:

重启测试:
编辑grub时,需要按下p键,然后输入密码:123456
基于centos7进行grub加密
生成密码
[root@localhost ~]# grub2-mkpasswd-pbkdf2
输入口令: 123456
Reenter password: 123456
PBKDF2 hash of your password is grub.pbkdf2.sha512.10000.8F355BAB512AFB7B8C990A1FEB887B8F2F3F1C54467E9B9F0535F2268E1FFC5F4E8D33F7633D7FBEC25B2039C6D8B3226A90528D4883AB9B99E391A4965D069F.DDE992693BE2C09FFEEC1149120B6B84DBAB933DE6CF7BFF718E1DDC858AB73EE32CFF45EB7F06AC45AA6792E91C4CD09E2B445FC288C47E79F537DBBABAD756
[root@localhost ~]# vim /etc/grub.d/00_header #在最后后面添加如下内容,注alon这个用户名可以换成自己的用户名
cat <
password_pbkdf2 alon grub.pbkdf2.sha512.10000.8F355BAB512AFB7B8C990A1FEB887B8F2F3F1C54467E9B9F0535F2268E1FFC5F4E8D33F7633D7FBEC25B2039C6D8B3226A90528D4883AB9B99E391A4965D069F.DDE992693BE2C09FFEEC1149120B6B84DBAB933DE6CF7BFF718E1DDC858AB73EE32CFF45EB7F06AC45AA6792E91C4CD09E2B445FC288C47E79F537DBBABAD756
EOF
[root@localhost ~]# grub2-mkconfig -o /boot/grub2/grub.cfg #更新grub信息
重启验证:
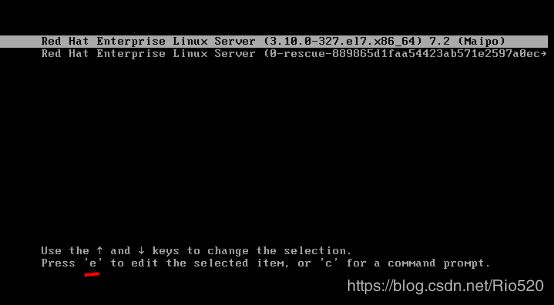
输入用户名和密码
看到可以进入GRUB菜单,就证明你加密成功了
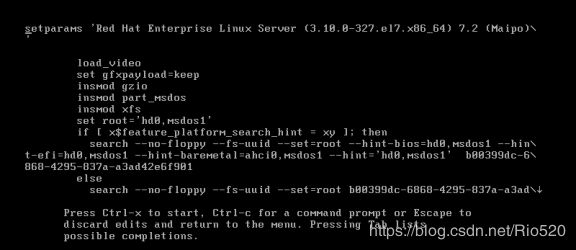
按ctrl-x 开始启动
通过liveCD进入救援模式-重装grub修复损坏的系统
实战:使用系统光盘进入救援模式拯救坏掉的系统
实战场景:当系统坏了,进不去了,还需要把里面的数据复制出来,怎么办?
可以进入救援模式拷贝数据
基于6版本系统进入救援模式
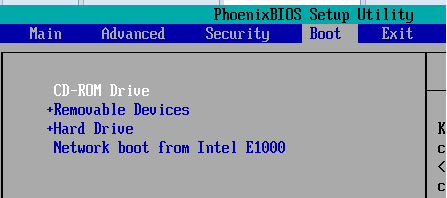
修改BIOS启动顺序,直接以光盘引导系统
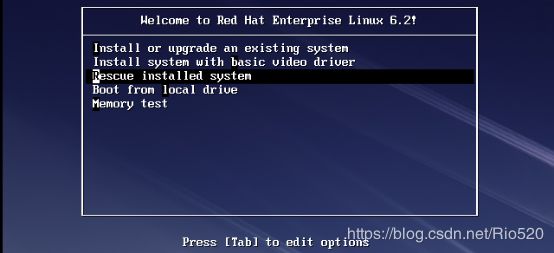
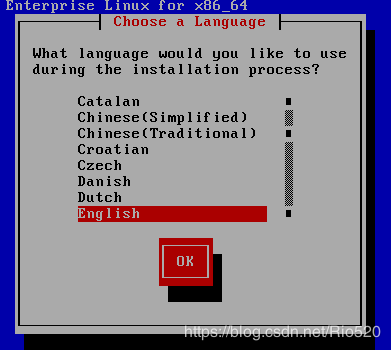
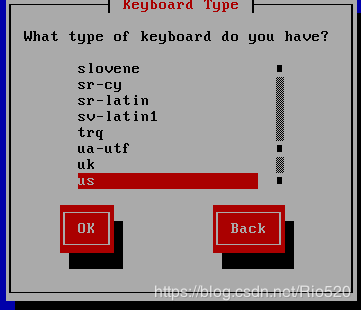
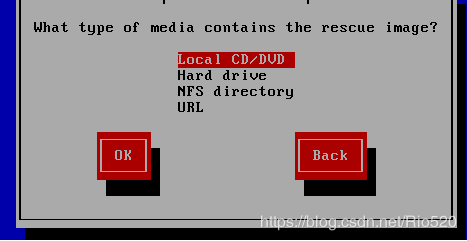
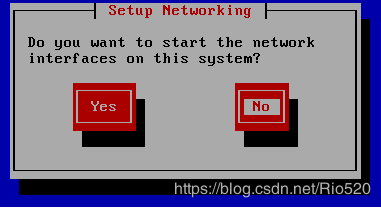
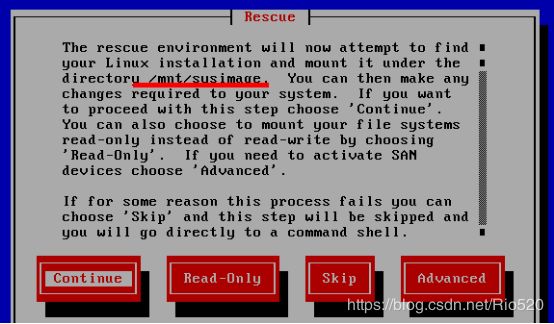
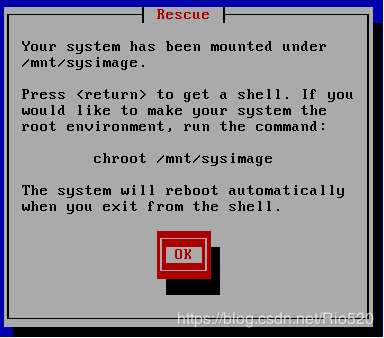
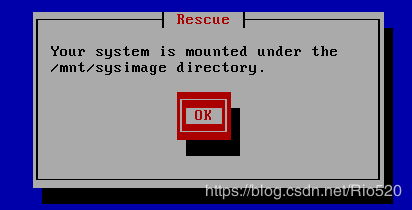
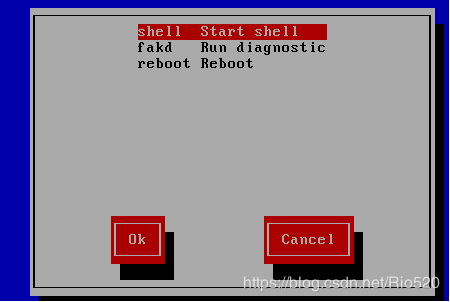

ramfs : 内存文件系统
chroot /mnt/sysimage # 切换文件系统根

当MBR引导记录损坏后-重装grub进行修复
使用场景: 修复MBR,主要出现在安装双系统时,后安装的系统把原来系统的MBR删除了,需要修复。
第一步:在centOS7下破坏硬盘的前446字节:
root@CT731 ~]#dd if=/dev/zero of=/dev/sda bs=1 count=446
446+0 records in
446+0 records out
446 bytes (446 B) copied,0.000758682 s,588 kB/s
第二步:将centos7系统光盘挂载到虚拟机光驱上,,重启计算机,修改BIOS引导顺序,让光盘启动。
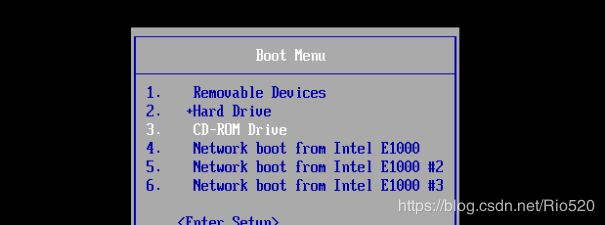
上面有三项,我们选择第三项进入troubleshooting故障排除界面 ,进入第三项后,点击第二项,进入救援模式的centos的系统
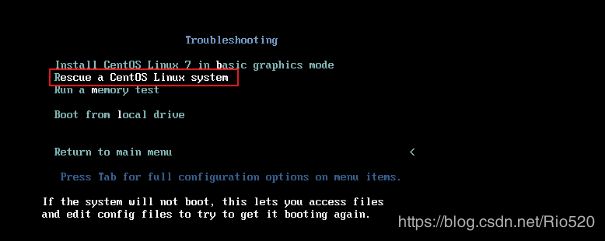
然后我们进入如下模式,选择1,继续进行,接下来,我们就会进入到一个shell模式中,需要切换根目录,进行系统修复:
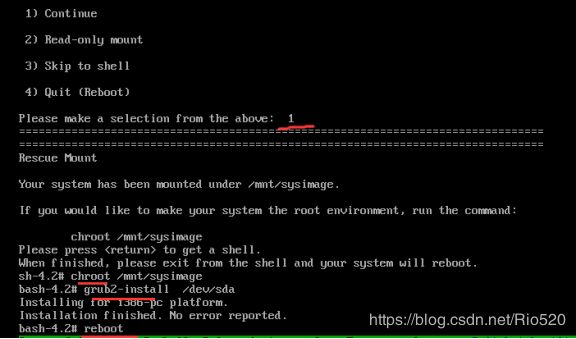
先退一下,再重启,修复完成

在centOS7下误删除grub文件进行修复
第一步:删除grub2
[root@localhost ~]# rm -rf /boot/grub2
第二步,重启计算机
[root@localhost ~]#reboot
进入如下界面:

现在开始解决grub
重启系统,按Esc,进入光盘救援模式,选择第三项,进入光盘救援(前提是挂载光盘)
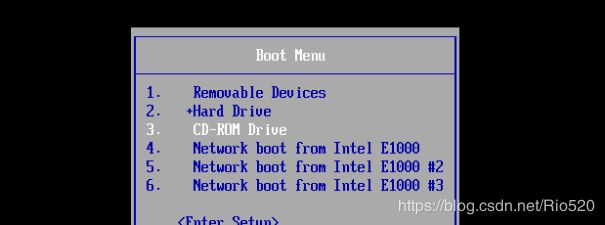
使用live cd 进入救援模式后:
第一步:切根

然后执行命令
grub2-install
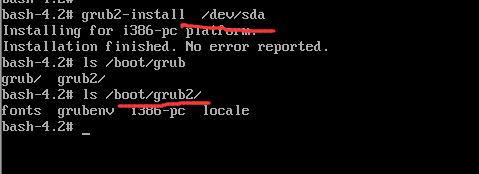
下图中,我们可以看到在grub2文件夹中,还没有grub.cfg文件,接下来,我们需要生成配置文件:
进入到grub2下,

exit然后,重启电脑:

修改BIOS 引导,让硬盘做第一引导
注: centos系统下载链接√ http://vault.centos.org/ 大家可以在这里下载centos6相关的系统。
