Maven私服Nexus安装与使用
文章目录
- Nexus介绍
- 私服的好处
- 使用Docker安装Nexus私服
- 查找Nexus3镜像
- 拉取Nexus3镜像
- 查看镜像
- 运行Nexus容器
- 登录Nexus
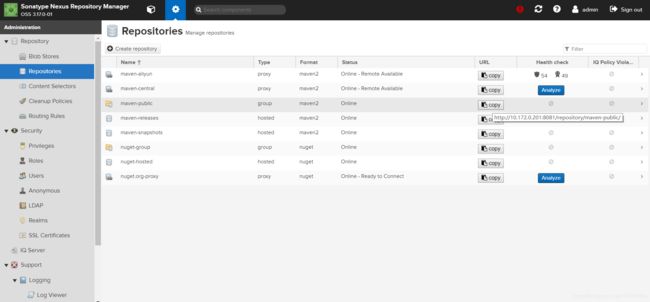
- 默认仓库说明
- 仓库类型
- 配置阿里云公共仓库
- Maven配置使用Nexus私服
- Maven配置私服下载依赖方式
- setting.xml文件配置
- 配置私服镜像
- 配置从私服下载jar包
- pom.xml文件配置
- 配置Maven连接私服打包上传项目
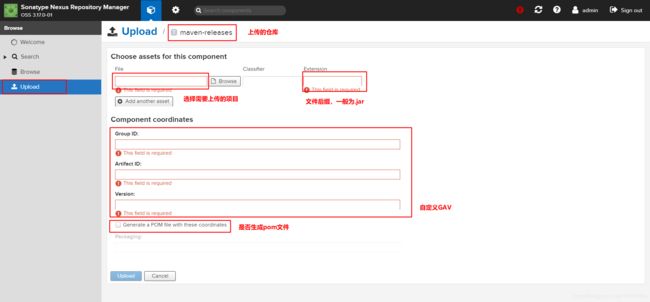
- 上传第三方jar包
Nexus介绍
Nexus是Maven仓库管理器,如果你使用Maven,你可以从Maven中央仓库下载所需要的构件(artifact),但这通常不是一个好的做法,你应该在本地架设一个Maven仓库服务器,在代理远程仓库的同时维护本地仓库,以节省带宽和时间,Nexus就可以满足这样的需要。此外,他还提供了强大的仓库管理功能,构件搜索功能,它基于REST,友好的UI是一个extjs的REST客户端,它占用较少的内存,基于简单文件系统而非数据库。这些优点使其日趋成为最流行的Maven仓库管理器。除此之外,Nexus还可以管理Docker镜像。
注:Maven简介可参考Maven简介
私服的好处
没有私服时:本地仓库没有,则去中央仓库下载
搭建私服后:本地仓库没有,再去私服下载,私服没有,再去中央仓库下载
- 减少网络带宽流量
- 加速Maven构建
- 部署第三方构件
- 提高稳定性、增强控制
- 降低中央仓库的负载
使用Docker安装Nexus私服
注意:请先自行安装Docker
查找Nexus3镜像
docker search nexus3
拉取Nexus3镜像
docker pull sonatype/nexus3
注:最新版本的Nexus3.18在下载依赖时有点问题,建议安装3.17版本的Nexus
具体报错是这样的:Caused by: org.apache.maven.wagon.authorization.AuthorizationException: Not authorized
查看镜像
docker images
运行Nexus容器
#进入/opt目录,创建宿主机挂载目录并设置权限
cd /opt
mkdir nexus-data
chown -R 200 nexus-data
#运行nuxus私服
# -d:后台运行
# -p:将容器内部端口向外映射,第一个参数是宿主机端口,第二个参数容器端口
# --name:命名容器名称
# --restart always在容器退出时总是重启容器
# -v:将容器内配置、日志、数据文件等文件夹挂载到宿主机指定目录
docker run -d --name nexus3 -p 8081:8081 --restart always -v /opt/nexus-data:/nexus-data sonatype/nexus3
如果没有设置权限,运行nexus时就会报如下错误
Warning:  Cannot open log file: ../sonatype-work/nexus3/log/jvm.log
Warning:  Forcing option -XX:LogFile=/tmp/jvm.log
Unable to update instance pid: Unable to create directory /nexus-data/instances
/nexus-data/log/karaf.log (No such file or directory)
Unable to update instance pid: Unable to create directory /nexus-data/instances
mkdir: cannot create directory '../sonatype-work/nexus3/log': Permission denied
mkdir: cannot create directory '../sonatype-work/nexus3/tmp': Permission denied
OpenJDK 64-Bit Server VM warning: Cannot open file ../sonatype-work/nexus3/log/jvm.log due to No such file or directory
登录Nexus
访问web地址:http://ip:8081
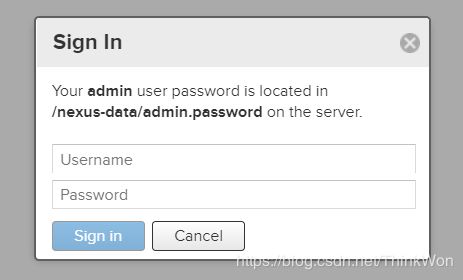
从3.17版本开始默认密码不再是admin123,密码是随机生成。首次登录页面会显示admin用户的密码在/nexus-data/admin.password
注意:我们刚才安装的时候把/nexus-data目录挂载到宿主机的/opt/nexus-data,所以密码在/opt/nexus-data/admin.password
执行命令vim /opt/nexus-data/admin.password,即可查看到如9c3ac7fb-4264-4457-8e48-4aa84c71e7ad这样的密码,然后登录即可。用户名:admin,密码:/opt/nexus-data/admin.password里面的密码
登录后会让用户设置新的密码。这里把用户名和密码设置为admin/admin123
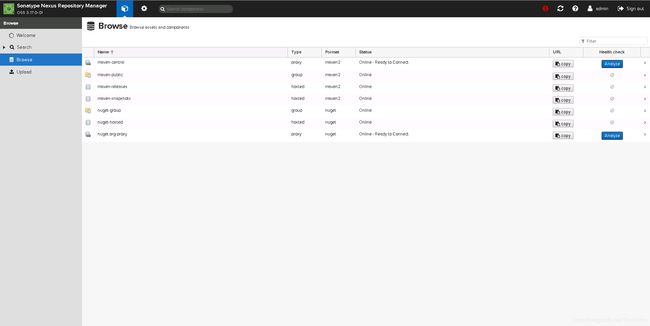
登录后界面如下
默认仓库说明
maven-central:maven中央库,默认从https://repo1.maven.org/maven2/拉取jar
maven-releases:私库发行版jar,初次安装请将Deployment policy设置为Allow redeploy
maven-snapshots:私库快照(调试版本)jar
maven-public:仓库分组,把上面三个仓库组合在一起对外提供服务,在本地maven基础配置settings.xml或项目pom.xml中使用
仓库类型
Group:这是一个仓库聚合的概念,用户仓库地址选择Group的地址,即可访问Group中配置的,用于方便开发人员自己设定的仓库。maven-public就是一个Group类型的仓库,内部设置了多个仓库,访问顺序取决于配置顺序,3.x默认Releases,Snapshots,Central,当然你也可以自己设置。
Hosted:私有仓库,内部项目的发布仓库,专门用来存储我们自己生成的jar文件
3rd party:未发布到公网的第三方jar (3.x去除了)
Snapshots:本地项目的快照仓库
Releases: 本地项目发布的正式版本
Proxy:代理类型,从远程中央仓库中寻找数据的仓库(可以点击对应的仓库的Configuration页签下Remote Storage属性的值即被代理的远程仓库的路径),如可配置阿里云maven仓库
Central:中央仓库
Apache Snapshots:Apache专用快照仓库(3.x去除了)
配置阿里云公共仓库
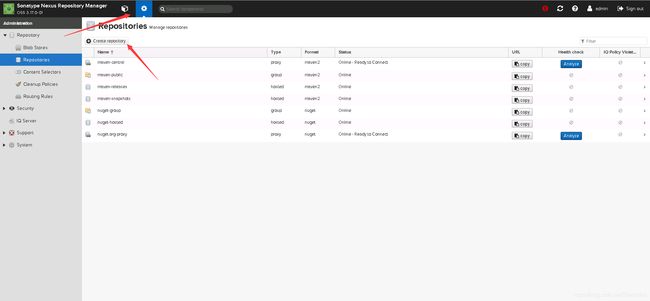
Nexus的maven-group的默认查找方式为:maven-releases --> maven-snapshots --> maven-central,我们在中间再加一个阿里云仓库,加快访问速度。
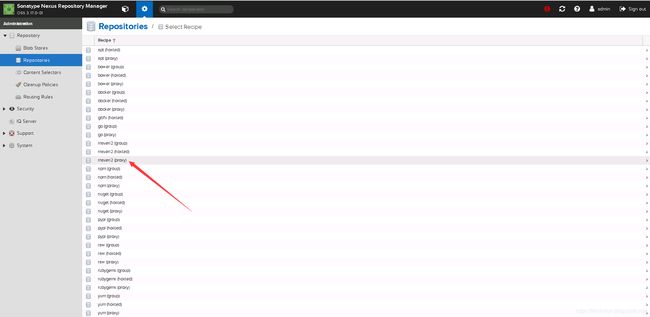
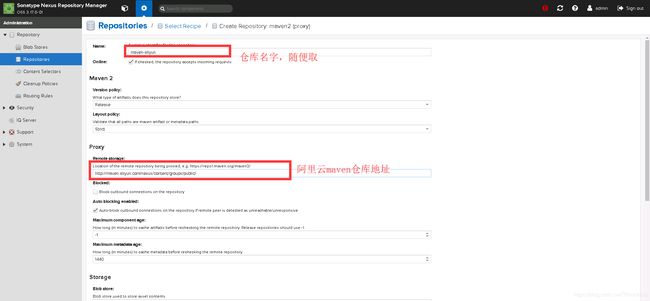
选择proxy类型
信息填写如下
仓库名字:maven-aliyun
阿里云远程maven仓库地址:http://maven.aliyun.com/nexus/content/groups/public/
其他选项:默认即可
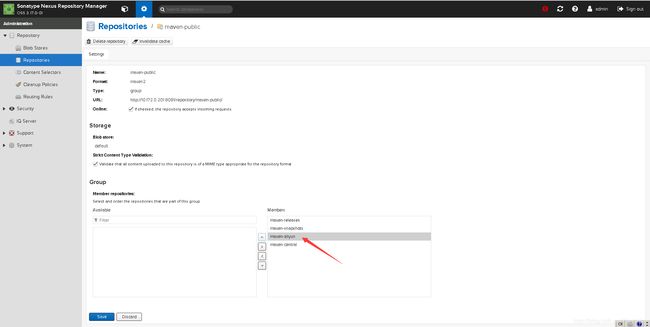
修改maven-public中的仓库引用及顺序:
至此,配置完毕!我们在maven使用maven-public仓库地址的时候,会按照如下顺序访问:本地仓库 --> 私服maven-releases --> 私服maven-snapshots --> 远程阿里云maven仓库 --> 远程中央仓库。
Maven配置使用Nexus私服
Maven配置私服下载依赖方式
maven配置私服下载有两种方式
-
setting.xml:该文件配置的是全局模式
-
pom.xml:该文件的配置的是项目独享模式
若pom.xml和setting.xml同时配置了,以pom.xml为准
setting.xml文件配置
这个时候不需要再配置pom.xml文件,即可使用私服下载jar依赖包
配置私服镜像
<mirrors>
    <mirror>

      <id>nexus-releasesid>

      <mirrorOf>*mirrorOf>

      <url>http://10.172.0.201:8081/repository/maven-public/url>
    mirror>
    <mirror>
      <id>nexus-snapshotsid>
      <mirrorOf>*mirrorOf>
      <url>http://10.172.0.201:8081/repository/maven-snapshots/url>
    mirror>
mirrors>
镜像的URL可以从页面中的copy按钮直接复制
配置从私服下载jar包
<profiles>

    <profile>

        <id>nexusid>
        <repositories>
            <repository>

                <id>nexus-releasesid>

                <url>http://nexus-releasesurl>
                <releases>

                    <enabled>trueenabled>
                releases>
                <snapshots>
                    <enabled>trueenabled>
                snapshots>
            repository>
            <repository>
                <id>nexus-snapshotsid>
                <url>http://nexus-snapshotsurl>
                <releases>
                    <enabled>trueenabled>
                releases>
                <snapshots>
                    <enabled>trueenabled>
                snapshots>
            repository>
        repositories>
        <pluginRepositories>

            <pluginRepository>

                <id>nexus-releasesid>
                <url>http://nexus-releasesurl>
                <releases>
                    <enabled>trueenabled>
                releases>
                <snapshots>
                    <enabled>trueenabled>
                snapshots>
            pluginRepository>
            <pluginRepository>
                <id>nexus-snapshotsid>
                <url>http://nexus-snapshotsurl>
                <releases>
                    <enabled>trueenabled>
                releases>
                <snapshots>
                    <enabled>trueenabled>
                snapshots>
            pluginRepository>
        pluginRepositories>
    profile>

profiles>


<activeProfiles>
    <activeProfile>nexusactiveProfile>
activeProfiles>
pom.xml文件配置
如果你配置了pom.xml,则以pom.xml为准
<repositories>
	<repository>
		<id>maven-nexusid>
		<name>maven-nexusname>
		<url>http://10.172.0.201:8081/repository/maven-public/url>
		<releases>
			<enabled>trueenabled>
		releases>
		<snapshots>
			<enabled>trueenabled>
		snapshots>
	repository>
repositories>
配置Maven连接私服打包上传项目
第一步,修改setting.xml文件,指定releases和snapshots server的用户名和密码
<servers>
	<server>
		<id>releasesid>
		<username>adminusername>
		<password>admin123password>
	server>
	<server>
		<id>snapshotsid>
		<username>adminusername>
		<password>admin123password>
	server>
servers>
第二步,在项目的pom.xml文件中加入distributionManagement节点
注意:repository里的id需要和第一步里的server id名称保持一致
<distributionManagement>
	<repository>
		<id>releasesid>
		<name>Releasesname>
		<url>http://10.172.0.201:8081/repository/maven-releases/url>
	repository>
	<snapshotRepository>
		<id>snapshotsid>
		<name>Snapshotname>
		<url>http://10.172.0.201:8081/repository/maven-snapshots/url>
	snapshotRepository>
distributionManagement>
第三步,执行发布
mvn deploy
登录Nexus,查看对应的仓库已经有相关的依赖包了。
注意以下几点:
- 若项目版本号末尾带有 -SNAPSHOT,则会发布到snapshots快照版本仓库
- 若项目版本号末尾带有 -RELEASES 或什么都不带,则会发布到releases正式版本仓库
