树莓派3b+安装ubuntu18.04 server
1.先下载Ubuntu server
http://cdimage.ubuntu.com/ubuntu/releases/18.04.3/release/ubuntu-18.04.3-preinstalled-server-arm64+raspi3.img.xz
2.下载写入工具
win32diskimager
3.将下载的ubuntu-18.04.3-preinstalled-server-arm64+raspi3.img.xz解压,把解压后的文件用win32diskimager写入到内存卡中
4.把内存卡插入树莓派中,上电
等待两分钟吧,点一下enter键
登录,初始账户及密码
用户名:ubuntu
密码:ubuntu
初次登陆需要修改密码
至此,Ubuntu server安装成功
5.添加root用户
输入命令sudo passwd 给root用户设置密码
输入su命令,切换至root用户
root用户不允许远程登陆,修改一下
令root 允许ssh远程登录
sudo vim /etc/ssh/sshd_config
找到PermitRootLogin without-password 修改为PermitRootLogin yes 或者直接添加PermitRootLogin yes
service ssh restart 重启ssh,即可通过Windows上的ssh工具远程连接树莓派root账户了
6.修改默认源
先备份/etc/apt/sources.list,
cp sources.list sources.list.d1
vi /etc/apt/sources.list
然后把sources.list里面的内容替换为
## Note, this file is written by cloud-init on first boot of an instance
## modifications made here will not survive a re-bundle.
## if you wish to make changes you can:
## a.) add 'apt_preserve_sources_list: true' to /etc/cloud/cloud.cfg
##     or do the same in user-data
## b.) add sources in /etc/apt/sources.list.d
## c.) make changes to template file /etc/cloud/templates/sources.list.tmpl

# See http://help.ubuntu.com/community/UpgradeNotes for how to upgrade to
# newer versions of the distribution.
deb https://mirrors.tuna.tsinghua.edu.cn/ubuntu-ports bionic main restricted
deb-src https://mirrors.tuna.tsinghua.edu.cn/ubuntu-ports bionic main restricted

## Major bug fix updates produced after the final release of the
## distribution.
deb https://mirrors.tuna.tsinghua.edu.cn/ubuntu-ports bionic-updates main restricted
deb-src https://mirrors.tuna.tsinghua.edu.cn/ubuntu-ports bionic-updates main restricted

## N.B. software from this repository is ENTIRELY UNSUPPORTED by the Ubuntu
## team. Also, please note that software in universe WILL NOT receive any
## review or updates from the Ubuntu security team.
deb https://mirrors.tuna.tsinghua.edu.cn/ubuntu-ports bionic universe
deb-src https://mirrors.tuna.tsinghua.edu.cn/ubuntu-ports bionic universe
deb https://mirrors.tuna.tsinghua.edu.cn/ubuntu-ports bionic-updates universe
deb-src https://mirrors.tuna.tsinghua.edu.cn/ubuntu-ports bionic-updates universe

## N.B. software from this repository is ENTIRELY UNSUPPORTED by the Ubuntu
## team, and may not be under a free licence. Please satisfy yourself as to
## your rights to use the software. Also, please note that software in
## multiverse WILL NOT receive any review or updates from the Ubuntu
## security team.
deb https://mirrors.tuna.tsinghua.edu.cn/ubuntu-ports bionic multiverse
deb-src https://mirrors.tuna.tsinghua.edu.cn/ubuntu-ports bionic multiverse
deb https://mirrors.tuna.tsinghua.edu.cn/ubuntu-ports bionic-updates multiverse
deb-src https://mirrors.tuna.tsinghua.edu.cn/ubuntu-ports bionic-updates multiverse

## N.B. software from this repository may not have been tested as
## extensively as that contained in the main release, although it includes
## newer versions of some applications which may provide useful features.
## Also, please note that software in backports WILL NOT receive any review
## or updates from the Ubuntu security team.
deb https://mirrors.tuna.tsinghua.edu.cn/ubuntu-ports bionic-backports main restricted universe multiverse
deb-src https://mirrors.tuna.tsinghua.edu.cn/ubuntu-ports bionic-backports main restricted universe multiverse

deb https://mirrors.tuna.tsinghua.edu.cn/ubuntu-ports bionic-security main restricted
deb-src https://mirrors.tuna.tsinghua.edu.cn/ubuntu-ports bionic-security main restricted
deb https://mirrors.tuna.tsinghua.edu.cn/ubuntu-ports bionic-security universe
deb-src https://mirrors.tuna.tsinghua.edu.cn/ubuntu-ports bionic-security universe
deb https://mirrors.tuna.tsinghua.edu.cn/ubuntu-ports bionic-security multiverse
deb-src https://mirrors.tuna.tsinghua.edu.cn/ubuntu-ports bionic-security multiverse

## Uncomment the following two lines to add software from Canonical's
## 'partner' repository.
## This software is not part of Ubuntu, but is offered by Canonical and the
## respective vendors as a service to Ubuntu users.
# deb http://archive.canonical.com/ubuntu bionic partner
# deb-src http://archive.canonical.com/ubuntu bionic partner
执行sudo apt update
sudo apt upgrade
更新软件
7.安装mysql
参考https://blog.csdn.net/Xiaofeng7s/article/details/91125516
安装mysql后一般都是远程连接使用,但Ubuntu server上的MySQL好像不允许远程连接
,所以需要设置一下
登录进去mysql 输入指令
GRANT ALL PRIVILEGES ON *.* TO 'root'@'%' IDENTIFIED BY 'youpassword' WITH GRANT OPTION;
退出mysql
vi /etc/mysql/my.cnf
加入下列
bind-address=0.0.0.0
然后即可
8.安装java环境
下载64位arm版本的jdk
![]()
(关于上传文件到树莓派上
apt install lrzsz
rz 这时候会弹出对话框,选择需要上传的文件
)
把jdk上传到树莓派中,解压
tar -zxvf xx.tar.gz
修改/etc/profile,在末尾添加
export JAVA_HOME=jdk安装位置
export CLASSPATH=.:${JAVA_HOME}/jre/lib/rt.jar:${JAVA_HOME}/lib/dt.jar:${JAVA_HOME}/lib/tools.jar
export PATH=$PATH:${JAVA_HOME}/bin
然后重新加载一下
source /etc/profile
如上图,成功
9.安装tomcat
上传tar 文件,并解压
进入tomcat安装目录里的conf文件夹,修改server.xml,注意红色部分
connectionTimeout="20000"
redirectPort="8443" />
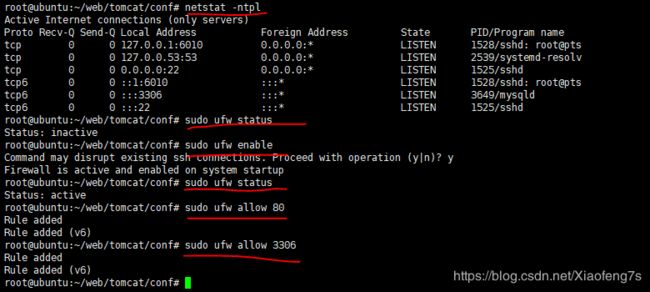
查看网络端口信息:netstat -ntpl
sudo ufw status查看防火墙状态
sudo ufw allow 80添加80端口(把3306 22 端口都加进去)
为了能让tomcat能监听80端口,所以需要以管理员身份启动,但这样会报错,因为找不到java环境位置,所以还需要配置一下
参考:https://blog.csdn.net/to_baidu/article/details/52848620
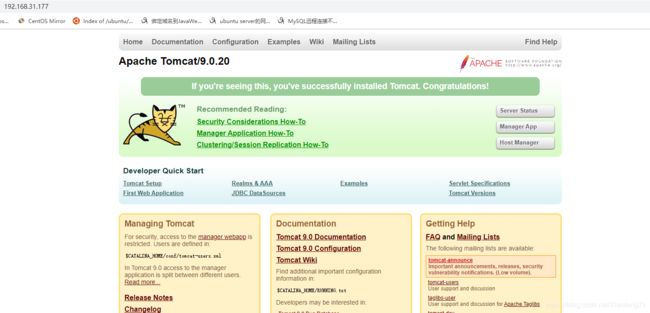
这样就可以通过ip地址直接访问到tomcat了


