SpringSession使用redis存储HttpSession(共享session)
web开发中session一直都是做分布式集群应用时需要解决的一个难题,过去解决这个难题的一般方式是从serlvet容器上解决,而现在使用spring session能够很容易的把session存储到第三方存储容器,框架提供了redis、jvm的map、mongo、gemfire、hazelcast、jdbc等多种存储session的容器的方式。 关于SpringSession更多的介绍以及功能,可以到SpringSession的官网上查看,SpringSession官方网站中也给出了简单快速的入门案例,Spring Session - HttpSession (Quick Start),本文是在此基础上实践后给予总结,以及分享一下我在学习springsession过程中遇到的问题以及解决方法。
Spring Session+Redis案例
1.Redis
Redis版本需要在2.8+以上,本案例使用的是redis-4.0.1.tar.gz(下载地址:redis4.0.1),在CentOS6.5下搭建了redis环境,运行并且监听默认的6379端口。
为了能让redis正常运行起来并且顺利使用客户端连接之前需要注意几点:
启动之前需要修改redis目录下的redis.conf配置文件:
(1)远程主机连接redis服务器
# bind 127.0.0.1 ::1 首先要注释掉这个绑定的ip地址,这是让其他机子能通过网络连接redis的前提。
(2)连接redis服务器的登录问题
# Protected mode is a layer of security protection, in order to avoid that
# Redis instances left open on the internet are accessed and exploited.
#
# When protected mode is on and if:
#
# 1) The server is not binding explicitly to a set of addresses using the
# "bind" directive.
# 2) No password is configured.
#
# The server only accepts connections from clients connecting from the
# IPv4 and IPv6 loopback addresses 127.0.0.1 and ::1, and from Unix domain
# sockets.
#
# By default protected mode is enabled. You should disable it only if
# you are sure you want clients from other hosts to connect to Redis
# even if no authentication is configured, nor a specific set of interfaces
# are explicitly listed using the "bind" directive.
#protected-mode yes
#daemonize no
#requirepass 677714
protected-mode no
这是连接redis服务器时是不是需要登录密码的设置,默认protected-mode的值为true,需要自己加上requirepass作为登录密码。以后客户端连接该服务器时需要使用-a passpw来指定密码验证登录。假设说redis服务器不需要使用密码进行登录,直接将protected-mode设置为false即可。
(3)redis监听端口6379
redis服务端,默认是监听的6379端口,在CentOS安装完redis之后,需要开放6379端口(记得重启才生效)。不然外网主机是连接不上redis服务端的。
启动redis服务端:
默认启动时会自动加载redis目录下的redis.conf配置文件,如果想指定conf文件进行启动,可以直接使用redis-server conf文件路径 命令即可。
开启redis客户端连接一下测试:
2. JAVA API(集成spring session)
springsession 的源代码下载地址:springsession1.31
在里面的sample目录下有spring session的demo,包括官方说明案例的源代码。
(1)使用Maven来够构建项目,依赖的porm.xml文件如下:
	4.0.0
	cn.eboy
	testspringtest
	war
	0.0.1-SNAPSHOT
	testspringtest Maven Webapp
	http://maven.apache.org


			org.springframework.session
			spring-session-data-redis
			1.3.1.RELEASE


			biz.paluch.redis
			lettuce
			3.5.0.Final


			org.springframework
			spring-web
			4.3.4.RELEASE


			javax.servlet
			javax.servlet-api
			3.1.0
			provided


			jstl
			jstl
			1.2


			taglibs
			standard
			1.1.2


			javax.el
			javax.el-api
			2.2.5
			provided


			junit
			junit
			3.8.1
			test


		testspringtest
(2)配置连接redis:
package sample;

import org.springframework.context.annotation.Bean;
import org.springframework.data.redis.connection.lettuce.LettuceConnectionFactory;
import org.springframework.session.data.redis.config.annotation.web.http.EnableRedisHttpSession;

@EnableRedisHttpSession
public class Config {
	@Bean
	public LettuceConnectionFactory connectionFactory() {

		LettuceConnectionFactory lettuceConnectionFactory = new LettuceConnectionFactory();

		lettuceConnectionFactory.setHostName("192.168.199.100");
		lettuceConnectionFactory.setPort(6379);
		//lettuceConnectionFactory.setPassword("677714");
		return lettuceConnectionFactory;
	}
}
(3)java servlet容器初始化
package sample;
import org.springframework.session.web.context.AbstractHttpSessionApplicationInitializer;

public class Initializer extends AbstractHttpSessionApplicationInitializer {
	public Initializer() {
		super(Config.class);
	}
}
main.jsp:
<%@ page language="java" contentType="text/html; charset=utf-8"
pageEncoding="utf-8"%>
<%@ taglib prefix="c" uri="http://java.sun.com/jsp/jstl/core" %>
Session Attributes
Description
This application demonstrates how to use a Redis instance to back your session. Notice that there is no JSESSIONID cookie. We are also able to customize the way of identifying what the requested session id is.
Try it
Attribute Name
Attribute Value
servlet:
package sample;

import java.io.IOException;

import javax.servlet.ServletException;
import javax.servlet.annotation.WebServlet;
import javax.servlet.http.HttpServlet;
import javax.servlet.http.HttpServletRequest;
import javax.servlet.http.HttpServletResponse;

@WebServlet("/testspringtest/session")
public class SessionServlet extends HttpServlet {

	@Override
	protected void doPost(HttpServletRequest req, HttpServletResponse resp)
			throws ServletException, IOException {
		String attributeName = req.getParameter("attributeName");
		String attributeValue = req.getParameter("attributeValue");
		req.getSession().setAttribute(attributeName, attributeValue);
		String path=req.getContextPath() + "/main.jsp";
		resp.sendRedirect(path);
	}

	private static final long serialVersionUID = 2878267318695777395L;
}
(5)测试
1.首先清空redis队列
127.0.0.1:6379> flushall
OK
127.0.0.1:6379> keys *
(empty list or set)
2.运行应用程序创建session
连接redis服务端,查看所有键值对:
[root@centos-server-yzr yzr]# redis-cli -h 127.0.0.1 -p 6379
127.0.0.1:6379> keys *
1) "spring:session:expirations:1502257200000"
2) "spring:session:sessions:expires:9aca7aef-5b8c-40f0-b5c1-78e57c4cab96"
3) "spring:session:sessions:9aca7aef-5b8c-40f0-b5c1-78e57c4cab96"
127.0.0.1:6379>
查看浏览器cookie:
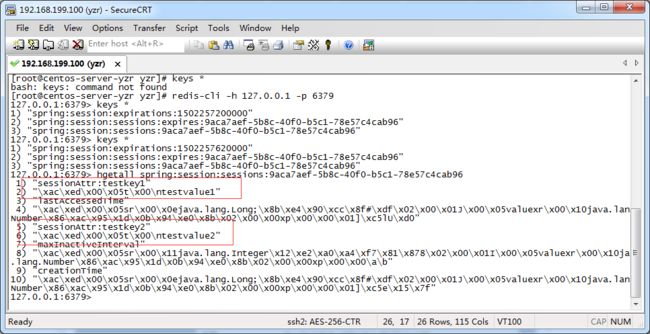
在redis客户端输入HGETALL来查看spring session具体的值:
删除redis中的数据:
$ redis-cli del spring:session:sessions:9aca7aef-5b8c-40f0-b5c1-78e57c4cab96
这样在应用程序中的session也就被删除掉了。
测试总结:HttpSession的数据都保存到redis中去了,这样操作httpsession数据的话直接操作redis就可以了。


