用python爬取微信公众号内容存到txt【2】多线程版本
上一次用的非多线程版本,这次我会把取地址和标题作为一个线程。得到的地址分析取得地址内容作为第二个线程。
然后并行运行。想看上一个版本在我博客。这里是链接。点击打开链接
需要的库:
import requests
import time
from bs4 import BeautifulSoup
import queue
import threading
上一章讲的header头处理网址什么的就不多重复了。
这里主要讲。多线程。我用的是继承方式。比如最少的这个类。
class A(threading.Thread):
    def __init__(self,xx):
        threading.Thread.__init__(self)
        self.xx=xx
    def run(self):
      return
因为python没有new的概念,这里面对对象就是用self来处理。self是每个类里必须的元素,可以用其他代替,如self23,不是固定的,我们统一规定为 self这样大家好理解。
怎么运行呢。看下面
class A(threading.Thread):
    def __init__(self,xx):
        threading.Thread.__init__(self)
        self.xx=xx
    def run(self):
      return
xx=1
t=A(xx)
t.start()
xx是要传递的参数。
t.start()就运行了类A里面的run函数
类A里面的__int__(self)是自己初始化的函数。
xx如果是list,dict等会改变的类型。那么类里面的某些函数改变了xx。xx本身也就会改变,如果传递的xx的类型是numbers,string,等不会改变的类型。
那么类里面的函数改变了值,是不影响本身的。
如果是不可以改变的类型,但是又想在类里面改变它的值,用global 在类里面全局定义一下就好了如:
class A(threading.Thread):
    def __init__(self,xx):
        threading.Thread.__init__(self)
        self.xx=xx
    def run(self):
      global xx
      return
这样外部定义的xx也就可以改变了。
说那么多久是为我们的多线程打基础。
直接上代码好了:
import requests
import time
from bs4 import BeautifulSoup
import queue
import threading
import re
head = {'User-Agent': 'Mozilla/5.0 (Windows NT 6.1; WOW64) AppleWebKit/537.36 (KHTML, like Gecko) Chrome/53.0.2785.104 Safari/537.36 Core/1.53.4882.400 QQBrowser/9.7.13039.400',
    'Connection': 'keep-alive'}
key='互联网'
pagecode='&page='
qulqueue=queue.Queue()
biaoji=int(1)
class getnul(threading.Thread):
    def __init__(self,qulqueue):
        threading.Thread.__init__(self)
        self.qulqueue=qulqueue
    def run(self):
      global key,pagecode,head,biaoji

      for page in range(1,2):
          fh=open("C:/Users/Administrator/python-text/book_example/微信/微信第{}页.txt".format(page),"w")
          try:
              print("正在输入第{}页".format(page))
              urls = "http://weixin.sogou.com/weixin?type=2&query="+str(key)+str(pagecode)+str(page)
              aaa=requests.get(url = urls,headers=head).text
              data = BeautifulSoup(aaa,"lxml")
              sp=data.find_all("div",{'class':'txt-box'})
              for data1 in sp:
                    neirong=data1.find_all("a")[0]
                    wzhi1=neirong.get('href')
                    wzhi1=wzhi1.replace("amp;",'')
                    self.qulqueue.put(wzhi1)
                    self.qulqueue.task_done()
                    biaoji=biaoji+1
                    net1=data1.find_all("a")[0].text
                    data3=net1+'\n'+wzhi1+'\n\n\n\n'
                    fh.write(data3)
              print("第{}页输入成功".format(page))

          except:
                print("第{}页输入失败,再来一次。".format(page))
                page=page-1
          fh.close
          time.sleep(4)
      print("over1")
      return

class getneirong(threading.Thread):
    def __init__(self,qulqueue):
        threading.Thread.__init__(self)
        self.qulqueue=qulqueue
    def run(self):
        global biaoji,head
        while(True):
            time.sleep(1)
            #print(biaoji==0)
            #print(self.qulqueue.empty())
            while(True):
                net=self.qulqueue.get()
                aaa=requests.get(url = net,headers=head).text
                data = BeautifulSoup(aaa,"lxml")
                sp=data.find_all("div",{'id':'img-content'})
                title=sp[0].find_all("h2")
                biaoti1=title[0].text
                biaoda=">(.*?)<"
                biaoti=re.compile(biaoda).findall(biaoti1)[0]
                biaoti=biaoti.replace(" ",'')
                biaoti=biaoti.replace("\n",'')
                biaoti=biaoti.replace("\r",'')
                biaoti=biaoti.replace("?",'')
                novel=sp[0].text
                fh=open("C:/Users/Administrator/python-text/book_example/微信/{}.txt".format(biaoti),'wb')
                aa=biaoti+'\n'*2+novel
                fh.write(aa.encode("utf-8"))
                print("{}已经载入".format(biaoti))
                biaoji=biaoji-1
                fh.close
                time.sleep(1)
                if(biaoji==1):
                    print('over2')
                    return
        return
t1=getnul(qulqueue)
t2=getneirong(qulqueue)
t1.setDaemon(False)
t2.setDaemon(False)
t1.start()
t2.start()
t1.join()
t2.join()
print('overall')
其中有用到函数库quque。是为了让数据更好传递,我感觉相当于堆栈
如:
A=queue.Queue() #初始化
A.put("asd") #开始放入asd
A.task_done #放入成功
A.put("zxc") #开始放入zxc
A.task_done #放入成功
xx=A.get() #
yy=A.get() #
print(xx) #asd
print(yy) #zxc
就是这样的用法。
其他的处理就是为了数据不出错的保存。
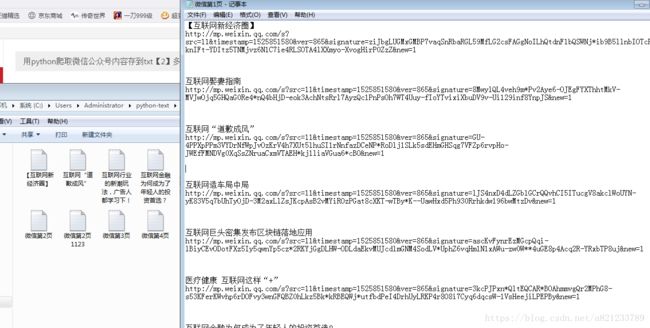
最后上运行效果:
其中网站内容我就随便的爬了一下。多了很多不需要的,但是我就不继续过滤了,有兴趣的处理一下。
代码可能也有问题。
我也正在学有什么问题的可以一起讨论讨论。


