从Filebeat到Logstash再到Elasticsearch,如何搭建ELK 日志平台
本文系作者本人原创,如需转载,请务必写明出处,谢谢!
一,背景
对于分布式系统,特别是基于容器的微服务系统,详细的系统日志和日志数据的实时收集和传输到集中平台是极其有必要的。主要基于两个原因,一是日志数据不能随容器的切换而丢失(当然也可以将日志数据存于持久存储层,但这种架构可能违背微服务自主和自助的设计原则),二是分布式的系统架构分散复杂,更加有必要对任何一个环节进行及时的监控。
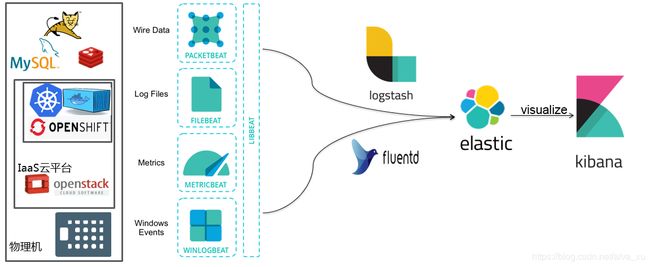
目前常用的日志平台架构如下,应用端采用各种beat采集数据,服务器端用logstash与之对接,存入elatic数据库中,然后通过kibana来编制报表展示监控结果,见下图所示。当然,在beat与logstash 之间,为了增加数据传输的可靠性和及时性,还可采用kafaka消息传输软件。
这里简单介绍一下各种beat的作用
1.Packetbeat:是一个网络数据包分析器,用于监控、收集网络流量信息,Packetbeat嗅探服务器之间的流量,解析应用层协议,并关联到消息的处理, 其支 持 ICMP (v4 and v6)、DNS、HTTP、Mysql、PostgreSQL、Redis、 MongoDB、Memcache等协议;
2. Filebeat:用于监控、收集服务器日志文件,其已取代 logstash forwarder;
3.Metricbeat:可定期获取外部系统的监控指标信息,其可以监控、收集Apache、HAProxy、MongoDB、MySQL、Nginx、PostgreSQL、 Redis、System、Zookeeper等服务;
4.Winlogbeat:用于监控、收集Windows系统的日志信息;
5. Create your own Beat:自定义beat ,如果上面的指标不能满足需求,elasticsarch鼓励开发者 使用go语言,扩展实现自定义的beats,只需要按照模板,实现监控的输入,日志,输出等即可。
其他组件的作用如下:
- Elasticsearch是个开源分布式搜索引擎,它的特点有:分布式,零配置,自动发现,索引自动分片,索引副本机制,restful风格接口,多数据源,自动搜索负载等。
- Logstash是一个完全开源的工具,他可以对你的日志进行收集、过滤,并将其输送给Elasticsearch存储供以后使用(如,搜索)。
- Kibana 也是一个开源和免费的工具,它可以为 Logstash 和 ElasticSearch 提供日志分析友好的 Web 界面,可以帮助您汇总、分析和搜索重要数据日志。
本文介绍本人在自己的个人电脑上是如何实现filebeat-logstash-elastic search-kibana 的
二,环境准备
1,一台win7笔记本电脑,安装了sts,用springboot编写运行了基于Springcloud框架的一个微服务service-hi,在此机器上需要安装配置运行filebeat,以实时采集应用日志。
2,在win7上虚拟出一台redhat服务器,虚机网络配置可参见本人写的博客如何配NAT和hostonly网卡使虚机既能上网又能互相通讯。安装在该虚机上需安装配置运行logstash,elastic search,kibana 。
三,各个软件的安装配置和运行
以下步骤请参考官方文档 Filebeat Reference [6.5] » Getting Started With Filebeat
https://www.elastic.co/guide/en/beats/filebeat/current/filebeat-getting-started.html
1.filebeat在win7 pc机上的安装配置运行
(1)Download the Filebeat Windows zip file from the downloads page.
(2)Extract the contents of the zip file into D:\Program Files.
(3)Rename the filebeat-
目录如下,我没有改名
D:\Program Files\filebeat-5.6.4-windows-x86_64
(4)Open a PowerShell prompt as an Administrator (right-click the PowerShell icon and select Run As Administrator). If you are running Windows XP, you may need to download and install PowerShell.
(5)From the PowerShell prompt, run the following commands to install Filebeat as a Windows service:
PowerShell.exe -ExecutionPolicy UnRestricted -File .\install-service-filebeat.ps1
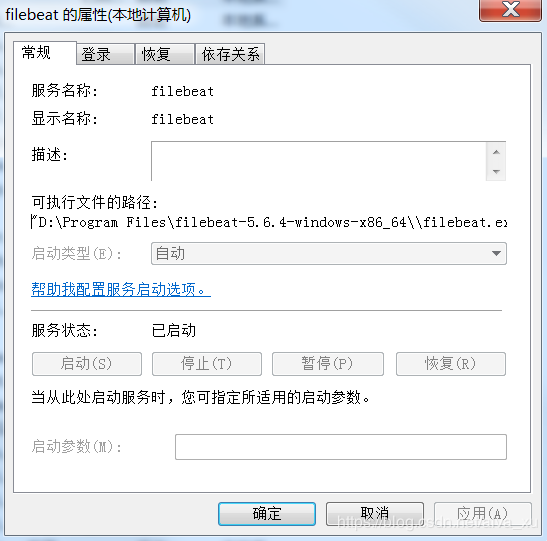
(6)查看windows的服务,可以看到filebeat 已经作为一个 service在运行。
(7)测试filebeat是否安装成功
D:\Program Files\filebeat-5.6.4-windows-x86_64>powershell
Windows PowerShell
版权所有 (C) 2009 Microsoft Corporation。保留所有权利。

PS D:\Program Files\filebeat-5.6.4-windows-x86_64> ./filebeat -configtest -e
2018/11/28 02:29:18.340434 beat.go:297: INFO Home path: [D:\Program Files\filebeat-5.6.4-windows-x86_64] Config path: [D:\Program Files\filebeat-5.6.4
-windows-x86_64] Data path: [D:\Program Files\filebeat-5.6.4-windows-x86_64\data] Logs path: [D:\Program Files\filebeat-5.6.4-windows-x86_64\logs]
2018/11/28 02:29:18.340934 beat.go:192: INFO Setup Beat: filebeat; Version: 5.6.4
2018/11/28 02:29:18.340434 metrics.go:23: INFO Metrics logging every 30s
2018/11/28 02:29:18.340934 logstash.go:91: INFO Max Retries set to: 3
2018/11/28 02:29:18.341434 outputs.go:108: INFO Activated logstash as output plugin.
2018/11/28 02:29:18.341434 publish.go:300: INFO Publisher name: cnsvwA090401609
2018/11/28 02:29:18.361434 async.go:63: INFO Flush Interval set to: 1s
2018/11/28 02:29:18.362434 async.go:64: INFO Max Bulk Size set to: 2048
Config OK
PS D:\Program Files\filebeat-5.6.4-windows-x86_64>
(8)修改配置文件filebeat.yml(filebeat在安装目录下),指定filebeat的input 和output 。有关filebeat.yml配置详解可参考https://www.cnblogs.com/zlslch/p/6622079.html
- input_type: log

  # Paths that should be crawled and fetched. Glob based paths.
  paths:
    #- /var/log/*.log
    #- E:\WorkSpace\Spring_Cloud\service-feign-hystrix\build\*.json
    - E:\WorkSpace\Spring_Cloud\service-hi\build\*.json
#----------------------------- Logstash output --------------------------------
output.logstash:
  # The Logstash hosts
  #hosts: ["localhost:5044"]
  hosts: ["192.168.122.10:9250"]
filebeat将收集E:\WorkSpace\Spring_Cloud\service-hi\build\*.json目录的json格式的log数据,并输出到地址为192.168.122.10的我的虚机redhat上,输出端口为9250.
(9)重启filebeat服务
可以在 PowerShell 窗口中通过以下几个命令来查看、启用以及停止 filebeat 服务:
- 查看 filebeat 服务状态:Get-Service filebeat
- 启动 filebeat 服务:Start-Service filebeat
- 停止 filebeat 服务:Stop-Service filebeat
PS D:\Program Files\filebeat-5.6.4-windows-x86_64> Get-Service filebeat

Status   Name               DisplayName
------   ----               -----------
Running  filebeat           filebeat
(10)启动STS下service-hi微服务应用,其log输出到E:\WorkSpace\Spring_Cloud\service-hi\build\*.json
- 以下是service-hi 的application.yml 配置,
注意log的级别
root: INFO
org.springframework.cloud.sleuth: DEBUG
server:
  port: 8081
spring:
  application:
    name: service-hi
#  zipkin:
#    base-url: http://localhost:9411
#  rabbitmq:
#    host: localhost
#    port: 5672
#    username: guest
#    password: guest
  sleuth:
    sampler:
      percentage: 1.0
logging:
  level:
    root: INFO
    org.springframework.cloud.sleuth: DEBUG

eureka:
  client:
    serviceUrl:
defaultZone: http://localhost:8761/eureka/- 以下是service-hi 的logback-spring.xml,用于配置该服务的log机制,注意最后对于log输出的配置,将关于org.springframework.cloud.sleuth: DEBUG的日志输出到Jasonfile里,也就是 E:\WorkSpace\Spring_Cloud\service-hi\build\*.json 里
      DEBUG


      ${CONSOLE_LOG_PATTERN}
      utf8


    ${LOG_FILE}

      ${LOG_FILE}.%d{yyyy-MM-dd}.gz
      7


      ${CONSOLE_LOG_PATTERN}
      utf8


    ${LOG_FILE}.json

      ${LOG_FILE}.json.%d{yyyy-MM-dd}.gz
      7


          UTC


            {
              "severity": "%level",
              "service": "${springAppName:-}",
              "trace": "%X{X-B3-TraceId:-}",
              "span": "%X{X-B3-SpanId:-}",
              "parent": "%X{X-B3-ParentSpanId:-}",
              "exportable": "%X{X-Span-Export:-}",
              "pid": "${PID:-}",
              "thread": "%thread",
              "class": "%logger{40}",
              "rest": "%message"
            }


  	192.168.122.10:9250


  	192.168.122.10:9250


          UTC


            {
              "severity": "%level",
              "service": "${springAppName:-}",
              "trace": "%X{X-B3-TraceId:-}",
              "span": "%X{X-B3-SpanId:-}",
              "parent": "%X{X-B3-ParentSpanId:-}",
              "exportable": "%X{X-Span-Export:-}",
              "pid": "${PID:-}",
              "thread": "%thread",
              "class": "%logger{40}",
              "rest": "%message"
            }
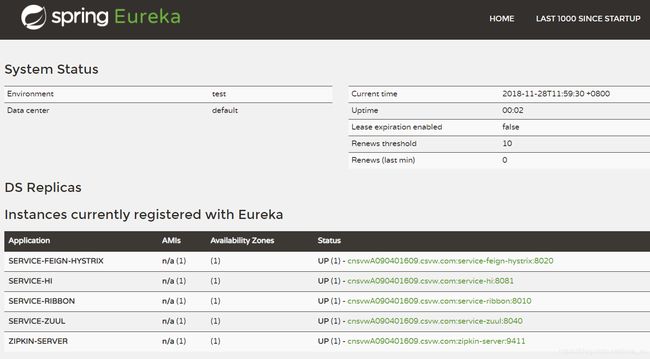
启动service-hi微服务,查看Eureka server,可以看到相应服务都已经起来。(这里是我的测试,大家也可以拿自己的程序来测试)
查看目录,可以看到修改日期为当前日期,说明日志文件有内容增加
查看filebeat的日志文件,D:\Program Files\filebeat-5.6.4-windows-x86_64\logs\filebeat,可以看出filebeat与logstash服务器尚未连接成功,我们需要安装启动logstash
2018-11-28T15:04:52+08:00 ERR Connecting error publishing events (retrying): dial tcp 192.168.122.10:9250: connectex: No connection could be made because the target machine actively refused it.
2018-11-28T15:04:54+08:00 INFO No non-zero metrics in the last 30s
2018-11-28T15:05:24+08:00 INFO No non-zero metrics in the last 30s
2018-11-28T15:05:53+08:00 ERR Connecting error publishing events (retrying): dial tcp 192.168.122.10:9250: connectex: No connection could be made because the target machine actively refused it.
2018-11-28T15:05:54+08:00 INFO No non-zero metrics in the last 30s
2018-11-28T15:06:24+08:00 INFO No non-zero metrics in the last 30s
2.在 redhat虚机上安装配置运行logstash
(1)在https://www.elastic.co/downloads 下载logstash软件,本人下载了logstash-5.6.1.tar.gz
(2)用root用户登录,将其解压到 /usr/local下,并对该目录所有文件赋权给用户(我的用户为xuweihua)
chown xuweihua:xuweihua /usr/local/logstash-5.6.1 -R
drwxr-xr-x. 13 xuweihua xuweihua 4096 Sep 30 2017 logstash-5.6.1
(3)配置logstash,修改config目录下的配置文件filebeat.conf,各个参数如何配置,参见配置文件中提到的网站
https://www.elastic.co/guide/en/logstash/current/plugins-inputs-log4j.html
# For detail structure of this file
# Set: https://www.elastic.co/guide/en/logstash/current/configuration-file-structure.html
input {
  # For detail config for log4j as input,
  # See: https://www.elastic.co/guide/en/logstash/current/plugins-inputs-log4j.html
  beats {
##host:port就是filebeat配置文件中的output的内容,这里其实把logstash作为服务,开启9250端口接收logback发出的消息
    port => 9250
    codec => json
  }
}
filter {
  #Only matched data are send to output.
  grok {
    match => { "message" => "%{TIMESTAMP_ISO8601:timestamp}\s+%{LOGLEVEL:severity}\s+\[%{DATA:service},%{DATA:trace},%{DATA:span},%{DATA:exportable}\]\s+%{DATA:pid}---\s+\[%{DATA:thread}\]\s+%{DATA:class}\s+:\s+%{GREEDYDATA:rest}" }
  }
}
output {
  # For detail config for elasticsearch as output,
  # See: https://www.elastic.co/guide/en/logstash/current/plugins-outputs-elasticsearch.html
  elasticsearch {
    action => "index"          #The operation on ES
    hosts  => "redhatserver:9200"   #ElasticSearch host, can be array.
    index  => "logback"         #The index to write data to.
  }
 #stdout { codec => json_lines }
 stdout { codec => rubydebug }
}
基本意思就是filebeat 把数据传到logstash 服务器的9250端口,logstash把数据过滤后传给主机名为redhatserver、端口号为9200的elasticsearch服务器
(4)运行logstash
[xuweihua@xuwhredhat logstash-5.6.1]$ bin/logstash -f config/filebeat.conf
Sending Logstash's logs to /usr/local/logstash-5.6.1/logs which is now configured via log4j2.properties
[2018-11-28T15:52:03,381][INFO ][logstash.modules.scaffold] Initializing module {:module_name=>"fb_apache", :directory=>"/usr/local/logstash-5.6.1/modules/fb_apache/configuration"}
[2018-11-28T15:52:03,385][INFO ][logstash.modules.scaffold] Initializing module {:module_name=>"netflow", :directory=>"/usr/local/logstash-5.6.1/modules/netflow/configuration"}
[2018-11-28T15:52:05,141][INFO ][logstash.outputs.elasticsearch] Elasticsearch pool URLs updated {:changes=>{:removed=>[], :added=>[http://redhatserver:9200/]}}
[2018-11-28T15:52:05,144][INFO ][logstash.outputs.elasticsearch] Running health check to see if an Elasticsearch connection is working {:healthcheck_url=>http://redhatserver:9200/, :path=>"/"}
[2018-11-28T15:52:05,337][WARN ][logstash.outputs.elasticsearch] Restored connection to ES instance {:url=>"http://redhatserver:9200/"}
[2018-11-28T15:52:05,338][INFO ][logstash.outputs.elasticsearch] Using mapping template from {:path=>nil}
[2018-11-28T15:52:05,454][INFO ][logstash.outputs.elasticsearch] Attempting to install template {:manage_template=>{"template"=>"logstash-*", "version"=>50001, "settings"=>{"index.refresh_interval"=>"5s"}, "mappings"=>{"_default_"=>{"_all"=>{"enabled"=>true, "norms"=>false}, "dynamic_templates"=>[{"message_field"=>{"path_match"=>"message", "match_mapping_type"=>"string", "mapping"=>{"type"=>"text", "norms"=>false}}}, {"string_fields"=>{"match"=>"*", "match_mapping_type"=>"string", "mapping"=>{"type"=>"text", "norms"=>false, "fields"=>{"keyword"=>{"type"=>"keyword", "ignore_above"=>256}}}}}], "properties"=>{"@timestamp"=>{"type"=>"date", "include_in_all"=>false}, "@version"=>{"type"=>"keyword", "include_in_all"=>false}, "geoip"=>{"dynamic"=>true, "properties"=>{"ip"=>{"type"=>"ip"}, "location"=>{"type"=>"geo_point"}, "latitude"=>{"type"=>"half_float"}, "longitude"=>{"type"=>"half_float"}}}}}}}}
[2018-11-28T15:52:05,470][INFO ][logstash.outputs.elasticsearch] New Elasticsearch output {:class=>"LogStash::Outputs::ElasticSearch", :hosts=>["//redhatserver:9200"]}
[2018-11-28T15:52:05,637][INFO ][logstash.pipeline        ] Starting pipeline {"id"=>"main", "pipeline.workers"=>2, "pipeline.batch.size"=>125, "pipeline.batch.delay"=>5, "pipeline.max_inflight"=>250}
[2018-11-28T15:52:06,372][INFO ][logstash.inputs.beats    ] Beats inputs: Starting input listener {:address=>"0.0.0.0:9250"}
[2018-11-28T15:52:06,585][INFO ][logstash.pipeline        ] Pipeline main started
[2018-11-28T15:52:06,639][INFO ][org.logstash.beats.Server] Starting server on port: 9250
[2018-11-28T15:52:06,825][INFO ][logstash.agent           ] Successfully started Logstash API endpoint {:port=>9600}
此时win7机器上filebeat的日志文件也显示了与logstash连接成功(由于没配时间同步,redhat虚机和win7机器时间上差了几分钟)
018-11-28T15:59:52+08:00 INFO Harvester started for file: E:\WorkSpace\Spring_Cloud\service-feign-hystrix\build\service-feign-hystrix.json
2018-11-28T15:59:54+08:00 INFO Non-zero metrics in the last 30s: filebeat.harvester.open_files=1 filebeat.harvester.running=1 filebeat.harvester.started=1 libbeat.logstash.call_count.PublishEvents=1 libbeat.logstash.publish.read_bytes=6 libbeat.logstash.publish.write_bytes=32574 libbeat.logstash.published_and_acked_events=609 publish.events=614 registrar.states.cleanup=1 registrar.states.current=1 registrar.states.update=614 registrar.writes=3
2018-11-28T16:00:24+08:00 INFO Non-zero metrics in the last 30s: libbeat.logstash.call_count.PublishEvents=1 libbeat.lo
当service-hi 进行业务操作,产生log时,logstash服务器的console就会显示如下信息
{
      "severity" => "DEBUG",
        "parent" => "",
          "rest" => "Received a request to uri [/hi] that should not be sampled [false]",
        "offset" => 93226,
    "input_type" => "log",
           "pid" => "26416",
        "thread" => "http-nio-8081-exec-2",
        "source" => "E:\\WorkSpace\\Spring_Cloud\\service-hi\\build\\service-hi.json",
          "type" => "log",
          "tags" => [
        [0] "beats_input_codec_json_applied",
        [1] "_grokparsefailure"
    ],
         "trace" => "",
    "@timestamp" => 2018-11-28T08:02:57.681Z,
    "exportable" => "",
       "service" => "service-hi",
      "@version" => "1",
          "beat" => {
            "name" => "cnsvwA090401609",
        "hostname" => "cnsvwA090401609",
         "version" => "5.6.4"
    },
          "host" => "cnsvwA090401609",
         "class" => "o.s.c.sleuth.instrument.web.TraceFilter",
          "span" => ""
}
3.在 redhat虚机上安装配置运行elastic search 和kibana
(1)在https://www.elastic.co/downloads 下载这两个软件,本人下载了elasticsearch-5.6.1.tar.gz和kibana-5.6.1-linux-x86_64.tar.gz
(2)用root用户登录,将其解压到 /usr/local下,并对该目录所有文件赋权给用户(我的用户为xuweihua)
chown xuweihua:xuweihua /usr/local/elasticsearch-5.6.1 -R
chown xuweihua:xuweihua /usr/local/kibana-5.6.1-linux-x86_64 -R
(3)用xuweihua用户登录,修改 /usr/local/elasticsearch-5.6.1/config下的elasticsearch.yml 文件,仅需修改网络配置部分,与logstash配置文件filebeat.conf 一致
# ---------------------------------- Network -----------------------------------
#
# Set the bind address to a specific IP (IPv4 or IPv6):
#
# network.host: localhost
network.host: 192.168.122.10
#
# Set a custom port for HTTP:
#
http.port: 9200
#
# For more information, consult the network module documentation.
#
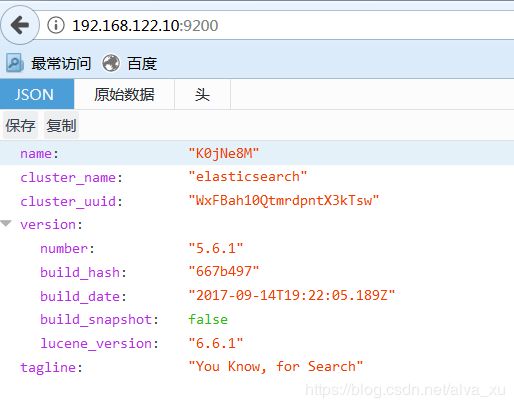
(4)启动elasticsearch(bin/elasticsearch),访问页面192.168.122.10:9200,有信息显示,说明elasticsearch运行成功
(5)配置kibana,要修改的就是网络配置
# Kibana is served by a back end server. This setting specifies the port to use.
server.port: 5601

# Specifies the address to which the Kibana server will bind. IP addresses and host names are both valid values.
# The default is 'localhost', which usually means remote machines will not be able to connect.
# To allow connections from remote users, set this parameter to a non-loopback address.
server.host: "192.168.122.10"

# Enables you to specify a path to mount Kibana at if you are running behind a proxy. This only affects
# the URLs generated by Kibana, your proxy is expected to remove the basePath value before forwarding requests
# to Kibana. This setting cannot end in a slash.
#server.basePath: ""

# The maximum payload size in bytes for incoming server requests.
#server.maxPayloadBytes: 1048576

# The Kibana server's name.  This is used for display purposes.
server.name: "kibanaserver"

# The URL of the Elasticsearch instance to use for all your queries.
elasticsearch.url: "http://192.168.122.10:9200"
(6)运行kibana bin/kibana
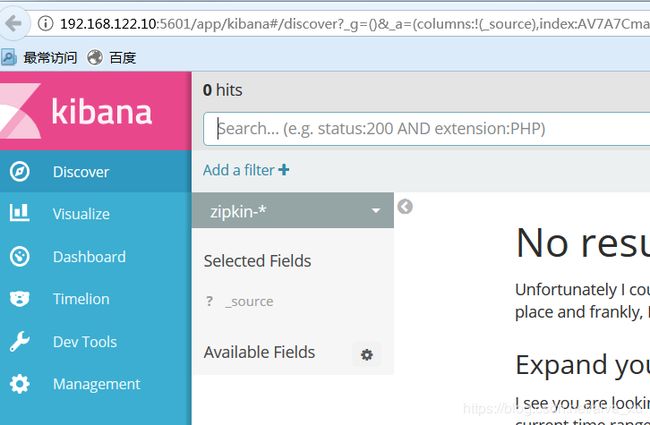
访问页面 192.168.122.10:5601,有内容出现,说明kibana 运行成功
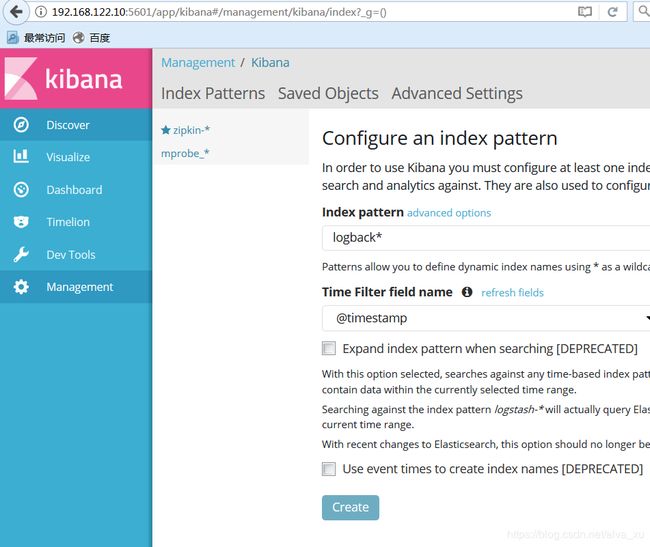
现在要添加index, 在上节我们在logstash的配置中将output到ElasticSearch的index配置为“logback”
在上述的界面点击”Management”按钮,然后点击“Add New”,添加一个index,“logback*”,点击“Create”按钮。
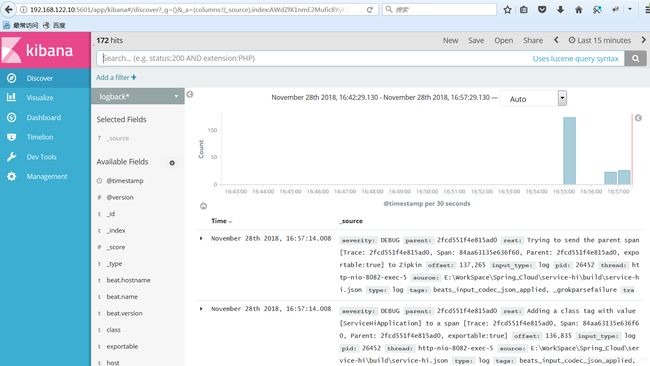
此时,如果service-hi 业务系统有日志记入日志文件,该记录将会最终被filebeat送到logstash,logstash对其进行过滤送到elastic search并被kibana展示出来
四,总结
本文成功搭建了一个从分布式的filebeat到集中的logstash、elasticsearch、kibana的一个集中日志收集和展示平台,当然这只是基础,实际上还有许多细节需要做才能真正成为可用的有价值的系统,比如平台组件的选择问题,应用系统的日志规范,收集哪些日志,哪些需要过滤,过滤规则是什么,怎样写kibana的报表,使报表真正是业务需要的。另外,在基础架构方面,我们还需要考虑这些组件的自动启停、高可用等问题。
备注
elasticsearch安装启动是可能会报如下错误,
[1]: max file descriptors [4096] for elasticsearch process is too low, increase to at least [65536]
解决:切换到root用户,编辑limits.conf ,添加类似如下内容
vi /etc/security/limits.conf 添加如下内容:
* soft nofile 65536

* hard nofile 131072

* soft nproc 2048

* hard nproc 4096
[2]: max virtual memory areas vm.max_map_count [65530] is too low, increase to at least [262144]
解决:切换到root用户 修改配置sysctl.conf
vi /etc/sysctl.conf 添加下面内容: vm.max_map_count=655360 并执行命令: sysctl -p 然后,重新启动elasticsearch,即可启动成功
如何将elastic search配成开机自启
在/etc/rc.local中加入
su - xuweihua -c " /usr/local/elasticsearch-5.6.1/bin/elasticsearch -d"
#!/bin/bash
# THIS FILE IS ADDED FOR COMPATIBILITY PURPOSES
#
# It is highly advisable to create own systemd services or udev rules
# to run scripts during boot instead of using this file.
#
# In contrast to previous versions due to parallel execution during boot
# this script will NOT be run after all other services.
#
# Please note that you must run 'chmod +x /etc/rc.d/rc.local' to ensure
# that this script will be executed during boot.

touch /var/lock/subsys/local
su - xuweihua -c " /usr/local/elasticsearch-5.6.1/bin/elasticsearch -d"
su - xuweihua -c "nohup /usr/local/kibana-5.6.1-linux-x86_64/bin/kibana&"
