小米手环iOS开发实战(一):iOS蓝牙框架CoreBluetooth
小米手环iOS开发实战(一):iOS蓝牙框架CoreBluetooth
本项目为对小米手环进行二次开发,利用了小米手环蓝牙连接并不安全的特性,连接后可以获取手环数据,并可修改数据。
本实例使用Swift3.0语言,Objective-C的蓝牙模块处理有略微不同,具体可见文档。
本节首先介绍iOS蓝牙框架CoreBluetooth,在此仅介绍本实例涉及到的蓝牙操作内容,如果大家有需要,可以专开一贴介绍CoreBluetooth的使用。
章节目录
- iOS蓝牙框架介绍
- CoreBluetooth.framework导入
- CoreBluetooth的基础使用
iOS蓝牙框架介绍
CoreBluetooth介绍
在iOS开发中,实现蓝牙通信的方法有两种。分别是GameKit.framework以及CoreBluetooth.framework,前者在iOS5后基本被淘汰。
在苹果文档中,写了Communicate with Bluetooth 4.0 low-energy devices,也就是说仅支持蓝牙4.0低功耗协议(BLE)。
对于iOS10以上的设备,苹果注明以下信息:
An iOS app linked on or after iOS 10.0 must include in its Info.plist file the usage description keys for the types of data it needs to access or it will crash. To access Bluetooth peripheral data specifically, it must include NSBluetoothPeripheralUsageDescription.
也就是说需要声明并注册蓝牙权限的使用。
CoreBluetooth协议
首先提及蓝牙使用,在此引入两个概念:中心设备和外围设备。
- 中心设备(客服端):作为中央管理器的设备,也就是本实例中的iOS设备。
- 外围设备(服务器):也就是外部设备,扮演者产生数据的角色。许多传感器、蓝牙服务设备均是外围设备。本实例中小米手环就是外围设备。
同时数据传输还涉及到以下几个值:
- UUID:相当与使用这个模块对映的应用的标识。
- RSSI:信号强度,利用此信息可进行蓝牙测距,后面将进行讲解。
CoreBluetooth中涉及以下对象类:
- CBCentralManager:中心设备类
- CBPeripheral:外围设备类
- CBCharacteristic:设备特征类
接下来就看一下如何导入蓝牙框架。
CoreBluetooth.framework导入
- 首先新建Xcode项目
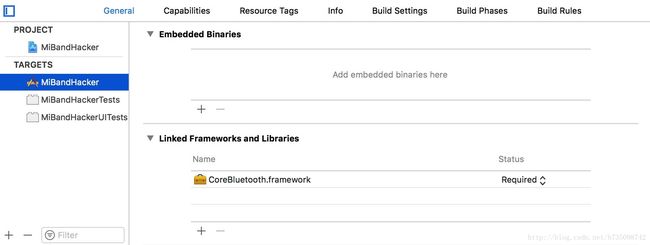
- 在General->TARGETS->Linked Framworks and Libraries中点击添加并选择CoreBluetooth.framework导入。

- 在代码中导入CoreBluetooth.framework
Swift:import CoreBluetooth
Objective-C:#import - 声明协议:使用CoreBluetooth需要支持CBCentralManagerDelegate, CBPeripheralDelegate协议,即前面所说的中心设备和外围设备,并实现相应方法
CoreBluetooth的基础使用
导入框架并声明协议后,即可开始实现必要方法。
下面通过展示整个流程所需要的方法
- 初始化
var manager = CBCentralManager.init(delegate: self as? CBCentralManagerDelegate, queue: nil)- 扫描设备
switch manager.state {
        case .poweredOn:
            NSLog("正在扫描")
            manager.scanForPeripherals(withServices: nil, options: nil)
        default:
            break
        }
注:这里为什么一定要用switch语法?
因为CBCentralManager的State属性在之前是CBCentralManagerState,但是现在变成了CBManagerState,而需要iOS10以上才支持后者(23333)。这一波强制升级我是拒绝的,找了很多方法之后,发现这样写可以被Xcode接受而不去检查
- 处理当前中心设备蓝牙状态
func centralManagerDidUpdateState(_ central: CBCentralManager) {
        switch central.state {
            case .poweredOn:
                NSLog("蓝牙已开启")
            default:
                NSLog("蓝牙未开启")
        }
}- 扫描到外围设备的处理
func centralManager(_ central: CBCentralManager, didDiscover peripheral: CBPeripheral, advertisementData: [String : Any], rssi RSSI: NSNumber) {

        //peripheral.name为设备名称
        //可以调用CBCentralManager的stopScan停止扫描
        central.stopScan()
        //可以调用CBCentralManager的connect连接设备
        central.connect(peripheral, options: nil)
        }
}- 成功连接到外围设备的处理
unc centralManager(_ central: CBCentralManager, didConnect peripheral: CBPeripheral) {
        NSLog("成功连接")
        //设置代理
        peripheral.delegate = self
        //连接成功后接下来该扫描服务
        peripheral.discoverServices(nil)
}- 连接失败的处理
func centralManager(_ central: CBCentralManager, didFailToConnect peripheral: CBPeripheral, error: Error?) {
        NSLog("连接设备失败")
}- 扫描已连接外围设备服务
func peripheral(_ peripheral: CBPeripheral, didDiscoverServices error: Error?) {
        if ((error) != nil) {
            NSLog("查找服务失败")
            return
        }
        else {
            for service in peripheral.services! {
                //扫描到服务后对服务逐个扫描特征值
                peripheral.discoverCharacteristics(nil, for: service)
           }
        }
}- 扫描到特征值后的操作
func peripheral(_ peripheral: CBPeripheral, didDiscoverCharacteristicsFor service: CBService, error: Error?) {
        if ((error) != nil) {
            NSLog("扫描特征值失败")
        }
        else {
            for characteristic in service.characteristics! {
                //设置特征值只要有更新就获取
                peripheral.setNotifyValue(true, for: characteristic)

                if (characteristic.uuid.uuidString == "你想匹配的字符串") {
                    peripheral.readValue(for: characteristic)
                    //或
                    characSaver = characteristic
                }
            }
        }
    }
解释一下原理:方法对每个服务进行扫描,获取特征值。辨别是否是你想要的功能的特征值就要用到UUID,用UUID去匹配。匹配到后你可以选择保存他的特征值从而在后面自行操作,或者用readValue读取它的值,并由系统自动调用下面介绍的方法
- 获取具体值之后的操作
func peripheral(_ peripheral: CBPeripheral, didUpdateValueFor characteristic: CBCharacteristic, error: Error?) {
        if ((error) != nil) {
            statusLabel.text = "从设备获取值失败"
            return
        }
        else {
            if(characteristic.uuid.uuidString == "特定值") {
                var infoBytes = [UInt8](characteristic.value!)
                var infoVal:Int = Int.init(infoBytes[0])
                NSLog("获取的值为:%d\n", infoVal)
            }
        }
    }
这里展示了一个示例操作,获取到手环的数据,由于手环的数据是最后8位Byte,所以取Byte值。但是由于Swift3.0已经取消了Byte,所以在此使用UInt8的类型转换来操作。对于你的蓝牙设备,根据数据的不同选择读取对应的位数。
这样,我们就完成了CoreBluetooth的方法,以及对应的处理。
对蓝牙框架CoreBluetooth的操作就告一段落,接下来将通过demo演示对控制小米手环进行讲解。如果对于蓝牙框架还有问题,欢迎提问或讨论。
写文章不易,如果觉得满意,欢迎大家粉一下我的GitHub,以及动动手指Star一下我的项目,持续更新需要你的支持!
本人GitHub:https://github.com/Minecodecraft
本项目链接:https://github.com/Minecodecraft/MiBandDemo
“小米手环iOS开发实战”系列
小米手环iOS开发实战(一):iOS蓝牙框架CoreBluetooth
小米手环iOS开发实战(二):开发Demo让你的手环振动起来