Nginx介绍
-
创建目录
- cd /opt
- mkdir app adwnload logs work backup
- app : 代码目录
- download : 网上下载的源码包等
- logs : 自定义日志
- work : shell 脚本
- backup : 默认配置文件的备份
-
关闭 iptables规则
- iptables -L : 查看是否有
- iptables -F : 关闭iptables 规则
-
停用selinux
- 通过 getenforce : 查看是否停用
- setenforce 0 : 关闭
-
Nginx命令
- 如果出现 “ Failed to start nginx.service: Access denied ”,那么有一下几种可能
- 端口被占用,那就很简单了,清理占用端口的进程或者修改Nginx监视端口
- 使用 sudo nginx -c nginx.conf,再 sudo nginx -s reload 先指定一下配置文件
- sudo find nginx.conf,查找一下配置文件。像我这里就出现了有两个nginx的情况,一个是 /usr/local/nginx/sbin/nginx(我应该使用的),另一个是/etc/nginx 里面的nginx(我以为应该使用的)找到对应nginx文件,再 -c 其对应的 conf文件
- 如果出现 “ Failed to start nginx.service: Access denied ”,那么有一下几种可能
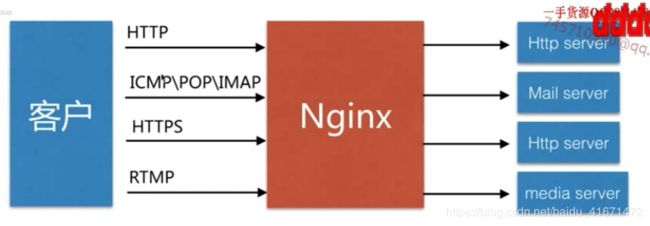
Nginx是一个开源且高性能,可靠的http中间件,代理服务。
中间件:可以直接调用操作系统,也可以调用应用。使网站更有层次性,便于开发维护。中间件可以获取web请求,并把请求分发给操作系统或者应用,也可以分发给其他中间件,也可以通过应用发给其他中间件。
- Nginx:开源且高性能,可靠的http中间件,代理服务意味着:
- 源代码开放,可以通过官网获取源代码,进行二次开发。淘宝就是基于Nginx1.6开发的。
- 高性能,支持海量并发请求的web server
- 服务稳定,不会因为本身代码原因导致问题。
- 常见其他的HTTP服务:
- HTTPD-Apache基金会
- IIS-微软
- GWS-Google
为什么选择Nginx:
-
IO多路复用epoll
- IO复用:解决的是并发性的问题。大家都在访问某个网站,对于后台而
言就有多个请求,对于中间件就产生多个IO流。 - 对于IO流,操作系统中有并行处理,和串行处理。可以用多线程的方式
处理,也有io多路复用。多线程处理会造成资源损失,因为 - 管理多个线程本身就消耗资源。io多路复用就是在一个线程里面交替并
发的完成。复用指的是重复使用同一个线程。 - IO多路复用的实现方式select, poll, epoll。
- IO复用:解决的是并发性的问题。大家都在访问某个网站,对于后台而
-
轻量级:功能模块少,代码模块化。
-
CPU亲和。减少额外的性能损耗。
是一种把CPU核心和Nginx工作进程保定方式,把每个worker进程固定
在一个CPU上执行,减少CPU开支。 -
sendfile工作机制。
Nginx快速搭建:
- Mainline version 开发版
- Stable version 稳定版
- Legacy version 历史版本
vim /etc/yum.repos.d/nginx.repo
复制一下代码:
[nginx]
name=nginx repo
baseurl=http://nginx.org/packages/OS/OSRELEASE/$basearch/
gpgcheck=0
enabled=1
-
其中将 OS 改成你的系统 这里我用的是centos OSRELEASE改成你的操作系统版本 我用的是centos7 所以 这里改成 7
所以这里改成:
baseurl=http://nginx.org/packages/centos/7/$basearch/ -
yum list |grep nginx 查看yum源中nginx版本
-
yun install nginx 安装nginx
-
通过nginx -v 查看版本
-
通过yum安装,其实是安装一个一个rpm包
-
sudo /usr/local/nginx/sbin/nginx -s reload
-
rpm -ql nginx 查看已经安装的服务所配置的文件以及对应的目录
-
查看输出,在 etc , usr , var 三个目录下都有安装
-
Linux 操作系统下 etc 目录安装的是系统的核心配置文件,同理Nginx中也适用。
以下只要没写的框框,就是同上
| 编译选项 | 是什么 | 作用 |
|---|---|---|
| /etc/logrotate.d/nginx | 配置文件 | Nginx日志轮转,用于logrotate服务的日志切割(用系统的logrotate服务进行的) |
| /etc/nginx | 目录,配置文件 | Nginx主配置文件 |
| /etc/nginx/nginx.conf | 主要配置 | Nginx启动的时候,读nginx.conf |
| /etc/nginx/conf.d | 目录 | |
| /etc/nginx/conf.d/default.conf | 配置文件 | 安装后默认执行的server加载 |
| /etc/nginx/fastcgi_params | 配置文件 | cgi配置相关,fastcgi配置 |
| /etc/nginx/uwsgi_params | uwsgi配置 | |
| /etc/nginx/scgi_params | scgi配置 | |
| /etc/nginx/koi-utf | 配置文件 | 编码转换映射转化文件 |
| /etc/nginx/koi-win | ||
| /etc/nginx/win-utf | ||
| /etc/nginx/mime.types | 配置文件 | 设置http协议的Content Type与扩展名对应关系(在ContentType中保存了返回的文件类型,.jpg,.json之类,nginx要把ContentType和扩展名建立对应关系,当Nginx无法识别扩展名的时候就需要去配置mime.types文件,进行添加) |
| /user/lib/systems/system/nginx-debug.service | 配置文件 | 用于配制出系统守护进程管理器管理方式 |
| /user/lib/systems/system/nginx.service | ||
| /etc/sysconfig/nginx | ||
| /etc/sysconfig/nginx-debug | ||
| /usr/lib64/nginx/modules | 目录 | Nginx模块目录 |
| /etc/nginx/modules | ||
| /usr/sbin/nginx | 命令 | Nginx服务的启动管理的终端命令 |
| /usr/sbin/nginx-debug | ||
| /usr/share/doc/nginx-你的nginx版本 | 文件,目录 | Nginx的手册和帮助文件 |
| /usr/share/doc/nginx-你的nginx版本/COPYRIGHT | ||
| /usr/share/man/ma8/nigninx.8.gz | ||
| /var/cache/nginx | 目录 | Nginx的缓存目录 |
| /var/log/nginx | 目录 | Nginx的日志目录 |
| 编译选项 | 作用 |
|---|---|
| –prefix=/usr/share/nginx | 安装目的目录或路径(nginx主目录) |
| –sbin-path=/usr/sbin/nginx | nginx的执行命令 |
| –modules-path=/usr/lib64/nginx/modules | nginx的模块 |
| –conf-path=/etc/nginx/nginx.conf | nginx的配置文件 |
| –http-log-path=/var/log/nginx/access.log | 访问日志 |
| –error-log-path=/var/log/nginx/error.log | 错误日志目录 |
| –lock-path=/var/lock/nginx.lock | 锁 |
| –pid-path=/run/nginx.pid | pid文件 |
| –http-client-body-temp-path=/var/lib/nginx/body | 执行对应模块时,Nginx所保留的临时性文件 |
| –http-fastcgi-temp-path=/var/lib/nginx/fastcgi | |
| –http-proxy-temp-path=/var/lib/nginx/proxy | |
| –http-scgi-temp-path=/var/lib/nginx/scgi | |
| –http-uwsgi-temp-path=/var/lib/nginx/uwsgi | |
| –user=nginx | 设定Nginx进程启动的用户和组 |
| –group=nginx | (可以自行配制root用户,安全性) |
| –with-cc-opt=parameters | 这是额外的参数将被添加到CFLAGS变量 |
| –with-ld-opt=parameters | 设置附加的参数,链接系统库 |
在nginx中的nginx.conf文件:cd /etc/nginx/ 之后 vim nginx.conf
http {
    include       /etc/nginx/mime.types;         #子配置文件
    default_type  application/octet-stream;
    log_format  main  '$remote_addr - $remote_user [$time_local] "$request" '
                      '$status $body_bytes_sent "$http_referer" '
                      '"$http_user_agent" "$http_x_forwarded_for"';//“log_format”定义日志类型

    access_log  /var/log/nginx/access.log  main;

    sendfile        on;
    #tcp_nopush     on;

    keepalive_timeout  65;		#设置客户端服务端访问超时时间,默认65s

    #gzip  on;

    include /etc/nginx/conf.d/*.conf;
}
-
查看default.conf,cd /etc/nginx/conf.d 之后 vim default.conf
-
listen 代表监听的端口,这里默认80端口
-
server-name 主机名(可以替换)
-
location 一个server中可以有多个location,当没有其他的访问路径时默认是“/” root是存放路径,index 是html文件
-
error_page 错误类型,以及其对应的错误网站
-
修改完配置文件之后需要重启nginx
server{
    listen 80; # 监听端口
    server_name localhost; # 服务名字/域名访问地址 baidu.com

    #charset koi8-r;
    #access_log  /var/log/nginx/host.access.log  main;

    location / { # 服务名字 与其 对应的访问路径,如果是 ‘/’代表所有访问都通过下面的路径
        root   /usr/share/nginx/html; # 根 路径
        index  index.html index.htm; # 默认访问的页面,如果没有index.html则访问index.htm
    }

    #error_page  404              /404.html;

    # redirect server error pages to the static page /50x.html
    #
    error_page   500 502 503 504  /50x.html; # 错误号与访问错误对应的的文件,可以手动添加
    location = /50x.html {
        root   /usr/share/nginx/html; # 错误对应的文件的位置
    }

    # proxy the PHP scripts to Apache listening on 127.0.0.1:80
    #
    #location ~ \.php$ {
    #    proxy_pass   http://127.0.0.1;
    #}
}
日志
- response
- request - 包括请求行,请求头部,请求数据
- response - 包括状态行,消息包头,响应正文
- 这个时候 安装一个curl,用于测试
- curl 我们的网站 会返回一个html代码 这个就是我们发出request请求后,服务端response给我们的响应包里的报文
- curl -v 网站 >/dev/null 返回的值重定向到linux的一个空设备中,这样就可以看到 请求行,请求方法等等等等
“>”是request。“<”是response
> GET / HTTP/1.1             #请求方式位GET方式
> User-Agent: curl/7.35.0.   #请求头是curl
> Host: www.csdn.net         #访问的网址是csdn
> Accept: */*

< HTTP/1.1 200 OK			 #200 是正常访问之后返回的值
* Server openresty is not blacklisted
< Server: openresty
< Date: Tue, 04 Sep 2018 05:32:19 GMT
< Content-Type: text/html; charset=UTF-8
< Transfer-Encoding: chunked
< Connection: keep-alive
< Keep-Alive: timeout=20
- Nginx的日志类型
- 包括:error.log(处理http请求的错误的状态以及nginx本身运行错误的状态,根据级别不同分别记录)
- access_log(记录Nginx每次hhtp请求的访问状态,用于分析客户请求,或者对客户行文进行分析)。
- log_format(实现分析用户交互,请求之类的)
- nginx的log中记录了很多的信息,这些信息可以被认为是nginx中的变量,
- log_format就是将这些变量组织到一起,记录到access.log中。
- log_format 只能配置到http模块下。
配置语法大概如下
Syntax: log_format name [escape=default|json] string ...;
Default:log_format combined "...";
Context:http。#必有
- 在 /etc/nginx/nginx.conf文件中看到 error_log ,后面的文件位置就是配置错误日志的地方
- warn表示warning,是一个级别
- 在/etc/nginx/nginx.conf文件中看到access.log,后面表示access.log的路径
- main表示nginx的log_format的main
Nginx变量
- Http请求变量 - arg_PaRAMETER, http_HEADER, send_http_HEADER
- 内置变量 - Nginx内置的
- 自定义变量
编辑/etc/nginx/nginx.conf 文件,使其能够输出请求头
htt{
	include /etc/nginx/mime.types;
	default_type application/octet-stream;
	log_format main '$http_user_agent' '$remote_addr - $remote_user [$time_local] "$request" '
					'$status $body_bytes_send "$http_referer" '
					'"$http_user_agent" "$http_x_forwarded_for"';
	access_log /var/log/nginx/access.log main;
}
- 这里 在 log_format中添加了 ‘$http_user_agent’,表示我们要查看的是 请求中的 User-Agent
- 对于其他参数,就是大写换成小写,‘-’换成‘_’。
- 这里User-Agent 换成 user_agent
- 使用nginx -t -c /etc/nginx/nginx.conf 检查文件是否书写正确
- -t:检查
- -c:文件路径
- 之后使用 nginx -s reload -c /etc/nginx/nginx.conf 重新加载配置
- 使用curl访问一下本机 localhost
- 通过查看/var/log/nginx/access.log文件可以查看到刚刚添加的请求头参数已经输出了
curl/7.29.0127.0.0.1 - - [21/Apr/2019:18:16:19 +0800] "GET / HTTP/1.1" 200 612 "-" "curl/7.29.0" "-"
# 在access.log文件中查看到的信息
-
Nginx内置变量(太多了,直接丢官网上的)
- http://nginx.org/en/docs/http/ngx_http_log_module.html#access_log
-
再看回nginx.conf文件中的log_format
- 每个内容最外层都有一个单引号,进行多个变量的囊括
- 变量之间的 ’ - ’ 作为分隔符
- remote_addr: 表示客户端地址
- remote_user: 客户端请求nginx认证的用户名
- time_local: nginx的时间
- request :request头的请求行(请求方式,http协议等)
- status: response返回的状态
- body_bytes_sent:服务端相应的body信息的大小
- http_referer:上一级url地址,即从哪个页面跳转过来的
- http_user_agent:http头信息
- http_x_forwarded_for:记录每一级用户通过http请求里面的对应的http信息
Nginx官方模块
- 命令 nginx -V 查看nignx编译的模块
- –with:Nginx开启的模块和编译进去的模块
http_stub_status_module
- 用于展示Nginx当前处理连接的状态
- 用于监控Nginx当前的连接的信息
- 需要再server或者location下配置
配置语法:
Syntax: stub_status; # 写法
Default:--	# 默认值
Context:server, location # 应该配置在什么地方
配置:
- vim /etc/nginx/conf.d/default.conf
- 添加如下代码,在 location / 上面
location /mystauts{
    stub_status;
}
- 访问 localhost/mystauts 得到链接的状态数
Active connections: 1  #Nginx 当前活跃的状态数
server accepts handled requests
 2 2 3  # Nginx 接受握手的总次数 处理的连接数 总的请求数
# 一般 握手数 与 连接数相同,表示没有丢失
Reading: 0 Writing: 1 Waiting: 0
# 上面三个表示当前的状态
# 第一个 正在读的个数 第二个 正在往Nginx写的个数 第三个等待个数
http_random_index_module 模块
-
目录中随机选择一个文件作为主页
-
很少用,但是也是有用的,比如随机生成不同主题的主页给用户不同体验
-
配置语法
Syntax:random_index on|off; # 有 on 和 off可供选择
Default:random_index off; # 默认关闭
Context:location # 配置在location中
- 这里在 /opt/code 文件夹中创建 1.html ,.html, 3.html三个文件
- 实战经历
location / {
    root   /opt/code;
    #index  index.html index.htm;
    random_index on;
}
- ngnix -tc nginx.conf 和 nginx -s reload 一下
http_sub_module 模块
-
Nginx服务端在给客户端response的http内容的时候,对http的内容进行替换
-
用的也比较少
-
常用语法
Syntax : sub_filter string replacement;
# string 表示要替换的内容
# replacement 替换后的对象,替换后的内容
Default : --
Context:http, server, location

Synatx : sub_filter_last_modified on|off;
# Nginx的服务端完成与客户端(浏览器),每次请求校验服务端内容是否有所更新
# 一般记录一串时间格式
Default : sub_filer_last_modified off;
Context : http, server, location;

Synatx : sub_filter_once on|off;
# 匹配所有html中的第一个,还是匹配所有指定的字符串
Default : sub_filter_once on;
# on 只修改匹配道德第一个 html内容
# off 把所有html指定内容都进行匹配
Context : htpp,server, locaiton
-
实战经历
-
创建测试html
<html>
	<head>
		<meta charset="UTF-8">
		<title>testtitle>
	head>
	<body>
		<a>qwera>
		<a>1234a>
		<a>5678a>
		<a>qwera>
	body>
html>
location /{
	root /opt/code;
	index index.html index.tm;
	sub_filter 'qwer' 'asdf';
	# 更新 qwer 为 asdf
}
- -tc 和 -s 一下,可能需要手动刷新浏览器,删除本地缓存
- 再次访问这个index.html 中,第一个qwer 变成了 asdf
- 如果想要所有qwer都变呢
location /{
	root /opt/code;
	index index.html index.tm;
	sub_filter 'qwer' 'asdf';
	sub_filter_once off; # 让其全局替换
	# 更新 qwer 为 asdf
}
Nginx的请求限制
-
连接请求限制
- limit_conn_module
-
请求频率限制
-limit_req_module -
Http请求建立在一次TCP链接基础上
-
一次TCP请求至少产生一次Http请求
-
配置语法
- limit_conn_zone
Syntax : limit_conn_zone key zone=name:size;
# 如果要限制连接,就需要存储各个连接的状态,因此需要开辟空间存储
# limit_conn_zone 就是开辟的空间
# key 为 限制的变量,例如ip等
# zone 为 name为申请空间名字,为下面的limit_conn中的zone做准备
# size 为开辟空间的大小
Default: --
Context : http
- limit_conn
Syntax : limit_conn zone number;
# zone 为上述的 开辟空间的 zone 的 name
# number 限制同一时间最多有多少个连接数
Dafault : --
Context : http,server, location;
- limit_req_zone
Syntax : limit_req_zone key zone=name:size rate=rate;
# 这里name,size同上,是为了后面做准备
# rate 速率,表示请求限制是多大,一般以秒为单位。表示每秒限制多少个
Default:--
Context:http
- limit_req
Syntax : limit_req zone=name [burst=number] [nodelay]
# zone 为上述的 zone 的 name
# 后面两个 [] 中的参数默认不需要配置

Default: --
Context:http,server,location
- 书写nginx.conf 文件
- 只写了与限制有关的
http{
	limit_conn_zone $binary_remote_addr zone=conn_zone:1m;
	# 这样的配配置,表明以ip为key,来限制每个ip访问的时候,最多只能有一个在线,否则其余的都要返回不可用。
	limit_req_zone $binary_remote_addr zone=req_zone:1m rate=1r/s;
	# binary_remote_addr 是访问的客户端ip地址
	# remote_addr也是客户端地址,但是binary_remote_addr比remote_addr节省10个字节的空间
	# 申请空间名字是req_zone,大小为1m
	# 限制 同一个ip 一秒只能访问一次
    server {
        listen       80;
        server_name  localhost;

        location / {
            root   root;
            # limit_conn conn_zone 1;
            # limit_req zone=req_zone burst=3 nodelay;
            # limit_req zone=req_zone burst=3;
            # limit_req zone=req_zone;
            index  index.html index.htm;
            #random_index on;
        }
    }
}
- 单独解开 limi_req zone=req_zone 的注释
- 运行ab -n 20 -c 20 http:127.0.0.1/
- 总共发生20次请求,同一时间请求20次
ab 命令运行后,命令行出现提示
其中 Non-2xx responses: 19,表示非200的请求有19次
This is ApacheBench, Version 2.3 <$Revision: 1430300 $>
Copyright 1996 Adam Twiss, Zeus Technology Ltd, http://www.zeustech.net/
Licensed to The Apache Software Foundation, http://www.apache.org/

Benchmarking 127.0.0.1 (be patient).....done


Server Software:        nginx/1.14.0
Server Hostname:       127.0.0.1
Server Port:            80

Document Path:          /
Document Length:        169 bytes

Concurrency Level:      20
Time taken for tests:   0.004 seconds
Complete requests:      20
Failed requests:        19
   (Connect: 0, Receive: 0, Length: 19, Exceptions: 0)
Write errors:           0
Non-2xx responses:      20
Total transferred:      14208 bytes
HTML transferred:       10372 bytes
Requests per second:    4663.09 [#/sec] (mean)
Time per request:       4.289 [ms] (mean)
Time per request:       0.214 [ms] (mean, across all concurrent requests)
Transfer rate:          3235.02 [Kbytes/sec] received

Connection Times (ms)
              min  mean[+/-sd] median   max
Connect:        0    1   0.2      1       1
Processing:     1    2   0.3      2       3
Waiting:        0    2   0.4      2       2
Total:          1    3   0.4      3       3

Percentage of the requests served within a certain time (ms)
  50%      3
  66%      3
  75%      3
  80%      3
  90%      3
  95%      3
  98%      3
  99%      3
 100%      3 (longest request)
查看 /var/log/nginx/error.log 日志文件
[error] 9893#0: *169 limiting requests, excess: 0.997 by zone "req_zone",
由此可见,我们配置限制请求成功,只有第一次请求成功,而后面19次都失败了
- 单独解开 limit_req zone=req_zone burst=3 nodelay; 的注释
- burst = 3:客户端在超过了指定速率之后,余留的3个释放到下一秒执行,可以起到访问限速的作用
- nodelay:除了上面余留的三个下一秒执行,其他的全部返回503
- 运行ab -n 20 -c 20 http:127.0.0.1/
- 总共发生20次请求,同一时间请求20次
ab 命令运行后,命令行出现提示
其中 Non-2xx responses: 16,表示非200的请求有16次
Concurrency Level:      20
Time taken for tests:   0.004 seconds
Complete requests:      20
Failed requests:        16
   (Connect: 0, Receive: 0, Length: 16, Exceptions: 0)
Write errors:           0
Non-2xx responses:      16
由此可见,总共20次请求,除了1个正常访问,3个延迟请求,其他16个全部返回503错误
- 单独解开limit_conn conn_zone 1;
- 限制同一时刻只允许一个ip的连接
Nginx中间件架构
- 基于IP的访问控制 - http_access_module:允许某些IP访问,不允许某些IP访问
- 基于用于的新人登录 - http_auch_basic_module
http_access_module
- http_access_module配置语法
Syntax : allow address | CIDR | unix: |all;
# address:允许的 ip 地址
# CIDR:允许的网段
# unix 	:允许socket方式访问
# all : 允许所有
Default:----
Context:http,server,location,limit_except


Syntax :deny address | CIDR | unix:|all;
# 这里是禁止访问,参数同上
Default:--
Context:http,server,location,limit_except
配置访问限制
~ ^/ 是Nginx 的一个正则匹配
可以自行百度:https://www.cnblogs.com/koal/p/6915106.html
location ~ ^/admin.html {
    root html;
    deny 61.136.151.252;
    allow all;
    index index.html;
}
通过访问127.0.0.1/admin.html 会出现403错误
location ~ ^/admin.html {
    root html;
    allow 61.136.151.252;
    deny all;
    index index.html;
}
设置只有我能访问,其他ip都不能访问
http_access_module的局限性

- 从图中可以看出来,如果通过代理去访问Nginx服务器,Nginx只能限制代理服务器的IP,不能先知道IP1
http_x_forwarded_for作为解决方式的一种
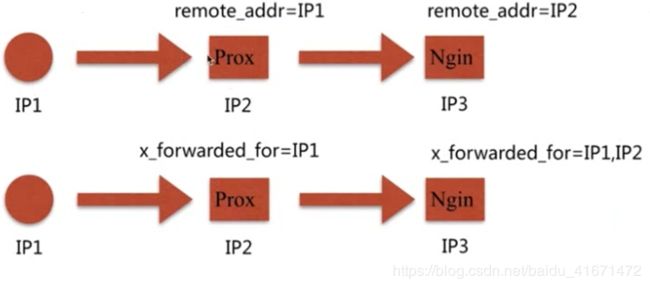
- x_forwarded_for 是 http请求的一个常见的头
- x_forwarded_for 中包括了IP1和IP2,包括了整个过程以及IP地址
作为Nginx访问控制的一种方式
http_x_forwarded_for = Client IP, Proxy(1) IP, Proxy(2) IP;
结合geo模块作为解决局限性方式的一种
http_auth_basic_module
- Nginx的基本认证模块
- 用于用户登录认证
参考博客
https://www.cnblogs.com/HKUI/articles/7812927.html
Synatx: auth_basic string | off;
Default : auth_basic off;
Context : http, server, location, limit_except

Synatx : auth_basic_user_file file;
Default : --;
Context : http, server, location, limit_except
- file的书写格式
file表示文件路径
存储用户用户名和密码
name1:passwd1
name2:passwd2:comment
name3:passwd3
-
创建密码文件 ** htpasswd -c …/conf/auth_conf cong**
- 参数解释:
- htpasswd 是命令名
- -c:创建密码文件,后跟文件路径
- cong:是用户名,自定义
- 查看 auth_conf 文件,可以看到已经加密过的密码
-
编写 nginx.conf文件
location ~ ^/admin.html {
	root html;
	auth_basic "Auth access test! input your passward";
	auth_basic_user_file /usr/local/nginx/conf/auth_conf;
	index index.html;
}
- 随后访问 127.0.0.0/admin.html,就会要求输入密码了
http_auth_basic_module的局限性
- 用于信息依赖文件方式
- 操作管理机械,效率低下
解决方案
- Nginx结合Lua实现高效验证
- Nginx和LDAp打通,利用nginx-auth-ldap模块
静态资源Web服务

静态资源类型
- 非服务器动态运行生成的文件
| 类型 | 种类 |
| 浏览器端渲染 | HTML, CSS, JS |
| 图片 | JPEG,GIF,PNG |
| 视频 | FLV,MPEG |
| 文件 | TXT,等任一下载文件 |
静态资源服务场景—CDN

- 有一个资源存储中心,作为存储中心节点
- 有多个二级代理节点,存储部分资源文件
- 有更多个边缘节点,存储部分资源文件
- 当用户请求的时候,如果边缘节点有就由边缘节点发送数据给用于
- 如果边缘节点没有,就访问二级节点,如果二级节点有,就把资源发送给边缘节点,由边缘节点发给用户,此时边缘节点就有了这个资源
- 如果二级代理资源没有,就请求总资源存储中心
配置Nginx
配置语法-文件读取
Syntax : sendfile on|off;
Syntax : sendfile off;
Context : http, server, location, if in location
引读:–with-file-aio 异步文件读取
Syntax : tco_nopush on | off;
Default : tcp_nopush off;
Context : http, server, location
- 作用:sendfile 开启的情况下,提高网络包的传输效率
- 不急着把一个包发送给 客户端,而是集中处理所有的包,一次发送多个包
- 如果要求立马传送,则不建议开启
-tcp_nodelay
Syntax : tcp_nodelay on|off;
Default : tcp_nodelay on;
Context : http,server, location;
- 不等待,实时发送给用户
- 作用:keepaliv 连接下,提高网络包的传输实时性
配置语法 - 压缩
Syntax : gzip on | off
Default : gzip off;
Context : http, server, location, if in location
- 作用:压缩传输
Syntax : gzip_comp_level level;
Default : gzip_comp_level 1;
Context : http, server, locaiton;
- 作用:压缩比,压缩固然能减少发送大小,但是也会消耗更多服务器性能
Syntax : gzip_http_version 1.0|1.1;
Default : gzip_http_version 1.1;
Context : http, server, locaiton;
- 作用:设置 gzip_http的版本,现在用的多是1.1版本
扩展Nginx压缩模块
- http_gzip_static_module:预读gzip功能
- 先在磁盘目录中找 同名的 .gz 文件,会节省cpu压缩的时间,损耗时间等
- http_gunzip_module:应用支持:gunzip压缩方式
- 用于解决那些不支持 gzip的浏览器(几乎没有这种浏览器)
编写nginx.conf
- 我这里提前在 /opt/app/ 文件夹下创建了一下文件和文件夹
sendfile on;

location ~ .*\.(jpg|gif|png)${
	#gzip on;
	#gzip_http_version 1.1;
	#gzip_comp_level 2;
	#gzip_types text/plain application/javascript applicaiton/x-javascript text/css text/javascript application/x-httpd-php image/jpeg image/gif image/png application/xml;
	root /opt/app/image;
}

location ~ .*.\.(txt|xml) ${
	#gzip on;
	#gzip_http_version 1.1;
	#gzip_comp_level 1;
	#gzip_types text/plain application/javascript applicaiton/x-javascript text/css text/javascript application/x-httpd-php image/jpeg image/gif image/png application/xml;
	root /ope/app/doc;
}

location ~ ^/download {
	# gzip_static on;
	tcp_nopush on;
	root /opt/app/down
}
- 在没有开启gzip的情况下(jpg|gif|png 那一栏)
- 访问127.0.0.1/nginx1.png
- 在开发这工具的 网络 中看到文件大小:119.20k
- 打开gzip的情况下(jpg|gif|png 那一栏)
- 三个注释全部解开
- 访问127.0.0.1/nginx1.png
- 在开发这工具的 网络 中看到文件大小:118.96k
图片确实有所减小,是进行了压缩效果
- 在没有开启gzip的情况下(txt|xml 那一栏)
- 访问127.0.0.1/test.xml
- 在开发这工具的 网络 中看到文件大小:128.34k
- 在开启gzip的情况下
- 访问127.0.0.1/test.xml
- 在开发这工具的 网络 中看到文件大小:48.40k
文本的压缩力度比较大
- 在没有开启gzip的情况下(download这一栏)
- 访问文件,情况同上
浏览器缓存
-
HTTP协议定义的缓存机制(如:Expires;Cache-control等)
- 减少服务器压力
- 提高响应效率
-
如果浏览器没有本地缓存
- 请求WEB服务
- 请求响应,发送文件
- 呈现在浏览器中
-
如果浏览器有本地缓存
- 校验本地缓存是否过期
- 呈现在浏览器中
-
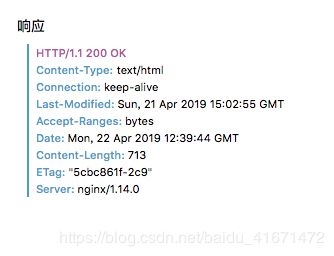
校验过期机制
- 校验(本地缓存)是否过期:Expires(Http1.0版本),Cache-Control(max-age)【Http1.1版本】
- 存储一个时间,表示规定超过某段时间就算过期
- 协议Etag头信息校验:Etag(向服务器验证)(用的比Last-Modified多)
- 存储一个字符串,如果本地缓存与服务器缓存字符串不同,则算作过期
- Last-Modified头信息校验:Last-Modified(向服务器验证)
- 与服务器端本地文件修改时间进行校验,如果本地Last-Modified时间与服务器端不一样,就算过期(单位s)
- 校验(本地缓存)是否过期:Expires(Http1.0版本),Cache-Control(max-age)【Http1.1版本】

location ~ .*\.(html|htm)$ {
	#expires 24h; #设置过期时间为24小时
	root html;
}
- 访问html文件后,打开开发者工具
- 在网络一栏,选中html文件,刷新页面
- 就可以查看Etag了
跨域访问
- 一般浏览器禁止跨域访问,因为不安全
- 百度查找SCRF攻击方式
- 有的时候一个公司的资源不在同一个域名下,需要手动开启
- Access-Control-Allow-Origin 请求头
- Nginx的做法
Syntax : add_header name value [always];
Default : ---
Context : http, server, location, if in location
- Nginx的写法
location ~ .*\.(htm|html)$ {
	add_header Access-Control-Allow-Origin http://www.test.com;
	# add_header Access-Control-Allow-Origin *; 允许所有站点都能跨域
	# 上面的 * 的写法,超级,不安全!!!!!!!!!
	add_header Access-Control-Methods GET,POST,PUT,DELETE,OPTIONS;
	root html;
}
防盗链
防止资源被盗用(非正常用户访问)
- 简单的防盗链:区别正常用户和不正常用户
http_refer 防盗链配置模块
Syntax : valid_referers none | blocked | server_names | string...;
Default : --
Context : server, location
其实access.log 默认是开启 http_refer 的,如果没有开启也可以手动开启
  log_format  main  '$remote_addr - $remote_user [$time_local] "$request" '
                      '$status $body_bytes_sent "$http_referer" '
                      '"$http_user_agent" "$http_x_forwarded_for"';
  access_log  /var/log/nginx/access.log  main;
- 然后书写一个refer.html
<html>
	<head>
	        <meta charset="UTF-8">
	        <title>testtitle>
	head>
	<body stylel="background-color:read;">
	        <img src="http://127.0.0.1/nginx1.png" />
	body>
html>
- 随后在nginx.conf中配置location
location ~ ^/refer.html{
     root html;
}
- 访问 127.0.0.1/refer.html
- 查看access.html文件
![]()
- 框出来的位置就是 http_refer 的值,因为img这个图片要加载进refer.html,所以会再次访问Nginx
- 所以会有俩次 日志输出
- 第一次 是 refer.html 的日志,因为是直接访问的所以 http_refer 为空
- 第二次 是 为了 获得 nginx1.png ,这里的 http_refer 是第一次访问的地址
防盗链 就是 防止其他网站直接使用我们网站的图片等信息(例如这里,别人网站直接在img标签中加入我们图片的地址)
- 编辑nginx.conf ,书写防盗链
location ~ .*\.(jpg|gif|png)$ {
	valid_referers none blocked 127.0.0.1;
	if ($invalid_referer){
		return 403;
	}
	root /opt/app/img;
}
- valid_referers:设置哪些允许访问
- none :http_refer为空的
- blocked:没有协议头的,非正常访问
- IP地址
- 这里 通过 valid_referers 设置 invalid_referer的值
- 如果不符合 valid_referers 中的要求,则invalid_referer 为 1
代理
-
正向代理
- 客户端请求服务端,不能直接请求到,就需要一个代理,代为访问
- 对象是客户端
-
反向代理
- 客户端请求服务器,服务器可能是一个集群有很多,其中一个作为分发代理服务器,向其他服务器发送信息
- 对象是服务端
配置语法
Syntax : proxy_pass URL;
# 请求到 Nginx 作为代理服务器后,去请求的URL
# 一般写成:http://localhost:8000/uri/
# 		  https://182.168.1.1/uri/
#   	  http://unix:/tmp/backend.socket:/uri/
Default : --
Context : location, if in location, limit_except
nginx.conf配置
location ~ /test_proxy.html$ {
	proxy_pass http://127.0.0.1:8081;
	# 外部访问80端口时,发送信息给本地8081端口
}
- 随后新写server
server {
    listen       8081;
    server_name  localhost;
    access_log /var/log/nginx/server.access.log main;

    location / {
        root /opr/app/code;
        index index.html index.htm;
    }
    error_page 500 502 503 504 /50.html;
    location = /50.html {
        root html;
    }
}
以上为 反向代理
http://nginx.org/en/docs/http/ngx_http_proxy_module.html
官方配置网址
配置缓冲区
Syntx : proxy_buffering on | off;
Default : proxy_buffering on;
Context : http, server, location
- 一次尽可能多的把一个请求打所有信息收集完,之后再返回给客户端
- 减少了IO请求
- 但是默认是写在内存中,如果内存不够就可能出现遗失文件
跳转重定向
Synatx : proxy_redirect default;
		 proxy_redirect off;
		 proxy_redirect redirect replacement;
Default : proxy_redirect default;
Context : htpp, server, location;
头信息
Syntax : proxy_set_header field value;
Default : proxy_set_header Host $proxy_host;
		  proxy_set_header Connection close;
Context : http, server, location;
还有 proxy_hide_header,proxy_set_body
超时
- 指的是 Nginx作为代理,连接到后端到超时
Syntax : proxy_connect_timeout time;
Default : proxy_connect_timeout 60s;
Context : http, server, location;
扩展:proxy_read_timeout,proxy_send_timeout
常用proxy的配置项
location / {
	proxy_pass http:127.0.0.1:8089;
	proxy_redirect default;

	proxy_set_header Host $http_host;
	proxy_set_header X-Real-IP $remote_addr;

	proxy_connect_timeout 30;
	proxy_send_timeout 60;
	proxy_read_timeout 60;

	proxy_buffer_size 32k;
	proxy_buffering on;
	proxy_buffers 4 128k;
	proxy_busy_buffers_size 256k;
	proxy_max_temp_file_size 256k;
}
负载均衡
- GSLB:全局负载均衡(已国家为单位大小)
- SLB:比GSLB小很多
我这就一台服务器,不学了,草!
Nginx缓存

proxy_cache配置语法
Syntax : proxy_cache_path path [levels=levels]
[use_temp_path=on|off] keys_zone=name:size[inactive=time]
[max_size=size][manager_files=number][manager_sleep=time]
[manager_threshold=time][lader_files=number]
[loader_sleep=time][loader_threshold=time][purger=on|off]
[purger_files=number][purger_sleep=time]
[purger_threshold=time];
Default : --
Context : http
- proxy_cache_path : 定义目录空间大小以及名字,用来存放对应的缓存文件
- levels:进行分级
- keys_zone:开启空间的名字,存放key的大小(一般1m存放8000个key)
- max_size:目录控制的最大的空间(超过的话,Nginx有自己的规则删掉不活跃的东西)
- inactive:后跟时间,表示这么段时间内如果资源没有被访问过,则清理掉该资源
- use_temp_path:用于存放临时文件,建议关闭
Syntax : proxy_cache zone|off;
Default : proxy_cache off;
Context : http,server, location;
- 缓存过期周期
Syntax : proxy_cache_valid [code ...]time;
# code 对应返回状态码
Default : --
Context : http, server, location;
- 缓存的维度
Syntax : proxy_cache_key string;
Default : proxy_cache_key $scheme$proxy_host$request_uri;
Context : http, server, location;
- proxy_cache :运用了proxy_cache_path 开启的zone
- proxy_cache_valid:对于 状态码的过期时间
书写nginx.conf
proxy_cache_path /opt/app/cache levels=1:2 keys_zone=my_cache:10m inactive=60m use_temp_path=off;

server{
	listen 80;
	server_name localhose;
	access_log /var/log/nginx/cache.access.log main;
	location / {
		proxy_cache my_cache;
		proxy_pass 127.0.0.1;
		proxy_cache_valid 200 304 12h;
		proxy_cache_valid any 10m;
		# 除了 200 403 外的状态码,10分钟过期
		proxy_cache_key $host$uri$is_args$args;
		add_header Nginx-Cache "$upstream_cache_status";
		# 表示缓存是否命中

		proxy_next_upstream error timeout invalid_header http_500 http_502 http_503 http_504;
		# 如果后端服务器 出现了不正常服务器,则不通过这台访问,去访问其他服务器
	}

}
清理指定缓存
- 方法1 : rm -rf 删除目录缓存
- 方法2 : 第三方模块:ngx_cache_purge
部分页面不缓存
- 对于一些 登录注册页面等 ,不希望它缓存
Syntax : proxy_no_cache stirng ...;
Default : --
Context : http, server, location;
上述模块的写法
if ($request_uri ~ ^/(url3|login|register|password\/reset)){
	set $cookie_nocache 1; # 如果请求地址以上述开头,则设置cookie_nocache为1
}
location / {
	proxy_cache my_cache;
	...#不重复写了
	proxy_no_cache $cookie_nocache;# 如果为1,Nginx就不会缓存了
}
动静分离
- 通过中间件(Nginx)将动态请求和静态请求分离
- 分离资源,减少不必要的请求消耗,减少请求延时

Nginx的rewrite
- 实现url重写以及重定向
- url访问跳转,支持开发设计
- 页面跳转,兼容性支持,展示效果等
- SEO优化
- 维护
- 后台维护,流量转发等
- 安全
- 让动态页面伪装成静态页面
配置语法
Syntax : rewrite regex replacement [flag];
# regex 为正则表达式,用于匹配需要进行改写的url或者路径
# replacement 替换成目标或者哪一个路径
# flag 为一个标示
Default : --
Context : server, location, if
rewrite ^(.*)$ /pages/maintain.html break;
- 这里的
- regex :^(.*)$ ,匹配所有路径
- 改写为 /pages/maintain.html 文件
- falg:break
- 常见的 网站维护的写法,对所有的请求都跳转到维护页面
正则表达式
| . | 匹配除换行符以外的任意字符 |
| ? | 重复0次或1次 |
| + | 重复1次或更多次 |
| * | 最少连接数 |
| \d | 匹配数字 |
| ^ | 匹配字符串的开头 |
| $ | 匹配字符串的结尾 |
| {n} | 重复n次 |
| {n , } | 重复n次或更多次 |
| [c] | 匹配单个字符c |
| [a-z] | 匹配a-z的任意一个 |
| () | 用于匹配括号之间的内容,通过$1,$2调用 |
if ($http_user_agent ~ MSIE){
	rewrite ^(.*)$ /msie/$1 break;
}
上述的意思就是,匹配客户端的头信息是否有MSIE的内容
如果有,则提取出访问的内容,赋值给$1
rewrite中的flag
| last | 停止rewrite检测,会新建请求,再按新链接请求一次服务端 |
| break | 停止rewrite检测,会跳转去root目录查找 |
| redirect | 返回302临时重定向,地址栏会显示跳转后的地址 |
| last | 返回301永久重定向,地址栏会显示跳转后的地址 |