React 之 jest 前端自动化测试
一. 自动化测试简介
-
为什么要前端自动化测试:
自动化测试可以间接的提供代码的测试,多人协作时相互之间未知逻辑的改动等产生的未知或新问题的预警。有效避免一些未考虑到及低级的错误。 -
自动化测试需要工作:
自动化测试需要我们手动编写测试代码,当部分逻辑发生改变时,也需要同步更新我们的测试代码。重一定的角度上它也间接的提高了开发及维护成本。这点在实际开发运用中,大家根据实际项目情况来衡量。 -
前段测试工具概览:
前端测试工具纷繁复杂,大致分为测试框架, 断言库, 测试覆盖率工具等。
测试框架
测试框架的作用是提供一些方便的语法来描述测试的用例,以及对用例进行分组。
测试框架可分为两种: TDD(测试驱动开发)和 BDD(行为驱动开发)。
常见的测试框架有 Jasmine, Mocha 及 接下来我们要介绍的 Jest
断言库
断言库主要提供语义化方法,用于对参与测试的值做各种各样的判断。 这些语义化方法会返回测试的结果,要么成功,要么失败。
产概念的断言库有Should.js Chai.js 等
测试覆盖率工具
用于统计测试用例对代码的测试情况, 生成响应的报表。 比如* istanbul *
- 关于Jest 测试框架概述
Jest 是Facebook 出品的一个测试框架, 其一大特点是内置了常用的测试工具,比如:自带断言(expect), 测试覆盖率工具(coverage),实现了开箱即用等 。
Jest 可以利用其特有的快照测试功能, 通过比对UI代码生成的快照文件, 实现对React等常见框架的自动化测试。
此外,Jest 测试用例是并行执行的, 而且只执行发生改变的文件所对应的测试,提升了测试速度。
二. Jest 的实践
1. 环境搭建
这里我们主要研究jest的搭建所以,您可以通过官网安装 Create React App 来搭建一个开发环境。
接下来我们需要做如下事情:
-
安装依赖包
npm i jest babel-jest -D -
添加jest.config.js 文件
// 根目录下创建: jest.config.js

// 配置文档
//https://jestjs.io/docs/zh-Hans/configuration
module.exports = {
  // Automatically clear mock calls and instances between every test
  clearMocks: true,

  // The directory where Jest should output its coverage files
  coverageDirectory: "coverage",

  // An array of regexp pattern strings used to skip coverage collection
  coveragePathIgnorePatterns: [
    "\\\\node_modules\\\\"
  ],

  // An array of file extensions your modules use
  moduleFileExtensions: [
   "js",
   "jsx",
  ],

  // A list of paths to directories that Jest should use to search for files in
  roots: null,

  // The test environment that will be used for testing
  testEnvironment: "node",

  // The glob patterns Jest uses to detect test files
  testMatch: [
    "**/__tests__/**/*.js?(x)",
    //"**/?(*.)+(spec|test).js?(x)"
  ],

  // An array of regexp pattern strings that are matched against all test paths, matched tests are skipped
  testPathIgnorePatterns: [
   "\\\\node_modules\\\\"
  ],

  // A map from regular expressions to paths to transformers
  transform: {
    "^.+\\.js$": "babel-jest"
  },

  // An array of regexp pattern strings that are matched against all source file paths, matched files will skip transformation
  transformIgnorePatterns: [
    "\\\\node_modules\\\\"
  ],
};
- 创建测试代码文件目录
在根目录下创建*tests* 文件夹用来存放测试脚本文件。
注: Jest 的测试脚本名形如 **.test.js 或 *.spec.js。 当执行npm run test 命令时,
它会执行当前目录下的所有 的 *.test.js 或 *.spec.js 文件, 完成测试。
- package.json中添加命令
"scripts":{
    "my-test": "jest --colors --coverage"
}
- 添加对Jest 的 ES6+支持
因为jest是基于Node 环境运行。 Node默认对ES6+语法不全支持。所以如果我们用到了ES6+语法,需要为其添加语法支持。
// 为了避免版本冲突,将babel版本全部升级为7,或者将版本全部降到6:
// 即: @babel/*  7.*
 "@babel/core": "^7.8.4",
 "@babel/preset-env": "^7.8.4",
 "@babel/preset-react": "^7.8.3",
  "babel-jest": "^24.9.0",
  "babel-loader": "^8.0.6",
2. 用法
- 用例的表示
Jest 内部使用了 Jasmin2 来进行测试, 故其用例语法与 Jasmine相同。==test()==函数来描述一个测试用例。
// Demo  普通函数

// src/sum.js
const sum = (a, b) => {
  return a+b
}
export default sum;

// __tests__/demo.test.js
import sum from '../src/sum';

test('adds 1 + 2 to equal 3', () => {
  expect(sum(1,2)).toBe(3)
})
执行命令 npm run my-test 输出结果如下:

单元测试的几个指标:
%stmts 是语句覆盖率(statement coverage):是不是每个语句都执行了?
%Branch 分支覆盖率(branch coverage):是不是每个if代码块都执行了?
%Funcs 函数覆盖率(function coverage):是不是每个函数都调用了?
%Lines 行覆盖率(line coverage):是不是每一行都执行了?
- UI 组件测试
// Demo UI 组件测试
// src/commentItem.js
import React from 'react'
const CommentItem = (props) => (
=1?'btn-expand':''}>
{
props.list.map((item, index) => {
return {item}
})
}
)
export default CommentItem
// __tests__/demo.ui.test.js
import React from 'react'
import Enzyme, { shallow } from 'enzyme'
import CommentItem from '../src/commentItem'
import Adapter from 'enzyme-adapter-react-16'
Enzyme.configure({ adapter: new Adapter() })
describe('测试评论列表项组件', () => {
// 这是mocha的玩法,jest可以直接兼容
it('测试评论内容小于等于200时不出现展开收起按钮', () => {
const propsData = {
name: 'hj',
content: '测试标题',
list:['l1','l2','l3']
}
const item = shallow(扩展
细心的同学应该注意到了,这个实例中用到了==enzyme,Adapter ==。 这里简单说下两者的作用。
(1)Enzyme 简介 传送门
(2)Adapter : 在使用 enzyme 时,需要先适配React版本。
npm i enzyme-adapter-react-16 -D
//使用
import Adapter from 'enzyme-adapter-react-16'
Enzyme.configure({ adapter: new Adapter() })
为了避免每次测试文件都这么写, 可以在test目录下新建一个配置文件:
import Enzyme from 'enzyme';
import Adapter from 'enzyme-adapter-react-16';

Enzyme.configure({
  adapter: new Adapter(),
});

export default Enzyme;
然后在测试文件的时候引入这个配置文件即可:
import React from 'react'
import Enzyme from './config/Enzyme.config';
................
const {shallow}=Enzyme
describe('Enzyme的浅渲染测试套件', function () {
it('Example组件中按钮的名字为text的值', function () {
const name='按钮名'
let app = shallow(3. Jest 之快照测试(Snapshot)
如果你的项目中还没有任何测试用例,那么使用快照测试将是一个最快的基本保障。
如果你想确保你的一些公共组件(UI)不会被意外的被修改变化,那么快照测试是一个非常有用的工具。
它的基本思想是:在测试文件目录下生成快照文件目录“snapshots/**.test.js.snap” 。 每次执行测试命令时,都会与该目录下的对应快照文件进行内容比对。 如果两个图像(内容)不匹配,则测试失败。 除非您同步更新了快照为最新版本(即测试用例中承认且同意修改更新快照内容)。
// snapshot test demo

// src/Link.Snapshot.js
import React from 'react';

const STATUS = {
  HOVERED: 'hovered',
  NORMAL: 'normal',
};

export default class Link extends React.Component {
  constructor() {
    super();

    this.state = {
      class: STATUS.NORMAL,
    };
  }

  _onMouseEnter = () => {
    this.setState({class: STATUS.HOVERED});
  };

  _onMouseLeave = () => {
    this.setState({class: STATUS.NORMAL});
  };

  render() {
    return (

        {this.props.children}

    );
  }
}


// __tests__/snapshot.test.js
import React from 'react';
import Link from '../src/Link.Snapshot';
import renderer from 'react-test-renderer';

it('renders correctly', () => {
  const tree = renderer.create(
    Instagram
  ).toJSON();
  expect(tree).toMatchSnapshot();
});
// __tests__/__snapshots__/snapshot.test.js.snap

// Jest Snapshot v1, https://goo.gl/fbAQLP
exports[`renders correctly 1`] = `

  Instagram

`;
当某人不小心修改了我们的公共UI组件代码后(注:测试用例没有修改):
// src/Link.Snapshot.js

...........
................
render() {
    return (

        {this.props.children}

    );
  }
 ...........
 ............................
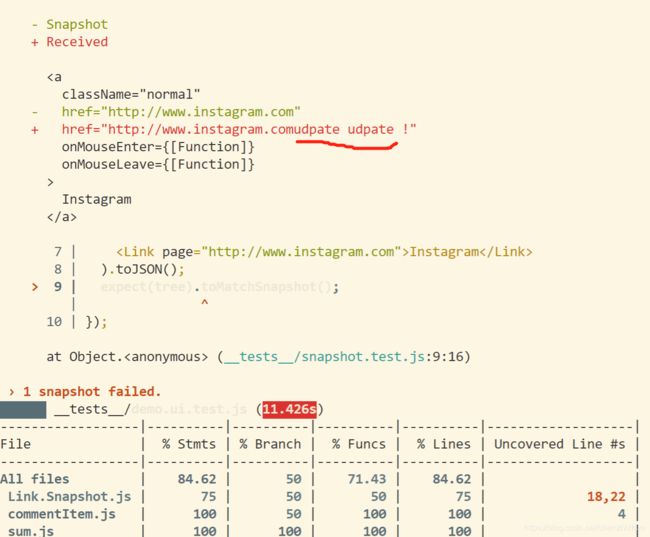
再次执行测试命令输入结果如下:

Jest 快照测试通过比对上次的快照输出文件内容,发现不一致。 输出测试失败! 表示该UI组件被修改…
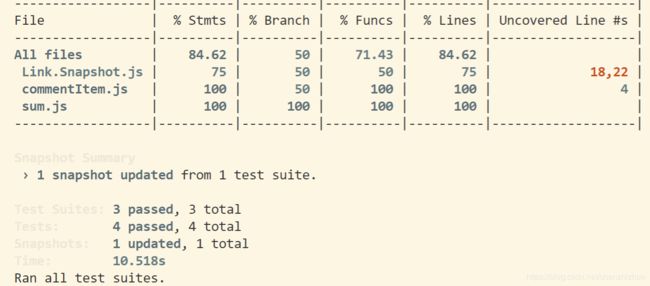
如果我们统一本次的修改, 那么可以通过: npm run my-test – -u 命令来同意同步更新历史快照文件。更新完成后,则测试提示通过。
注: 快照文件应该与代码更改一起提交,并作为代码审查过程的一部分进行审核。
Jest 使用 pretty-format 对快照文件进行了处理,代码会变成可阅读的文件。
3. 常用API
- Jest 全局方法
Describe(name, fn) : 测试套件,一组相关的测试用例。第一个参数是测试套餐的描述,第二个参数是测试用例。
const my = {
	name : "fynn",
	age : 27
}
describe("my info", ()=>{
	test("my name", ()=>{
		expect(my.name).toBe("fynn")
	});
	test("my age", ()=>{
		expect(my.age).toBe(27)
	})

})
- Describe.only(name, fn)
当一个file有多个测试套件,但你只想执行其中一个测试套件,可以使用 describe.only。
const my = {
	name : "fynn",
	age : 27
}
let hw = () =>"Hello World!";
describe("my info", ()=>{
	test("my name", ()=>{
		expect(my.name).toBe("fynn")
	});
	test("my age", ()=>{
		expect(my.age).toBe(27)
	})

});
describe.only('hw function test suit',()=>{
	test('hw test',()=>{
		expect(hw()).toBe("Hello World!");
	})
})
- Describe.skip(name, fn)
一个file中有多个测试套件,如果你想跳过某个测试套件可以使用 describe.skip
- Test
测试用例,可以写在 describe测试套件中,也可以单独写在测试套件外面
const my = {
   	name : "fynn",
   	age: 27
}
let hw = ()=>"Hello World!"
describe("my info",()=>{
   	test("my name",()=>{
       	expect(my.name).toBe("fynn")
   	});
   	test("my age",()=>{
       	expect(my.age).toBe(27)
   	})
});
test("hw test",()=>{
   	expect(hw()).toBe("Hello World!");
})
- Test.only
有多个测试用例或测试套件,只想执行其中某一个测试用例时可以用test.only。
const my = {
	name : "fynn",
	age : 27
};
let hw = ()=>"Hello World!";
test("my name",()=>{
	expect(my.name).toBe("fynn");
})
test.only("hw test",()=>{
	expect(hw()).toBe("Hello World!");
})
- Test.skip(name, fn)
当有多个测试用例,想跳过某个测试用例可以使用test.skip;
- It(name,fn)
用法和test一样,不能嵌套在test中!可以嵌套在describe中
const my = {
	name : "fynn",
	age : 27
};
let hw = ()=>"Hello World!";
it("my name",()=>{
	expect(my.name).toBe("fynn");
})
xit("hw test",()=>{
	expect(hw()).toBe("Hello World!");
})
- AfterAll(fn)
当file所有test都执行完毕后,执行afterAll中的方法。
const my = {
	name :"fynn",
	age : 27
};
test("my name",()=>{
	expect(my.name).toBe("fynn")
});
test("my age",()=>{
	expect(my.age).toBe(27)
});
afterAll(()=>{
	console.log("执行完所有test!")
})
- AfterEach(fn)
每当一个test执行完后,调用一次afterEach中的方法
const my = {
	name :"fynn",
	age : 27
};
test("my name",()=>{
	expect(my.name).toBe("fynn")
});
test("my age",()=>{
	expect(my.age).toBe(27)
});
afterEach(()=>{
	console.log("执行完一个test!")
})
- BeforeAll(fn)
在所有执行test前先调用beforeAll中的方法
const my = {
   	name :"fynn",
   	age : 27
};
test("my name",()=>{
   	expect(my.name).toBe("fynn")
});
test("my age",()=>{
   	expect(my.age).toBe(27)
});
beforeAll(()=>{
   	console.log("要开始执行test了!")
});
- BeforeEach(fn)
在每个test执行前都会调用一次beforeEach中的方法
const my = {
   	name :"fynn",
   	age : 27
};
test("my name",()=>{
   	expect(my.name).toBe("fynn")
});
test("my age",()=>{
   	expect(my.age).toBe(27)
});
beforeEach(()=>{
   	console.log("要开始执行一个test了!")
})
其它相关API 参考如下地址:
关于Jest 官方地址 传送门
未完待续…

