在本教程中,您将使用Kubernetes将Spring Boot微服务架构部署到Google Cloud,特别是Google Kubernetes Engine(GKE)。 您还将使用Istio创建服务网格层并创建公共网关。 整个事情将使用Okta OAuth JWT身份验证进行保护。
那是一堆烂话。 我们在这里不会深入解释微服务。 简而言之,微服务是一种设计模式,可将较大的单片服务拆分为较小的独立“微”服务。 这些服务通过网络松散耦合。 这种体系结构的好处是,每个服务都变得可测试,可维护且可独立部署。 在互联网规模上,在像Amazon和Netflix这样的大型公司中,这种架构都很棒,因为它允许公司将小型团队的职责分配给可管理的,离散的功能单元。 与拥有成千上万的人监督的巨大的整体代码块相反。 缺点是复杂性和基础架构的初期成本很高,这对于无法规模化的小型项目可能没有意义。
ķubernetes is a platform for deploying containerized services. You can think of it as a container orchestrator for Docker containers (this is a simplification, but it’ll work). It will allow us to write YAML scripts that automate the deployment of our microservice architecture to our chosen platform, GKE. It’s a huge project with lots to dig into. Take a look at their docs for more info.
一世stio adds another layer of features on top of Kubernetes, adding some great monitoring, security, access control, and load balancing features. Check out their website for more info.
微服务架构的最后一部分是Google Cloud和GKE。 这是您用来部署微服务的平台。 本教程中未介绍的另一个选项是Minikube。 Minikube在您的计算机上本地运行,可能对某些人有用。 我发现Google Kubernetes Engine更易于使用且性能更高。
我们假设您熟悉Spring Boot和Java。 如果不是这样,请查看教程末尾的一些链接以开始使用。
Requirements for Spring Boot and Kubernetes
HTTPie: Install HTTPie from their website so that we can run HTTP requests easily from the terminal.
docker: Please download and install Docker Desktop from their website if you don’t have it already installed.
ķubectl: This is Kubernetes’ command line interface. Instructions for installing it are on their website.
Google Cloud: You’ll need a Google Cloud account with billing enabled. A free trial is available and should include more than enough credit and time to get you through this tutorial. Go to the Google Cloud website and sign up.
developer.okta.com: We offer free developer accounts on our developer site. Please sign up for one now. You’ll use it toward the end of the tutorial.
Gcloud: This is the Google Cloud CLI. Install it using the instructions from their website. Once that is done, you’ll need to install the Gcloud kubectl components by running the following command:
gcloud components install kubectl
我是否提到微服务的初始复杂性成本很高?
Create a Google Kubernetes Engine Project with Istio
您现在应该拥有一个启用了结算功能的Google Cloud帐户。 同样,您实际上不需要花任何钱,但是如果不付费,您将无法使用免费试用版。
创建一个新项目。 命名春靴(或您想要的任何内容,但您需要使用各个项目的项目ID)。 等待项目创建。
项目名称的结尾可能会带有一个ID号,例如弹簧靴gke-232934。 您将需要多次使用该项目名称,因此请继续将其存储在shell变量中并加以注意。
PROJECT_NAME=
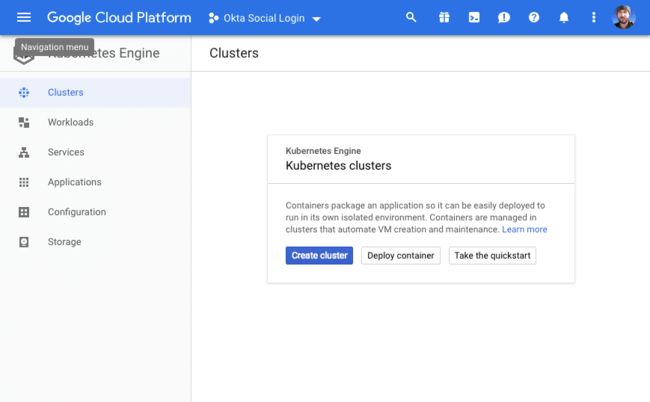
项目准备就绪后,打开项目仪表板,打开导航菜单,然后单击Kubernetes引擎。 点击启用帐单按钮(如果您尚未启用结算功能),然后选择一个结算帐户。
请点击创建集群。
在左侧面板中,选择您的第一个集群。
将集群命名为“ spring-boot-cluster”。
选择区域“ us-west1-a”。
点击高级选项群集配置面板底部的链接以显示高级选项。 向下滚动到底部,然后选中复选框启用Istio(测试版)。 这将自动在群集上安装Istio。
在底部,单击创建创建集群。 喝咖啡或休息一下; 创建集群将需要几分钟。
同时,如果您还没有的话,请继续进行初始化gcloudCLI通过运行:
gcloud init
在初始化过程中,您可以将新项目设置为默认项目,并将项目区域设置为默认区域。
部署集群后,您需要连接本地gcloud和Kubectl使用以下命令对其进行CLI:
gcloud container clusters get-credentials {yourClusterName} --zone us-west1-a --project {yourProjectId}
如果您使用其他项目名称,则需要更改命令以反映该名称。
注意:如果您点击连接Google Cloud Platform仪表板右侧的按钮,您将看到正确的命令,可输入:
结果,您应该看到类似以下的内容:
Fetching cluster endpoint and auth data.
kubeconfig entry generated for spring-boot-cluster.
您还需要为自己赋予集群管理员权限:
kubectl create clusterrolebinding cluster-admin-binding --clusterrole=cluster-admin --user=$(gcloud config get-value core/account)
现在,您需要检查并确保Istio服务已安装并正在运行。 有两种检查方法。 首先,在您的Google Cloud Platform Kubernetes Engine仪表板中,单击服务按钮。 您应该在自己的计算机上看到Istio服务列表春季引导集群。 它们的状态栏中都应有绿色的“确定”。
在那里,请注意名为历史门户类型负载均衡器。 这是群集的公共负载平衡器,该条目显示公共IP和开放端口。
另一种检查方法是使用KubectlCLI。
要检查服务,请使用以下命令:kubectl获取服务-所有命名空间。 的--all-命名空间需要显示Istio服务,该服务位于组织系统命名空间。
$ kubectl get services --all-namespaces
NAMESPACE      NAME                     TYPE           CLUSTER-IP      EXTERNAL-IP      PORT(S)                                                                                                                   AGE
default        kubernetes               ClusterIP      10.31.240.1                443/TCP                                                                                                                   5m
istio-system   istio-citadel            ClusterIP      10.31.252.214              8060/TCP,9093/TCP                                                                                                         3m
istio-system   istio-egressgateway      ClusterIP      10.31.247.186              80/TCP,443/TCP                                                                                                            3m
istio-system   istio-galley             ClusterIP      10.31.249.131              443/TCP,9093/TCP                                                                                                          3m
istio-system   istio-ingressgateway     LoadBalancer   10.31.244.186   35.185.213.229   80:31380/TCP,443:31390/TCP,31400:31400/TCP,15011:30675/TCP,8060:31581/TCP,853:32460/TCP,15030:30998/TCP,15031:31606/TCP   3m
istio-system   istio-pilot              ClusterIP      10.31.251.44               15010/TCP,15011/TCP,8080/TCP,9093/TCP                                                                                     3m
istio-system   istio-policy             ClusterIP      10.31.246.176              9091/TCP,15004/TCP,9093/TCP                                                                                               3m
istio-system   istio-sidecar-injector   ClusterIP      10.31.240.214              443/TCP                                                                                                                   3m
istio-system   istio-telemetry          ClusterIP      10.31.247.23               9091/TCP,15004/TCP,9093/TCP,42422/TCP                                                                                     3m
istio-system   promsd                   ClusterIP      10.31.246.88               9090/TCP                                                                                                                  3m
kube-system    default-http-backend     NodePort       10.31.250.134              80:31955/TCP                                                                                                              4m
kube-system    heapster                 ClusterIP      10.31.250.242              80/TCP                                                                                                                    4m
kube-system    kube-dns                 ClusterIP      10.31.240.10               53/UDP,53/TCP                                                                                                             4m
kube-system    metrics-server           ClusterIP      10.31.245.127              443/TCP
要检查Kubernetes容器,请使用:kubectl获取pods --all-namespaces
$ kubectl get pods --all-namespaces
NAMESPACE      NAME                                                      READY     STATUS      RESTARTS   AGE
istio-system   istio-citadel-7c4864c9d5-7xq9x                            1/1       Running     0          10m
istio-system   istio-cleanup-secrets-ghqbl                               0/1       Completed   0          10m
istio-system   istio-egressgateway-c7f44ff8-tz7br                        1/1       Running     0          10m
istio-system   istio-galley-698f5c74d6-hmntq                             1/1       Running     0          10m
istio-system   istio-ingressgateway-774d77cb7c-qvhkb                     1/1       Running     0          10m
istio-system   istio-pilot-6bd6f7cdb-gb2gd                               2/2       Running     0          10m
istio-system   istio-policy-678bd4cf9-r8p6z                              2/2       Running     0          10m
istio-system   istio-sidecar-injector-6555557c7b-99c6k                   1/1       Running     0          10m
istio-system   istio-telemetry-5f4cfc5b6-vj8cf                           2/2       Running     0          10m
istio-system   promsd-ff878d44b-hlkpg                                    2/2       Running     1          10m
kube-system    heapster-v1.6.0-beta.1-8c76f98c7-2b4dm                    2/2       Running     0          9m
kube-system    kube-dns-7549f99fcc-z5trl                                 4/4       Running     0          10m
kube-system    kube-dns-autoscaler-67c97c87fb-m52vb                      1/1       Running     0          10m
kube-system    kube-proxy-gke-spring-boot-cluster-pool-1-b6988227-p09h   1/1       Running     0          10m
kube-system    l7-default-backend-7ff48cffd7-ppvnn                       1/1       Running     0          10m
kube-system    metrics-server-v0.2.1-fd596d746-njws2                     2/2       Running     0          10m
吊舱的所有状态都必须为已完成要么跑步。 我遇到了几次问题,即自动配置无法正常工作,并且某些吊舱从未到达跑步身份,被困在容器创建。 我必须删除群集并重新安装它才能正常工作。
如果发生这种情况,您可以使用描述豆荚命令以查看发生了什么事情:kubectl 描述豆荚 -n 组织系统。 这将为您提供有关所有Pod中所有豆荚的信息组织系统命名空间,使用-n选项。
如果到此为止没有问题,现在您已经在安装了Istio的GKE上部署了Kubernetes集群! 很甜
Both Google and Istio have some pretty helpful docs if you have a problem. Check out the Google GKE docs and the Istio GKE docs for further support.
Create a Spring Boot Project for Your Microservices
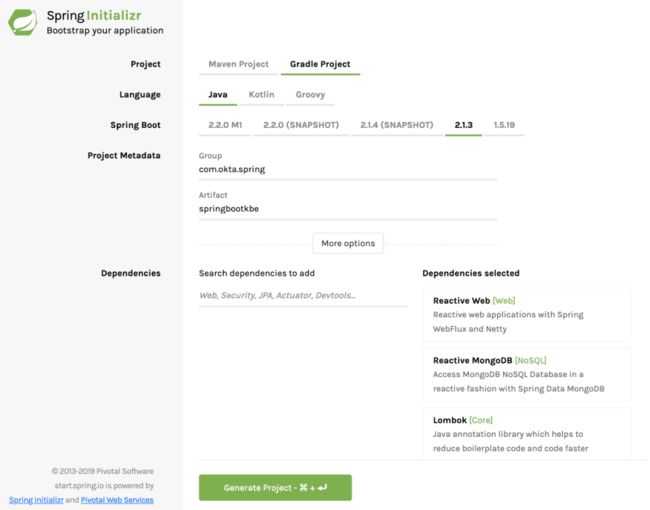
Now go to the Spring Initializer and create your starter project.
- 将构建工具从Maven更改为摇篮使用爪哇和Spring Boot版本2.1.3更新组至:com.okta.spring使用神器:springbootkbe加三依存关系:响应式网页,反应性MongoDB,and 龙目岛
请点击产生专案并下载项目。 将项目解压缩到本地计算机上的某个位置,然后在您喜欢的IDE或编辑器中将其打开。
Spring Initializer创建了一个带有MongoDB支持的准系统响应式Webflux项目,供您扩展。
与我的其他一些教程一样,并且由于我喜欢皮划艇,因此您将构建一个简单的反应式REST服务,该服务维护皮艇条目的数据库。 它实际上只是为了演示CRUD的基本功能(创建,读取,更新和删除),并且可以推广到任何类型的资源。
在里面com.okta.spring.springbootkbe包下src /主/ java,创建一个名为Kayak.java并将以下内容粘贴到其中。 这是您的反应性数据模型文档。
package com.okta.spring.springbootkbe;

import lombok.AllArgsConstructor;
import lombok.Data;
import lombok.NoArgsConstructor;
import org.springframework.data.mongodb.core.mapping.Document;

@Document
@Data
@AllArgsConstructor
@NoArgsConstructor
public class Kayak {

    private String name;
    private String owner;
    private Number value;
    private String makeModel;
}
现在在同一个包中创建另一个文件,名为KayakRepository。java。
package com.okta.spring.springbootkbe;

import org.springframework.data.mongodb.repository.ReactiveMongoRepository;

public interface KayakRepository extends ReactiveMongoRepository<Kayak, Long> {
}
在本教程中,我不会对这里发生的事情进行过多的详细介绍。 Spring Boot在这两个文件之间进行了大量自动匹配,以创建功能齐全的反应式Mongo文档。
接下来,您需要添加一个控制器以允许访问Kayak文档数据模型。 创建一个名为皮划艇控制器在里面com.okta.spring.springbootkbe包。
package com.okta.spring.springbootkbe;

import org.springframework.beans.factory.annotation.Autowired;
import org.springframework.stereotype.Controller;
import org.springframework.web.bind.annotation.*;
import reactor.core.publisher.Flux;
import reactor.core.publisher.Mono;

@Controller
@RequestMapping(path = "/kayaks")
public class KayakController {

    private final KayakRepository kayakRepository;

    public KayakController(KayakRepository kayakRepository) {
        this.kayakRepository = kayakRepository;
    }

    @PostMapping()
    public @ResponseBody
    Mono<Kayak> addKayak(@RequestBody Kayak kayak) {
        return kayakRepository.save(kayak);
    }

    @GetMapping()
    public @ResponseBody
    Flux<Kayak> getAllKayaks() {
        Flux<Kayak> result = kayakRepository.findAll();
        return result;
    }}
该控制器将两种方法添加到/皮划艇端点,即POST和GET端点,它们分别添加新的皮划艇并列出所有皮划艇。
最后,添加一个简单的根控制器,名为根控制器。
package com.okta.spring.springbootkbe;

import org.springframework.stereotype.Controller;
import org.springframework.web.bind.annotation.*;
import reactor.core.publisher.Flux;

@Controller
public class RootController {

    @GetMapping("/")
    @ResponseBody
    public Flux<String> getRoot() {
      return Flux.just("Alive");
    }
}
该控制器是必需的,因为Kuberenetes在我们服务的根端点上执行运行状况检查,并且需要返回响应,否则群集将认为您的服务已关闭。 实际的端点是可配置的,但是您现在可以将其留在根目录下。
要将一些示例数据引导到我们的数据库中,请更新Springbootkbe应用程序类定义要匹配以下内容。
package com.okta.spring.springbootkbe;

import org.springframework.boot.ApplicationRunner;
import org.springframework.boot.SpringApplication;
import org.springframework.boot.autoconfigure.SpringBootApplication;
import org.springframework.context.annotation.Bean;
import reactor.core.publisher.Flux;

@SpringBootApplication
public class SpringbootkbeApplication {

    public static void main(String[] args) {
        SpringApplication.run(SpringbootkbeApplication.class, args);
    }

    @Bean
    ApplicationRunner init(KayakRepository repository) {

        Object[][] data = {
            {"sea", "Andrew", 300.12, "NDK"},
            {"creek", "Andrew", 100.75, "Piranha"},
            {"loaner", "Andrew", 75, "Necky"}
        };

        return args -> {
            repository
                .deleteAll()
                .thenMany(
                    Flux
                        .just(data)
                        .map(array -> {
                            return new Kayak((String) array[0], (String) array[1], (Number) array[2], (String) array[3]);
                        })
                        .flatMap(repository::save)
                )
                .thenMany(repository.findAll())
                .subscribe(kayak -> System.out.println("saving " + kayak.toString()));

        };
    }
}
至此,您已经有了一个功能齐全的Spring Boot应用程序(减去了MongoDB服务器)。 要测试您的应用,请将以下依赖项添加到您的build.gradle文件。
compile 'de.flapdoodle.embed:de.flapdoodle.embed.mongo'
这会将嵌入式MongoDB数据库添加到您的项目。 在部署到集群之前,您需要删除此依赖关系,但这将使您可以在本地运行Spring Boot应用程序。
使用以下命令运行Spring Boot应用程序:gradle bootRun。
您应该看到一堆以结尾的输出:
2019-02-14 19:29:34.941 INFO 35982 --- [ntLoopGroup-2-4] org.mongodb.driver.connection : Opened connection [connectionId{localValue:5, serverValue:5}] to localhost:61858
2019-02-14 19:29:34.946 INFO 35982 --- [ntLoopGroup-2-3] org.mongodb.driver.connection : Opened connection [connectionId{localValue:4, serverValue:4}] to localhost:61858
saving Kayak(name=sea, owner=Andrew, value=300.12, makeModel=NDK)
saving Kayak(name=loaner, owner=Andrew, value=75, makeModel=Necky)
saving Kayak(name=creek, owner=Andrew, value=100.75, makeModel=Piranha)
使用HTTPie测试应用程序:http:8080(这会在默认的Spring Boot端口上运行一个get请求)。
HTTP/1.1 200 OK
Content-Type: text/plain;charset=UTF-8
transfer-encoding: chunked

Alive
并获取您的/皮划艇端点使用:http :8080/皮划艇。
HTTP/1.1 200 OK
Content-Type: application/json;charset=UTF-8
transfer-encoding: chunked
[
  {
    "makeModel": "NDK",
    "name": "sea",
    "owner": "Andrew",
    "value": 300.12
  },
  {
    "makeModel": "Necky",
    "name": "loaner",
    "owner": "Andrew",
    "value": 75
  },
  {
    "makeModel": "Piranha",
    "name": "creek",
    "owner": "Andrew",
    "value": 100.75
  }
]
假设一切正常,删除嵌入式Mongo依赖项。 您将使用Mongo Kubernetes窗格,这种依赖性将导致群集部署出现问题。
compile 'de.flapdoodle.embed:de.flapdoodle.embed.mongo'
Deploy the MongoDB Kubernetes Pod for Your Spring Boot App
Kubernetes通过使用YAML部署脚本部署Docker容器来工作(大致概括和简化)。
创建一个名为部署mongo.yml在项目的根目录中。
apiVersion: apps/v1
kind: Deployment
metadata:
  name: mongodb
  labels:
    appdb: mongodb
spec:
  replicas: 1
  selector:
    matchLabels:
      appdb: mongodb
  template:
    metadata:
      labels:
        appdb: mongodb
    spec:
      containers:
        - name: mongodb
          image: mongo:3.6.6
          ports:
            - containerPort: 27017
---
apiVersion: v1
kind: Service
metadata:
  name: mongodb
  labels:
    app: mongodb
spec:
  ports:
    - port: 27017
      protocol: TCP
  selector:
    appdb: mongodb
This defines the MongoDB Kubernetes Deployment and Service required to create the Mongo database on the cluster. I’m not going to try and fully explain what these objects are here, but you can read the Kubernetes deployment docs and the service docs. Roughly speaking, deployments define the micro-applications that run in the deployed pods while services provide the overarching abstraction that defines the access point to the apps in the pods. This abstraction provides a necessary continuity because pods may be killed and restarted and there may be multiple pods running a single service.
现在有些激动! 您将把Mongo数据库部署和服务部署到GKE集群。
使用以下命令:
kubectl apply -f deployment-mongo.yml
您应该看到:
deployment.apps "mongodb" created
service "mongodb" created
通过运行以下命令来检查Pod:
$ kubectl get pods
您应该看到:
NAME READY STATUS RESTARTS AGE
mongodb-c5b8bf947-rkw5f 1/1 Running 0 21s
如果状态列为容器创建,请稍等片刻,然后再次运行命令。 如果卡住了容器创建超过几分钟,可能出了点问题。 您可以使用kubectl描述豆荚和kubectl获取事件命令以了解发生的情况。
这使用标准docker映像配置了在端口27017上运行的Mongo数据库mongo:3。6。6。
太好了吧? 下一站,火箭科学!
Deploy the Spring Boot App to the Cluster
添加一个名为Docker文件在根目录中:
FROM openjdk:8-jdk-alpine
ENV APP_FILE springbootkbe-0.1.0-SNAPSHOT.jar
ENV APP_HOME /usr/app
EXPOSE 8000
COPY build/libs/*.jar $APP_HOME/
WORKDIR $APP_HOME
ENTRYPOINT ["sh", "-c"]
CMD ["exec java -jar $APP_FILE"]
更新src / main / resources / application.properties:
server.port=8000
spring.data.mongodb.host=mongodb
spring.data.mongodb.port=27017
这会将您的Spring Boot端口配置为您在Docker文件以及配置MongoDB主机和端口。 默认情况下,主机将是集群中服务的名称。
再次构建您的应用(您确实删除了梦呓依赖,对吧?):
gradle clean build
创建另一个名为的Kubernetes部署脚本Deployment.yml在根项目目录中:
apiVersion: v1
kind: Service
metadata:
  name: kayak-service
  labels:
    app: kayak-service
spec:
  ports:
    - name: http
      port: 8000
  selector:
    app: kayak-service
---
apiVersion: extensions/v1beta1
kind: Deployment
metadata:
  name: kayak-service
spec:
  replicas: 1
  template:
    metadata:
      labels:
        app: kayak-service
        version: v1
    spec:
      containers:
        - name: kayak-app
          image: gcr.io/spring-boot-gke-/kayak-app:1.0
          imagePullPolicy: IfNotPresent
          env:
            - name: MONGODB_HOST
              value: mongodb
          ports:
            - containerPort: 8000
          livenessProbe:
            httpGet:
              path: /
              port: 8000
            initialDelaySeconds: 5
            periodSeconds: 5
注意:仔细看看gcr.io/spring-boot-gke/kayak-app:1.0。 中间部分是Google Cloud项目名称。 这需要与您使用的项目名称以及分配的ID号(例如弹簧靴gke-43234)。
Gcr.io specifies a Google Cloud host for the docker image in the United States. It’s possible to specify other locations. See the GooGle Container Registry docs for more info.
即将发生的事情的简要摘要,因为有很多活动的部分。 Spring Boot应用程序将进行docker化:内置于docker映像中。 在群集上运行部署脚本时,它将尝试从Google Container注册表中提取此映像。 因此,您需要将映像推送到容器注册表并对其进行标记,以便Kubernetes可以找到正确的映像。
如果您使用的是本地Docker桌面,请继续启动并等待其启动。
在执行任何操作之前,您将需要配置Google Cloud和docker才能很好地协同工作:
gcloud auth configure-docker
构建docker镜像:
docker build -t kayak-app:1.0 .
标记图像并将其推送到Google容器注册表(再次注意Google Cloud项目名称):
docker tag kayak-app:1.0 gcr.io/$PROJECT_NAME/kayak-app:1.0;
docker push gcr.io/$PROJECT_NAME/kayak-app:1.0
现在应用Deployment.yml文件到GKE集群:
kubectl apply -f deployment.yml
检查以确保Pod正确部署:
kubectl get pods
NAME                             READY     STATUS    RESTARTS   AGE
kayak-service-7df4fb9c88-srqkr   1/1       Running   0          56s
mongodb-c5b8bf947-dmghb          1/1       Running   0          16m
但是,此时集群还没有准备好。 它不能公开访问。
创建一个名为istio-gateway。yml。
apiVersion: networking.istio.io/v1alpha3
kind: Gateway
metadata:
  name: kayak-gateway
spec:
  selector:
    istio: ingressgateway # use Istio default gateway implementation
  servers:
  - port:
      name: http
      number: 80
      protocol: HTTP
    hosts:
    - '*'
---
apiVersion: networking.istio.io/v1alpha3
kind: VirtualService
metadata:
  name: kayak-service
spec:
  hosts:
  - "*"
  gateways:
  - kayak-gateway
  http:
  - match:
    - uri:
        prefix: /
    route:
    - destination:
        port:
          number: 8000
        host: kayak-service
并应用:
kubectl apply -f istio-gateway.yml
您应该得到:
gateway.networking.istio.io "kayak-gateway" created
virtualservice.networking.istio.io "kayak-service" created
Test the Deployed Google Kubernetes Engine + Spring Boot App
既然您已成功将Spring Boot应用程序部署到Google Kubernetes集群,并创建了将服务链接到外部世界的网关,那么您将需要测试端点。
There are some good docs on the Istio website about ingress traffic that have a lot of good information. Below, copied from that page, are some commands that will determine the public-facing host/ip address and ports and save them into shell variables.
export INGRESS_HOST=$(kubectl -n istio-system get service istio-ingressgateway -o jsonpath='{.status.loadBalancer.ingress[0].ip}');
export INGRESS_PORT=$(kubectl -n istio-system get service istio-ingressgateway -o jsonpath='{.spec.ports[?(@.name=="http2")].port}');
在您的配置中,INGRESS_PORT可能只是HTTP的默认值80(无SSL)。
运行以下命令以查看主机和端口:
echo "$INGRESS_HOST, HTTP PORT=$INGRESS_PORT";
您还可以通过查看负载均衡器的IP地址来找到公共IP地址。Cloud Platform Dashboard -> Kubernetes Engine -> Services。 寻找历史门户服务类型负载均衡器。
测试应用程序!
http $INGRESS_HOST:$INGRESS_PORT/
您应该看到:
HTTP/1.1 200 OK
content-type: text/plain;charset=UTF-8
...

Alive
然后打/皮划艇端点:
http $INGRESS_HOST:$INGRESS_PORT/kayaks
您应该看到:
HTTP/1.1 200 OK
content-type: application/json;charset=UTF-8
...
[
  {
    "makeModel": "NDK",
    "name": "sea",
    "owner": "Andrew",
    "value": 300.12
  },
  {
    "makeModel": "Piranha",
    "name": "creek",
    "owner": "Andrew",
    "value": 100.75
  },
  {
    "makeModel": "Necky",
    "name": "loaner",
    "owner": "Andrew",
    "value": 75
  }
]
欢迎来到微服务的世界!
GKE和Istio显然可以做很多工作。 在实践中,微服务通常管理大型服务网格和已部署的Pod,可以根据需要进行扩展和缩小,并且可以在不同部分之间以及与外部世界一起管理复杂的安全体系结构。 本教程将不涉及更多内容,但还剩一个步骤:使用Okta添加JSON Web令牌身份验证。
Create an OpenID Connect App on Okta
大号og into your developer.okta.com account (You did sign up for one of their free developer accounts, right? If not head over to developer.okta.com).
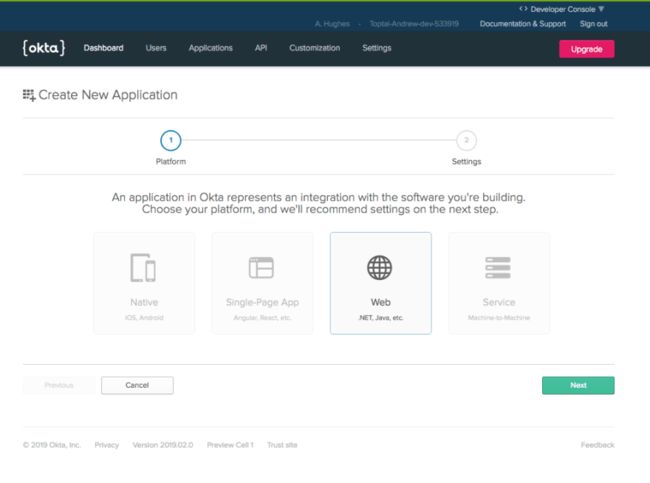
点击应用顶层菜单,然后Add 应用按钮。
选择应用程序类型网页。
请点击下一个。
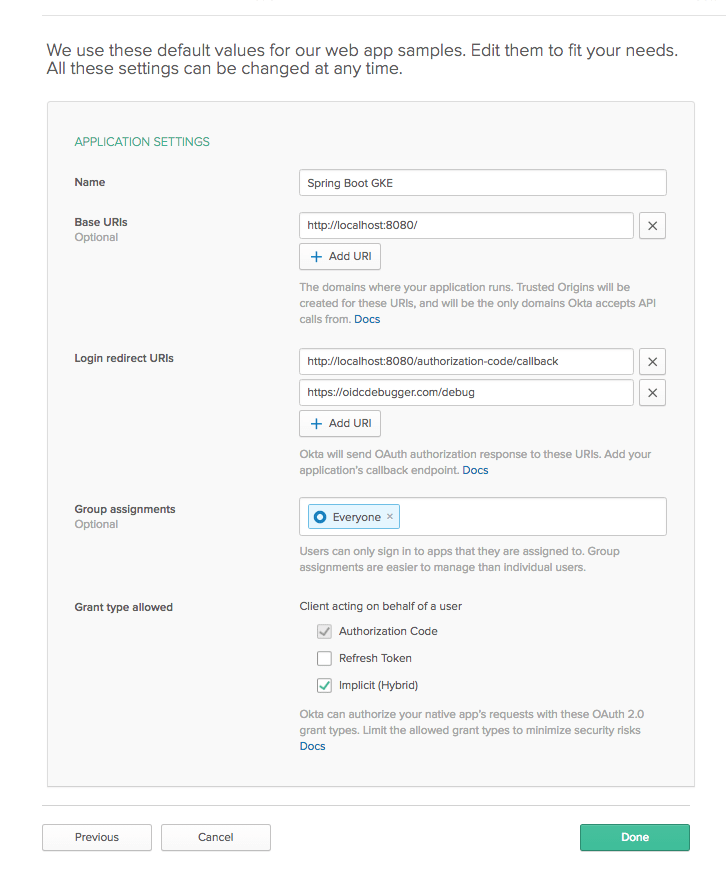
为应用命名。 我将其命名为“ Spring Boot GKE”。
下登录重定向URI加https://oidcdebugger。com/debug。
往底部下方允许的赠款类型, 检查隐式(混合)框。
请点击完成。
让页面保持打开状态并注意客户编号和客户机密。 使用OIDC调试器生成JSON网络令牌时,一分钟之内将需要它们。
Update Your Spring Boot Microservices for OAuth 2.0
将以下依赖项添加到您的build.gradle:
compile 'org.springframework.security:spring-security-oauth2-client'
compile 'org.springframework.security:spring-security-oauth2-resource-server'
您还需要将以下内容添加到您的src / main / resources / application.properties文件(填写您自己的Oktadeveloper URL,类似于dev-123456.okta.com):
spring.security.oauth2.resourceserver.jwt.issuer-uri=https://{yourOktaDomain}/oauth2/default
这告诉Spring需要在什么地方对您稍后要生成的JSON Web令牌(JWT)进行身份验证。
最后,您需要添加一个新的Java类,名为SecurityConfiguration.java:
package com.okta.spring.springbootkbe;

import org.springframework.context.annotation.Bean;
import org.springframework.security.config.annotation.web.reactive.EnableWebFluxSecurity;
import org.springframework.security.config.web.server.ServerHttpSecurity;
import org.springframework.security.web.server.SecurityWebFilterChain;

@EnableWebFluxSecurity
@EnableReactiveMethodSecurity
public class SecurityConfiguration {

    @Bean
    public SecurityWebFilterChain securityWebFilterChain(ServerHttpSecurity http) {
        http
            .authorizeExchange()
            .pathMatchers("/").permitAll()
            .anyExchange().authenticated()
            .and()
            .oauth2ResourceServer()
            .jwt();
        return http.build();
    }
}
此文件将项目配置为允许根端点上的所有事务,但授权所有其他事务。
Build A New Docker Image and Push to the GKE Cluster
现在您有了一个新的,启用了身份验证的Spring Boot应用程序,您需要对其进行构建,将其打包在Docker容器中,将其推送到Google Cloud Docker注册表中,然后将新的部署应用于Kubernetes集群。
从您的外壳转到项目根目录。
使用身份验证更新构建Spring Boot应用程序:
gradle clean build
构建新的Docker映像。 注意新的图像名称(其中包括-身份验证)。 另外:确保您的Docker桌面正在运行。
docker build -t kayak-app-auth:1.0 .
标记您的Docker映像并将其推送到Google Cloud容器注册表。 如有必要,请在回购路径中更改项目名称。
docker tag kayak-app-auth:1.0 gcr.io/$PROJECT_NAME/kayak-app-auth:1.0;
docker push gcr.io/$PROJECT_NAME/kayak-app-auth:1.0;
删除集群上已部署的Pod:
kubectl delete -f deployment.yml
更新Deployment.yml文件以反映新的图像名称(文件中的第28行):
spec:
  containers:
    - name: kayak-app
      image: gcr.io/spring-boot-gke/kayak-app-auth:1.0
重新部署更新的Kubernetes部署:
kubectl apply -f deployment.yml
使用kubectl得到豆荚检查吊舱的状态。 完全更新将需要几秒钟。 准备就绪后,请测试/端点。
http $INGRESS_HOST:$INGRESS_PORT/
HTTP/1.1 200 OK
...

Alive
和/皮划艇端点,应加以保护:
$ http $INGRESS_HOST:$INGRESS_PORT/kayaks
HTTP/1.1 401 Unauthorized
...
很近! 您需要做的最后一件事是使用OIDC调试器工具生成令牌并测试JWT身份验证。
Generate A JWT and Test OAuth 2.0
Go to the OIDC Debugger. You’ll need your Client ID from your Okta OIDC application.
- 填写授权URI:https:// {yourOktaDomain} / oauth2 / default / v1 / authorize。填写客户编号。放abcdef为了州。在底部,单击发送请求。
复制生成的令牌,并将其存储在shell变量中以方便使用:
TOKEN=eyJraWQiOiI4UlE5REJGVUJOTnJER0VGaEExekd6bWJqREp...
在上运行GET/皮划艇再次成为端点,这次使用令牌:
http $INGRESS_HOST:$INGRESS_PORT/kayaks Authorization:"Bearer $TOKEN"
注意双引号!单引号无效,因为该变量不会在字符串中扩展。
您应该得到:
HTTP/1.1 200 OK
cache-control: no-cache, no-store, max-age=0, must-revalidate
content-type: application/json;charset=UTF-8
...
[
  {
    "makeModel": "NDK",
    "name": "sea",
    "owner": "Andrew",
    "value": 300.12
  },
  {
    "makeModel": "Piranha",
    "name": "creek",
    "owner": "Andrew",
    "value": 100.75
  },
  {
    "makeModel": "Necky",
    "name": "loaner",
    "owner": "Andrew",
    "value": 75
  }
]
Move Forward with Spring Boot Microservices and Kubernetes
而已! 您已经在这里铺了很多土地。 您使用Istio在Google Cloud上使用Google Kubernetes创建了Kubernetes集群。 您将本地系统配置为使用以下命令与集群交互gcloud和Kubectl. You created a Spring Boot app that used a MongoDB backend, dockerized it, pushed it to the Google Cloud registry,和deployed it to your cluster. You also added OIDC authentication to the app.
You can find the source code for this example on GitHub at oktadeveloper/okta-spring-boot-microservice-kubernetes.
如果您喜欢微服务和Spring Boot,那么您可能也喜欢这些帖子:
- Build Spring Microservices and Dockerize Them for Production
- Secure Service-to-Service Spring Microservices with HTTPS and OAuth 2.0
- Build and Secure Microservices with Spring Boot 2.0 and OAuth 2.0
If you have any questions about this post, please add a comment below. For more awesome content, follow @oktadev on Twitter, like us on Facebook, or subscribe to our YouTube channel.


