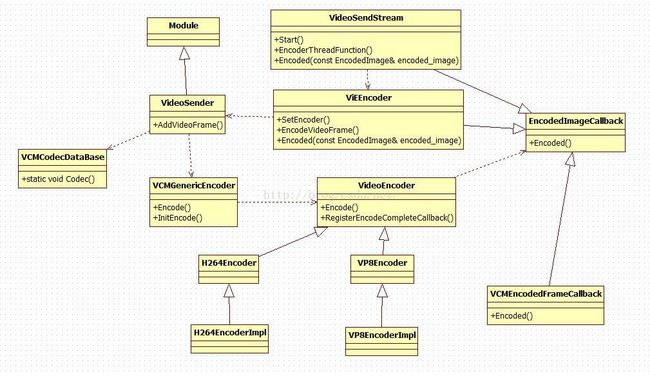
WEBRTC视频编解码支持H264 VP8 VP9 但是默认是VP8 ,根据SDP描述协商
WEBRTC H264编码采用OPENH264 解码采用FFMPEG
一 让WEBRTC支持H264编码
1. 修改配置支持H264编码
webrtc/build/common.gypi rtc_use_h264=1(只要有都设为1),这样OPENH264就会生成
然后需要重新编译 Python webrtc/build/gyp_webrtc ninja -C out/Debug
2 修改SDP生成次序
webrtcvideoengine2.cc DefaultVideoCodecList 可以修改SDP中 视频编码的次序把
放在最前面,让SDP支持H264
- if (CodecIsInternallySupported(kH264CodecName)) {
- VideoCodec codec = MakeVideoCodecWithDefaultFeedbackParams(
- kDefaultH264PlType, kH264CodecName);
-
-
-
-
-
- codec.SetParam(kH264FmtpProfileLevelId,
- kH264ProfileLevelConstrainedBaseline);
- codec.SetParam(kH264FmtpLevelAsymmetryAllowed, "1");
- codec.SetParam(kH264FmtpPacketizationMode, "1");
- codecs.push_back(codec);
- codecs.push_back(
- VideoCodec::CreateRtxCodec(kDefaultRtxH264PlType, kDefaultH264PlType));
- }
二 让WEBRTC支持H264解码
thirdpart 下有ffmpeg源码,不用下载ffmpeg编译
1.修改gyp配置 支持ffmpeg编译 2.默认ffmpeg 不会把h264.c等文件编译进ffmpeg 就会导致 H264DecoderImpl::InitDecode 调用 avcodec_find_decoder 失败,
找不到解码器需要修改 ffmpeg_generated.gypi 默认只支持chrome chromeOS中编译H264,找到h264.c
然后 在Linux X64 中去掉chrome
- ['(OS == "linux" and target_arch == "arm" and arm_neon == 1 and ffmpeg_branding == "Chrome") or (OS == "linux" and target_arch == "arm" and arm_neon == 1 and ffmpeg_branding == "ChromeOS") or (OS == "linux" and target_arch == "arm" and ffmpeg_branding == "Chrome") or (OS == "linux" and target_arch == "arm" and ffmpeg_branding == "ChromeOS") or (OS == "linux" and target_arch == "arm64" and ffmpeg_branding == "Chrome") or (OS == "linux" and target_arch == "arm64" and ffmpeg_branding == "ChromeOS") or (OS == "linux" and target_arch == "ia32" and ffmpeg_branding == "Chrome") or (OS == "linux" and target_arch == "ia32" and ffmpeg_branding == "ChromeOS") or (OS == "linux" and target_arch == "mipsel" and ffmpeg_branding == "Chrome") or (OS == "linux" and target_arch == "mipsel" and ffmpeg_branding == "ChromeOS") or (OS == "linux" and target_arch == "x64" and ffmpeg_branding == "Chrome") or(OS == "linux" and target_arch == "x64")or (OS == "mac" and target_arch == "x64" and ffmpeg_branding == "Chrome") or (OS == "win" and target_arch == "ia32" and ffmpeg_branding == "Chrome") or (OS == "win" and target_arch == "x64" and ffmpeg_branding == "Chrome")', {
再找到
- 'libavcodec/x86/h264_qpel.c',
- 'libavcodec/x86/h264chroma_init.c',
- 'libavcodec/x86/h264dsp_init.c',
对应得
- ['(OS == "linux" and target_arch == "ia32" and ffmpeg_branding == "Chrome") or (OS == "linux" and target_arch == "ia32" and ffmpeg_branding == "ChromeOS") or (OS == "linux" and target_arch == "x64" and ffmpeg_branding == "Chrome") or (OS == "linux" and target_arch == "x64") or (OS == "mac" and target_arch == "x64" and ffmpeg_branding == "Chrome") or (OS == "win" and target_arch == "ia32" and ffmpeg_branding == "Chrome") or (OS == "win" and target_arch == "x64" and ffmpeg_branding == "Chrome")', {
在LINUX X64 中去掉chrome
3.重新生成ninja python webrtc/build/gyp_webrtc ninja -C out/Debug
可在video_send_stream.cc 函数,中调试 encoded_image._buffer 看码流或写入文件
- int32_t VideoSendStream::Encoded(const EncodedImage& encoded_image,
- const CodecSpecificInfo* codec_specific_info,
- const RTPFragmentationHeader* fragmentation)
- class="cpp" name="code" snippet_file_name="blog_20160630_8_8873287" code_snippet_id="1736351">
