最简集成SpringMVC、纯手工打包部署到tomcat
前面已经介绍了tomcat,了解了其简单的部署方法;以及Listener、Filter、Servlet的概念,并且自己写了写,实现了网站的简单访问。
注意到了这里和我们的SpringMVC还完全没有关系。
今天来看怎么集成SpringMVC到我们的项目中
SpringMVC文档地址;
https://docs.spring.io/spring/docs/current/spring-framework-reference/web.html
1、下载依赖
        <dependency>
            <groupId>org.springframeworkgroupId>
            <artifactId>spring-webmvcartifactId>
            <version>5.0.0.RELEASEversion>
        dependency>
2、SpringMVC肯定也是相同的套路:各种Servlet、Filter、Listener
Listener:之前已经学习了通过xml的方式来装配IoC容器,产生ApplicationContext对象。那么想要在web开发中使用,SpringMVC就是靠Listener在启动时来读取并装配。
DispatcherServlet:SpringMVC的核心调度器(自己写Servlet实现调度也可以,但是吃不饱了没事干^_^)

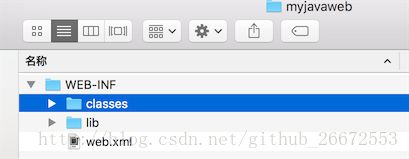
(上图是我们之前网站的一个目录结构,为了方便我们在开发的项目里也可以创建这样的目录结构,往下看就明白了)
3、一些基础配置

在项目src下创建一个文件夹,然后在该文件里创建WEB-INF文件夹,然后做基本的web配置web.xml:
<web-app xmlns="http://xmlns.jcp.org/xml/ns/javaee"
  xmlns:xsi="http://www.w3.org/2001/XMLSchema-instance"
  xsi:schemaLocation="http://xmlns.jcp.org/xml/ns/javaee
                      http://xmlns.jcp.org/xml/ns/javaee/web-app_3_1.xsd"
  version="3.1">

    <listener>
        <listener-class>org.springframework.web.context.ContextLoaderListenerlistener-class>
    listener>

    <context-param>
        <param-name>contextConfigLocationparam-name>
        <param-value>classpath:context-spring.xmlparam-value>
    context-param>

    <servlet>
        <servlet-name>myappservlet-name>
        <servlet-class>org.springframework.web.servlet.DispatcherServletservlet-class>
        <init-param>
            <param-name>contextConfigLocationparam-name>
            <param-value>classpath:myapp-servlet.xmlparam-value>
        init-param>
        <load-on-startup>1load-on-startup>
    servlet>

    <servlet-mapping>
        <servlet-name>myappservlet-name>
        <url-pattern>/*url-pattern>
    servlet-mapping>

web-app>
上图已经解释了web.xml中的2个配置项所对应的文件:
context-spring.xml可以当做是SpringMVC的全局配置文件,myapp-servlet.xml文件可以当做是专门做Servlet相关配置的。
4、context-spring.xml代码暂时如下:
<beans xmlns="http://www.springframework.org/schema/beans"
       xmlns:xsi="http://www.w3.org/2001/XMLSchema-instance" xmlns:mvc="http://www.springframework.org/schema/cache"
       xmlns:context="http://www.springframework.org/schema/context"
       xsi:schemaLocation="http://www.springframework.org/schema/beans http://www.springframework.org/schema/beans/spring-beans.xsd http://www.springframework.org/schema/cache http://www.springframework.org/schema/cache/spring-cache.xsd http://www.springframework.org/schema/context http://www.springframework.org/schema/context/spring-context.xsd">


    <mvc:annotation-driven/>


    <context:component-scan base-package="com.mydev"/>

beans>
只开启了注解和包扫描
5、创建控制器
@Controller 负责处理由DispatcherServlet(在web.xml里配置好了DispatcherServlet的)分发的请求;
@RequestMapping 处理请求地址映射的注释,可用于类火方法上;
@ResponseBody 把内容或对象作为HTTP响应正文返回
package com.mydev.Controllers;

import org.springframework.stereotype.Controller;
import org.springframework.web.bind.annotation.RequestMapping;
import org.springframework.web.bind.annotation.ResponseBody;

@Controller
public class Index {
    @RequestMapping("index")
    public @ResponseBody  String index(){
        return "this is home page";
    }
}
6、编译项目没有问题,接下来就应该是准备打包,然后放入tomcat上去运行了。

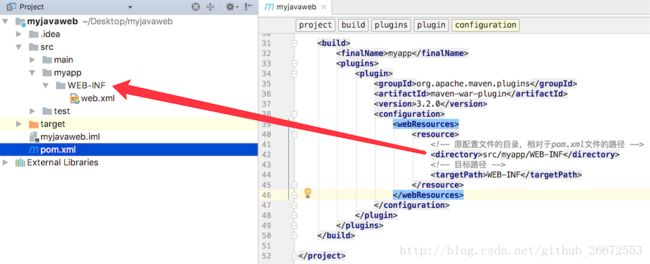
我们在自己项目里创建myapp/WEB-INF就是为了以后方便,通过前面的学习我们知道要把target目录下的classes目录和lib目录都拷贝到WEB-INF目录中。当然我们还是可以按照之前方法这样搞。
但这里我们利用插件
    <packaging>warpackaging>
    <build>
        <finalName>myappfinalName>
        <plugins>
            <plugin>
                <groupId>org.apache.maven.pluginsgroupId>
                <artifactId>maven-war-pluginartifactId>
                <version>3.2.0version>
                <configuration>
                    <webResources>
                        <resource>

                            <directory>src/myapp/WEB-INFdirectory>

                            <targetPath>WEB-INFtargetPath>
                        resource>
                    webResources>
                configuration>
            plugin>
        plugins>
    build>
然后打开终端
cd 项目中(pom.xml所在的文件夹下)
#执行
mvn clean  package


