Qt3D模块初探
0.前言
Qt3D 是由诺基亚发起,后由 Digia 和 KDAB 完善(新版貌似基本都是 KDAB 做的),基于 OpenGL 的三维图像展示和处理模块。可惜的是, Qt3D 的资料比较少,而且随着版本更迭,很多网上老的 Demo 也不能跑了。
除了 QtCreator 中的示例,这里推荐几个 Qt3D 的 github 项目,可以参照学习:
https://github.com/MidoriYakumo/learnopengl-qt3d
https://github.com/jaredtao/Qt3D-learn
https://github.com/KDAB/qt3d-examples
此外,可以看下 Qt3D 概述:https://doc.qt.io/qt-5/qt3d-overview.html
因为我也刚玩,所以很多东西还不了解,慢慢学。文本代码链接:https://github.com/gongjianbo/HelloQt3D
1.在QtQuick中使用Qt3D
使用前,先把会用到的Qt3D模块加到pro文件中:
QT += qml quick
QT += 3dcore 3drender 3dinput 3dlogic 3dextras 3dquick 3danimation
要创建一个3D场景嵌入到QtQuick中,需要一个Scene3D对象。在Scene中,我们通过Entity来定义我们的3D对象。多个Entity的组织结构就类似对象树,Scene3D需要一个根Entity来定义一些基本的行为,一个简单的空窗口示例如下:

import QtQuick 2.15
import QtQuick.Scene3D 2.15
import Qt3D.Core 2.15
import Qt3D.Render 2.15

Item{
    //创建3d场景嵌入到QtQuick
    Scene3D {
        id: scene3d
        anchors.fill: parent
        anchors.margins: 20
        //实体Entity是一个Node子类,可以聚合几个Component3D实例来指定其行为
        //根实体
        Entity {
            //RenderSettings组件必须为场景根实体的组件。
            //它指定渲染策略和选择设置,并托管活动的FrameGraph
            RenderSettings {
                //相当于glClearColor
                activeFrameGraph: ClearBuffers {
                    buffers: ClearBuffers.ColorBuffer
                    clearColor: Qt.rgba(0.0,0.5,0.0,1.0)
                    RenderSurfaceSelector {
                        // Default render output: window surface
                    }
                }
            }
        }
    }
    Text {
        anchors.centerIn: parent
        text: "First Window"
    }
}
Qt3D为我们提供了一些基本的Mesh、Material组件,对于简单的应用,我们可以直接拼接这些基本形状(我本一些基本的信息都写在了代码注释上):

import QtQuick.Scene3D 2.15
import Qt3D.Core 2.15
import Qt3D.Render 2.15
import Qt3D.Input 2.15
import Qt3D.Extras 2.15
import Qt3D.Logic 2.15

//创建3d场景嵌入到QtQuick
Scene3D {
    //自动宽高比
    cameraAspectRatioMode: Scene3D.AutomaticAspectRatio
    aspects: ["logic", "input"]

    //实体Entity是一个Node子类,可以聚合几个Component3D实例来指定其行为
    //根实体
    Entity {
        id: root
        //相机
        Camera {
            id: camera
            //透视投影
            projectionType: CameraLens.PerspectiveProjection
            fieldOfView: 45
            nearPlane: 0.1
            farPlane: 1000.0
            position: Qt.vector3d(0.0, 0.0, 10.0)
            upVector: Qt.vector3d(0.0, 1.0, 0.0)
            viewCenter: Qt.vector3d(0.0, 0.0, 0.0)
        }
        //用于控制相机
        OrbitCameraController {
            // 鼠标左键按下,沿x轴或y轴拖动时,移动相机位置
            // 鼠标右键按下,沿x轴或y轴拖动时,控制相机偏转
            camera: camera
        }
        //RenderSettings组件必须为场景根实体的组件。
        //它指定渲染策略和选择设置,并托管活动的FrameGraph
        RenderSettings {
            //正向渲染。逐个光源计算的一种渲染方式。
            activeFrameGraph: ForwardRenderer {
                camera: camera
                clearColor: Qt.rgba(0.0, 0.3, 0.0, 1.0)
            }
        }
        //InputSettings组件必须为场景根实体的组件。
        //它存储一个指向对象的指针,该对象充当各种输入类要处理的输入事件的源。
        InputSettings{
        }

        //物体Node
        Entity {
            PhongMaterial {
                id: material
                //环境光
                ambient: "gray"
                //漫反射光
                diffuse: "orange"
                //镜面高光
                specular: "yellow"
                //高光半径
                shininess:32

            }
            /*CuboidMesh {
                id: cube
            }
            Transform {
                id: trans
                matrix: {
                    let m = Qt.matrix4x4();
                    //旋转下角度,默认正视的看不出效果
                    m.rotate(45, Qt.vector3d(1, 1, 0))
                    return m;
                }
            }
            components: [material, cube, trans]*/
            Entity{
                id: sub1
                CuboidMesh {
                    id: cube1
                    xExtent: 2
                    zExtent: 2
                }
                Transform {
                    id: trans1
                    matrix: {
                        let m = Qt.matrix4x4();
                        //矩形旋转下角度,默认正视的看不出效果
                        m.rotate(45, Qt.vector3d(1, 1, 0))
                        return m;
                    }
                }
                components: [cube1, trans1,material]
            }
            Entity{
                id:sub2
                SphereMesh {
                    id: ball2
                    //半径默认为1
                    radius: 1
                    //网格环数
                    rings: 2
                    //网格切片数
                    slices: 10
                }
                Transform {
                    id: trans2
                    matrix: {
                        let m = Qt.matrix4x4();
                        //和另一个mesh错开位置
                        m.translate(Qt.vector3d(3, 0, 0))
                        return m;
                    }
                }
                components: [ball2, trans2,material]
            }
        }
    }
}
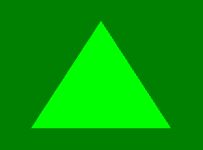
2.画一个三角
没有三角的3D学习是不完整的,要画三角,需要给Entity添加GeometryRenderer几何渲染对象和Material材质对象。顶点信息在Geometry中,而着色器在Matrial中:
import QtQuick 2.15
import QtQuick.Scene3D 2.15
import Qt3D.Core 2.15
import Qt3D.Render 2.15
import Qt3D.Extras 2.15

//Qt3D QML的文档不怎么详细,有些可以参见CPP版本的
//创建3d场景嵌入到QtQuick
Scene3D{
    id:scene
    anchors.fill: parent

    //根实体Entity
    Entity {
        //RenderSettings组件必须为场景根实体的组件。
        //它指定渲染策略和选择设置,并托管活动的FrameGraph
        RenderSettings {
            id: renderSettings
            //保存当前活动的FrameGraph
            //Qt 3D渲染方面允许渲染算法完全由数据驱动。
            //该控制的数据结构被称为framegraph
            activeFrameGraph: ClearBuffers {
                //为什么ColorBuffer渲染不出来三角?
                buffers: ClearBuffers.ColorDepthBuffer
                clearColor: Qt.rgba(0.0,0.5,0.0,1.0)

                //可以用来选择Qt3D渲染内容的表面。
                //该表面可以是窗口表面或屏幕外表面。
                RenderSurfaceSelector {
                    //与可以在RenderPass上设置的每个材质状态相反,
                    //在RenderStateSet上设置的状态是全局设置的
                    RenderStateSet {
                        renderStates: DepthTest {
                            //如果片段深度小于z缓冲区值,则通过深度测试
                            depthFunction: DepthTest.Less
                        }
                    }
                }
            }
        }

        //三角实体Entity
        Entity{
            //几何渲染器
            GeometryRenderer {
                id: geometry
                //几何体
                //Geometry类型用于将Attribute对象列表分组在一起,
                //以形成Qt3D能够使用GeometryRenderer渲染的几何形状。
                geometry: Geometry {
                    //属性Attribute,对应Shader中的attribute
                    Attribute {
                        id: position
                        attributeType: Attribute.VertexAttribute
                        vertexBaseType: Attribute.Float
                        vertexSize: 3
                        count: 3
                        name: "position"
                        buffer: Buffer {
                            type: Buffer.VertexBuffer
                            usage: Buffer.StaticDraw
                            accessType: Buffer.Write
                            data: new Float32Array(
                                      [
                                          -0.5, -0.5, 0.0,
                                          0.5, -0.5, 0.0,
                                          0.0,  0.5, 0.0,
                                      ])

                        }
                    }
                }
            }//end GeometryRenderer
            //材质定义如何渲染Entity
            Material {
                id: material
                effect: Effect {
                    //一个渲染方法Technique指定一组RenderPass对象,FilterKey对象,Parameter对象和GraphicsApiFilter,
                    //它们共同定义了给定图形API可以渲染的渲染技术。
                    techniques: Technique {
                        //指定使用的图形API过滤器
                        //profile 默认为 NoProfile。 Core模式时,设置为CoreProfile。精简。
                        graphicsApiFilter.profile: GraphicsInfo.profile === GraphicsInfo.CoreProfile ?
                                                       GraphicsApiFilter.CoreProfile : GraphicsApiFilter.NoProfile
                        //指定tehcnique使用的渲染通道
                        renderPasses: RenderPass {
                            //着色器
                            shaderProgram: ShaderProgram {
                                //GLSL可以用字符串或者文件
                                vertexShaderCode: vertStr
                                //vertexShaderCode: loadSource('qrc:/triangle1.vert')
                                fragmentShaderCode: fragStr
                                //fragmentShaderCode: loadSource('qrc:/triangle1.frag')
                            }
                        }
                    }
                }

            }//end Material
            components: [geometry, material]
        }


    }

    property string vertStr: '
                    #version 330 core
                    layout (location = 0) in vec3 position;
                    void main()
                    {
                        gl_Position = vec4(position, 1.0f);
                    }
                    '
    property string fragStr: '
                    #version 330 core
                    out vec4 color;
                    void main()
                    {
                        color = vec4(0.0f, 1.0f, 0.0f, 1.0f);
                    }
                    '
}