spring cloud config 统一配置中心 读取Git/SVN/本地文件配置及动态刷新
一、简介
Spring Cloud Config为分布式系统中的外部化配置提供服务器和客户端支持。使用配置服务器,你可以在中心位置管理所有环境中应用程序的外部属性。服务器存储后端的默认实现使用Git,同时也支持SVN及本地化配置,因此它很容易支持配置环境的标记版本,并且可以被用于管理内容的各种工具访问。可以很容易地添加替代实现,并将它们插入到Spring配置中。 在spring cloud config 组件中,分两个角色,一是config server,二是config client。
一个配置中心提供的核心功能
- 提供服务端和客户端支持
- 集中管理各环境的配置文件
- 配置文件修改之后,可以快速的生效
- 可以进行版本管理
- 支持大的并发查询
- 支持各种语言
Spring Cloud Config可以完美的支持以上所有的需求
二、构建Config Server
创建一个spring-boot项目,取名为config-server,pom.xml中引入依赖:
            org.springframework.cloud
            spring-cloud-starter-config


            org.springframework.boot
            spring-boot-starter-web


            org.springframework.boot
            spring-boot-starter-actuator


	    org.springframework.cloud
	    spring-cloud-starter-bus-amqp
启动类开启配置服务@EnableConfigServer
import org.springframework.boot.SpringApplication;
import org.springframework.boot.autoconfigure.SpringBootApplication;
import org.springframework.cloud.config.server.EnableConfigServer;

@SpringBootApplication
@EnableConfigServer
public class ConfigServerApplication {

    public static void main(String[] args) {
        SpringApplication.run(ConfigServerApplication.class,args);
    }
}
application.properties:
#服务端口
server.port=8091
#服务名称
spring.application.name=configServer
#服务注册中心
#eureka.client.service-url.defaultZone=http://localhost:8761/eureka/
#--------------------------------------------------------------------------------
#服务的git仓库地址
#spring.cloud.config.server.git.uri=https://github.com/huyilong1995/bdms-service.git
#配置文件拉去到本地的目录位置
#spring.cloud.config.server.git.basedir=target/config
#配置文件所在的目录
#spring.cloud.config.server.git.search-paths=/**
#git仓库的用户名
#spring.cloud.config.username=
#git仓库的密码
#spring.cloud.config.password=
#--------------------------------------------------------------------------------
#本地化配置file/classpath
spring.profiles.active=native
spring.cloud.config.server.native.search-locations=file:/C:/Users/13163/Desktop/config
#spring.cloud.config.server.native.search-locations=classpath:/config
#--------------------------------------------------------------------------------
#使用svn作为配置仓库,必须显示声明profiles.active=subversion
#spring.profiles.active=subversion
#spring.cloud.config.server.svn.uri=https://192.168.9.56/svn/Config_Files/
#spring.cloud.config.server.svn.username=
#spring.cloud.config.server.svn.password=
#spring.cloud.config.server.svn.search-paths=/**
#spring.cloud.config.server.svn.default-label=config
#--------------------------------------------------------------------------------
#rabbitmq配置,用于配置的动态刷新
spring.rabbitmq.host=127.0.0.1
spring.rabbitmq.port=5672
spring.rabbitmq.username=guest
spring.rabbitmq.password=guest

#是否开启基本的鉴权,默认为true
security.basic.enabled=false
management.security.enabled=false
这里分别配置了Git、SVN、本地化配置(磁盘或项目根路径)作为配置仓库的相关配置信息,本例仅演示本地化配置
启动程序:访问http://localhost:8091/serviceA-test.properties
证明配置服务中心可以从远程程序获取配置信息
http请求地址和资源文件映射如下:
- /{application}/{profile}[/{label}]
- /{application}-{profile}.yml
- /{label}/{application}-{profile}.yml
- /{application}-{profile}.properties
- /{label}/{application}-{profile}.properties
三、构建一个config client
创建一个springboot项目,取名为config-client,其pom文件引入依赖:
            org.springframework.cloud
            spring-cloud-starter-config


            org.springframework.boot
            spring-boot-starter-web


            org.springframework.boot
            spring-boot-starter-actuator


	    org.springframework.cloud
	    spring-cloud-starter-bus-amqp


            org.springframework.boot
            spring-boot-starter-test
            test
其配置文件bootstrap.properties:
#注意客户端里是没有配置服务的端口的,我们会从仓库中加载application.properties,那里配置了端口
spring.application.name=configClient

#对应前配置文件中的{application}部分,这样会加载多个配置文件,注意的是不同的配置文件里有相同的key会造成属性覆盖
spring.cloud.config.name=application,serviceA

#对应前配置文件中的{profile}部分
spring.cloud.config.enabled=true
spring.cloud.config.profile=test

#配置仓库的分支
#spring.cloud.config.label=config1
#配置中心服务端的地址
spring.cloud.config.uri=http://localhost:8091/

#rabbitmq配置
spring.rabbitmq.host=127.0.0.1
spring.rabbitmq.port=5672
spring.rabbitmq.username=guest
spring.rabbitmq.password=guest

#启动失败时能够快速响应
spring.cloud.config.fail-fast=true
1、注意客户端里是没有配置服务的端口的,我们会从仓库中加载application.properties,那里配置了端口
2、可以这样spring.cloud.config.name=application,serviceA 加载多个配置文件,注意的是不同的配置文件里有相同的key会造成属性覆盖,后面会覆盖前面的配置
3、spring.cloud.config.label=config1 指定了配置仓库的分支,比如Git的默认分支伟master,这里是分文件夹管理配置
写一个rest接口,返回从配置中心读取的变量的值,代码如下:
package com.dscomm.client.config.web;


import org.springframework.beans.factory.annotation.Autowired;
import org.springframework.beans.factory.annotation.Value;
import org.springframework.cloud.context.config.annotation.RefreshScope;
import org.springframework.web.bind.annotation.RequestMapping;
import org.springframework.web.bind.annotation.RestController;
import com.dscomm.client.service.TestService;

@RefreshScope
@RestController
public class TestController {

	@Value("${name}")
        private String name;
	@Value("${age}")
        private String age;
	@Value("${sex}")
        private String sex;

	@RequestMapping("age")
	public String age() {
	  return age;
	}
	@RequestMapping("sex")
	public String sex() {
	    return sex;
	}
	@RequestMapping("name")
	public String name() {
	   return name;
	}
}
需要注意的是@RefreshScope 注解,在我们需要刷新的配置类上加上这个注解,就可以实现动态刷新的效果了
启动客户端进行测试:
可以看到客户端运行在了8081端口上,而我们的客户端配置文件里是没有指定端口的,是因为我们在配置仓库的config1分支里面配置了application-test.properties指定了port,客户端应用了此配置。
接下来访问 localhost:8081/sexzhehe
这就说明我们就拿到了serviceA-test.properties里定义的sex的值
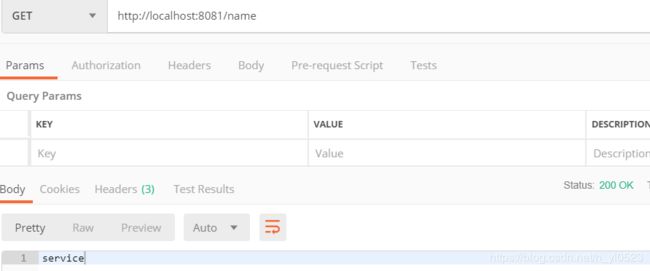
关于属性覆盖:可以看到我们在application-test.properties和serviceA-test.properties里都定义了name的值,但是我们在访问localhost:8081/name 会拿到什么呢
这就说明application里的那么被serviceA覆盖掉了,所以应避免多个配置文件配置相同名称的属性
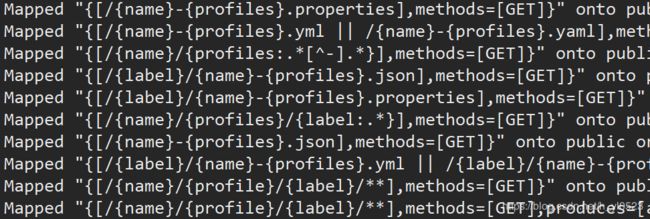
关于动态刷新:以上的配置我们其实就已经实现了动态刷新的功能了。在config的服务端我们引入了bus-amqp的依赖同时配置文件里配置了rabbitMQ的配置信息(需要提前安装rabbitMQ)。启动config服务端可以看到会暴露很多接口信息:
1、资源文件的映射:
2、 刷新配置的接口
当配置仓库的配置文件发生更该,无需重启客户端,只需要调用服务端的bus/refresh接口再配合@refreshScope注解即可
测试:我们修改之前的sex的属性值为man
调用服务端 http://localhost:8091/bus/refresh 接口刷新配置,不重启客户端再次调用客户端的接口,可以看到拿到的属性值已经改变了
严格意义上来说,进行到这一步只能说是半自动刷新,SVN/本地化配置与Git不相同的是,Git可以配置webhook,当git端配置发生改变,自动调用/bus/refresh接口刷新配置,可以达到真正的自动化配置。
拓展:使用SVN和本地化配置达到像Git一样的自动化配置,无需手动调用/bus/refresh接口
思路:可以利用commons-io,服务端一启动就开始监听配置仓库的文件,文件发生变化就自动发送一个post请求调用bus/refresh接口,达到自动刷新的效果
服务端改造:
添加依赖:
			commons-io
			commons-io
			2.4


			org.apache.httpcomponents
			httpclient
			4.5.5
服务启动开始监听:
import java.io.File;
import org.apache.commons.io.filefilter.FileFilterUtils;
import org.apache.commons.io.filefilter.IOFileFilter;
import org.apache.commons.io.monitor.FileAlterationMonitor;
import org.apache.commons.io.monitor.FileAlterationObserver;
import org.apache.commons.lang.StringUtils;
import org.springframework.beans.factory.annotation.Value;
import org.springframework.boot.ApplicationArguments;
import org.springframework.boot.ApplicationRunner;
import org.springframework.stereotype.Component;

import com.dscomm.service.config.listener.ConfigurationListener;

@Component
public  class DsServiceInit implements ApplicationRunner {

	@Value("${spring.cloud.config.server.native.search-locations}")
	private String monitorPath;

	@Override
	public void run(ApplicationArguments args) throws Exception {
                //截取要监听的仓库路径
		String path = StringUtils.substring(monitorPath, 6);
		File dir = new File(path);
		FileAlterationMonitor monitor = new FileAlterationMonitor();
		IOFileFilter filter = FileFilterUtils.or(FileFilterUtils.directoryFileFilter(),
				FileFilterUtils.fileFileFilter());
		FileAlterationObserver observer = new FileAlterationObserver(dir, filter);
		observer.addListener(new ConfigurationListener(dir));
		monitor.addObserver(observer);
		try {
			monitor.start();
			System.out.println("启动配置文件监听……");
		} catch (Exception e) {
			e.printStackTrace();
		}
	}
}
配置文件监听
import java.io.File;
import javax.annotation.PostConstruct;
import org.apache.commons.io.monitor.FileAlterationListenerAdaptor;
import org.springframework.beans.factory.annotation.Autowired;
import org.springframework.beans.factory.annotation.Value;
import org.springframework.stereotype.Component;
import com.dscomm.service.config.service.ConfigService;

@Component
public class ConfigurationListener extends FileAlterationListenerAdaptor {

	private static ConfigurationListener configurationListener;
	@Autowired
	private ConfigService configService;
	@PostConstruct
	public void init() {
		configurationListener = this;
		configurationListener.configService = this.configService;
	}

	public File DirContext;

	public ConfigurationListener() {
		super();
	}

	public ConfigurationListener(File dirContext) {
		super();
		DirContext = dirContext;
	}

	@Override
	public void onDirectoryCreate(File directory) {
		configurationListener.configService.refreshConfig();

	}

	@Override
	public void onDirectoryChange(File directory) {
		configurationListener.configService.refreshConfig();
	}

	@Override
	public void onDirectoryDelete(File directory) {
		configurationListener.configService.refreshConfig();
	}

	@Override
	public void onFileCreate(File file) {
		configurationListener.configService.refreshConfig();
	}

	@Override
	public void onFileChange(File file) {
		configurationListener.configService.refreshConfig();
	}

	@Override
	public void onFileDelete(File file) {
		configurationListener.configService.refreshConfig();
	}
}
发生post请求刷新配置服务
/*
 * Description:配置刷新服务
 *
 */
package com.dscomm.service.config.service;

import java.io.IOException;
import java.io.UnsupportedEncodingException;

import org.apache.http.client.methods.CloseableHttpResponse;
import org.apache.http.client.methods.HttpPost;
import org.apache.http.impl.client.CloseableHttpClient;
import org.apache.http.impl.client.HttpClients;
import org.apache.http.util.EntityUtils;
import org.springframework.beans.factory.annotation.Value;
import org.springframework.stereotype.Component;

@Component
public class ConfigService {

        //这里是自己定义的服务端的ip地址
	@Value("${service.config.ip}")
	private String serverIP;
	@Value("${server.port}")
	private String port;

	public void refreshConfig() {
		CloseableHttpClient httpClient = getHttpClient();
		try {
			String url = "http://" + serverIP + ":" + port + "/bus/refresh";
			HttpPost post = new HttpPost(url);
			post.setHeader("Content-type", "application/x-www-form-urlencoded; charset=UTF-8");
			post.setHeader("User-Agent", "Mozilla/4.0 (compatible; MSIE 5.0; Windows NT; DigExt)");
			System.out.println("send POST 请求...." + post.getURI());
			CloseableHttpResponse httpResponse = httpClient.execute(post);
			try {
				org.apache.http.HttpEntity entity = httpResponse.getEntity();
				if (null != entity) {
					System.out.println("-------------------------------------------------------");
					System.out.println(EntityUtils.toString(entity, "UTF-8"));
				}
			} finally {
				httpResponse.close();
			}
		} catch (UnsupportedEncodingException e) {
			e.printStackTrace();
		} catch (IOException e) {
			e.printStackTrace();
		} finally {
			try {
				closeHttpClient(httpClient);
			} catch (Exception e) {
				e.printStackTrace();
			}
		}
	}

	public static CloseableHttpClient getHttpClient() {
		return HttpClients.createDefault();
	}

	public static void closeHttpClient(CloseableHttpClient client) throws IOException {
		if (client != null) {
			client.close();
		}
	}

}
这样就完成了配置仓库的监听以及自动刷新的功能,当有配置文件发生变化,服务端会自动发生post请求刷新配置而不需要我们再去手动刷新了
修改一下配置文件可以看到
这样客户端的就可以拿到最新的配置信息了
总结:
本例是以本地化配置来使用测试spring cloud config,Git/SVN/本地化配置三种方式的主要区别还是在服务端的配置文件里,三种配置在上面的配置文件里都是经过测试的,可以根据选择合适的仓库配置


