1.编译配置Linux内核
由于实验一中已经下载了Linux内核源代码,故这部分省略。从配置内核选项开始。
1.1 配置内核选项
make defconfig
make menuconfig
打开Compile the kernel with debug info、Provide GDB scripts for kernel debugging、Kernel debugging,关闭Randomize the address of the kernel image(KASLR)

1.2 编译和运行内核
此部分在实验一中有过相同操作,这里不再阐述。
2.制作内存根文件系统
下载busybox源码并解压,配置编译并安装。
编译时选择静态链接,默认安装会安装到源码目录下的_install目录中,然后制作内存跟文件系统镜像。
mkdir rootfs
cd rootfs
cp ../busybox-1.31.1/_install/* ./ -rf
mkdir dev proc sys home
sudo cp -a /dev/{null,console,tty,tty1,tty2,tty3,tty4} dev/
准备init脚本文件放在根文件系统跟目录下(rootfs/init),向init文件中添加内容。
#!/bin/sh
mount -t proc none /proc
mount -t sysfs none /sys
echo "Wellcome MengningOS!"
echo "--------------------"
cd home
/bin/sh
给init脚本添加可执行权限
chmod +x init
打包成内存根文件系统镜像
find . -print0 | cpio --null -ov --format=newc | gzip -9 > ../rootfs.cpio.gz
测试挂载
qemu-system-x86_64 -kernel linux-5.4.34/arch/x86/boot/bzImage-initrd rootfs.cpio.gz
挂载成功入下图所示(输入ls后应该没有文件)。

3.找一个系统调用,系统调用号为学号最后2位相同的系统调用
学号最后两位17,对应系统调用内核函数为__x64_sys_pread64,对应API函数为pread64。
![]()
pread64()函数在内核2.6以上是pread64(),在2.6以下是pread()函数,通过man手册查看pread()函数。

从man手册中可以清楚的看到pread()的使用方法以及作用:从偏移offset处的文件描述符fd读取count个字节到从buf处开始的缓冲区。下面来简单实现。
#include#include #include #include #include int main(int agrc, char *agrv[]) { int count; int fd; void *buf; fd=open("text.txt",O_RDONLY); count=pread(fd,buf,4,0); printf("Bytes: %d\n",count); return 0; }
使用gcc静态编译后运行,结果如下图所示。

其中text.txt文件与hello.c在同一个目录下。
4.手写汇编指令触发该系统调用
#include#include #include #include #include int main(int agrc, char *agrv[]) { int count; int fd; void *buf; fd=open("text.txt", O_RDONLY); asm volatile( "movq $0x0, %%rcx\n\t" //参数4 "movq $0x4, %%rdx\n\t" //参数3 "movq %2, %%rsi\n\t" //参数2 "movq %1, %%rdi\n\t" //参数1 "movl $0x11, %%eax\n\t" //传递系统调用号 "syscall\n\t" //系统调用 "movq %%rax, %0\n\t" //结果存到count中 :"=m"(count) //输出 :"m"(fd),"p"(&buf)//输入 ); printf("Bytes: %d\n",count); return 0; }
使用gcc静态编译后运行,结果如下图所示。

5.GDB跟踪该系统调用的内核处理过程
执行下列命令,重新打包根文件系统,进行gdb调试。
find . -print0 | cpio --null -ov --format=newc | gzip -9 > ../rootfs.cpio.gz
qemu-system-x86_64 -kernel linux-5.4.34/arch/x86/boot/bzImage -initrd rootfs.cpio.gz -S -s -nographic -append "console=ttyS0"

#开启新的terminal

cd linux-5.4.34
gdb vmlinux
target remote:1234
#设置断点
b __x64_sys_pread64

设置断点之后,继续执行,监听。在虚拟机中执行 ./hello ,界面卡住,回到gdb的窗口。

查看read_write.c文件的第646行代码:
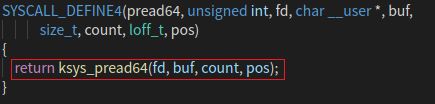
触发了 ksys_pread64() 函数,查看该函数。

ksys_pread64() 函数实现了 pread64() 函数的功能,继续在gdb窗口单步执行。

发现执行完 ksys_pread64() 函数之后, 触发了 do_syscall_64() 函数,查看该函数。

发现接下来要执行 syscall_return_slowpath() 。查看该函数,发现其作用是为接下来的恢复现场做准备,准备退回用户态。继续执行。

触发 entry_SYSCALL_64() 函数,查看该函数。
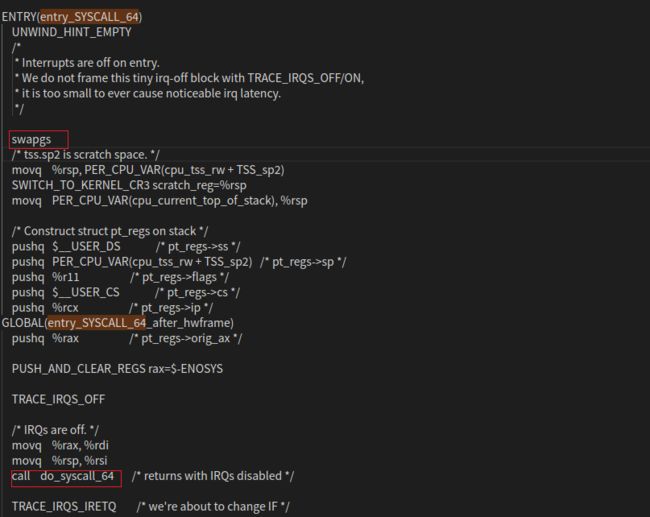
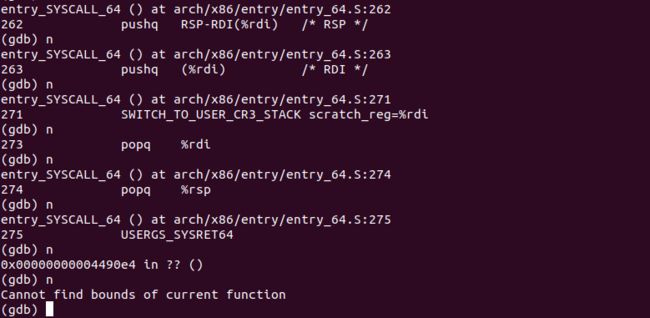
继续执行,使用 swapgs 指令恢复现场。
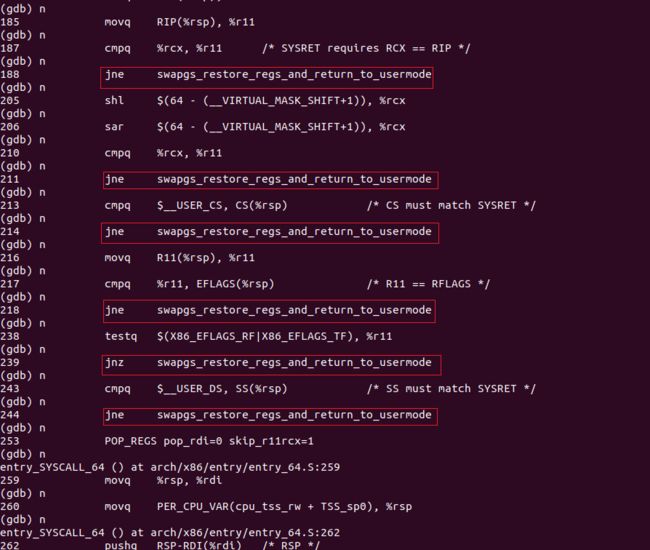
单步执行直到完成。
6. 总结
pread 函数触发系统调用 __x64_sys_pread64 ,其功能由 ksys_pread64() 实现;
汇编指令触发系统调用,找到函数中断入口,执行 entry_SYSCALL_64() ,通过 swapgs 指令保存现场,触发 do_syscall_64 。通过 do_syscall_64 函数得到了 系统调用号 ,执行系统调用内容。然后程序跳到read_write.c文件,触发了 ksys_pread64() 函数,执行完毕后,又跳回了 do_syscall_64 中的 syscall_return_slowpath() ,准备进行现场恢复操作,并准备跳回用户态。最后回到 entry_SYSCALL_64() 执行 popq ,完成堆栈切换。