ELK之安装与部署
elasticsearch负责存储数据,充当搜索引擎
logstash包括index和agent,前者负责收集数据,后者负责过滤数据
kibana提供友好的web界面
其中,elasticsearch与logstash是java编写,需要部署jdk1.8.0
kibana用node.js框架
服务器之间的时间需要实时且同步
防火墙和selinux保持关闭
环境
192.168.2.112 jdk/elasticsearch/kibana CentOS release 6.5
192.168.2.118 jdk/logstash CentOS release 6.3 (Final)
elasticsearch部署
elasticsearch的主要配置参数
cluster.name: chuck-cluster       判别节点是否是统一集群
node.name: linux-node1            节点的hostname
path.data: /data/es-data          数据存放路径
path.logs: /var/log/elasticsearch/ 日志路径
bootstrap.mlockall: true          锁住内存,使内存不会在swap中使用
network.host: 0.0.0.0             允许访问ES的ip
http.port: 9200                   端口
安装步骤
mkdir elktest;cd elktest
wget   https://artifacts.elastic.co/downloads/elasticsearch/elasticsearch-5.3.0.tar.gz
tar -zxvf elasticsearch-5.3.0.tar.gz
mv elasticsearch-5.3.0 /usr/local/elasticsearch/
- ES参数配置
cd /usr/local/elasticsearch/config1)在elasticsearch.yml里,在Network下面配置监听地址和端口
network.host: 0.0.0.0
http.port: 9200
2)由于centos6不支持seccomp,需要在Memory下面添加(注意顺序)
bootstrap.memory_lock: false
bootstrap.system_call_filter: false
3)在后面的head插件安装后需要配置跨域操作
http.cors.enabled: true
http.cors.allow-origin: "*"
4)若内存不够大,可以把默认分配jvm的空间设置成1G
在/usr/local/elasticsearch/config/jvm.options里修改
-Xms1g
-Xmx1g
- 内核参数配置
1)有时候在启动es的时候会提示elasticsearch process is too low, increase to at least [65536]
在/etc/security/limits.conf添加
* soft nofile 65536
* hard nofile 65536
2)若提示max number of threads [1024] for user [hadoop] is too low, increase to at least [2048]
在/etc/security/limits.d/90-nproc.conf把1024改成2048
* soft nproc 10243)若提示max virtual memory areas vm.max_map_count [65530] is too low, increase to at least [262144]
在/etc/sysctl.conf文件尾部添加
vm.max_map_count=6553604)最后执行
sysctl -p5)由于ES5.3不能用root启动,需要建立子账号来启动ES
useradd elk
chown -R elk:elk /usr/local/elasticsearch
su - elk
/usr/local/elasticsearch/bin/elasticsearch -d
ps -ef| grep elasticsearch
netstat -tunlp | grep -E "9200|9300"
如下图所示:
启动ES后
[root@log-nginx logs]# curl 192.168.2.112:9200
{
  "name" : "Li5G4mg",
  "cluster_name" : "elasticsearch",
  "cluster_uuid" : "w3Iu6U4kQWqc6Sdtoq88pQ",
  "version" : {
    "number" : "5.3.0",
    "build_hash" : "3adb13b",
    "build_date" : "2017-03-23T03:31:50.652Z",
    "build_snapshot" : false,
    "lucene_version" : "6.4.1"
  },
  "tagline" : "You Know, for Search"
}
- ES插件head安装
yum -y install nodejs npm
yum install -y git
cd /usr/local/elasticsearch/
git clone https://github.com/mobz/elasticsearch-head.git
cd elasticsearch-head
npm install   如果网速不好,用下面一行的命令
#npm install -g cnpm --registry=https://registry.npm.taobao.org
1)head修改监听地址,在Gruntfile.js下添加hostname: ‘*’,
connect: {
                        server: {
                                options: {
                                        hostname: '*',
                                        port: 9100,
                                        base: '.',
                                        keepalive: true
                                }
                        }
                }
2)设置head连接ES的ip地址,在_site/app.js下
this.prefs.get("app-base_uri") || "http://192.168.2.112:9200";3)启动head服务
cd /usr/local/elasticsearch/elasticsearch-head/
nohup ./node_modules/grunt/bin/grunt server &>/dev/null &
logstash部署
wget   https://artifacts.elastic.co/do4wnloads/logstash/logstash-5.3.0.tar.gz
tar -zxvf logstash-5.3.0.tar.gz
mv logstash-5.3.0 /usr/local/logstash
cd /usr/local/logstash
mkdir etc; cd etc
1)建立文件logstash.conf并添加下面内容
input {
 stdin { }
}
output {
 stdout {
 codec => rubydebug {}
}
 elasticsearch {
 hosts => "192.168.2.112" }
}
2)启动logstash
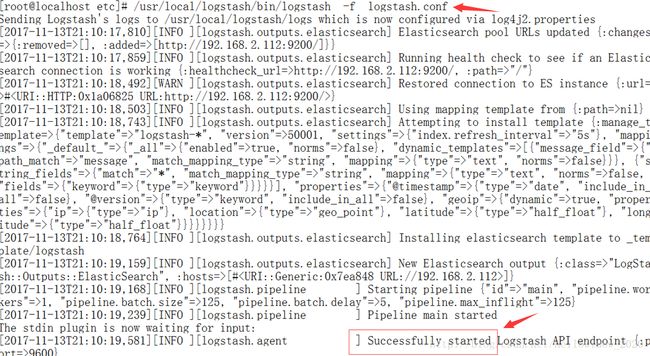
/usr/local/logstash/bin/logstash  -f  logstash.conf
# nohup /usr/local/logstash/bin/logstash -f logstash.conf &>/dev/null &      后台启动
3)此时开启了ES后,再执行logstash启动命令,则如下图所示:
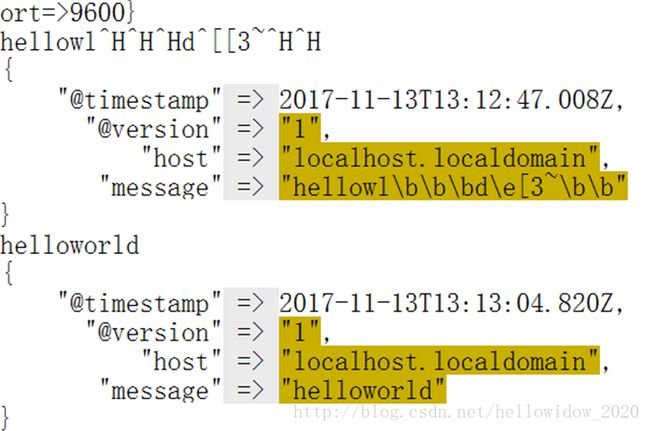
4)然后继续在界面输入内容,则会把数据发送给ES:
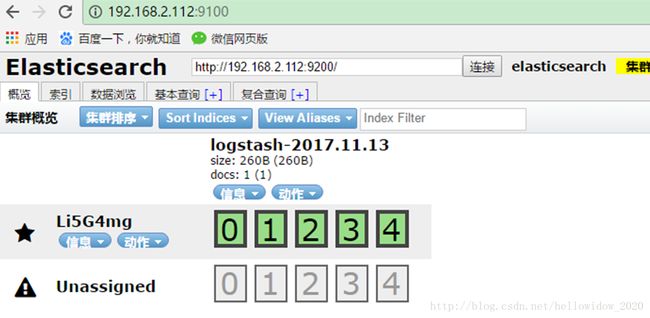
在网页上可以看到:
上图中外围带绿色框的为主分片,不带框的为副本分片,另外图右上角显示黄色背景,是因为没有设置副本
kibana部署
wget   https://artifacts.elastic.co/downloads/kibana/kibana-5.3.0-linux-x86_64.tar.gz
tar -zxvf kibana-5.3.0-linux-x86_64.tar.gz
mv kibana-5.3.0-linux-x86_64 /usr/local/kibana/
1)kibana参数配置
进入cd /usr/local/kibana/config/kibana.yml里设置
server.port: 5601
server.host: "0.0.0.0"
elasticsearch.url: "http://192.168.2.112:9200"     设置与ES的连接
2)启动kibana
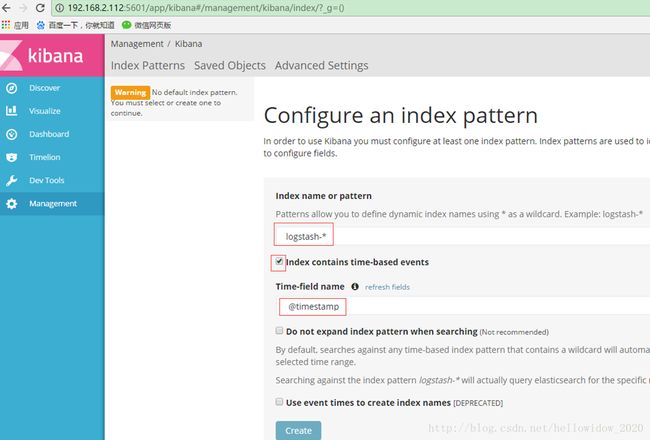
nohup /usr/local/kibana/bin/kibana &>/dev/null &在web界面,需要配置至少一个索引模式,用于确认ES index,实现搜索和分析功能
Index contains time-based events     索引基于时间的事件
Logstash-*                       定义动态的索引名字,用符号*作为通配符
@timestamp
按照上图配置点击create按钮后,进入discover页面,默认搜索时间是最近15分钟,可以点击右上角的时间修改
当有数据的时候,如下图所示:
至此ELK环境部署完成。


