企业私有网络构建运维
交换网络的构建与配置
规划拓扑
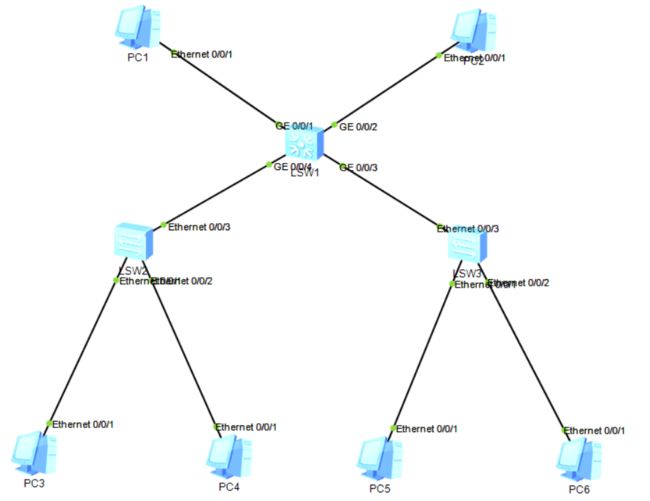
拓扑描述
部门1网络为子网1:192.168.1.0/24,对应VLAN10
部门2网络为子网2:192.168.2.0/24,对应VLAN20
部门1、部门2的计算机分别通过交换机SW2、SW3接入,然后通过总交换机SW1互连
拓扑图
将所有设备启动
配置各个设备
配置过程说明
SW1:需要创建vlan、配置access和trunk接口、并将相应接口加入对应vlan10、vlan20中
SW2:需要创建vlan、配置access和trunk接口、并将相应接口加入对应vlan10、vlan20中
SW3:需要创建vlan、配置access和trunk接口、并将相应接口加入对应vlan10、vlan20中
S1配置步骤
Enter system view, return user view with Ctrl+Z.
[Huawei]sysname SW1
[SW1]vlan batch 10 20
Info: This operation may take a few seconds. Please wait for a moment...done.
[SW1-GigabitEthernet0/0/1]port link-type access
[SW1-GigabitEthernet0/0/1]port default vlan 10
[SW1-GigabitEthernet0/0/1]quit
[SW1]interface GigabitEthernet 0/0/2
[SW1-GigabitEthernet0/0/2]port link-type access
[SW1-GigabitEthernet0/0/2]port default vlan 20
[SW1-GigabitEthernet0/0/2]quit
[SW1]interface GigabitEthernet 0/0/3
[SW1-GigabitEthernet0/0/3]port link-type trunk
[SW1-GigabitEthernet0/0/3]port trunk allow-pass vlan 10 20
[SW1-GigabitEthernet0/0/3]quit
[SW1]interface GigabitEthernet 0/0/4
[SW1-GigabitEthernet0/0/4]port link-type trunk
[SW1-GigabitEthernet0/0/4]port trunk allow-pass vlan 10 20
[SW1-GigabitEthernet0/0/4]quit
S2配置步骤
Enter system view, return user view with Ctrl+Z.
[Huawei]sysname SW2
[SW2]vlan batch 10 20
Info: This operation may take a few seconds. Please wait for a moment...done.
[SW2-GigabitEthernet0/0/1]port link-type access
[SW2-GigabitEthernet0/0/1]port default vlan 10
[SW2-GigabitEthernet0/0/1]quit
[SW2]interface GigabitEthernet 0/0/2
[SW2-GigabitEthernet0/0/2]port link-type access
[SW2-GigabitEthernet0/0/2]port default vlan 20
[SW2-GigabitEthernet0/0/2]quit
[SW2]interface GigabitEthernet 0/0/3
[SW2-GigabitEthernet0/0/3]port link-type trunk
[SW2-GigabitEthernet0/0/3]port trunk allow-pass vlan 10 20
[SW2-GigabitEthernet0/0/3]quit
S3配置步骤
Enter system view, return user view with Ctrl+Z.
[Huawei]sysname SW3
[SW3]vlan batch 10 20
Info: This operation may take a few seconds. Please wait for a moment...done.
[SW3-GigabitEthernet0/0/1]port link-type access
[SW3-GigabitEthernet0/0/1]port default vlan 10
[SW3-GigabitEthernet0/0/1]quit
[SW3]interface GigabitEthernet 0/0/2
[SW3-GigabitEthernet0/0/2]port link-type access
[SW3-GigabitEthernet0/0/2]port default vlan 20
[SW3-GigabitEthernet0/0/2]quit
[SW3]interface GigabitEthernet 0/0/3
[SW3-GigabitEthernet0/0/3]port link-type trunk
[SW3-GigabitEthernet0/0/3]port trunk allow-pass vlan 10 20
[SW3-GigabitEthernet0/0/3]quit
配置PC地址
PC1 192.168.1.1/24
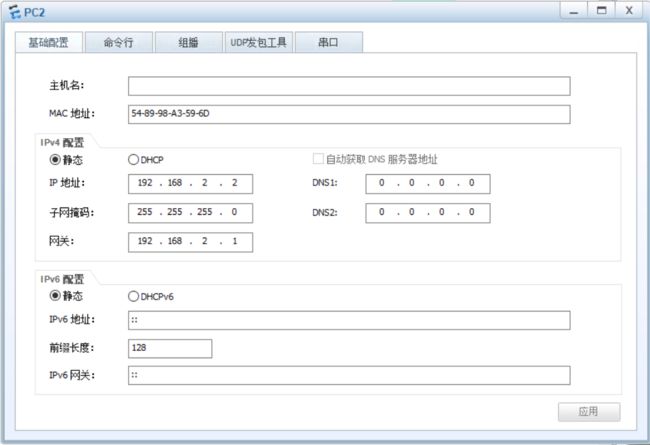
PC2 192.168.2.2/24
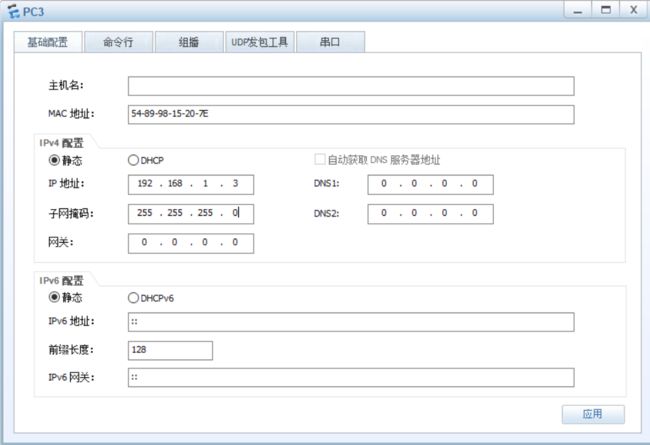
PC3 192.168.1.3/24
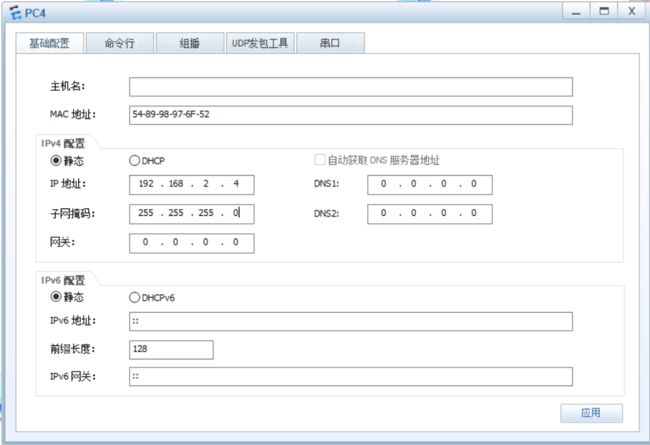
PC4 192.168.2.4/24
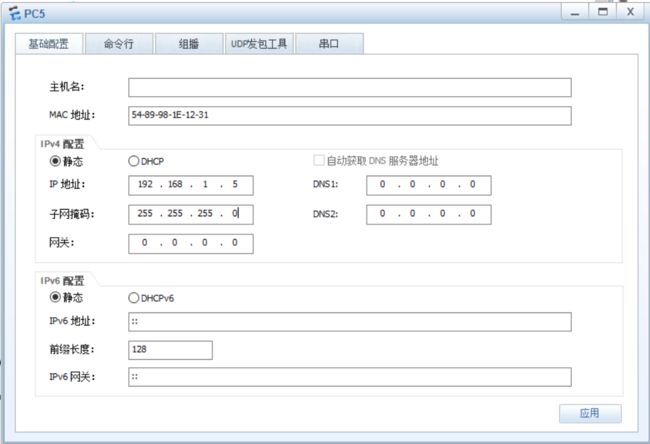
PC5 192.168.1.5/24
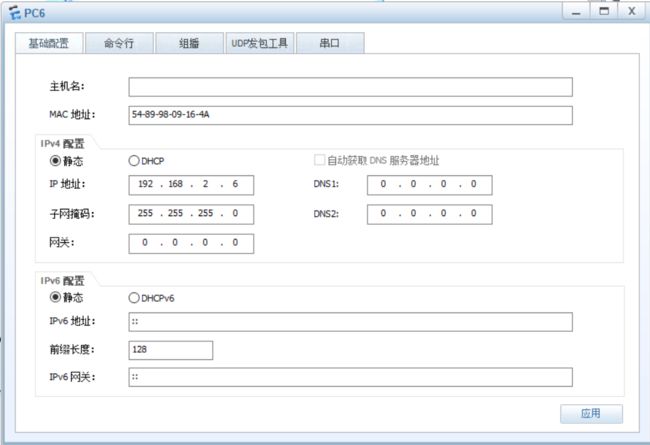
PC6 192.168.2.6/24
配置PC1地址
配置PC1地址为192.168.1.1/24
配置PC2地址
配置PC2地址为192.168.2.2/24
配置PC3地址
配置PC3地址为192.168.1.3/24
配置PC4地址
配置PC4地址为192.168.2.4/24
配置PC5地址
配置PC5地址为192.168.1.5/24
配置PC6地址
配置PC6地址为192.168.2.6/24
网络连通性测试
打开PC1命令行,通过ping命令对其他PC机进行连通测试
路由网络的构建与配置
规划拓扑
架构分析
在构建的局域网中,通过路由器间配置静态路由,实现PC1和PC2主机直接连通,主机网段不能与路由器直接互联网段通信
拓扑描述
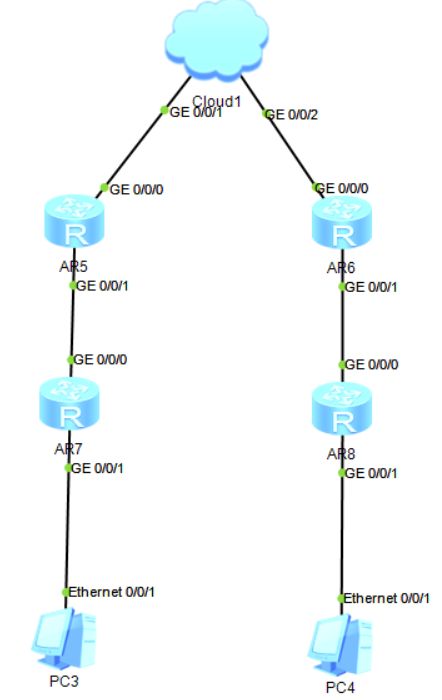
路由器之间通过静态路由设置路由策略。通过配置Cloud设备,R1和R2路由器之间建立通信
R1路由器:配置指向192.168.2.0/24网络的静态路由,下一跳为R2接口地址。配置指向192.168.1.0/24网络的静态路由,下一跳为R3接口地址
R2路由器:配置指向192.168.1.0/24网络的静态路由,下一跳为R1接口地址。配置指向192.168.2.0/24网络的静态路由,下一跳为R4接口地址
R3路由器:配置指向192.168.2.0/24网络的静态路由,下一跳为R1接口地址
R4路由器:配置指向192.168.1.0/24网络的静态路由,下一跳为R2接口地址
拓扑图
路由器使用AR2220
配置cloud
添加cloud设备
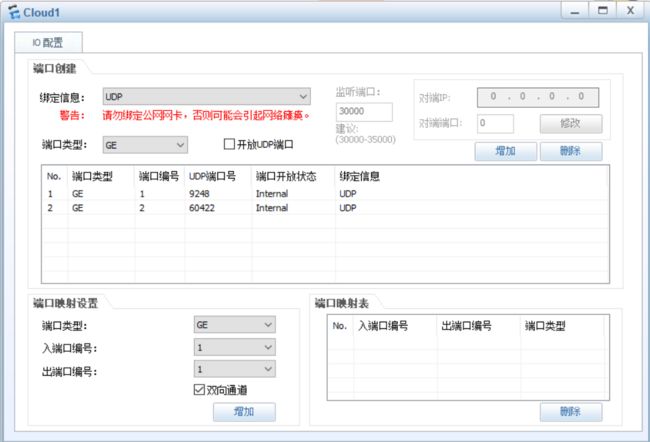
将cloud设备拖入拓扑中,双击进行配置,增加UDP端口,UDP端口为Cloud设备与虚拟设备的连接端口
添加端口映射
添加端口映射,入端口编号为UDP1端口编号,出端口编号为UDP2编号,勾选“双向通道”复选框,单击下方“增加”按钮,可以在端口映射表中查看添加的端口映射关系
连接cloud和路由器
配置路由器
R1路由器配置
Enter system view, return user view with Ctrl+Z.
[Huawei]sysname R1
[R1]interface GigabitEthernet 0/0/0
[R1-GigabitEthernet0/0/0]ip address 12.12.12.1 30
May 13 2020 18:38:44-08:00 R1 %%01IFNET/4/LINK_STATE(l)[0]:The line protocol IP
on the interface GigabitEthernet0/0/0 has entered the UP state.
[R1-GigabitEthernet0/0/0]quit
[R1]interface GigabitEthernet 0/0/1
[R1-GigabitEthernet0/0/1]ip address 192.168.101.1 30
May 13 2020 18:40:16-08:00 R1 %%01IFNET/4/LINK_STATE(l)[1]:The line protocol IP
on the interface GigabitEthernet0/0/1 has entered the UP state.
[R1-GigabitEthernet0/0/1]quit
[R1]ip route-static 192.168.2.0 24 12.12.12.2
[R1]ip route-static 192.168.1.0 24 192.168.101.2
R2路由器配置
Enter system view, return user view with Ctrl+Z.
[Huawei]sysname R2
[R2]interface GigabitEthernet 0/0/0
[R2-GigabitEthernet0/0/0]ip address 12.12.12.2 30
May 13 2020 18:45:20-08:00 R2 %%01IFNET/4/LINK_STATE(l)[0]:The line protocol IP
on the interface GigabitEthernet0/0/0 has entered the UP state.
[R2-GigabitEthernet0/0/0]quit
[R2]interface GigabitEthernet 0/0/1
[R2-GigabitEthernet0/0/1]ip address 192.168.101.5 30
May 13 2020 18:45:59-08:00 R2 %%01IFNET/4/LINK_STATE(l)[1]:The line protocol IP
on the interface GigabitEthernet0/0/1 has entered the UP state.
[R2-GigabitEthernet0/0/1]quit
[R2]ip route-static 192.168.1.0 24 12.12.12.1
[R2]ip route-static 192.168.2.0 24 192.168.101.6
R3路由器配置
Enter system view, return user view with Ctrl+Z.
[Huawei]sysname R3
[R3]interface GigabitEthernet 0/0/0
[R3-GigabitEthernet0/0/0]ip address 192.168.101.2 30
May 13 2020 18:51:11-08:00 R3 %%01IFNET/4/LINK_STATE(l)[0]:The line protocol IP
on the interface GigabitEthernet0/0/0 has entered the UP state.
[R3-GigabitEthernet0/0/0]quit
[R3]interface GigabitEthernet 0/0/1
[R3-GigabitEthernet0/0/1]ip address 192.168.1.1 24
May 13 2020 18:51:40-08:00 R3 %%01IFNET/4/LINK_STATE(l)[1]:The line protocol IP
on the interface GigabitEthernet0/0/1 has entered the UP state.
[R3-GigabitEthernet0/0/1]quit
[R3]ip route-static 192.168.2.0 24 192.168.101.1
R4路由器配置
Enter system view, return user view with Ctrl+Z.
[Huawei]sysname R4
[R4]interface GigabitEthernet 0/0/0
[R4-GigabitEthernet0/0/0]ip address 192.168.101.6 30
May 13 2020 18:54:42-08:00 R4 %%01IFNET/4/LINK_STATE(l)[0]:The line protocol IP
on the interface GigabitEthernet0/0/0 has entered the UP state.
[R4-GigabitEthernet0/0/0]quit
[R4]interface GigabitEthernet 0/0/1
[R4-GigabitEthernet0/0/1]ip address 192.168.2.1 24
May 13 2020 18:55:09-08:00 R4 %%01IFNET/4/LINK_STATE(l)[1]:The line protocol IP
on the interface GigabitEthernet0/0/1 has entered the UP state.
[R4-GigabitEthernet0/0/1]quit
[R4]ip route-static 192.168.1.0 24 192.168.101.5
PC配置IP地址
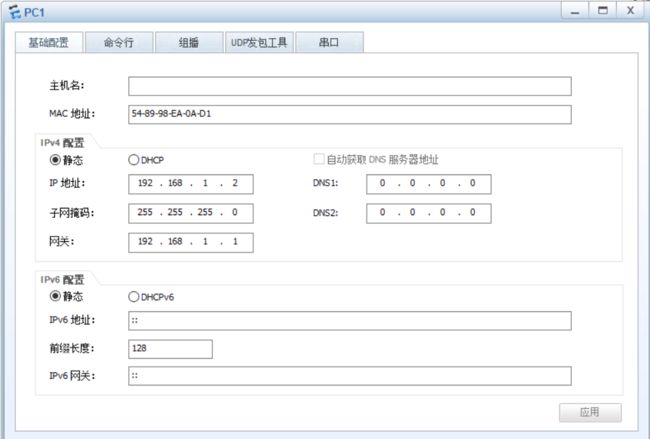
PC1配置IP地址
配置PC1地址为192.168.1.2/24,网关地址为192.168.1.1
PC2配置IP地址
配置PC2地址为192.168.2.2/24,网关地址为192.168.2.1
PC1连通测试
在PC1上进入命令行模式,通过PING命令对PC2 IP地址和R4路由器上行端口IP地址进行测试
PC2连通测试
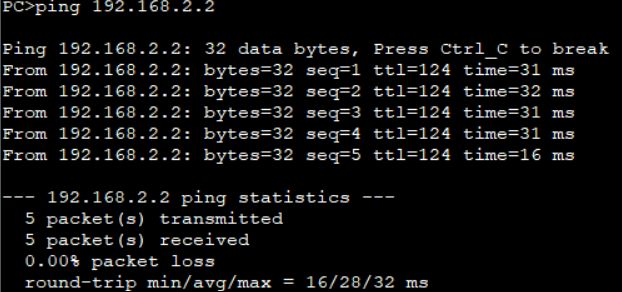
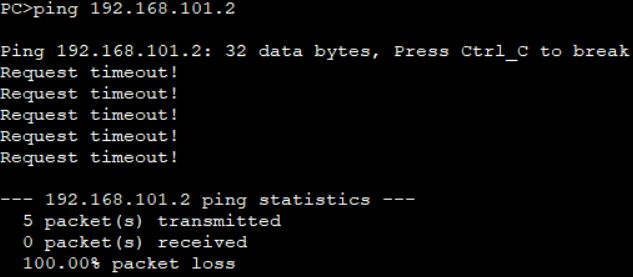
在PC2上进入命令行模式,通过PING命令对PC1 IP地址和R3路由器上行端口IP地址进行测试
使用模拟器配置无线网络
规划拓扑
拓扑分析
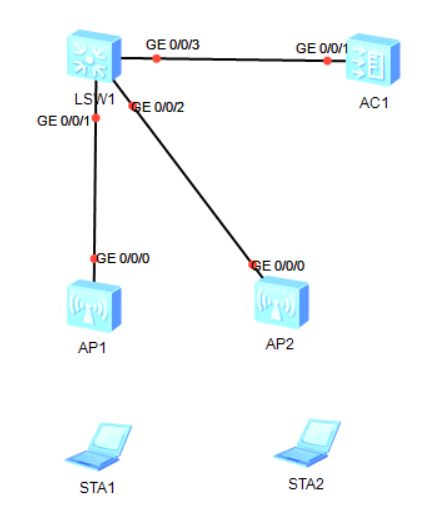
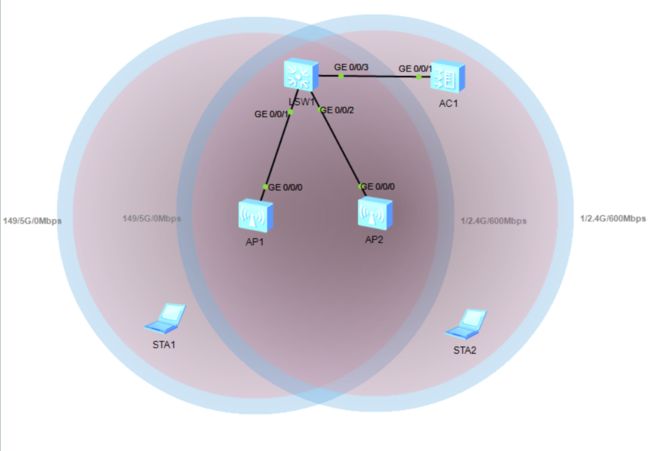
对于小型局域网中,鉴于接入设备的需求,需要在局域网中部署无线网络,通过无线控制器AC管理网络中所有的无线AP设备,下发无线配置信息。无线网络发布2.4G和5G信号,满足不同设备的连接使用
拓扑描述
交换机配置vlan100为连接无线设备,网关地址为10.10.100.1/22。
AC控制器管理地址为172.16.101.1/24,设置vlan101为AC和AP之间管理VLAN,配置DHCP地址池,使AP可以自动获取管理地址
拓扑图
交换机使用S5700,AC使用AC6005,AP使用AP2050
配置设备
SW1交换机配置
Enter system view, return user view with Ctrl+Z.
[Huawei]sysname SW1
[SW1]vlan batch 100 101
Info: This operation may take a few seconds. Please wait for a moment...done.
[SW1]interface GigabitEthernet 0/0/1
[SW1-GigabitEthernet0/0/1]port link-type trunk
[SW1-GigabitEthernet0/0/1]port trunk pvid vlan 101
[SW1-GigabitEthernet0/0/1]port trunk allow-pass vlan 100 101
[SW1-GigabitEthernet0/0/1]quit
[SW1]interface GigabitEthernet 0/0/2
[SW1-GigabitEthernet0/0/2]port link-type trunk
[SW1-GigabitEthernet0/0/2]port trunk pvid vlan 101
[SW1-GigabitEthernet0/0/2]port trunk allow-pass vlan 100 101
[SW1-GigabitEthernet0/0/2]quit
[SW1]interface GigabitEthernet 0/0/3
[SW1-GigabitEthernet0/0/3]port link-type trunk
[SW1-GigabitEthernet0/0/3]port trunk allow-pass vlan 100 101
[SW1-GigabitEthernet0/0/3]quit
[SW1]dhcp enable
Info: The operation may take a few seconds. Please wait for a moment.done.
[SW1]interface Vlanif 100
[SW1-Vlanif100]ip address 10.10.100.1 22
[SW1-Vlanif100]dhcp select interface
[SW1-Vlanif100]dhcp server dns-list 114.114.114.114 223.5.5.5
[SW1-Vlanif100]quit
AC1交换机配置
Enter system view, return user view with Ctrl+Z.
[AC6005]sysname AC1
[AC1]vlan batch 100 101
Info: This operation may take a few seconds. Please wait for a moment...done.
[AC1]dhcp enable
Info: The operation may take a few seconds. Please wait for a moment.done.
[AC1]interface GigabitEthernet 0/0/1
[AC1-GigabitEthernet0/0/1]port link-type trunk
[AC1-GigabitEthernet0/0/1]port trunk allow-pass vlan 100 101
[AC1-GigabitEthernet0/0/1]quit
[AC1]interface Vlanif 101
[AC1-Vlanif101]ip address 172.16.101.1 24
[AC1-Vlanif101]dhcp select interface
[AC1-Vlanif101]quit
[AC1]wlan
[AC1-wlan-view]ap-group name ap-group1
Info: This operation may take a few seconds. Please wait for a moment.done.
[AC1-wlan-ap-group-ap-group1]regulatory-domain-profile default
Warning: Modifying the country code will clear channel, power and antenna gain c
onfigurations of the radio and reset the AP. Continue?[Y/N]:y
[AC1-wlan-ap-group-ap-group1]quit
[AC1-wlan-view]quit
[AC1]capwap source interface Vlanif 101
[AC1]wlan
[AC1-wlan-view]ap auth-mode mac-auth
[AC1-wlan-view]ap-id 0 ap-mac 00e0-fc41-4200 ##在AP1上用dis arp查询MAC地址
[AC1-wlan-ap-0]ap-name area_1
[AC1-wlan-ap-0]ap-group ap-group1
Warning: This operation may cause AP reset. If the country code changes, it will
clear channel, power and antenna gain configurations of the radio, Whether to c
ontinue? [Y/N]:y
Info: This operation may take a few seconds. Please wait for a moment.. done.
[AC1-wlan-ap-0]quit
[AC1-wlan-view]ap-id 1 ap-mac 00e0-fcb8-7380
[AC1-wlan-ap-1]ap-name area_2
[AC1-wlan-ap-1]ap-group ap-group1
Warning: This operation may cause AP reset. If the country code changes, it will
clear channel, power and antenna gain configurations of the radio, Whether to c
ontinue? [Y/N]:y
Info: This operation may take a few seconds. Please wait for a moment.. done.
[AC1-wlan-ap-1]quit
[AC1-wlan-view]display ap all
Info: This operation may take a few seconds. Please wait for a moment.done.
Total AP information:
nor : normal [2]
--------------------------------------------------------------------------------
---------------
ID MAC Name Group IP Type State STA Up
time
--------------------------------------------------------------------------------
---------------
0 00e0-fc41-4200 area_1 ap-group1 172.16.101.252 AP2050DN nor 0 2M
:0S
1 00e0-fcb8-7380 area_2 ap-group1 172.16.101.91 AP2050DN nor 0 1M
:58S
--------------------------------------------------------------------------------
---------------
Total: 2
[AC1-wlan-view]security-profile name Internet
[AC1-wlan-sec-prof-Internet]security wpa-wpa2 psk pass-phrase a1234567 aes
[AC1-wlan-sec-prof-Internet]quit
[AC1-wlan-view]ssid-profile name Internet
[AC1-wlan-ssid-prof-Internet]ssid Internet
Info: This operation may take a few seconds, please wait.done.
[AC1-wlan-ssid-prof-Internet]quit
[AC1-wlan-view]vap-profile name Internet
[AC1-wlan-vap-prof-Internet]forward-mode direct-forward
[AC1-wlan-vap-prof-Internet]service-vlan vlan-id 100
Info: This operation may take a few seconds, please wait.done.
[AC1-wlan-vap-prof-Internet]security-profile Internet
Info: This operation may take a few seconds, please wait.done.
[AC1-wlan-vap-prof-Internet]ssid-profile Internet
Info: This operation may take a few seconds, please wait.done.
[AC1-wlan-vap-prof-Internet]quit
[AC1-wlan-view]ap-group name ap-group1
[AC1-wlan-ap-group-ap-group1]vap-profile Internet wlan 1 radio 0
Info: This operation may take a few seconds, please wait...done.
[AC1-wlan-ap-group-ap-group1]vap-profile Internet wlan 1 radio 1
Info: This operation may take a few seconds, please wait...done.
[AC1-wlan-ap-group-ap-group1]quit
查看无线网络信号
设备连接无线
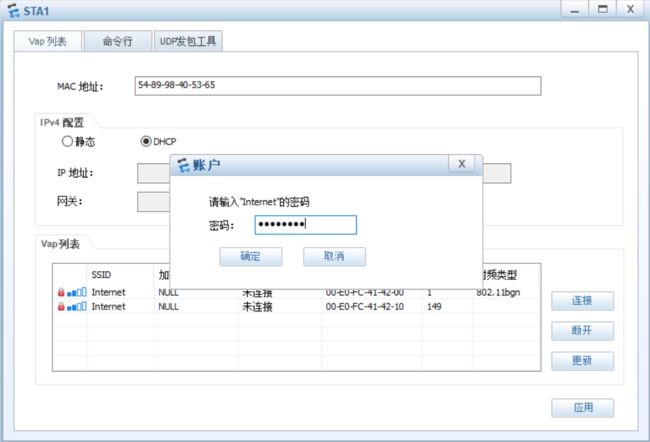
笔记本连接2.4G信号
打开STA1笔记本配置窗口,选择信道1,输入密码,点击确定,应用
连接完成后SSID显示状态为已连接
通过命令行查看电脑的无线ip地址,通过PING命令访问网关地址10.10.100.1
> ifconfig
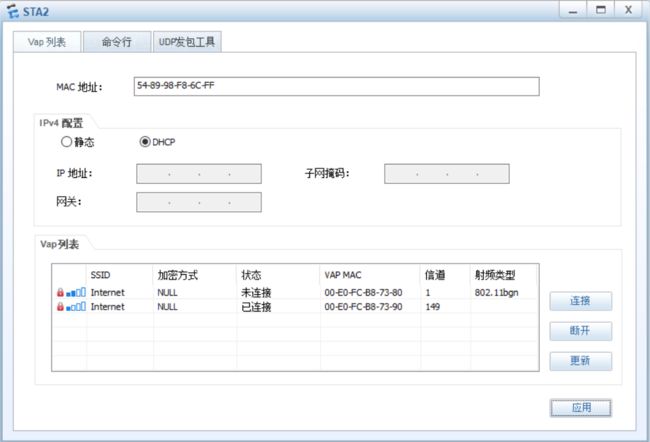
笔记本连接5G信号
打开STA2笔记本配置窗口,选择信道149,输入密码,点击确定,应用
在Vap列表显示状态为“已连接”
命令行模式查看当前WIFI获取的IP地址,通过PING命令访问STA1笔记本电脑地址为10.10.103.25
