Github超级菜鸟上传代码实验过程(Window XP环境下实验)
Window XP环境下实验
第一步:创建Github新账户 mchdbagh
第二步:创建Repositories,
用新账号登陆 https://github.com/访问,点击右下角的绿色按钮“New repository”
第三部:完善内容
填写名称,简介(可选),
勾选Public (Anyone can see this repository. You choose who can commit.)
勾选Initialize this repository with a README选项,这是自动创建REAMDE.md文件,省的你再创建。
最后点击绿色按钮“Create repository”
第四步:安装Github shell程序
地址:http://windows.github.com/
第五步:打开Git Shell,输入以下命令生成密钥来验证身份
1 git命令行窗口执行 ssh-keygen -C '[email protected]' -t rsa
2 连续三个回车之后会在windows当前用户目录下生成.ssh文件夹,和linux一样。
3 找到.ssh路径C:\Documents and Settings\skyman\.ssh\, 把文件夹下的id_rsa.pub文件内容全部复制。
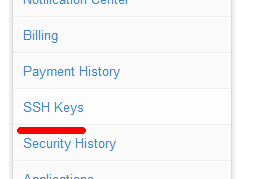
4 访问https://github.com/settings/ssh页面,然后打开github账户设置,打开ssh keys,如下图
5 右上角点击add ssh key,如下图
6 然后在title随便输入mchdba,key栏粘贴刚才的密钥。点击 “Add key” 绿色按钮,添加SSH key。
第六步:在Git Shell下输入命令测试刚才的公钥是否认证正确。
$ ssh -T -vv [email protected]
OpenSSH_4.6p1, OpenSSL 0.9.8e 23 Feb 2007
debug2: ssh_connect: needpriv 0
debug1: Connecting to github.com [192.30.252.131] port 22.
debug1: Connection established.
debug1: identity file /c/Documents and Settings/skyman/.ssh/identity type -1
debug2: key_type_from_name: unknown key type '-----BEGIN'
debug2: key_type_from_name: unknown key type '-----END'
debug1: identity file /c/Documents and Settings/skyman/.ssh/id_rsa type -1
debug1: identity file /c/Documents and Settings/skyman/.ssh/id_dsa type -1
debug1: Remote protocol version 2.0, remote software version OpenSSH_5.9p1 Debian-5ubuntu1+github5
debug1: match: OpenSSH_5.9p1 Debian-5ubuntu1+github5 pat OpenSSH*
debug1: Enabling compatibility mode for protocol 2.0
debug1: Local version string SSH-2.0-OpenSSH_4.6
debug2: fd 3 setting O_NONBLOCK
debug1: SSH2_MSG_KEXINIT sent
debug1: SSH2_MSG_KEXINIT received
debug2: kex_parse_kexinit: diffie-hellman-group-exchange-sha256,diffie-hellman-group-exchange-sha1,diffie-hellman-
group14-sha1,diffie-hellman-group1-sha1
debug2: kex_parse_kexinit: ssh-rsa,ssh-dss
debug2: kex_parse_kexinit: aes128-cbc,3des-cbc,blowfish-cbc,cast128-cbc,arcfour128,arcfour256,arcfour,aes192-cbc,aes256-
cbc,[email protected],aes128-ctr,aes192-ctr,aes256-ctr
debug2: kex_parse_kexinit: aes128-cbc,3des-cbc,blowfish-cbc,cast128-cbc,arcfour128,arcfour256,arcfour,aes192-cbc,aes256-
cbc,[email protected],aes128-ctr,aes192-ctr,aes256-ctr
debug2: kex_parse_kexinit: hmac-md5,hmac-sha1,hmac-ripemd160,[email protected],hmac-sha1-96,hmac-md5-96
debug2: kex_parse_kexinit: hmac-md5,hmac-sha1,hmac-ripemd160,[email protected],hmac-sha1-96,hmac-md5-96
debug2: kex_parse_kexinit: none,[email protected],zlib
debug2: kex_parse_kexinit: none,[email protected],zlib
debug2: kex_parse_kexinit:
debug2: kex_parse_kexinit:
debug2: kex_parse_kexinit: first_kex_follows 0
debug2: kex_parse_kexinit: reserved 0
debug2: kex_parse_kexinit: ecdh-sha2-nistp256,ecdh-sha2-nistp384,ecdh-sha2-nistp521,diffie-hellman-group-exchange-
sha256,diffie-hellman-group-exchange-sha1,diffie-hellman-group14-sha1,diffie-hellman-gro
debug2: kex_parse_kexinit: ssh-rsa,ssh-dss
debug2: kex_parse_kexinit: aes128-ctr,aes192-ctr,aes256-ctr,arcfour256,arcfour128,aes128-cbc,3des-cbc,blowfish-
cbc,cast128-cbc,aes192-cbc,aes256-cbc,arcfour,[email protected]
debug2: kex_parse_kexinit: aes128-ctr,aes192-ctr,aes256-ctr,arcfour256,arcfour128,aes128-cbc,3des-cbc,blowfish-
cbc,cast128-cbc,aes192-cbc,aes256-cbc,arcfour,[email protected]
debug2: kex_parse_kexinit: hmac-md5,hmac-sha1,[email protected],hmac-sha2-256,hmac-sha2-256-96,hmac-sha2-512,hmac-sha2
-512-96,hmac-ripemd160,[email protected],hmac-sha1-96,hmac-md5-96
debug2: kex_parse_kexinit: hmac-md5,hmac-sha1,[email protected],hmac-sha2-256,hmac-sha2-256-96,hmac-sha2-512,hmac-sha2
-512-96,hmac-ripemd160,[email protected],hmac-sha1-96,hmac-md5-96
debug2: kex_parse_kexinit: none,[email protected]
debug2: kex_parse_kexinit: none,[email protected]
debug2: kex_parse_kexinit:
debug2: kex_parse_kexinit:
debug2: kex_parse_kexinit: first_kex_follows 0
debug2: kex_parse_kexinit: reserved 0
debug2: mac_init: found hmac-md5
debug1: kex: server->client aes128-cbc hmac-md5 none
debug2: mac_init: found hmac-md5
debug1: kex: client->server aes128-cbc hmac-md5 none
debug1: SSH2_MSG_KEX_DH_GEX_REQUEST(1024<1024<8192) sent
debug1: expecting SSH2_MSG_KEX_DH_GEX_GROUP
debug2: dh_gen_key: priv key bits set: 135/256
debug2: bits set: 525/1024
debug1: SSH2_MSG_KEX_DH_GEX_INIT sent
debug1: expecting SSH2_MSG_KEX_DH_GEX_REPLY
debug1: Host 'github.com' is known and matches the RSA host key.
debug1: Found key in /c/Documents and Settings/skyman/.ssh/known_hosts:1
debug2: bits set: 484/1024
debug1: ssh_rsa_verify: signature correct
debug2: kex_derive_keys
debug2: set_newkeys: mode 1
debug1: SSH2_MSG_NEWKEYS sent
debug1: expecting SSH2_MSG_NEWKEYS
debug2: set_newkeys: mode 0
debug1: SSH2_MSG_NEWKEYS received
debug1: SSH2_MSG_SERVICE_REQUEST sent
debug2: service_accept: ssh-userauth
debug1: SSH2_MSG_SERVICE_ACCEPT received
debug2: key: /c/Documents and Settings/skyman/.ssh/identity (0x0)
debug2: key: /c/Documents and Settings/skyman/.ssh/id_rsa (0x0)
debug2: key: /c/Documents and Settings/skyman/.ssh/id_dsa (0x0)
debug1: Authentications that can continue: publickey
debug1: Next authentication method: publickey
debug1: Trying private key: /c/Documents and Settings/skyman/.ssh/identity
debug1: Trying private key: /c/Documents and Settings/skyman/.ssh/id_rsa
debug1: read PEM private key done: type RSA
debug2: we sent a publickey packet, wait for reply
debug1: Authentications that can continue: publickey
debug1: Trying private key: /c/Documents and Settings/skyman/.ssh/id_dsa
debug2: we did not send a packet, disable method
debug1: No more authentication methods to try.
Permission denied (publickey).
skyman@SKYMAN-CF7E3587 ~
报错了 ,看调试信息,得出如下结论:
这个是一个典型问题,这个是两种ssh实现的文件格式不一样,兼容性问题
一个比较简单的解决方式是,去.ssh目录 ,把rsa_id 和github_id.pub删除
改完名字,去git命令行下执行
ssh-keygen -C '[email protected]' -t rsa
去网址 https://github.com/settings/ssh 生成 rsa密钥,如果有已经生成的,点击delete按钮删除它
还是报以前的一样的错误,仔细检查想了想,问题所在,原来是check命令错误,不是ssh -T -vv [email protected]而是用ssh [email protected]
ssh [email protected]
skyman@SKYMAN-CF7E3587 ~
$ ssh [email protected]
Hi mchdbagh! You've successfully authenticated, but GitHub does not provide shell access.
Connection to github.com closed.
skyman@SKYMAN-CF7E3587 ~
看OK了,check成功了,可以继续进行下面操作了。
第七步:clone公共的库manual56的repository 到本地,输入命令:
现在用 git clone [email protected]:mchdbagh/manual56就能把你的库clone本地了
skyman@SKYMAN-CF7E3587 ~
$ git clone [email protected]:mchdbagh/manual56
Cloning into 'manual56'...
remote: Counting objects: 1828, done.
remote: Compressing objects: 100% (913/913), done.
Receiving objects: 100% (1828/1828), 749.87 KiB | 114 KiB/s, done.
Resolving deltas: 100% (867/867), done.
skyman@SKYMAN-CF7E3587 ~
$
现在执行:
git fetch https://github.com/mysql2cn/manual56.git master:tmp
skyman@SKYMAN-CF7E3587 ~
$ cd manual56
skyman@SKYMAN-CF7E3587 ~/manual56 (master)
$ git fetch https://github.com/mysql2cn/manual56.git master:tmp
Username for 'https://github.com': mchdbagh
Password for 'https://[email protected]':
remote: Counting objects: 1888, done.
remote: Compressing objects: 100% (693/693), done.
Receivingremote: Total 1807 (delta 1172), reused 1698 (delta 1086)
Receiving objects: 100% (1807/1807), 669.10 KiB | 59 KiB/s, done.
Resolving deltas: 100% (1172/1172), completed with 37 local objects.
From https://github.com/mysql2cn/manual56
* [new branch] master -> tmp
skyman@SKYMAN-CF7E3587 ~/manual56 (master)
同步主库的最新版本到你的库
git merge tmp
git push
执行
未完待续
参考资料:
http://lazynight.me/2898.html
http://www.worldhello.net/gotgithub/04-work-with-others/010-fork-and-pull.html
