Docker入门教程(一)
一、Docker是什么
Docker使用Google公司推出的Go语言进行开发实现,基于lInux内核的cgroup,namespace,以及AUFS类的Union FS 等技术。对进程进行封装隔离,属于操作系统层面的虚拟化技术。由于隔离的进程独立于宿主机和其他的隔离的进程,因此也称为容器。
Docker在容器的基础上,进行了进一步的封装,从文件系统,网络互联到进程隔离等等。极大的简化了容器的创建和维护。是的Docker技术比虚拟机技术更为轻便、快捷。
二、Docker的优势
更高效的利用系统资源
更快速的启动时间
一致的运行环境
持续交付和部署
更轻松的迁移
更轻松的维护和扩展
三、Docker与传统虚拟机比较
特性 容器 虚拟机
启动 秒级 分钟级
硬盘使用 一般为MB 一般为GB
性能 接近原生 较弱
系统支持量 单机支持上千个容器 一般几十个
四、Docker架构
Docker使用客户端-服务端架构模式,使用远程API来管理和创建Docker容器。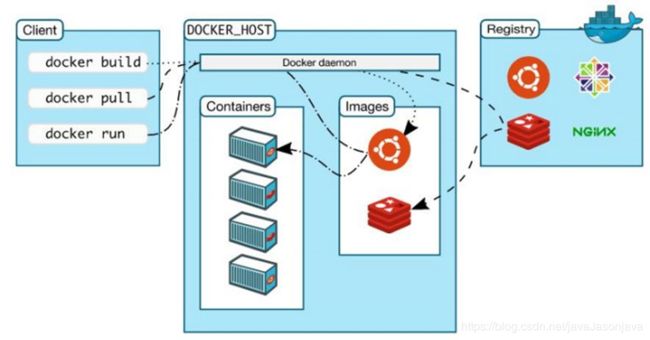
五、Docker的三个基本概念(Docker的生命周期)
镜像:操作系统分为内核和用户空间,对于Linux而言,内核启动后,会挂载root文件系统为其提供用户空间支持。而Docker镜像就相当于是一个root文件系统。
Docker镜像是一个特殊的文件系统,除了提供容器运行时所需的程序、库、资源、配置等文件外,还包含了一些运行时准备的一些配置参数(如匿名卷、环境变量、用户等)。镜像不含包任何动态数据,其内容在构建之后也不会被改变。
因为镜像包含操作系统完整的root文件系统,其体积往往是庞大的,因此在 Docker设计时将其设计为分层存储的架构。镜像只是一个虚拟的概念,其实际体现并非有一个文件组成,而是由一组文件系统组成或者说,由多层文件系统联合组成。
镜像构建时,会一层层构建,前一层是后一层的基础。每一层构建完就不会再发生改变,后一层的任何改变只发生在自己这一层。在构建镜像的时候,需要额外小心,每一层尽量只包含该层需要添加的东西,任何额外的东西应该在该层构建结束前清理掉。
分层存储的特征还是用镜像的复用、定制变的更为容易。甚至可以用之前构建好的镜像作为基础层,然后进一步添加新的层,以定制自己所需要的内容,构建新的镜像。
容器:镜像和容器的关系,就想java中的类和实例一样,镜像是静态的定义,容器是进行运行时的实体。容器可以被创建、启动、停止、删除、暂停等。
镜像使用的是分层存储,容器也是如此。每一个容器运行时,是以镜像为基础层,在其上创建一个当前容器的存储层,我们可以称这个为容器运行时读写而准备的存储层为容器存储层。
容器存储层是生存周期和容器一样,容器消亡时,容器存储层也随之消亡。因此任何保存于容器存储层的信息都会随容器删除而丢失。
按照Docker最佳实践的要求,容器不应该向其存储层内写入任何数据,容器存储层要保持无状态化。所有的文件写入操作,都应该使用Volume数据卷、或者绑定宿主目录,在这些位置的读写会跳过容器存储层,直接对宿主发生读写,其性能和稳定性更高。
数据卷的生存周期独立于容器,容器的消亡,数据卷不会消亡。因此使用数据卷后,容器删除或者重新运行之后,数据却不会丢失。
仓库:镜像构建完成后,可以很容易的在当前宿主机上运行,但是如果需要在其他服务器上使用这个镜像,我们就需要一个集中的存储、分发镜像的服务,Docker Register 就是这样的服务。
一个Docker Register中可以包含多个仓库,每个仓库可以包含多个标签,每个标签对应一个镜像。
通常,一个仓库会包含同一个软件不同版本的镜像,而标签就常用于对应该软件的各个版本。我们可以通过<仓库名>:<标签>的格式来指定具体是哪个版本的镜像,如果不给出标签,将以latest作为默认标签。
六、Docker的安装
1)系统要求:
Docker CE 支持64位版本Centos 7,并且要求内核版本不低于3.10
# 可以使用uname -a 查看内核版本
[root@localhost ~]# uname -a
Linux localhost 3.10.0-1062.9.1.el7.x86_64 #1 SMP Fri Dec 6 15:49:49 UTC 2019 x86_64 x86_64 x86_64 GNU/Linux
# 或者使用uname -r 查看内核版本
[root@localhost ~]# uname -r
3.10.0-1062.9.1.el7.x86_64
2)卸载旧版本
旧版本的Docker称为docker或者docker-engine, 使用一下命令卸载旧版本
[root@localhost ~]# sudo yum remove docker docker-common docker-selinux docker-engine
出现以下内容就卸载完成,可以重新安装Docker拉。
[root@localhost ~]# sudo yum remove docker docker-common docker-selinux docker-engine
# 此处内容省略
......
Dependencies Resolved

=============================================================================================================================================================================================
 Package                                         Arch                                 Version                                          Repository                                       Size
=============================================================================================================================================================================================
Removing:
 container-selinux                               noarch                               2:2.107-3.el7                                    @extras                                          40 k
Removing for dependencies:
 containerd.io                                   x86_64                               1.2.13-3.1.el7                                   @docker-ce-stable                                90 M
 docker-ce                                       x86_64                               3:19.03.8-3.el7                                  @docker-ce-stable                               104 M

Transaction Summary
=============================================================================================================================================================================================
Remove  1 Package (+2 Dependent packages)

Installed size: 194 M
Is this ok [y/N]: y
Downloading packages:
Running transaction check
Running transaction test
Transaction test succeeded
Running transaction
  Erasing    : 3:docker-ce-19.03.8-3.el7.x86_64                                                                                                                                          1/3
  Erasing    : containerd.io-1.2.13-3.1.el7.x86_64                                                                                                                                       2/3
  Erasing    : 2:container-selinux-2.107-3.el7.noarch                                                                                                                                    3/3
  Verifying  : containerd.io-1.2.13-3.1.el7.x86_64                                                                                                                                       1/3
  Verifying  : 2:container-selinux-2.107-3.el7.noarch                                                                                                                                    2/3
  Verifying  : 3:docker-ce-19.03.8-3.el7.x86_64                                                                                                                                          3/3

Removed:
  container-selinux.noarch 2:2.107-3.el7

Dependency Removed:
  containerd.io.x86_64 0:1.2.13-3.1.el7                                                           docker-ce.x86_64 3:19.03.8-3.el7

Complete!
[root@localhost ~]#
如果出现以下内容,则说明没有安装过,可以直接安装
[root@localhost ~]# sudo yum remove docker docker-common docker-selinux docker-engine
Loaded plugins: fastestmirror
No Match for argument: docker
No Match for argument: docker-common
No Match for argument: docker-selinux
No Match for argument: docker-engine
No Packages marked for removal
[root@localhost ~]#
3)使用yum安装
[root@localhost ~]# yum install docker-ce
4)启动docker
[root@localhost ~]# systemctl start docker
可以使用一下命令查看docker是否启动成功
[root@localhost ~]# systemctl status docker
● docker.service - Docker Application Container Engine
   Loaded: loaded (/usr/lib/systemd/system/docker.service; enabled; vendor preset: disabled)
   Active: active (running) since Fri 2020-05-01 07:03:36 CST; 5s ago
     Docs: https://docs.docker.com
 Main PID: 573347 (dockerd)
    Tasks: 11
   Memory: 40.9M
   CGroup: /system.slice/docker.service
           └─573347 /usr/bin/dockerd -H fd:// --containerd=/run/containerd/containerd.sock

May 01 07:03:35 localhost dockerd[573347]: time="2020-05-01T07:03:35.997904188+08:00" level=info msg="ccResolverWrapper: sending update to cc: {[{unix:///run/containerd/containerd..." module=grpc
May 01 07:03:35 localhost dockerd[573347]: time="2020-05-01T07:03:35.997917772+08:00" level=info msg="ClientConn switching balancer to \"pick_first\"" module=grpc
May 01 07:03:36 localhost dockerd[573347]: time="2020-05-01T07:03:36.016765727+08:00" level=info msg="[graphdriver] using prior storage driver: overlay2"
May 01 07:03:36 localhost dockerd[573347]: time="2020-05-01T07:03:36.039730058+08:00" level=info msg="Loading containers: start."
May 01 07:03:36 localhost dockerd[573347]: time="2020-05-01T07:03:36.158494578+08:00" level=info msg="Default bridge (docker0) is assigned with an IP address 172.17.0.0/16. Daemon...d IP address"
May 01 07:03:36 localhost dockerd[573347]: time="2020-05-01T07:03:36.203335230+08:00" level=info msg="Loading containers: done."
May 01 07:03:36 localhost dockerd[573347]: time="2020-05-01T07:03:36.224586842+08:00" level=info msg="Docker daemon" commit=afacb8b graphdriver(s)=overlay2 version=19.03.8
May 01 07:03:36 localhost dockerd[573347]: time="2020-05-01T07:03:36.224665888+08:00" level=info msg="Daemon has completed initialization"
May 01 07:03:36 localhost dockerd[573347]: time="2020-05-01T07:03:36.257371691+08:00" level=info msg="API listen on /var/run/docker.sock"
May 01 07:03:36 localhost systemd[1]: Started Docker Application Container Engine.
Hint: Some lines were ellipsized, use -l to show in full.
5)测试Docker是否安装正确
使用一下名称启动一个基于hello-world镜像的容器,出现以下内容说明docker安装成功
[root@localhost ~]# docker run hello-world
Hello from Docker!
This message shows that your installation appears to be working correctly.

To generate this message, Docker took the following steps:
 1. The Docker client contacted the Docker daemon.
 2. The Docker daemon pulled the "hello-world" image from the Docker Hub.
    (amd64)
 3. The Docker daemon created a new container from that image which runs the
    executable that produces the output you are currently reading.
 4. The Docker daemon streamed that output to the Docker client, which sent it
    to your terminal.

To try something more ambitious, you can run an Ubuntu container with:
 $ docker run -it ubuntu bash

Share images, automate workflows, and more with a free Docker ID:
 https://hub.docker.com/

For more examples and ideas, visit:
 https://docs.docker.com/get-started/
6)删除docker安装包
[root@localhost ~]# yum remove docker-ce
7)删除docker镜像
[root@localhost ~]# rm -rf /var/lib/docker
七、Docker命令
查看Docker命令
[root@localhost ~]# docker --help
从Docker镜像仓库获取镜像的命令是docker pull,格式为
docker pull [选项] [Docker Register 地址[:端口]/] 仓库名[:标签]
例如:
docker pull ubuntu:16.04
运行镜像
docker run -it --rm ubuntu:16.04 bash
-it: 这是两个参数,-i:交互操作, -t:是终端
--rm: 这个参数是说容器退出后随之将其删除
ubuntu:16.04: 这是指用ubuntu:16.04镜像为基础来启动容器
bash: 放在镜像名后面的是命令,
exit: 退出容器
查看已经下载的镜像
[root@localhost /]# docker image ls
REPOSITORY          TAG                 IMAGE ID            CREATED             SIZE
ubuntu              16.04               005d2078bdfa        6 days ago          125MB
查看镜像、容器、数据卷占用的空间
[root@localhost /]# docker system df
TYPE                TOTAL               ACTIVE              SIZE                RECLAIMABLE
Images              1                   0                   124.6MB             124.6MB (100%)
Containers          0                   0                   0B                  0B
Local Volumes       0                   0                   0B                  0B
Build Cache         0                   0                   0B                  0B