从0开始写一个小程序
项目简介
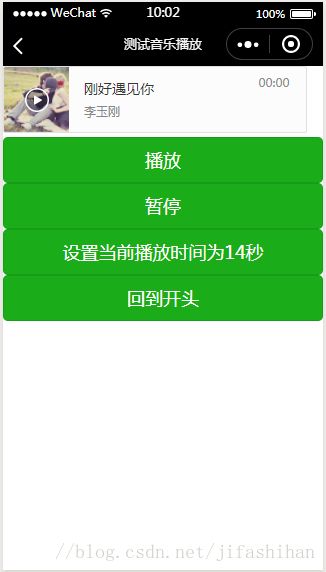
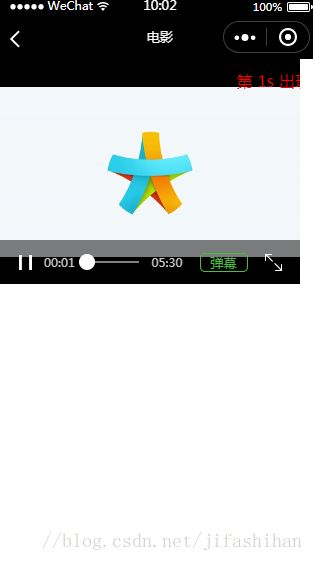
从0开始写一个小程序,本来想写一个新闻类的程序,后来发现调用的聚合数据api每天只能访问100次,就换成豆瓣的了,直接用豆瓣的接口又访问不了,在网上查了一下,要把豆瓣的地址换成“http://t.yushu.im”才能访问,所以电影和图书用的豆瓣的接口,音乐用的是百度音乐的接口。主要分三个部分,一个是电影,一个是图书,一个是音乐。主要功能包括分享功能,电影主要包括列表和焦点图轮播,其他图书和音乐界面只包括列表,对于详情页,因为api数据问题,没有现成的接口做详情页,所以做了三个演示详情页,一个是演示怎么加载html格式的字符串,并且在界面上显示,一个是演示播放音乐,一个是演示播放电影。主要图片如下:
项目搭建
首先新建一个小程序项目,基本上需要6个界面,可以在app.json文件中,写入需要创建的文件,点击保存,工具会自动将文件创建好,代码如下:
"pages":[
    "pages/index/index",
    "pages/lista/lista",
    "pages/listb/listb",
    "pages/view0/view0",
    "pages/view/view",
    "pages/view2/view2",
    "pages/logs/logs"
  ]
这样项目中就会创建出需要的文件,

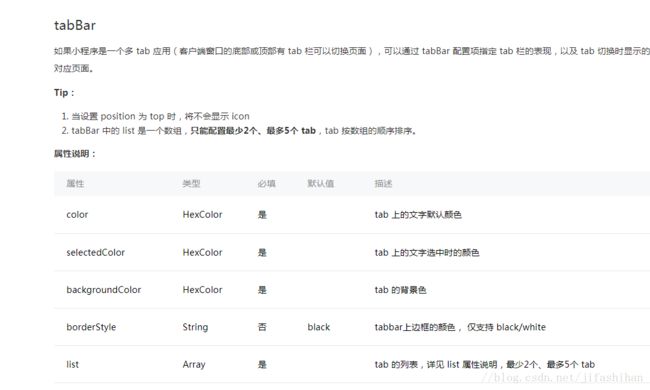
然后搭建三个tab,分别是电影,图书,娱乐,tab的创建,可以查看小程序api中配置部分(https://mp.weixin.qq.com/debug/wxadoc/dev/framework/config.html),

另外,分享一个网页,可以在里边搜索一些icon,方便开发(http://www.iconfont.cn/),我在这个网上搜索了一些图片,作为tab的iconPath和selectedIconPath,在项目中创建一个image文件夹,将下载下来的文件放在文件夹中,如图:
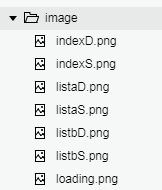
在app.json中创建tab:
 "tabBar":{
    "color":"#8a8a8a",
    "selectedColor":"#d81e06",
    "list":[
      {
        "pagePath": "pages/index/index",
        "text": "电影",
        "iconPath": "image/listaD.png",
        "selectedIconPath": "image/listaS.png"
      },
      {
      "pagePath":"pages/lista/lista",
      "text":"图书",
      "iconPath":"image/indexD.png",
      "selectedIconPath":"image/indexS.png"
    },
    {
      "pagePath": "pages/listb/listb",
      "text": "音乐",
      "iconPath": "image/listbD.png",
      "selectedIconPath": "image/listbS.png"
    }]
  }
然后对navigationBar进行定制,也是在app.json中:
 "window":{
    "backgroundTextStyle":"light",
    "navigationBarBackgroundColor": "#000",
    "navigationBarTitleText": "电影",
    "navigationBarTextStyle":"white",
    "enablePullDownRefresh":true,
    "backgroundTextStyle":"dark"
  },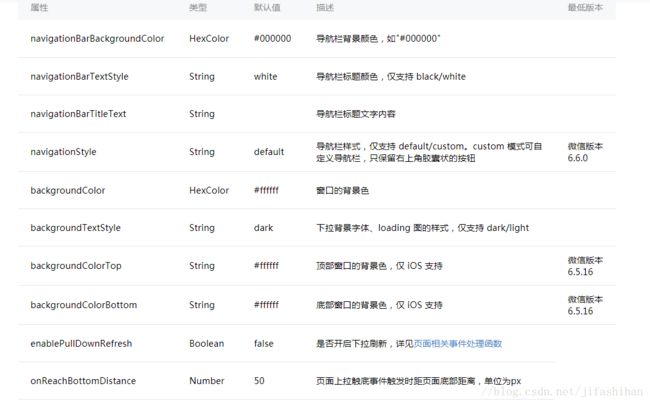
有一个属性:enablePullDownRefresh,这个设置为true可以开启下拉刷新功能,backgroundTextStyle设置下拉刷新时怎么显示。navigationBar可以在不同的界面进行定制,比如在图书模块,在图书模块的json中设置:
{
  "navigationBarTitleText": "图书"
}
在音乐模块的json中设置:
{
  "navigationBarTitleText": "音乐"
}
电影
现在开始写电影页面,这个主要包括三个功能,一个是焦点图轮播,一个是列表,包括列表拉到底部显示加载图标,加载数据,还有分享功能
首先是焦点图轮播,焦点图需要用到swiper,这个使用方法具体查看官方文档(https://mp.weixin.qq.com/debug/wxadoc/dev/component/swiper.html),
小程序开发,.wxml和.js文件进行通信,在.js中,通过data定义变量,如果要改变变量值,需要使用 setData方法来赋值,在wxml中,通过{{变量}}来调用,对于方法通信,在.wxml中,在控件中,通过bindtap=”方法名”定义,在js中,通过 方法名: function(e) {}来响应。对于界面样式,在wxml的控件中,定义class属性,在.wxss中,通过.class名来设置样式
1.设置焦点图:
在index.wxml中:
<swiper indicator-dots='{{indicatorDots}}' autoplay='{{autoplay}}' interval='{{interval}}' duration='{{duration}}' circular='{{circular}}'>
  <block wx:for='{{imageUrls}}'>
    <swiper-item>
      <navigator url='/pages/view0/view0'>
        <image src='{{item.images.large}}'>image>
      navigator>
    swiper-item>
  block>
swiper>
解释一下这段代码:
{{}}包括的是变量,可以在index.js中进行设置,wx:for是列表渲染,官方解释:
wx:for
在组件上使用 wx:for 控制属性绑定一个数组,即可使用数组中各项的数据重复渲染该组件。

默认数组的当前项的下标变量名默认为 index,数组当前项的变量名默认为 item

<view wx:for="{{array}}">
  {{index}}: {{item.message}}
view>
Page({
  data: {
    array: [{
      message: 'foo',
    }, {
      message: 'bar'
    }]
  }
})
使用 wx:for-item 可以指定数组当前元素的变量名,

使用 wx:for-index 可以指定数组当前下标的变量名:

<view wx:for="{{array}}" wx:for-index="idx" wx:for-item="itemName">
  {{idx}}: {{itemName.message}}
view>
wx:for 也可以嵌套,下边是一个九九乘法表

<view wx:for="{{[1, 2, 3, 4, 5, 6, 7, 8, 9]}}" wx:for-item="i">
  <view wx:for="{{[1, 2, 3, 4, 5, 6, 7, 8, 9]}}" wx:for-item="j">
    <view wx:if="{{i <= j}}">
      {{i}} * {{j}} = {{i * j}}
    view>
  view>
view>
block wx:for
类似 block wx:if,也可以将 wx:for 用在<block/>标签上,以渲染一个包含多节点的结构块。例如:

<block wx:for="{{[1, 2, 3]}}">
  <view> {{index}}: view>
  <view> {{item}} view>
block>
navigator是页面链接,就是点击一个控件,跳转到另一个页面,主要用法:
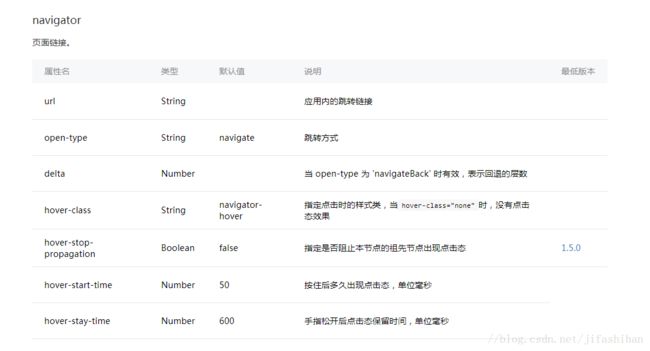
注意:url属性可以带一些值,比如:
<navigator url="/page/navigate/navigate?id=navigate" hover-class="navigator-hover">跳转到新页面navigator>跳转到新页面时,可以在console中查看到传入的值:
onLoad:function(e){
    // 页面初始化 options为页面跳转所带来的参数
    console.log(e.id)
    }
这一点很重要,因为有的时候,跳转到的页面,需要上一个页面的数据作为参数调用接口,设置值之类的操作,类似于安卓中的Intent
index.js中设置焦点图的对应的代码:
 //初始化数据
  data: {
    imageUrls:{},
    newsList:{},
    page:1,
    loading:false,
    indicatorDots: false,
    autoplay: true,
    interval: 5000,
    duration: 1000,
    circular:true
  },
  //加载时的操作
  onLoad: function () {
    console.log("加载时触发");
    var that = this;
    //顶部图片轮播调用的数据
    wx.request({
      url: 'http://t.yushu.im/v2/movie/in_theaters',
      method:"GET",
      success: function (res) {
        that.setData({
          imageUrls: res.data.subjects
        })
      }
    })
首先定义一个变量,imageUrls,然后通过 wx.request调用数据,将获取的数据给imageUrls赋值,然后index.wxml中{{imageUrls}}就可以使用js中imageUrls的值了。
开始做列表功能,列表同样需要用到wx:for进行循环,将数据显示在界面上,对应代码:
<block wx:for='{{newsList}}'>
  <navigator class='listWrap' url='/pages/view0/view0'>
    <image class='listThumb' src='{{item.images.large}}'>image>
    <view class='listInfo'>
      <view class='listTitle'>{{item.original_title}}view>
      <view class='listKeyAdd'>
        <text class='addFN'>{{item.year}}text>
        <text class='addKY'>{{item.rating.average}}text>
      view>
    view>
  navigator>
block>
注意:控件中的class,是为了对控件好进行操作,这里要对控件设置布局,在index.wxss中进行设置:
/*优化后的样式*/
swiper-item image {
  width:750rpx;
}
.listWrap {
  width:705rpx;
  padding:0 25rpx;
  padding:30rpx 25rpx;
  border-bottom:1px solid #e5e5e5;
}
.listThumb {
  width:260rpx;
  height:160rpx;
  display:block;
  float:left;
}
.listInfo {
  height:160rpx;
  width:435rpx;
  display:inline-block;
  padding-left:10rpx;
  position: relative;
}
.listTitle {
  color:#333;
  font-size:36rpx;
  font-weight:600;
}
.listKeyAdd {
  font-size:30rpx;
  position: absolute;
  bottom: 0;
  width:100%;
}
.addFN {
  color: #808080;
  display:block;
  float:left;
}
.addKY {
  color: #d9c599;
  float:right;
  display:block;
  margin-right:15rpx;
}
rpx单位是微信小程序中css的尺寸单位,rpx可以根据屏幕宽度进行自适应。规定屏幕宽为750rpx。如在 iPhone6 上,屏幕宽度为375px,共有750个物理像素,则750rpx = 375px = 750物理像素,1rpx = 0.
下拉列表,界面到达底部,有一个onReachBottom方法进行监听,可以在这个方法里,进行一些分页加载之类的操作
index.js中列表操作的代码:
 //列表调用的数据
    wx.request({
      url: 'http://t.yushu.im/v2/movie/top250',
      data: {
        start: that.data.page,
        count:10
      },
      method: "GET",
      success: function (res) {
        console.log(res)
        that.setData({
          newsList: res.data.subjects
        })
      }
    })

 /*页面上拉触底事件的处理函数 演示滑到底部加载新数据*/
  onReachBottom:function(e){
    var that = this
    that.setData({
      //界面滑到底部,页面加1
      page:++that.data.page,
      loading:true
    })
    console.log(that.data.page);
    wx.request({
      url: 'http://t.yushu.im/v2/movie/top250',
      data: {
        start: that.data.page,
        count: 10
      },
      method: "GET",
      success: function (res) {
        loading:false
        that.setData({
          //获取到数据,将新获取的数据加在原有数据的后边
          newsList: that.data.newsList.concat(res.data.subjects)
        })
      }
    })
  }
在原来数据基础上加上新的数据,需要通过concat方法
分享功能:
默认情况下,点击右上角的三点图标,会提示没有配置分享,如果要实现分享,需要通过onShareAppMessage方法,对应的使用说明(https://mp.weixin.qq.com/debug/wxadoc/dev/api/share.html),对应的代码:
 //分享
  onShareAppMessage: function (res) {
    return {
      title: "电影",
      path: "pages/index/index",
      success: function (res) {

        wx.showToast({
          title: "转发成功" + res.errMsg,
          icon: 'success',
          duration: 2000
        })
      },
      fail: function (res) {
        console.log(res);
        wx.showToast({
          title: "失败:" + res.errMsg,
          icon: 'none',
          duration: 2000
        })
      }
    }
显示瞬时提示,需要通过wx.showToast方法(https://mp.weixin.qq.com/debug/wxadoc/dev/api/api-react.html#wxshowtoastobject)。
在列表底部,需要一个加载的loading,具体设置:
<block wx:if="{{loading}}">
    <image class='loading' src='/image/loading.png'>image>
block>
这个用到了wx:if,条件渲染(https://mp.weixin.qq.com/debug/wxadoc/dev/framework/view/wxml/conditional.html),在js中设置loading的值,控制loading图标是否显示,需要在wxss中设置样式
@-webkit-keyframes rotation{
from {-webkit-transform: rotate(0deg);}
to {-webkit-transform: rotate(360deg);}
}
.loading {
-webkit-transform: rotate(360deg);
animation: rotation 1.5s linear infinite;
-moz-animation: rotation 1.5s linear infinite;
-webkit-animation: rotation 1.5s linear infinite;
-o-animation: rotation 1.5s linear infinite;
width:60rpx;
height:60rpx;
display:block;
margin:10rpx auto;
}
index.js全部代码:
//index.js
//获取应用实例
const app = getApp()

Page({
  //初始化数据
  data: {
    imageUrls:{},
    newsList:{},
    page:1,
    loading:false,
    indicatorDots: false,
    autoplay: true,
    interval: 5000,
    duration: 1000,
    circular:true
  },
  //加载时的操作
  onLoad: function () {
    console.log("加载时触发");
    var that = this;
    //顶部图片轮播调用的数据
    wx.request({
      url: 'http://t.yushu.im/v2/movie/in_theaters',
      method:"GET",
      success: function (res) {
        that.setData({
          imageUrls: res.data.subjects
        })
      }
    })
    //列表调用的数据
    wx.request({
      url: 'http://t.yushu.im/v2/movie/top250',
      data: {
        start: that.data.page,
        count:10
      },
      method: "GET",
      success: function (res) {
        console.log(res)
        that.setData({
          newsList: res.data.subjects
        })
      }
    })
  },
  //下拉刷新
  onPullDownRefresh: function () {
    this.onLoad();
  },
  /*页面上拉触底事件的处理函数 演示滑到底部加载新数据*/
  onReachBottom:function(e){
    var that = this
    that.setData({
      //界面滑到底部,页面加1
      page:++that.data.page,
      loading:true
    })
    console.log(that.data.page);
    wx.request({
      url: 'http://t.yushu.im/v2/movie/top250',
      data: {
        start: that.data.page,
        count: 10
      },
      method: "GET",
      success: function (res) {
        loading:false
        that.setData({
          //获取到数据,将新获取的数据加在原有数据的后边
          newsList: that.data.newsList.concat(res.data.subjects)
        })
      }
    })
  },
  //分享
  onShareAppMessage: function (res) {
    return {
      title: "电影",
      path: "pages/index/index",
      success: function (res) {

        wx.showToast({
          title: "转发成功" + res.errMsg,
          icon: 'success',
          duration: 2000
        })
      },
      fail: function (res) {
        console.log(res);
        wx.showToast({
          title: "失败:" + res.errMsg,
          icon: 'none',
          duration: 2000
        })
      }
    }
  }
})
index.wxml
<swiper indicator-dots='{{indicatorDots}}' autoplay='{{autoplay}}' interval='{{interval}}' duration='{{duration}}' circular='{{circular}}'>
  <block wx:for='{{imageUrls}}'>
    <swiper-item>
      <navigator url='/pages/view0/view0'>
        <image src='{{item.images.large}}'>image>
      navigator>
    swiper-item>
  block>
swiper>

<block wx:for='{{newsList}}'>
  <navigator class='listWrap' url='/pages/view0/view0'>
    <image class='listThumb' src='{{item.images.large}}'>image>
    <view class='listInfo'>
      <view class='listTitle'>{{item.original_title}}view>
      <view class='listKeyAdd'>
        <text class='addFN'>{{item.year}}text>
        <text class='addKY'>{{item.rating.average}}text>
      view>
    view>
  navigator>
block>

<block wx:if="{{loading}}">
    <image class='loading' src='/image/loading.png'>image>
block>
index.wxss
/**index.wxss**/
.userinfo {
  display: flex;
  flex-direction: column;
  align-items: center;
}

.userinfo-avatar {
  width: 128rpx;
  height: 128rpx;
  margin: 20rpx;
  border-radius: 50%;
}

.userinfo-nickname {
  color: #aaa;
}

.usermotto {
  margin-top: 200px;
}

/*优化后的样式*/
swiper-item image {
  width:750rpx;
}
.listWrap {
  width:705rpx;
  padding:0 25rpx;
  padding:30rpx 25rpx;
  border-bottom:1px solid #e5e5e5;
}
.listThumb {
  width:260rpx;
  height:160rpx;
  display:block;
  float:left;
}
.listInfo {
  height:160rpx;
  width:435rpx;
  display:inline-block;
  padding-left:10rpx;
  position: relative;
}
.listTitle {
  color:#333;
  font-size:36rpx;
  font-weight:600;
}
.listKeyAdd {
  font-size:30rpx;
  position: absolute;
  bottom: 0;
  width:100%;
}
.addFN {
  color: #808080;
  display:block;
  float:left;
}
.addKY {
  color: #d9c599;
  float:right;
  display:block;
  margin-right:15rpx;
}

@-webkit-keyframes rotation{
from {-webkit-transform: rotate(0deg);}
to {-webkit-transform: rotate(360deg);}
}
.loading {
-webkit-transform: rotate(360deg);
animation: rotation 1.5s linear infinite;
-moz-animation: rotation 1.5s linear infinite;
-webkit-animation: rotation 1.5s linear infinite;
-o-animation: rotation 1.5s linear infinite;
width:60rpx;
height:60rpx;
display:block;
margin:10rpx auto;
}
其他两个图书和音乐界面基本上和电影类似,就不写了
加载html 字符串
在做项目的时候,避免不了会用到富文本,也就是html格式的内容,而小程序默认是不支持html格式的内容显示的,需要显示html内容的时候,就可以通过wxParse来实现。
github地址:https://github.com/icindy/wxParse
将项目下载下来,打开本地小程序,将wxParse文件夹复制到小程序目录中,在view.js文件中引入:
var WxParse = require('../../wxParse/wxParse.js');在view.wxss中:
@import "/wxParse/wxParse.wxss";数据绑定:
/**
* WxParse.wxParse(bindName , type, data, target,imagePadding)
* 1.bindName绑定的数据名(必填)
* 2.type可以为html或者md(必填)
* 3.data为传入的具体数据(必填)
* 4.target为Page对象,一般为this(必填)
* 5.imagePadding为当图片自适应是左右的单一padding(默认为0,可选)
*/
在view.js中配置
Page({
  data: {
   htmlData:{}
  },
  onLoad: function () {
    console.log("加载时触发");
    var that = this;
    wx.request({
      url: 'http:\/\/mini.eastday.com\/mobile\/180320091535191.html',
      method: "GET",
      success: function (res) {
        console.log(res)
        that.setData({
          htmlData: WxParse.wxParse('htmlData', 'html', res.data, that, 5)
        })
      }
    })
  },
在view.wxml中:
<import src="../../wxParse/wxParse.wxml"/>
<template is="wxParse" data="{{wxParseData:htmlData.nodes}}"/>
注意:wxParseData:htmlData.nodes中的htmlData与view.js中的htmlData保持一致。
这样基本上就可以完成富文本的显示了
播放音乐
播放音乐,使用微信提供的audio(https://mp.weixin.qq.com/debug/wxadoc/dev/component/audio.html),
view2.js
// pages/view2/view2.js
Page({

  onReady: function (e) {
    // 使用 wx.createAudioContext 获取 audio 上下文 context
    this.audioCtx = wx.createAudioContext('myAudio')
  },
  data: {
    poster: 'http://oeff2vktt.bkt.clouddn.com/image/45.jpg',
    name: '刚好遇见你',
    author: '李玉刚',
    src: 'http://up.mcyt.net/?down/35760.mp3',
  },
  audioPlay: function () {
    this.audioCtx.play()
  },
  audioPause: function () {
    this.audioCtx.pause()
  },
  audio14: function () {
    this.audioCtx.seek(14)
  },
  audioStart: function () {
    this.audioCtx.seek(0)
  }
})
view2.wxml
<audio poster="{{poster}}" name="{{name}}" author="{{author}}" src="{{src}}" id="myAudio" controls loop>audio>

<button type="primary" bindtap="audioPlay">播放button>
<button type="primary" bindtap="audioPause">暂停button>
<button type="primary" bindtap="audio14">设置当前播放时间为14秒button>
<button type="primary" bindtap="audioStart">回到开头button>
播放视频
播放视频使用video(https://mp.weixin.qq.com/debug/wxadoc/dev/component/video.html)
view0.js
function getRandomColor() {
  let rgb = []
  for (let i = 0; i < 3; ++i) {
    let color = Math.floor(Math.random() * 256).toString(16)
    color = color.length == 1 ? '0' + color : color
    rgb.push(color)
  }
  return '#' + rgb.join('')
}

Page({
  onReady: function (res) {
    this.videoContext = wx.createVideoContext('myVideo')
  },
  inputValue: '',
  data: {
    src: '',
    danmuList: [
      {
        text: '第 1s 出现的弹幕',
        color: '#ff0000',
        time: 1
      },
      {
        text: '第 3s 出现的弹幕',
        color: '#ff00ff',
        time: 3
      }]
  },
  bindInputBlur: function (e) {
    this.inputValue = e.detail.value
  }
})
view0.wxml
<view class="section tc">
  <video id="myVideo" src="http://wxsnsdy.tc.qq.com/105/20210/snsdyvideodownload?filekey=30280201010421301f0201690402534804102ca905ce620b1241b726bc41dcff44e00204012882540400&bizid=1023&hy=SH&fileparam=302c020101042530230204136ffd93020457e3c4ff02024ef202031e8d7f02030f42400204045a320a0201000400" danmu-list="{{danmuList}}" enable-danmu danmu-btn controls>video>
view>
项目源码:
https://download.csdn.net/download/jifashihan/10299954

