浅谈Azure virtual machine scale set
相比on-premise的一些架构,云计算上的IaaS服务明显的优势是VM的伸缩性(scale in and scale out或者scale up and down)
在Azure里面有两种方式实现VM的伸缩, 一种是横向的,我们称之为 scale up 和scale down, 简单理解就是用同样的景象创建多个instances去实现增加计算资源;另外一种就是scale in 和scale out,这个就和我们管理Hyper-v或者vmware里面的虚拟机一样,加内存或者加CPU,然后重启生效。
今天谈谈Azure VMSS(virtual machine scale set) 的一些特点以及平常使用中需要注意的地方。
在Azure中,如果只创建一台虚拟机来跑某个服务,这样的VM是不会有SLA保证的,Azure建议用户创建至少两台在一个Availability set里面,这样SLA为99.95%.
所以通常我们在Azure上跑某个应用,我们会创建多台虚拟机来提高计算性能以及保证SLA, 但是如果应用的用户特别多,应用的变更也比较多,我们创建多台虚拟机不方便管理和应用的配置变更。所以Azure提供了VMSS。
VMSS方便部署,便于管理配置。下面简单介绍下VMSS的实现方式。
首先我们要准备好需要用到的镜像(image), 可以是全新的操作系统,也可以是安装好软件的镜像(但是需要prepare).这边先不介绍怎么准备镜像了,我们先用原始镜像。
创建VMSS会用到Azure Load Balancer, Azure storage account, Azure virtual network.我们可以用PowerShell去创建VMSS,或者使用template 去创建。
Powershell 如下:
创建一个资源组:
New-AzureRmResourceGroup -ResourceGroupName "myResourceGroup" -Location "EastUS"创建一个load balancer:
# Create a virtual network subnet
$subnet = New-AzureRmVirtualNetworkSubnetConfig `
  -Name "mySubnet" `
  -AddressPrefix 10.0.0.0/24

# Create a virtual network
$vnet = New-AzureRmVirtualNetwork `
  -ResourceGroupName "myResourceGroup" `
  -Name "myVnet" `
  -Location "EastUS" `
  -AddressPrefix 10.0.0.0/16 `
  -Subnet $subnet

# Create a public IP address
$publicIP = New-AzureRmPublicIpAddress `
  -ResourceGroupName "myResourceGroup" `
  -Location "EastUS" `
  -AllocationMethod Static `
  -Name "myPublicIP"

# Create a frontend and backend IP pool
$frontendIP = New-AzureRmLoadBalancerFrontendIpConfig `
  -Name "myFrontEndPool" `
  -PublicIpAddress $publicIP
$backendPool = New-AzureRmLoadBalancerBackendAddressPoolConfig -Name "myBackEndPool"

# Create a Network Address Translation (NAT) pool
$inboundNATPool = New-AzureRmLoadBalancerInboundNatPoolConfig `
  -Name "myRDPRule" `
  -FrontendIpConfigurationId $frontendIP.Id `
  -Protocol TCP `
  -FrontendPortRangeStart 50001 `
  -FrontendPortRangeEnd 50010 `
  -BackendPort 3389

# Create the load balancer
$lb = New-AzureRmLoadBalancer `
  -ResourceGroupName "myResourceGroup" `
  -Name "myLoadBalancer" `
  -Location "EastUS" `
  -FrontendIpConfiguration $frontendIP `
  -BackendAddressPool $backendPool `
  -InboundNatPool $inboundNATPool

# Create a load balancer health probe on port 80
Add-AzureRmLoadBalancerProbeConfig -Name "myHealthProbe" `
  -LoadBalancer $lb `
  -Protocol TCP `
  -Port 80 `
  -IntervalInSeconds 15 `
  -ProbeCount 2

# Create a load balancer rule to distribute traffic on port 80
Add-AzureRmLoadBalancerRuleConfig `
  -Name "myLoadBalancerRule" `
  -LoadBalancer $lb `
  -FrontendIpConfiguration $lb.FrontendIpConfigurations[0] `
  -BackendAddressPool $lb.BackendAddressPools[0] `
  -Protocol TCP `
  -FrontendPort 80 `
  -BackendPort 80

# Update the load balancer configuration
Set-AzureRmLoadBalancer -LoadBalancer $lb

# Create IP address configurations
$ipConfig = New-AzureRmVmssIpConfig `
  -Name "myIPConfig" `
  -LoadBalancerBackendAddressPoolsId $lb.BackendAddressPools[0].Id `
  -LoadBalancerInboundNatPoolsId $inboundNATPool.Id `
  -SubnetId $vnet.Subnets[0].Id
创建scale set:
# Provide your own secure password for use with the VM instances
$securePassword = "P@ssword!"
$adminUsername = "azureuser"

# Create a config object
$vmssConfig = New-AzureRmVmssConfig `
    -Location "EastUS" `
    -SkuCapacity 2 `
    -SkuName "Standard_DS2" `
    -UpgradePolicyMode Automatic

# Reference a virtual machine image from the gallery
Set-AzureRmVmssStorageProfile $vmssConfig `
  -ImageReferencePublisher "MicrosoftWindowsServer" `
  -ImageReferenceOffer "WindowsServer" `
  -ImageReferenceSku "2016-Datacenter" `
  -ImageReferenceVersion "latest"

# Set up information for authenticating with the virtual machine
Set-AzureRmVmssOsProfile $vmssConfig `
  -AdminUsername $adminUsername `
  -AdminPassword $securePassword `
  -ComputerNamePrefix "myVM"

# Attach the virtual network to the config object
Add-AzureRmVmssNetworkInterfaceConfiguration `
  -VirtualMachineScaleSet $vmssConfig `
  -Name "network-config" `
  -Primary $true `
  -IPConfiguration $ipConfig

# Create the scale set with the config object (this step might take a few minutes)
New-AzureRmVmss `
  -ResourceGroupName "myResourceGroup" `
  -Name "myScaleSet" `
  -VirtualMachineScaleSet $vmssConfig
现在这个VMSS已经创建完成了。
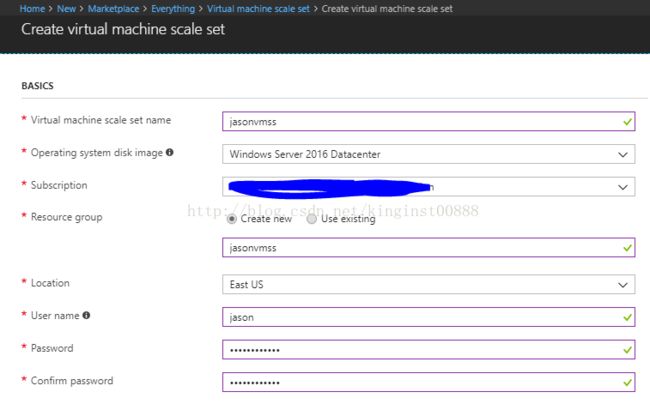
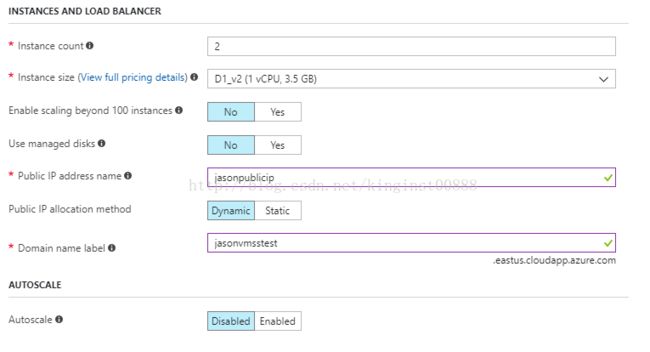
同样,我们也可以用Azure marketplace 里面的模板去创建VMSS(Azure portal):
创建完成了,我们可以在资源组里面看到VMSS:
VMSS所有的instances运行的是同样的app,提供同一种服务。所以instances的增加和减少不会中断服务,伸缩的是计算资源。
如果使用Azure市场里面的镜像,我们最大可以创建1000个instances, 如果使用自己定制的镜像,最多可以创建300个instances。
VMSS的网络使用的是Azure Load balancer , 可以是面向内网的,也可以是面向公网的,当然VMSS也可以不带VMSS。
通过LB的probe去探测后端的状态,然后将网络流量路由到后面的instances。
关于Azure VMSS 的自动伸缩,我们需要在配置VMSS时开启,目前这个功能后期是不可以修改的。
我们可以根据下面的metrics 来执行伸缩:
| Metric name |
|---|
| Percentage CPU |
| Network In |
| Network Out |
| Disk Read Bytes |
| Disk Write Bytes |
| Disk Read Operations/Sec |
| Disk Write Operations/Sec |
| CPU Credits Remaining |
| CPU Credits Consumed |
关于更新VMSS的镜像,我们需要用PowerShell来执行,而且这有个前提条件, VMSS不能是Azure marketplace里面的template创建的,而且需要是自己的镜像创建的。
PowerShell如下:
$rgname = "myrg"
$vmssname = "myvmss"
$newversion = "4.0.20160229"
$instanceid = "1"

# get the VMSS model
$vmss = Get-AzureRmVmss -ResourceGroupName $rgname -VMScaleSetName $vmssname

# set the new version in the model data
$vmss.virtualMachineProfile.storageProfile.imageReference.version = $newversion

# update the virtual machine scale set model
Update-AzureRmVmss -ResourceGroupName $rgname -Name $vmssname -VirtualMachineScaleSet $vmss

# now start updating instances
Update-AzureRmVmssInstance -ResourceGroupName $rgname -VMScaleSetName $vmssname -InstanceId $instanceId
也可以用image去更新:
# set the new version in the model data
$vmss.virtualMachineProfile.storageProfile.osDisk.image.uri= $newURI
Note:
VMSS支持多层的应用:


